The Eclipse Leda project provides system image “recipes” to deliver a functional and always-available Linux-based image/distribution in the context of SDV (Software Defined Vehicle), by pulling together individual contributor pieces from Eclipse SDV and the larger OSS community.
The quickstart images help to learn how the SDV development, test and deployment lifecycle works from an E2E perspective, including the deployment of applications into the container runtimes on constrained embedded devices.
The ready images are also useful for quickly setting up showcases with virtual or real hardware devices.
Eclipse Leda provides a Poky-based reference build pipeline and an OpenEmbedded Metalayer meta-leda for integration into existing Yocto-based projects.
The Eclipse Leda project will provide system image “recipes” to deliver a functional Linux-based image/distribution in the context of SDV (Software Defined Vehicle), by pulling together individual contributons from the SDV and the larger OSS community.
The Eclipse Leda distribution will work with build scripts, package definitions, image build pipelines, etc, with the goal to pull SDV projects and dependecies from the larger OSS community into a working Linux system. Such system images (or other useful forms of delivery, as determined by the project) will be made available for consumption for anyone who is interested in working with the SDV tech stack. These deliveries take the form of container (base) images, installable/flashable image files, etc (again to be evolved by the project team according to community needs). Also in scope is concise and useful documentation for consumers of the project’s deliverables, plus a method of delivering that documentation.
In the context described above - the ambition of SDV to build a technology ecosystem for software-defined vehicle concern - a prime challenge will be the combination of these initially diverse components into a coherent and useful whole: all the software components in the world will not have the impact needed to transform the automotive industry unless we can make them play together coherently an form a functional portfolio. As a first step towards that goal, this proposal (Eclipse Leda) is for a “SDV distribution” project that pulls together individual contributor pieces from SDV and the larger OSS community, to deliver a functional and always-available Linux-based image/distribution with two primary goals:
be the crystalization point for functionally integrating diverse SDV-scope projects into a working whole
deliver a continually available, always working starting image for developers interested in getting going with the SDV tech stack
1.1 - Architecture
Runtime Overview
The runtime overview shows the general layer architecture for the runtime of the SDV edge stack as implemented by the Leda quickstart image.
Dotted lines indicate out-of-scope components. They may be non-Edge components (such as cloud services, or SDKs and additional development tooling for vehicle applications). Dotted lines for in-vehicle edge components indicate that they may be used, but are not pre-installed or pre-configured on the Leda quickstart image.
Deployment Overview
Eclipse Leda can be used in different deployment scenarios: on physical hardware, on virtual machines or installed on existing Linux distributions.
Depending on the specific deployment, some features may not be applicable. Each deployment option is meant for different uses. The applicabability
depend to your specific requirements.
Option 1: Hardware - Suitable for proof-of-concepts, system integration tasks, access to actual physical actuators and sensors.
However, an automated setup is much harder to realize, as additional hardware for remote controlling of power supply is needed.
The constrained environment of a physical device is good to verify accidental assumptions made by application developers,
such as resource consumptions (CPU, memory) or the existence of Linux tools, Kernel modules or device drivers.
Option 2: Docker Containers - Good for quick startup and throw-away (ephemeral) uses, such as automated system testing or one-off troubleshooting.
The access to physical hardware is limited and more complicated to set up. QEMU provides emulation of devices, such as CAN-Bus.
Due to multiple nesting of abstraction technology (Docker + QEMU + OS), additional configuration of networking and device pass-thrus are necessary.
It’s easy and cheap to spin-off many separate instances to simulate a whole vehicle system with multiple vehicle computers and
simulated ECUs in the same vehicle network.
Option 3: Package Installation - Good for existing devices with feature-rich functionality where the original OS should be used.
Leda does not support self-update for this deployment option, as it relies on the master OS distribution channels.
The constraints of an embedded device are not replicable easily on a PC-style host machine without additional effort.
Package installation is good when the focus is on exploring the Vehicle Applications, SDKs, Vehicle Signal Abstractions etc.
Option 1: Hardware
Option 2: Docker Containers
Option 3: Package Installation
Target use case
PoC
Automation
Existing devices
Cloud communication
++
++
+++
Automation
–
+++
++
Device provisioning
++
++
+++
Access to hardware
+++
-
++
Container isolation
+++
++
+++
Network flexibility
+++
-
++
Self update
+++
+
–
Realistic constrains
+++
-
-
Build Environment Overview
1.2 - Features
Publish/Subscribe messaging infrastructure for cloud connectivity by Eclipse Kanto
local messaging for applications and SDV system components via an MQTT message broker
connection to a backend messaging hub, such as Azure IoT Hub or the IoT Suite
device identification and authentication for cloud connectivity by using TLS device certificates
Container runtime
An OCI-compliant container orchestration for vehicle applications and services by Eclipse Kanto
containerd.io as the default container runtime. Both layers of container runtimes can be exchanged with other implementations
A Vehicle Update Manager to orchestrate deployments of Vehicle Applications, configurations and base operating system updates
An example Vehicle Seat Service implementation to showcase
An OpenTelemetry collector and example configurations to collect and publish logs and metrics of containerized Vehicle Applications to the cloud backend for further processing
The features of the reusable build recipes implemented as an OpenEmbedded metalayer meta-leda are:
Build recipes for a Yocto-based distribution to build SDV-related software components
Build recipes for customizations of the target device’s storage structure to enable A/B system updates
Build recipes for pre-packaging container images into the device during the manufacturing process to minimize initial online provisioning time
A customized minimal setup for use on constrained devices and a full setup with convenient developer tools
Ready images for virtual devices, for automated testing and evaluation purposes, eg QEMU ARM-64
Ready images for physical devices, for evaluation and demo purposes, eg Raspberry Pi 4
1.3 - Goals
The project aims to provide an integration point for Open Source components for the Software Defined Vehicle ecosystem.
In a complex architecture, there are many different ways of implementations and alternative solutions possible.
For embedded vehicle computer systems and their software stack, there are a lot of requirements to consider, depending on the actual use cases:
Integration and High-Level Testing (System Integrators, Suppliers)
Open Source Collaboration (Developers, OEMs, ISVs, Open Source Organizations, Standardization Organizations)
Some of the requirements derived from the above are taken into account for Leda’s quickstart setups.
Thereas some other requirements can only be met once the project is in a nearer production environment and by customizing the target device image.
The following document will list some of these requirements and give an explanation on why they are set as goals in the Leda quickstart distribution.
Overview
Provide an example operating system build and configuration for constrained in-vehicle devices:
Suppliers and system integrators want a way to cusomize and optimize the base operating system as much as possible.
This is to achieve a high efficiency, high level of reuse and cost benefits of the planned hardware.
The build system for the operating system, and the selection of the underlying distribution is key to the convenience for new users,
but also commercially a business decision with an impact on the future maintainability of the platform.
The Yocto Project has been chosen as an established de-facto standard for customized Linux distributions for embedded systems.
Leda provides an OpenEmbedded Meta-Layer, which can be used with many existing SDKs of SoC manufacturers.
Additionally, Leda will strive for being easy to install on low-cost “evaluation boards” such as the Raspberry Pi,
or development environments such as a virtual machine in the cloud.
Integrate software-defined-vehicle Open Source components to showcase the available features and their state of maturity:
The SDV ecosystem will grow and a lot of new software projects will be needed to solve the current problems and challenges.
The Eclipse SDV ecosystem already contains many software packages, which independently make sense for their set goals.
With Leda, we want to increase the integrational aspect, helping project leads, developers, contributors, users and architects
to evaluate the SDV portfolio, how it can be integrated with each other and how a possible reference architecture implementation might be loooking like.
Demonstrate the use and interaction of open protocols and specifications:
OpenTelemetry specs and components, to show the possibilities of applying DevOps methodologies and technologies
to operate, monitor and maintain fleets of vehicles and their distributed software applications
Eclipse IoT related specifications for software rollouts and digital twin representations
1.4 - Roadmap
Initial Open Source contribution expected by Q2 2022 (Done)
A first milestone build is expected end of 2022 (Done)
Plan for the first release cycle to be created in Q1/2023 (In Progress - Q2/2023)
Release cycles are planned every 3-6 months
Release planning will be conducted together with corresponding Eclipse projects
First pre-release of Eclipse Leda quickstart images, based on Yocto LTS release
Kirkstone with Long Term Support until at least April 2024.
Minimal feature set to run software-defined-vehicle applications (such as Eclipse Velocitas apps) using COVESA Vehicle Signal Specification
and the Eclipse Kuksa.VAL Databroker on virtual devices (QEMU), in Docker,
or on physical consumer-grade devices (Raspberry Pi 4 64-Bit) for development, demonstration and prototyping purposes.
Includes example applications from Kuksa:
Example Seat Service
Example HVAC Service
DBC Feeder replays a Tesla Model 3 CAN-Dump and feeds it into Kuksa.VAL Databroker
Switched to a BitBake build using kas for layer management
Added automated system tests using Robot framework and Dockerized environments
General cleanup of recipes, dependencies and structuring of the meta-leda sublayers to improve reusability
Automatic deployment of containers based on container manifests with ad-hoc updates (filewatcher in kanto-auto-deployer)
Preparation for AirGap installation of containers
General improvements, such as Wifi network management
Known Issues
The following issues were known to the development team before starting the 0.1.0-M1 build cycle.
They have been prioritized as non-critical and may be fixed for later releases.
Rule: OCaaS Policy A9 License with no classification
Message: The license LicenseRef-scancode-biosl-4.0 found for package ‘Unmanaged::leda-distro-fork:0716b55ff8f57319263d67ee16d90e64588b391d’ is not categorized and / or evaluated for usage.
Evaluation: This license seems to be detected incorrectly by the tool being used, as it is an internal, proprietary license which is not used in the Eclipse Leda project.
Incorrectly detected license “GPL-1.0” for ORT configuration file
Rule: OCaaS Policy C1 Strict Copyleft
Message: License GPL-1.0-only found for package ‘Unmanaged::leda-distro-fork:0716b55ff8f57319263d67ee16d90e64588b391d’ is categorized as strict-copyleft which must not be used for BT11 Open Source Development service applications.
Evaluation: The scan tool incorrectly detects its own configuration file (.ort.original.yml) as being licensed under GPL-v1.0
Incorrectly detected license “GPL-2.0-only” for standard Leda license header (which is Apache Software License)
Rule: OCaaS Policy C1 Strict Copyleft
Message: License GPL-2.0-only found for package ‘Unmanaged::leda-distro-fork:0716b55ff8f57319263d67ee16d90e64588b391d’ is categorized as strict-copyleft which must not be used for BT11 Open Source Development service applications.
Evaluation: The scan tool incorrectly detects the Apache License header as GPL-2.0 license text
Incorrectly detected license “proprietary”
Rule: OCaaS Policy C3 Commercial
Message: License LicenseRef-scancode-proprietary-license found for package ‘Unmanaged::leda-distro-fork:0716b55ff8f57319263d67ee16d90e64588b391d’ is categorized as commercial and requires special handling.
Evaluation: The scan tool incorrectly detects its own configuration file (.ort.original.yml) as being licensed under proprietary licenses.
First pre-release of Eclipse Leda quickstart images, based on Yocto LTS release
Kirkstone with Long Term Support until at least April 2024.
Minimal feature set to run software-defined-vehicle applications (such as Eclipse Velocitas apps) using COVESA Vehicle Signal Specification
and the Eclipse Kuksa.VAL Databroker on virtual devices (QEMU), in Docker,
or on physical consumer-grade devices (Raspberry Pi 4 64-Bit) for development, demonstration and prototyping purposes.
Includes example applications from Kuksa:
Example Seat Service
Example HVAC Service
DBC Feeder replays a Tesla Model 3 CAN-Dump and feeds it into Kuksa.VAL Databroker
Change log 0.1.0-M2
Remove skopeo dependency from packagegroup-sdv-tools.bb
Fix typo in SRCREV_FORMAT for pahocpp
dd kernel config for RAUC stream mode to raspberrypi4-64 and qemuarm64
Switched to a BitBake build using kas for layer management
Added automated system tests using Robot framework and Dockerized environments
General cleanup of recipes, dependencies and structuring of the meta-leda sublayers to improve reusability
Automatic deployment of containers based on container manifests with ad-hoc updates (filewatcher in kanto-auto-deployer)
Preparation for AirGap installation of containers
General improvements, such as Wifi network management
Known Issues
The following issues were known to the development team before starting the 0.1.0-M1 build cycle.
They have been prioritized as non-critical and may be fixed for later releases.
Rule: OCaaS Policy A9 License with no classification
Message: The license LicenseRef-scancode-biosl-4.0 found for package ‘Unmanaged::leda-distro-fork:0716b55ff8f57319263d67ee16d90e64588b391d’ is not categorized and / or evaluated for usage.
Evaluation: This license seems to be detected incorrectly by the tool being used, as it is an internal, proprietary license which is not used in the Eclipse Leda project.
Incorrectly detected license “GPL-1.0” for ORT configuration file
Rule: OCaaS Policy C1 Strict Copyleft
Message: License GPL-1.0-only found for package ‘Unmanaged::leda-distro-fork:0716b55ff8f57319263d67ee16d90e64588b391d’ is categorized as strict-copyleft which must not be used for BT11 Open Source Development service applications.
Evaluation: The scan tool incorrectly detects its own configuration file (.ort.original.yml) as being licensed under GPL-v1.0
Incorrectly detected license “GPL-2.0-only” for standard Leda license header (which is Apache Software License)
Rule: OCaaS Policy C1 Strict Copyleft
Message: License GPL-2.0-only found for package ‘Unmanaged::leda-distro-fork:0716b55ff8f57319263d67ee16d90e64588b391d’ is categorized as strict-copyleft which must not be used for BT11 Open Source Development service applications.
Evaluation: The scan tool incorrectly detects the Apache License header as GPL-2.0 license text
Incorrectly detected license “proprietary”
Rule: OCaaS Policy C3 Commercial
Message: License LicenseRef-scancode-proprietary-license found for package ‘Unmanaged::leda-distro-fork:0716b55ff8f57319263d67ee16d90e64588b391d’ is categorized as commercial and requires special handling.
Evaluation: The scan tool incorrectly detects its own configuration file (.ort.original.yml) as being licensed under proprietary licenses.
The following components are not yet released in public or did not yet finished the project review, and may only be added to the release on shorter notice:
(Eclipse Backend-Function-Bindings)
(Eclipse SommR)
(OTA Client)
Compatibility
Compatibility to previous versions is not considered for this first release.
This page introduces the main concepts around Eclipse Leda, Eclipse Kuksa, Eclipse Velocitas, and Eclipse Kanto for
developing and deploying applications for a software defined vehicle (SDV).
The intention is to introduce the main concepts and how these projects interact. When you are already familiar with the general ideas of the Eclipse SDV,
you can also jump to a hands-on tutorial on how to develop a seat adjuster application or
replicate an Eclipse SDV Blueprint for managing vehicle fleets using Eclipse SDV concepts and technologies.
Abstract Architecture
For the software defined vehicle we may assume the following abstract architecture.
The architecture evolves around actuators and sensors in a vehicle, like the state of a passenger seat or a door, which get controlled by connected ECUs.
These ECUs react to and produce signals, which they communicate over automotive communication systems like CAN or SOME/IP.
To establish a more flexible interaction between these ECUs and make the overall vehicle more software-defined, we assume various vehicle applications which
want to interact with the actuators and sensors, e.g., to control a seat based on a saved driver profile.
The architecture contains a vehicle abstraction layer between the ECUs and the vehicle applications.
This abstraction layer introduces a potential control point for security and safety considerations and generally decouples the application logic
from the more deeply embedded soft- and hardware layers.
Vehicle Abstraction Layer
As the name implies the vehicle abstraction layers offers abstract ways to interact with the underlying vehicle.
Vehicle Signal Specification (VSS)
We need a joint data model for the potential signals with which an application can interact. We propose to use the
Vehicle Signal Specification (VSS) from
the Connected Vehicle Systems Alliance (COVESA) for this.
VSS essentially defines a rule set of how to express the definition of signals in a vehicle.
This definition bases a tree structure where each domain, like body control, gets an individual sub-tree.
The authors of VSS further provide a default tree of signals to be expected in a vehicle.
However, it is common practice to tailor the default tree for a specific vehicle model by adding overlays.
VSS allows modeling and structuring of the data from a vehicle but does not define interfaces for the interaction with this data since this depends on the used
communication technology and further circumstances like whether VSS data gets processed inside the vehicle or off-board.
The Eclipse Kuksa.val databroker acts as a vehicle abstraction layer by brokering VSS signals between vehicle applications
and deeply embedded systems in the vehicle. Enabling this abstraction requires a vehicle-specific component to translate between the Kuksa.val databroker and
the underlying transport systems and ECUs.
With Eclipse Kuksa, we refer to these software components as providers and further differentiate between actuation and data providers.
For actuators, the Kuksa.val databroker stores the desired and the current state. Typically, an application would perform a control operation by setting
the target state and monitoring the current state. It is then the task of the actuation provider to perform the action while the data provider updates
the current state according to signals sent on the vehicle bus.
To get notified of any changes, applications, and providers can subscribe to specific signals at the Kuksa.val databroker.
The Kuksa.val databroker is written in Rust and offers communication over gRCP. To make life easier for developers using the Kuksa.val databroker there is a
Python-client which can be integrated in own applications.
When developing with other languages, you may have to generate client code yourself with the gRPC tooling.
Either way, these clients allow the development of vehicle applications and providers.
Vehicle Application Development
When developing an application to interact with the abstraction layer, there are a couple of aspects to cover, which are not specific to a single application.
Because of that, some projects are evolving around the application development phase.
Eclipse Autowrx and digital.auto Playground
A good starting point to figure out what signals are available is the website of the digital.auto playground based on Eclipse Autowrx.
In the next step, you can ideate on new applications, start coding, and get fast feedback using the prototyping feature of the playground.
Once you are confident with the initial version, you can continue the development journey with the help of Eclipse Velocitas,
which comes with several features making the life of vehicle application developers easier.
Eclipse Velocitas
Eclipse Velocitas™ is an open source project providing a development tool chain to create containerized Vehicle Apps, offering a development experience to increase the speed of a development team (velocity).
Among other things, Eclipse Velocitas provides a template repository.
To kick-start the development of a new application, you can create an individual repository from this template.
As an alternative, Eclipse Velocitas provides a CLI application with which you can configure the creation of a tailored vehicle application repository.
Either way, the resulting repository contains skeleton code for the actual application
and comes with pre-defined GitHub Actions workflows to automate
the testing and releasing of applications as containers.
The repository further contains the Dockerfile for a dev container that setups a development and vehicle environment on the developer machine.
It is then possible to interact with this container through VSCode.
Another aspect of Eclipse Velocitas is the so-called vehicle model. Here it becomes possible to take a custom vehicle model expressed in
VSS and generate a tailored SDK with specific domain classes to interact
with a Kuksa.val databroker using the same model.
This way, we can directly develop against the used vehicle model.
commit and push vehicle applications to trigger tests in GitHub Actions workflows
trigger release workflow in GitHub
As a result of the Release workflow, the generated repository contains a Container image with the vehicle application.
A target device, e.g., a vehicle or test device, can pull and execute this container.
Vehicle Providers and Emulation
The underlying assumption when developing a vehicle application against the vehicle abstraction layer is that components below the abstraction fulfill
the requests coming from the application. In other words: Developers have to assume that there are providers for the signals with which their application interacts.
For a production-ready vehicle, this should be the case. But during development and testing the creation of such providers adds overhead and
is a potential cause for further errors. An alternative is to use pre-developed services or
even a generalized vehicle mock service which acts as such a provider.
Developers can alter the vehicle mock service by defining the desired behavior through a Python-based DSL.
Vehicle Application Runtime
The next step is to bring the application to the target device and the vehicle. There are various options for how to run and orchestrate vehicle application containers.
Some originate from general IT scenarios like Kubernetes or Docker Compose, and others focus more on automotive and IoT-use cases like Eclipse Kanto.
So a vehicle application developer now faces the challenge of picking a runtime and integrating this runtime with required infrastructure components like
the Kuksa.val databroker or respective Kuksa.val providers to enable the vehicle application.
Eclipse Leda
Among other things, Eclipse Leda already provides such a target platform through a Linux-based distribution of pre-integrated Eclipse SDV components.
See the architecture page for more details on the elements in Eclipse Leda.
For the container execution, Eclipse Leda utilizes Eclipse Kanto, which implements lightweight management of OCI-compliant containers and comes by default with containerd.
It is possible to manage the containers either through a CLI or by writing container manifest files and placing them in a dedicated folder on the file system
from where Eclipse Kanto automatically performs them.
Service Exchange
Another challenge when deploying multiple components that need to collaborate as services is how they find and communicate with each other.
In Eclipse Kanto, the discovery and exchange can happen over container indetifiers or topics on a local MQTT broker.
The Eclipse SDV community already came up with other approaches for the service exchange topic like Eclipse uProtocol,
Eclipse Chariott or Eclipse Zenoh.
Seat Adjuster
To see the explained concepts in action, it is best to build your own application. The Seat Adjuster
is good starting point with specific examples.
Note: There are no official releases yet.
The artifacts available on the Release page are for testing the build and release workflows.
They should be considered as unstable nightly builds from the main branch.
Releases marked -M1, -M2, -RC1 etc. are preparations for official releases according to the Eclipse Release process.
Go to the Eclipse Leda Releases page and download the release archive for the respective machine.
The release archives container the disk image and the respective Linux kernel:
Machine
Filename
Description
QEMU x86_64
eclipse-leda-qemu-x86_64.tar.xz
For running QEMU x86 64-Bit
QEMU ARM 64
eclipse-leda-qemu-arm64.tar.xz
For running QEMU ARM 64-Bit
Raspberry Pi 4
eclipse-leda-raspberrypi.tar.xz
For running on Raspberry Pi 4 (SD-Card Image)
Using GitHub CLI tool
To download all files of the latest release using the GitHub CLI:
By using the dockerized Leda quickstart images, the SDV vehicle edge components can be evaluated on emulated X86-64 and ARM64 system images,
without having to install QEMU and dependencies manually.
If you want to execute the image without Docker, please see Running on QEMU.
This allows to tweak the startup script, modify the emulated hardware device and set up advanced network configurations.
There are two options to run Leda:
Docker: Simple, restricted to one container
Docker Compose: Advanced, allows networking between containers
Recommendations
A Linux host with 4 vCPUs, 8GB of RAM and SSD storage is recommended
Docker
Docker
The easiest way is to run a single instance of Leda in a Docker container:
Run the Leda Docker quickstart image:
docker run -it ghcr.io/eclipse-leda/leda-distro/leda-quickstart-x86
Login with root
Stop the Docker container
shutdown now
Note: If you need to stop the container from outside, use the docker stop <id> command from a separate terminal.
Privileged Containers
When run as a privileged container, QEMU will try to set up a TAP network and use KVM acceleration.
Network and CPU will be faster, depending on the host system.
To be able to use these host devices, QEMU needs access to the following devices:
/dev/kvm
/dev/net/tun
Example command:
docker run -it --privileged --device=/dev/kvm:/dev/kvm --device=/dev/net/tun:/dev/net/tun ghcr.io/eclipse-leda/leda-distro/leda-quickstart-x86
Exposing additional ports
To also expose ports to connect to ssh, mqtt or the Kuksa databroker, add the port mappings to the Docker command:
The following ports are specifically of interest and exposed by the docker container:
2222 for SSH (mapped internally to 22)
1880 - free slot reserved for user service
1883 for MQTT
8888 - free slot reserved for user service
30555 for Kuksa Databroker
Note: In unprivileged mode, only these ports are mapped by the Docker container and forwarded to the Leda system.
In privileged mode, all TCP ports can be exposed, which will then be forwarded from the Docker container into the Leda system.
See the
entrypoint script
for details.
Running ARM-64 version
To run the ARM-64 bit version of the image, use the leda-quickstart-arm64 container image:
docker run -it ghcr.io/eclipse-leda/leda-distro/leda-quickstart-arm64:latest
Docker Compose
A more convenient way to setup advanced scenarios is to use Docker Compose.
There is a Docker Compose configuration for an Eclipse Leda setup in resources/docker-compose.
As the networking is a bit more complicated to set up with emulated network inside of QEMU, the following explanation is helpful to understand networking better.
All docker compose containers are attached to a network called leda-bridge and leda-network and can see each other
The QEMU instances use a TAP network inside of each leda-quickstart-xxx container and do a NAT network translation to their own container
The Docker internal DNS server is being used. This is implemented by a DNS Proxy container,
which will forward incoming DNS requests to the Docker DNS running on the 127.0.0.x network.
In unprivileged mode: Only the exposed ports are forwarded from the docker container into the QEMU process:
mosquitto 1883, ssh 2222 and kuksa.val databroker 30555.
In privileged mode, all TCP ports are forwarded from the Docker container into the QEMU process and the special port 2222 is forwarded to ssh port.
Developer Shell
Developer Shell:
docker compose run --rm devshell
From there, you can log in to either Leda on QEMU x86-64, or log in to Leda on QEMU ARM-64.
ssh leda-x86
ssh leda-arm64
To run an additional terminal in the developer shell, execute this:
docker compose exec devshell /bin/bash
Interacting with Eclipse Leda
Check the general system status
sdv-health
Device Provisioning
Run the provisioning script:
sdv-provision
Copy the fingerprints
Go to Azure IoT Hub, create a new device
Use the certificate’s common name (CN) as Device Id - on Leda, this defaults to a part of the MAC Address
Select X.509 Self-Signed authentication type and enter both fingerprints
Click Save
MQTT Broker Bridge
graph LR;
A["MQTT Container on docker host localhost:1883"] -- Bridge --> B[leda-x86:31883];
A -- Bridge --> C[leda-arm64:31883];
B-->B1[mosquitto service leda-x86:1883];
C-->C1[mosquitto service leda-arm64:1883];
The Docker Compose setup will also start an Eclipse Mosquitto message broker as a bridge to both Leda instances.
This allows a user or developer to monitor messages sent by or received by both virtual devices.
Connect your MQTT client to mqtt-broker.leda-network by using the exposed port 1883 on the host:
mosquitto_sub -h localhost -p 1883 -t '#' -v
Docker Networking
You need to enable IP forwarding from Docker containers to make networking work.
The containers (leda-arm64, leda-x86) need to run with --privileged as they change iptables rules for proper forwarding of network packets.
Each Eclipse Leda instance (ARM64, x86_64) is running within a QEMU emulated network (192.168.7.2), which itself is contained
in a containerized network called leda-network (192.168.8.x).
The containers wrapping the QEMU instances will forward the following ports to the respective QEMU process:
SSH on port 2222
Mosquitto on port 1883
DHCP and DNS setup
Each Leda-QEMU container is running a local DHCP on the tap0 network interface and listens for DHCP requests by the Leda Distro running inside of QEMU.
The DHCP server will respond with the same IP address (192.168.7.2) to the request from QEMU.
The DHCP response contains a DNS nameserver pointing to the dns-proxy.leda-network (192.168.8.14) IP,
which in turn forwards to Docker’s internal 127.0.0.11 nameserver.
This allows the QEMU guests to resolve Docker Compose Services by their service name, e.g. leda-bundle-server.leda-network.
Volumes
The /root path inside of the Leda containers is mounted as a volume and contains the raw disk image and runner scripts for the QEMU Leda distribution.
Changes on the QEMU filesystem are made persistent on a copy of the QCOW2 disk image, so that restarting the device will keep any changes.
To reset to the original state, delete the respective docker volumes and restart the containers:
Profiles can be used to determine which containers (services) docker compose should be starting by default.
This is mostly used to have the devshell container not start up by default.
tools: Contains docker containers which are not essential at runtime, must useful for testing and development purposes
2.4 - Running on Raspberry Pi
What you need:
A Raspberry Pi 4B (64 Bit) with 2 GiB of RAM or more, recommended is 8 GiB
Network connection (Ethernet or Wifi) with transparent internet access
Optional keyboard and display (makes it easier to troubleshoot)
Optional: If you need to adapt the network configuration eg Wifi credentials, edit the configuration files on the boot partition.
Shutdown the Raspberry and insert the SD-Card into the Raspberry Pi SD-Card slot at the bottom
Power on your Raspberry to boot the image
Login with root
Check disk space:
The raspberry-growdisk system service will do this automatically on first boot.
To manually enlarge the available disk space on the SD-Card, resize the disk partition: parted /dev/mmcblk0 resizepart 6 100% && resize2fs /dev/mmcblk0p6.
Note: Due to changes in the disk partition, the partition number (6 in the example) may have changed.
Verify with df -h.
Verify and wait until container runtime is started: systemctl status container-management
The Eclipse Leda quickstart image has CAN-Bus kernel modules and some CAN hardware drivers pre-installed.
However, some hardware configuration needs to be adapted at boot time depending on the specific CAN-Extension being attached to the device.
On Raspberry Pi, there is a /boot/config.txt file where you can configure the dtoverlay options accordingly.
Note: After modification, the device requires rebooting for the changes to take effect.
Verify and wait until container runtime is started: systemctl status container-management
Optional: Check the system health: sdv-health
Note: The status of some containers (e.g. cloud connector) are expected to stay in FAILED status as long as the Device Provisioning steps are not completed.
Verify and wait until container runtime is started: systemctl status container-management
Optional: Check the system health: sdv-health
Note: The status of some containers (e.g. cloud connector) are expected to stay in FAILED status as long as the Device Provisioning steps are not completed.
ip link add dev vcan0 type vcan
ip link set vcan0 up
Enabling CAN Bus interfaces (can)
Standalone CAN within Qemu
To run a standalone CAN setup, qemu must be instructed to emulate a specific CAN hardware device. We will be using the kvaser_pci device in this example:
After the image has booted, load the Linux Kernel Module kvaser_pci device driver and configure the CAN-Bus device (eg bitrate) before bringing the interface up:
root@qemux86-64:~# modprobe kvaser_pci
root@qemux86-64:~# dmesg | grep kvaser
[ 9.565149] kvaser_pci 0000:00:04.0: initializing device 10e8:8406
[ 9.569308] kvaser_pci 0000:00:04.0: reg_base=00000000d5a68095 conf_addr=000000002b3c7ef6 irq=20
[ 9.596942] kvaser_pci 0000:00:04.0: xilinx version=13 number of channels=0
root@qemux86-64:~# ip link show type can
4: can0: <NOARP,ECHO> mtu 16 qdisc noop state DOWN mode DEFAULT group default qlen 10
link/can
Configure the interface:
root@qemux86-64:~# ip link set can0 type can bitrate 1000000
[ 165.519919] kvaser_pci 0000:00:04.0 can0: setting BTR0=0x00 BTR1=0x14
root@qemux86-64:~# ip link set can0 up
[ 186.906065] IPv6: ADDRCONF(NETDEV_CHANGE): can0: link becomes ready
root@qemux86-64:~# ip link show type can
4: can0: <NOARP,UP,LOWER_UP,ECHO> mtu 16 qdisc pfifo_fast state UP mode DEFAULT group default qlen 10
link/can
# ip link show type can
3: can0: <NOARP,ECHO> mtu 16 qdisc noop state DOWN mode DEFAULT roup default qlen 10
Continue with configuring the CAN chip and bring up the SocketCAN network interface:
# ip link set can0 type can bitrate 1000000
# ip link set can0 up
# ip link show type can
Linux Kernel Modules
The following Linux Kernel modules are available on the quickstart images:
Note: For QEMU, only kvaser_pci is used
Leda main Kernel
peak_pciefd - Socket-CAN driver for PEAK PCAN PCIe/M.2 FD family cards
m_can - CAN bus driver for Bosch M_CAN controller
m_can_pci - CAN bus driver for Bosch M_CAN controller on PCI bus
m_can_platform - M_CAN driver for IO Mapped Bosch controllers
softing - Softing DPRAM CAN driver
cc770_platform - Socket-CAN driver for CC770 on the platform bus
cc770_isa - Socket-CAN driver for CC770 on the ISA bus
cc770 - cc770CAN netdevice driver
ifi_canfd - CAN bus driver for IFI CANFD controller
kvaser_usb - CAN driver for Kvaser CAN/USB devices
etas_es58x - Socket CAN driver for ETAS ES58X USB adapters
ucan - Driver for Theobroma Systems UCAN devices
peak_usb - CAN driver for PEAK-System USB adapters
kvaser_pciefd - CAN driver for Kvaser CAN/PCIe devices
kvaser_pci - Socket-CAN driver for KVASER PCAN PCI cards
f81601 - Fintek F81601 PCIE to 2 CANBUS adaptor driver
sja1000_isa - Socket-CAN driver for SJA1000 on the ISA bus
plx_pci - Socket-CAN driver for PLX90xx PCI-bridge cards with the SJA1000 chips
sja1000 - sja1000CAN netdevice driver
ems_pci - Socket-CAN driver for EMS CPC-PCI/PCIe/104P CAN cards
peak_pci - Socket-CAN driver for PEAK PCAN PCI family cards
sja1000_platform - Socket-CAN driver for SJA1000 on the platform bus
vxcan - Virtual CAN Tunnel
c_can_platform - Platform CAN bus driver for Bosch C_CAN controller
c_can - CAN bus driver for Bosch C_CAN controller
c_can_pci - PCI CAN bus driver for Bosch C_CAN/D_CAN controller
slcan - serial line CAN interface
can_dev - CAN device driver interface
vcan - virtual CAN interface
can-isotop - PF_CAN isotp 15765-2:2016 protocol
can-gw - PF_CAN netlink gateway
can-j1939 - PF_CAN SAE J1939
can-raw - PF_CAN raw protocol
can-bcm - PF_CAN broadcast manager protocol
can - Controller Area Network PF_CAN core
Raspberry Pi
The following Linux Kernel modules are available on the quickstart image for Raspberry Pi:
can - Controller Area Network PF_CAN core
vxcan - Virtual CAN Tunnel
can-dev - CAN device driver interface
can-bcm - PF_CAN broadcast manager protocol
can-gw - PF_CAN netlink gateway
can-raw - PF_CAN raw protocol
can-isotop - PF_CAN isotp 15765-2:2016 protocol
can-j1939 - PF_CAN SAE J1939
vcan - virtual CAN interface
slcan - serial line CAN interface
mcp251x - Microchip 251x/25625 CAN driver
mcp251xfd - Microchip 251xFD Family CAN controller driver
ems_usb - CAN driver for EMS Dr. Thomas Wuensche CAN/USB interfaces
gs_usb - Socket CAN device driver for Geschwister Schneider UG
peak_usb - CAN driver for PEAK-System USB adapters
2.5.2 - Transferring Files
Sharing a directory with the guest
When you want to copy files between the host and the guest, an easy way is to use an SFTP tunnel.
With sshfs, you can mount a local directory to a remote directory via SSH.
Pre-Requisites
Installation of needed packages:
Run apt-get install sshfs on your host
Enable CORE_IMAGE_EXTRA_INSTALL += " openssh-sftp-server" in local.conf of your image (e.g. in the local_conf_header section in your kas file)
Verify SFTP connection working with sftp -P 2222 root@localhost
Transfering files from host to guest
When you want to copy files from the host to the guest, an easy way is to use an SFTP tunnel.
With sshfs, you can mount a local directory to a remote directory via SSH.
Create a mount point on your host: mkdir remote
Open the SSH Filesystem tunnel: sshfs root@localhost:/ remote/ -p 2222
Check files: ls -al remote/ - you should see the root filesystem of the device now
You can now easily copy files: cp foo.txt remote/home/root/
Transfering files from guest to host
Note: The reverse direction, e.g. initiating an SSH tunnel from within the device to the host, is currently not supported by the installed software on the image.
2.6 - Running on Linux
To run the main components of the SDV EDGE stack on an existing Linux distribution (e.g. Debian, Ubuntu, Raspberry Pi OS),
you need to install the following packages.
Please note that since this is not a full-system installation, but an additional installation, there are some differences
compared to the usual Leda installation on Docker/QEMU/Devices using our Quickstart image:
The Self-Update use case is not used, as the distribution-specific channels apply.
E.g. it does not make sense to use the Leda infrastructure to flash a full system image.
The configuration differs slightly and you need to put some more work into getting the examples to work out of the box.
This may include different port numbers, different paths of volume mounts for containers etc.
Debian-based Linux distributions
Tested on x86_64 via Docker:
Debian 11
Debian 12
Ubuntu 20.04
Ubuntu 22.04
Ubuntu 23.10
Note: Ubuntu 18.04 is not supported, as the glibc is outdated.
Pre-Requisuites
The SDV stack requires the following packages to be present on the target system:
Mosquitto (adapt configuration, see below)
Data folders
Storage for Self Update Bundles: mkdir -p /data/selfupdates
Download the Debian package from the Eclipse Kanto release page
wget "https://github.com/eclipse-kanto/kanto/releases/download/v0.1.0-M3/kanto_0.1.0-M3_linux_x86_64.deb"apt-get install -y ./kanto_0.1.0-M3_linux_x86_64.deb
# Check if Kanto has been installedcommand -v container-management
command -v kanto-cm
systemctl status container-management
Mosquitto must be configured to allow anonymous access and listen on the network interface available to the containers. The easiest (and least secure!) configuration would be:
/etc/mosquitto/conf.d/public.conf:
listener 1883 0.0.0.0
allow_anonymous true
Attention: Only apply this configuration on a device in a secured network, or adapt the configuration accordingly (e.g. specify internal IP address)
2.7 - Cheatsheet
This cheat sheet gives you an overview of common command line commands to interact with the tools available on the quickstart image.
General Commands
Category
Task
Command
General
Overall info
sdv-health
Show device info
sdv-device-info
Device provisioning
sdv-provision
Switch Keyboard layout
loadkeys de
System
System load
htop
Disk free
df -h -t ext4
Memory free
free -h
Network
Interfaces summary
networkctl
Ethernet status
networkctl status enp0s2
Routing table
route
Active listeners
netstat -l -n -t
Multicast for Some/IP
route add -net 224.0.0.0 netmask 240.0.0.0 dev eth0
A failed download of container images may be caused by out-of-sync clock, thus failing the TLS certificate validation.
A hardware device without hardware clock (such as the Raspberry Pi) relies on network time.
In some (corporate) networks, there might be rogue NTP servers and it might be necessary to override the NTP sources.
To reset NTP server to a public server, follow these steps:
When things go really wrong and the container runtime is unable deploy containers properly, it may be necessary to reset the internal state.
This is achieved by stopping the container runtime(s) and deleting the /var/lib/container-management folder:
# Stop all container runtimessystemctl stop container-management
systemctl stop containerd
# Delete the persistence of container management# Attention! Here be dragonsrm -rf /var/lib/container-management
# Restart the container runtimessystemctl start containerd
systemctl start container-management
# Redeploy the containerssystemctl restart kanto-auto-deployer
Running custom ad-hoc containers
To install arbitrary containers, create the container using the kanto-cm command line tool.
If it’s not a background service, but a cli tool, adding the --t --i options allows console access.
root@qemux86-64:~# kanto-cm remove --name python
root@qemux86-64:~# kanto-cm create --name python --t --i --privileged docker.io/library/python:3.8.16-slim-bullseye
bf9deca4-dbf1-4132-9ba7-e0f378bd34a7
root@qemux86-64:~# kanto-cm start --name python --a --i
Python 3.8.16 (default, Jan 24 2023, 00:19:05)[GCC 10.2.1 20210110] on linux
Type "help", "copyright", "credits" or "license"for more information.
>>> quit()
Raspberry Pi Overlays
Edit /boot/config.txt and reboot:
# Disable to fix non-working standard Raspberry Pi 7" display
# dtoverlay=vc4-kms-v3d
# PiCAN 2
# dtoverlay=mcp2515-can0,oscillator=16000000,interrupt=25
# Waveshare RS485 CAN Hat
# dtoverlay=mcp2515-can0,oscillator=12000000,interrupt=25,spimaxfrequency=2000000
2.8 - Utilities
The quickstart image contains the following utilities.
These utility scripts are meant to be convenience tools for users and developers.
They help to experiment with the container deployment, device provisioning or vehicle data access.
sdv-health: Show SDV software components health status
kantui: A text user interface for kanto-cm to manage containers (start, stop, logs, redeploy all)
sdv-device-info: Show and update device information
sdv-provision: Generate device certificates and configuration of cloud connection
sdv-motd: Message-of-the-Day shown after login prompt
can-forward: Forwarding a CAN-bus network interface into a containerized Vehicle Application
kanto-auto-deployer: Automatically deploys containers on boot. Runs as a systemd service, and can also be invoked by a user directly.
sdv-ctr-exec: Execute arbitrary commands in existing containers
sdv-kanto-ctl: Manage the Kanto Container Management configuration via CLI
blueprint-selector: Deploy and fetch new SDV blueprints easily with an interactive CLI
Note:
These scripts are not meant to be reused or called from production software.
Their behaviour or command line syntax is not a stable API and should not be trusted for automation purposes.
For details, please see leda-utils
2.8.1 - SDV Health
Health check
The sdv-health utility displays a status overview of some important dependencies and device configurations for the SDV edge stack.
The sdv health utility can be configured using the sdv.conf configuration file.
Usage:
# sdv-health
Example output:
Version Information
The Leda image version and build time will be displayed at the top in the first category:
OS Release: Year and codename of the release version
Image Version: Name of the image and more specific version information, such as the git tag or commit id
Build timestamp in yyyMMddHHmmss notation
Note: The information is read from the system base file in /etc/os-release:
If available, vehicle bus network information, such as the status of the CAN-Bus, will be displayed iin its own category.
This helps to quickly identify if there problems with the hardware connectivity for automotive bus networks.
Ports
The health utility checks the TCP ports of specific services.
This helps to identify if these services are up and running and potentiallyconnectable via external network interfaces.
Services and Containers
The services category shows the status of required and optional containers.
The required containers are supposed to be up and running for the SDV.EDGE stack to be correctly up and running.
If any of these core components have a failed state, the functionality is impacted.
The optional containers are for additional features and for example applications.
These containers may not be necessary for each use case and hence will be marked as a warning if they are not up and running.
The overview still helps to identify which containers are working properly.
Errors, Warnings, Failed states
When there are errors or warnings related to the status of SDV related components,
the health utility will print out these error states, and if available also a more detailed error message.
In the following example, the health utility helps the troubleshooting process:
The container runtime is properly started: “Kanto CM” is OK in the “SDV Ports” section and the “container-management” service is OK in the “SDV Services” section".
Some containers are in state “OK”, which means there is no general issue with the container runtime.
The cloud connector is in a “Stopped” state, which indicates that the user manually stopped the container by using “kanto-cm stop -n cloud-connector”.
The sua container is in a “Exited” state, which indicates the process exited with an error code.
2.8.2 - KantUI
The KantoUI tool is a text-based user interface for conveniently managing containers in the Kanto Container Management.
It supports simple navigation using keyboard and mouse to select a specific container.
Commands to start, stop, remove and re-deploy containers are available along with a functionality to retrieve the application logs of a selected container.
Kanto User Interface
Usage:
kantui
Example output:
Command Line Options
Print command line help:
root@qemux86-64:~# kantui --help
kantui 0.2.0
A TUI for Kanto CM that allows easier management of deployed containers. Requires root.
USAGE:
kantui [OPTIONS]OPTIONS:
-c, --config-file-path <CONFIG_FILE_PATH>
Set a custom path for the kantui configuration file [default:
/etc/kantui/kantui_conf.toml] -h, --help
Print help information
-V, --version
Print version information
Note: All config values can be overridden through env variables prefixed with KANTUI_,
e.g. KANTUI_STOP_TIMEOUT=5 overrides the timeout before SIGKILL is sent to be 5 seconds.
Keyboard commands
Arrow keys Up and Down to select a container
Arrow keys Left and Right to select a column
Enter to change the sort ordering of the currently selected column
S to start the selected container which is currently not running
P to stop the selected container
R to remove a container
L to show the log output of a container
D to redeploy an existing container (rereads deployment descriptor)
Q to quit kantui
Note: The mouse can be used to select ui items when holding the Shift key.
Starting, Stopping, Removing containers
To use the lifecycle commands on a container:
Select a container by using the mouse or the arrow keys.
The selected container is highlighted.
Press one of the lifecycle commands, e.g. s, p or r
Wait for the value in the State column to change, before issueing the next command.
Note: When using the lifecycle commands for containers (Start, Stop, Remove), it may take a few seconds before the UI is updated with the status changes.
The amount of time before a container is forcefully killed is determined by the stop_timeout configuration option.
Show container Logs
To view the container’s log output:
Select a container by using the mouse or the arrow keys.
Press the L key
Log output will be displayed (tail, oldest messages first)
Use the arrow keys Up and Down or drag the scrollbar using your mouse to scroll through the log
Close the Log viewer by pressing Enter or clicking on the OK button
Note: The log output is not followed automatically. Close the dialog and reopen to see new output.
Redeploying containers
To redeploy a container, e.g. when a deployment descriptor has changed on disk:
Select a container by using the mouse or the arrow keys.
Press the P key to stop the container
Press the R key to remove the container
Press the D key to invoke the Kanto Auto Deployer, which will redeploy the missing containers
Note: Only containers managed by Kanto Auto Deployer will be redeployed.
Column Sorting
To sort a column:
Select the column using the Left and Right arrow keys
Press Enter to activate sorting
Press Enter again on a sorted column to invert sort order (Ascending -> Descending -> Ascending)
Note: The selected sort order is not persisted and will reset to the default on restart: By ID, ascending
Configuration File
The default location of the configuration file is /etc/kantui/kantui_conf.toml:
# General Configuration Optionssocket_path="/run/container-management/container-management.sock"# Path to kanto-cm unix socketstop_timeout=5# timeout (integer) in seconds before a SIGKILL is sent after a SIGTERM[keyconfig]start_btn_name="[S]tart"start_kbd_key="s"stop_btn_name="Sto[P]"stop_kbd_key="p"remove_btn_name="[R]emove"remove_kbd_key="r"logs_btn_name="[L]ogs"logs_kbd_key="l"quit_btn_name="[Q]uit"quit_kbd_key="q"redeploy_btn_name="Re[D]eploy"redeploy_kbd_key="d"# Includes a shell lexer so anything that would be a valid shell command can be used# No pipes/redirects allowed.# N.B.: Command inherits kantui's privileges (root)redeploy_command="systemctl restart kanto-auto-deployer.service"
2.8.3 - SDV Device Info
Displays the current device configuration, such as Device ID.
Note: Requires the Cloud Connector component to be configured and running.
Usage:
sdv-device-info
Usage
Synposis: ./sdv-device-info [options] [command]
Full help:
root@qemux86-64:~# sdv-device-info --help
sdv-device-info v0.2
Usage: /usr/bin/sdv-device-info [options][command]Show SDV device configuration information
Example: /usr/bin/sdv-device-info show
Commands:
show : Display configuration (default command)help : This message
env : Format output for use in scripts
Options:
--ansi | -a : Don't use colored output.
--norestart | -n : Do not automatically restart services
--verbose | -v : Enable verbose mode.
--help | -h : This message.
Use in scripts
To use device information on other scripts, it may be useful to source the device information variables into the current environment variable context:
The provisioning helper script can be used to manually perform a device provisioning with a cloud backend.
It is meant as a convenient tool for developers, who wish to connect their device to a selfmanaged cloud backend directly.
In a production environment, the device provisioning functionality is implemented either by the Cloud Connector component.
The provisioning script currently supports the following backend and authentication options:
Azure IoT Hub
Connection String
Device Certificates
Azure IoT Device Provisioning Service
Device Certificates
Usage
The sdv-provision script is interactive and asks for the type of backend and authentication option:
root@qemux86-64:~# sdv-provision
Checking Eclipse Leda Device Provisioning configuration...
- Certificates directory exists
Checking Device ID
- Based on network device: eth0
- Device ID: 52-54-21-4c-f9-5a
Checking whether either IdScope or ConnectionString is configured
- Neither Id Scope file nor ConnectionString found, needs manual configuration
Do you want to use the global Azure IoT Device Provisioning Service (DPS) by using an Id Scope, or do you want to use a direct connection to a specific Azure IoT Hub using a Connection String?
d) Azure IoT Device Provisioning Service (DPS) with Id Scope
h) Azure IoT Hub with Connection String
Choose:d
Please enter your Id Scope of the Azure IoT Device Provisioning Service:example
Recreating the Cloud Connector container...
Checking device certificates
- All device certificates are present
- Primary device certificate: /data/var/certificates/device.crt
- Primary device private key: /data/var/certificates/device.key
- Secondary device certificate: /data/var/certificates/device2.crt
- Secondary device private key: /data/var/certificates/device2.key
Fingerprints (add these to the Azure IoT Hub Device)- Primary thumbprint: 1B172ED3D06F4E25AFFEF675ADCE519457FFFFFF
- Secondary thumbprint: B6CD5EACE96E9D0448BCB0BAED2DEE87AFFFFFFF
Once a configuration has been selected, the script will:
Generate a random Device Id (based on physical network address)
Store the Device Id in /etc/deviceid
Generate a primary self-signed device certificate pair
Generate a secondary self-signed device certificate pair
Store the certificates in /data/var/certificates/
Reconfigure the container descriptor in /data/var/containers/manifests_dev/cloudconnector.json
Restarting the Cloud Connector container
Print the key fingerprints, used for onboarding the device in Azure IoT Device Provisioning Service
Reconfiguration
Note: Re-running the script will only print the existing configuration.
To reconfigure the device and use different options, perform the following steps:
The sdv-motd script provides an alternative motd profile, which displays some additional information after login.
The script does not have any command line options.
Example output:
2.8.6 - CAN Forward
The can-forward help script can be used to forward an existing CAN-Bus interface on the host system to a container process.
Note: Warning! The script does not yet support Kanto (or containerd) as a container runtime. It has been implemented for k3s.
Usage
root@qemux86-64:~# can-forward --help
Usage: /usr/bin/can-forward {-h}{-p PID}{-c container} <hw_can>
hw_can Host CAN hw interface to forward. Default: can0
-c container Attemmpt to get netns PID from a running container: (docker, ctr). Default: seat_service
-p PID Use provided PID for transferring vxcan interface (e.g.: docker inspect -f '{{ .State.Pid }}' container) -h Prints this message
The script performs the following steps:
Find the process ID of the target container process
Check and modprobe vxcan
Check and modprobe can-gw
Create a new virtual CAN interface (vxcanX)
Create a new virtual CAN interface (vxcanX+1)
Link both interfaces together
Move the second interface (vxcanX+1) into the namespace of the target container
Set up a bi-directional CAN-Bus packet forwarding between both interfaces using cangw
2.8.7 - Kanto Auto Deployer (KAD)
Automatically deploys containers to the Kanto Container Management based on deployment descriptors from a given path.
All deployment descriptors in the manifests folder will be deployed (created and started) on startup of the service.
The directory will then be monitored for creation of/changes to manifests and those changes will be redeployed.
Usage
Usage:
$ kanto-auto-deployer --help
kanto-auto-deployer 0.2.0
Automated deployment of Kanto Container Management Manifests
USAGE:
kanto-auto-deployer [OPTIONS][MANIFESTS_PATH]ARGS:
<MANIFESTS_PATH> Set the path to the directory containing the manifests [default: .]OPTIONS:
-d, --daemon Run as a daemon that continuously monitors the provided path for changes
-h, --help Print help information
-s, --socket-cm <SOCKET_CM> Set the path to the Kanto Container Management API socket
[default: /run/container-management/container-management.sock] -V, --version Print version information
Example:
# Use container manifests from current working directoryroot@qemux86-64:/data/var/containers/manifests# kanto-auto-deployer
[2023-04-18T10:27:21Z INFO kanto_auto_deployer] Running initial deployment of "/data/var/containers/manifests"[2023-04-18T10:27:21Z INFO kanto_auto_deployer] Reading manifests from [/data/var/containers/manifests][2023-04-18T10:27:21Z WARN kanto_auto_deployer::manifest_parser] Failed to load manifest directly. Will attempt auto-conversion from init-dir format.
[2023-04-18T10:27:21Z INFO kanto_auto_deployer] Already exists [cloudconnector][2023-04-18T10:27:21Z WARN kanto_auto_deployer::manifest_parser] Failed to load manifest directly. Will attempt auto-conversion from init-dir format.
[2023-04-18T10:27:21Z INFO kanto_auto_deployer] Already exists [databroker]# Use container manifests from specified directoryroot@qemux86-64:~# kanto-auto-deployer /data/var/containers/manifests/
[2023-04-18T10:27:44Z INFO kanto_auto_deployer] Running initial deployment of "/data/var/containers/manifests"[2023-04-18T10:27:44Z INFO kanto_auto_deployer] Reading manifests from [/data/var/containers/manifests][2023-04-18T10:27:44Z WARN kanto_auto_deployer::manifest_parser] Failed to load manifest directly. Will attempt auto-conversion from init-dir format.
[2023-04-18T10:27:44Z INFO kanto_auto_deployer] Already exists [cloudconnector][2023-04-18T10:27:44Z WARN kanto_auto_deployer::manifest_parser] Failed to load manifest directly. Will attempt auto-conversion from init-dir format.
[2023-04-18T10:27:44Z INFO kanto_auto_deployer] Already exists [databroker]
root@qemux86-64:/lib/systemd/system# systemctl status kanto-auto-deployer.service
* kanto-auto-deployer.service - Kanto Auto Deployer
Loaded: loaded (/lib/systemd/system/kanto-auto-deployer.service; enabled; vendor preset: enabled) Active: active (running) since Tue 2023-04-18 10:22:10 UTC; 3min 55s ago
Main PID: 525(kanto-auto-depl) Tasks: 10(limit: 4708) Memory: 1.4M
CGroup: /system.slice/kanto-auto-deployer.service
`- 525 /usr/bin/kanto-auto-deployer /data/var/containers/manifests --daemon
Apr 18 10:22:48 qemux86-64 kanto-auto-deployer[525]: [2023-04-18T10:22:48Z INFO kanto_auto_deployer] Creating [sua]Apr 18 10:23:04 qemux86-64 kanto-auto-deployer[525]: [2023-04-18T10:23:04Z INFO kanto_auto_deployer] Created [sua]Apr 18 10:23:04 qemux86-64 kanto-auto-deployer[525]: [2023-04-18T10:23:04Z INFO kanto_auto_deployer] Starting [sua]Apr 18 10:23:05 qemux86-64 kanto-auto-deployer[525]: [2023-04-18T10:23:05Z INFO kanto_auto_deployer] Started [sua]Apr 18 10:23:05 qemux86-64 kanto-auto-deployer[525]: [2023-04-18T10:23:05Z WARN kanto_auto_deployer::manifest_parser] Failed to load manifest directly. Will attempt auto-conversion from init-dir format.
Apr 18 10:23:05 qemux86-64 kanto-auto-deployer[525]: [2023-04-18T10:23:05Z INFO kanto_auto_deployer] Creating [vum]Apr 18 10:23:10 qemux86-64 kanto-auto-deployer[525]: [2023-04-18T10:23:10Z INFO kanto_auto_deployer] Created [vum]Apr 18 10:23:10 qemux86-64 kanto-auto-deployer[525]: [2023-04-18T10:23:10Z INFO kanto_auto_deployer] Starting [vum]Apr 18 10:23:11 qemux86-64 kanto-auto-deployer[525]: [2023-04-18T10:23:11Z INFO kanto_auto_deployer] Started [vum]Apr 18 10:23:11 qemux86-64 kanto-auto-deployer[525]: [2023-04-18T10:23:11Z INFO kanto_auto_deployer] Running in daemon mode. Continuously monitoring "/data/var/containers/manifests"
2.8.8 - SDV Container Exec
The sdv-ctr-exec wrapper allows to execute arbitrary user commands in existing containers.
Kanto Container Management cli tool (kanto-cm) only allows to manage the lifecycle of a container,
but does not allow to specify or override the entrypoint or command definitions of an existing container.
The ctr command line tool of containerd allows the execution of additional tasks in a running container.
Usage
As a convenient tool, sdv-ctr-exec allows the simple execution of arbitrary commands inside of containers.
This is especially useful for non-service-containers, or containers which have additional binaries (e.g. cli tools) embedded.
Usage:
root@qemux86-64:~# sdv-ctr-exec
/usr/bin/sdv-ctr-exec -h to print this message
Usage:
/usr/bin/sdv-ctr-exec <container-id> <command>
or
/usr/bin/sdv-ctr-exec -n <container-name> <command>
Note: nerdctl is currently not installed on the Leda Quickstart images.
containerd: ctr and mounting
To execute a binary natively (outside of a containerized environment), the container image may be mounted to the host filesystem using the ctr snapshots mount commands.
This approach only works if the binary is compatible with the host environment (dependencies, libraries etc.).
Manage the Kanto Container Management configuration via CLI.
Note: Requiresjq to be installed.
Features:
Add and remove container registries (for authentication purposes)
Set primitive values in configuration
Restart container-management.service on configuration changes
Automatically back up configuration file
Display changes to user
Usage
Synposis: ./sdv-kanto-ctl <command> [<options>]
Full help:
$ ./sdv-kanto-ctl --help
Eclipse Kanto Container Manager Configuration Utility
See https://eclipse.dev/kanto/docs/references/containers/container-manager-config/
Usage: ./sdv-kanto-ctl <command> {options}Commands:
add-registry -h <hostname> -u <username> -p <password>
Adds or replaces a container registry authentication configuration
-h or --hostname: Configure the hostname of the container registry (e.g. hub.docker.io, ghcr.io, ...) -u or --username: Configure the username
-p or --password: Configure the password
remove-registry -h <hostname>
Removes the specified container registry
-h or --hostname: The hostname of the container registry
remove-all-registries
Removes all configured container registries
list-registries
Prints all configured container registries
show-config
Print the container management configuration
set <key> <value>
Set a primitive configuration value. Key in JSON Dot-Notation
Examples: ./sdv-kanto-ctl set containers.registry_configurations.MyRegistry.credentials.password foobar
./sdv-kanto-ctl set things.enable trueOptions:
--no-reload : Do not reload the configuration and restart the container-management service automatically
--ansi : Don't use colored output.
--verbose | -v : Enable verbose mode.
--help : This message.
Example: Private Container Registries
To be able to pull container images, the container runtime needs access to the container registry.
Some container registries require authentication.
The Kanto Container Manager can be configured to use credentials when accessing remote container registries.
In the Leda images, the sdv-kanto-ctl tools allows to easily add authentication to the container manager configuration:
For example, to access container images from GitHub Packages in a private repository, you need a GitHub Personal Access Token (PAT) with the read: packages scope.
Then, add the repository as shown below:
sdv-kanto-ctl will make the necessary modifications to /etc/container-management/config.json and restarts the container-management.service systemd unit,
so that the changes take effect. You may need to recreate or restart the container if a previous pull failed.
Enable the container manager digital twin representation.
sdv-kanto-ctl set things.enable true
Example: Container Stop Timeout
Kanto waits for a timeout before forcefully stopping a container.
The default is 30 seconds in Kanto, and 10 seconds in the Leda quickstart image.
To change this behavior at runtime:
sdv-kanto-ctl set manager.default_ctrs_stop_timeout 2
2.8.10 - Blueprint Selector
A Rust application that reads all blueprint files in a directory and provides the user with an
interactive (supports filtering) menu to select the one to be deployed on the edge device via MQTT.
If no directory is provided the default one on a Leda Quickstart Image is: /data/var/containers/blueprints.
The “blueprint” files are desired state messages, that have the extension “.blueprint.json” (configurable) and an additional metadata header (required):
{"blueprintMetadata":{"name":"<NAME>","description":"<Short Description>"},"activityId":"correlation-id","timestamp":1235466"payload":{}// This is the desired state message
}
The metadata header will be used to construct the list of options presented to the user. You can find example blueprints under the
example_blueprints directory in the leda-utils repository.
The selected blueprint is then published as an MQTT message on the vehicleupdate/desiredstate topic.
CLI options
To get all available configuration options use the --help/-h flag:
A user-friendly tool to select and deploy SDV blueprints
Usage: blueprint-selector [OPTIONS]Options:
-d, --blueprints-dir <BLUEPRINTS_DIR>
The directory containing the SDV blueprints [default: /data/var/containers/blueprints] -f, --fetch-blueprints
Start in fetch mode (presents a menu to fetch new/updated blueprints) from a remote repository
-e, --blueprints-ext <BLUEPRINT_EXTENSION>
Extension to use when iterating over the files in the blueprints directory [default: .blueprint.json] --mqtt-broker-host <HOST>
Hostname/IP to the MQTT broker where the desired state message would be posted [default: 127.0.0.1] --mqtt-broker-port <PORT>
Port for the MQTT broker [default: 1883] --mqtt-topic <TOPIC>
Topic on which to publish the blueprint desired state message [default: vehicleupdate/desiredstate] -h, --help
Print help -V, --version
Print version
Normal mode
To run in normal mode use:
blueprint-selector
or if you’d like to provide a directory different from the default one, use:
blueprint-selector -d </path/to/dir>
Fetch mode
When starting the blueprint-selector with the -f/--fetch-blueprints flag, you will be presented with a selection of different
fetchers that allow you to download/update blueprints directly in the directory specified with the -d/--blueprints-dir flag
(or in the default directory if not specified).
For example:
blueprint-selector -fd </path/to/dir>
When you choose a fetcher, you will be asked for an URI and blueprint-selector will attempt to fetch the blueprints inside the directory specified by -d.
After providing a URI, pressing Enter, and a successful fetch, you will be brought back to the usual
selector menu, this time including all successfully fetched manifests.
2.9 - Wifi Configuration
BSP packages for emulated WiFi devices (QEMU) and hardware device drivers are provided in meta-leda for supported hardware.
They usually do not require extra configuration.
The required kernel modules and binary blobs are provided with the sdv-wifi-kernel-config.inc config file and the packagegroup-sdv-rpi4wifi packagegroup. These
are included in sdv-image-full.bb and sdv-image-minimal.bb by default.
If you, however, decide to define your own custom image based on Custom Distros,
you would have to make sure the packagegroup is installed to enable WiFi connectivity.
QEMU
QEMU images provide the kernel modules necessary to set-up a virtual wlan interface and connect it to a virtual wifi network. This can be useful in various testing scenarios.
To create and link a virtual WiFi interface to eth0, boot your QEMU image and run:
$ ip link add link eth0 name wlan0 type virt_wifi
The SSID of the virtual network you can connect to is VirtWifi.
Note: Leda Quickstart QEMU images set the name of the default virtual ethernet interface to eth0 through kernel CMDLINE configurations (net.ifnames=0 biosdevname=0).
If you are building a custom image with a different kernel CMDLINE replace eth0 with the name of your virtual interface (check ifconfig).
2.9.1 - Connecting to Wi-Fi networks
Here we will describe the basic steps on how to identify and connect to a WiFi network in interactive or headless mode.
Initial steps (identifying wlan interfaces)
Start by running:
$ ip a
...
3: wlan0: <BROADCAST,MULTICAST,UP,LOWER_UP> mtu 1500 qdisc fq_codel state DOWN group default qlen 1000 link/ether <MAC> brd ff:ff:ff:ff:ff:ff
...
Note: Usually the name of the interface would be wlan0. It might however follow the newer “predictable interface names” standart.
Then the interface name would start with wl* with the remaining characters identifying a physical bus/chip/number/etc
corresponding to the interface. For simplicity we will wlan0 in all examples below.
Most likely your wlan interface would be in the state DOWN. To bring it up:
$ ip link set wlan0 up
Scanning for wireless networks
You can scan for wireless networks using either iw or wpa_cli.
$ iw wlan0 scan
Note: The output of this command can be quite verbose. You can grep for SSID to find the SSIDs of the networks around you.
$ wpa_cli scan && wpa_cli scan_results
The output of wpa_cli is cleaner and more readable so it is recommended to use that.
Connecting to a network
Once you have identified the SSID of your network you can connect to it by ussing the following commands:
You should now be connected to the wireless network. To confirm that, you can once again use ip a to check that wlan0 has been configured with an IP.
This configuration shall be remembered from now on and your interface will try to connect automaticatically to that network whenever it is available.
Headless Wi-Fi configuration
Similarly to the Raspbian, meta-leda provides a mechanism for headless configuration of Wi-Fi credentials for your device (Headless Raspberry Pi Setup).
To use this feature you have to prepapre your wpa_supplicant.conf ahead of time (check the reference above):
IMPORTANT: It is recommended that if you are creating this configuration file on Windows to use an editor such as Notepad++ that can save files using the
“Unix Line endings” (DOS vs. Unix Line Endings), or run it through a tool such as dos2unix
that can convert between the two file formats. Otherwise wpa_supplicant.conf might not be read properly in the Linux image.
Once you have your wpa_supplicant.conf put your SD-card in your Desktop machine and place the configuration file in the root of the BOOT partion.
When you boot your device it should now automatically connect to your Wi-Fi network.
2.10 - GPS Connectivity
GPSD
Leda Quickstart Images provide (within meta-leda) recipes for the integration and setup of GPSD.
GPSD is a service daemon that monitors one or more GPSes or AIS receivers attached to a host computer through serial or USB ports,
making all data on the location/course/velocity of the sensors available to be queried on TCP port 2947
of the host computer. To find out more about GPSD, check out its official documentation.
For easier interaction and debugging gpsd client utilities such as installed gpsfake,
gpspipe, etc. are installed.
Service
GPSD is installed on Leda Quickstart Images as a service. To check its status and/or logs you can use the following two commands:
root@leda-525400123502:~# systemctl status gpsd.service
* gpsd.service - GPS (Global Positioning System) Daemon
Loaded: loaded (/lib/systemd/system/gpsd.service; disabled; vendor preset: disabled) Active: active (running) since Mon 2023-10-02 11:19:54 UTC; 41min ago
...
and the socket:
root@leda-525400123502:~# systemctl status gpsd.socket
* gpsd.socket - GPS (Global Positioning System) Daemon Sockets
Loaded: loaded (/lib/systemd/system/gpsd.socket; enabled; vendor preset: enabled) Active: active (running) since Mon 2023-10-02 11:19:30 UTC; 42min ago
...
With the location of the default config file being:
/etc/default/gpsd.default
By default, the GPSD service on Leda is configured to automatically discover USB devices (plug-and-play). In some cases, a system reboot might be required
after plugging the USB GPS device.
Kuksa.val FeederGPS
The Kuksa GPS Feeder consumes gpsd as a data source and pushes location data to the kuksa.val server (databroker). It is installed as a pre-configured container on Leda Images
through the feedergps.json container manifest.
The container has an internal gpsd server (on port 2948) that connects to the host’s gpsd instance (on port 2947). With the provided container manifest
feedergps should be plug-and-play.
Using pre-recorded GPS traces with gpsfake
Recording NMEA traces
It sometimes might be useful to mock gps services when testing, especially on QEMU virtual machines where emulated USB GPS hardware is not available.
Pre-recorded traces should be in the NMEA-format.
To record a GPS trace in the NMEA format, on a device with physical GPS hardware, gpsd, and gpsd-client utilities installed, run:
gpspipe -R > gps_log.nmea
A sample NEMA file that can be used for testing is provided in the kuksa.val.feeders repository - simplelog_example.nmea.
Feeding NMEA traces to feedergps
Since the running gpsd service will interfere with the following steps, make sure to stop it first by running:
To start gpsfake on port 2946 with gps_log.nmea as an input,
either in the background (by adding & at the end of the shell line) or in a separate shell session run:
root@leda-525400123502:~# gpsfake -P 2946 gps_log.nmea
/usr/bin/gpsfake:21: DeprecationWarning: The distutils package is deprecated and slated for removal in Python 3.12. Use setuptools or check PEP 632for potential alternatives
from distutils import spawn
Processing gps_log.nmea
gpsfake: log cycle of gps_log.nmea begins.
Note: you can safely ignore the distutils warning.
Then, run a foreground instance of gpsd that reads from gpsfake on port 2946 on the loopback interface only and forwards
the traffic on port 2947 for all interfaces:
gpsd -GNS 2947 gpsd://127.0.0.1:2946
These extra steps are needed as feedergps requires the gpsd server on port 2947 to be available on the kanto-cm0 bridge, as it’s running as a
container and gpsfake cannot be configured to listen on an interface different from the loopback.
Sometimes the feedergps container is started before the databroker and/or gpsd which leads to the container not being able to connect to either
of those services. In such cases, after you’ve made sure the databroker and gpsd are up and running, restart feedergps with:
The device needs to be configured before it can make a connection to the cloud.
The following initial configuration steps are required:
Create a device in the cloud backend, such as Azure IoT Hub
Configure authentication on device
Configure credentials for accessing private container registries
3.1 - Manual Provisioning
Follow these steps to do a manual device provisioning:
Generate the device certificate (eg using openssl) and sign it with your CA.
Log in to Azure Portal, Go to Azure Iot Hub and create a new device
Select the proper authentication type, e.g. X.509 Self-signed or X.509 CA Signed
Copy the device certificate (cert file and key file) to the device to /data/var/certificate
Restart cloud connector service or container.
Create a device in Azure IoT Hub
For the device to be connectable, it needs to be known to the cloud service first. In these steps, we will create a new device identity by using Azure IoT Hub.
Pre-Requisites:
Virtual device must already be started with runqemu ... or leda
Note: For Raspberry Pi, please follow the manual steps below and adapt the SSH connection options to the IP of your Raspbery Pi.
The virtual device needs to be remotely accessible via ssh port 2222 on the host’s localhost (Qemu port forwarding in userspace)
or via ssh port 22 on the IP address 192.168.7.2 (Qemu virtual networking using TAP network interface)
The container runtime needs to have started successfully, check with sdv-health
A Device has been created in Azure IoT Hub
Note: Do NOT create an “edge” device.
Configure authentication on device
For the proper device authentication, the device management backend authority needs to issue a device-specific certificate and sign it. This is a complex process and subject to the specific situation.
For the Leda quickstart images, the software configuration is prepared with dummy certificates which need to be replaced.
ATTENTION: The Leda example device certificates are public and insecure, they only serve demonstration purposes. You need to replace the intermediate certificates and device certificates with your own.
Generate a device certificate using openssl
Sign it with your intermediate CA certificate
Put it into /data/var/certificate/
Restart the cloud connector service or container: systemctl restart cloud-connector or kanto-cm stop -n cloudconnector --force; kanto-cm start -n cloudconnector
Please refer to the Container Registries on how to configure private container registries.
3.2 - Provisioning with sdv-provision
Meta-leda and the Leda-quickstart image provide a utility sdv-provision that simplifies the device provisioning procedure.
Connecting to the device
Since the procedure includes copying and pasting device IDs, it is recommended to connect to the device over a ssh connection. sdv-motd provides an
easy way to find your device’s ip. More information on connecting via ssh can be found here.
Provisioning via a connection string
Device-side
After connecting via ssh run sdv-provision.
Example output:
root@qemux86-64:~# sdv-provision
Checking Eclipse Leda Device Provisioning configuration...
- Certificates directory exists
Checking Device ID
- Based on network device: eth0
- File does not exist, creating: /etc/deviceid
- Device ID: XX-XX-XX-XX-XX-XX
Checking whether either IdScope or ConnectionString is configured
- Neither Id Scope file nor ConnectionString found, needs manual configuration
Do you want to use the global Azure IoT Device Provisioning Service (DPS) by using an Id Scope, or do you want to use a direct connection to a specific Azure IoT Hub using a Connection String?
d) Azure IoT Device Provisioning Service (DPS) with Id Scope
h) Azure IoT Hub with Connection String
Choose:
Note the generated Device ID (XX-XX-XX-XX-XX-XX).
Type h /Azure IoT Hub with Connection String/ and press Enter.
Paste your Azure IoT Hub Connection String: HostName=<IoT Hub in Azure>.azure-devices.net;DeviceId=<XX-XX-XX-XX-XX-XX> and press enter. Where <IoT Hub in Azure> is your Azure IoT Hub name.
The Vehicle Update Manager delegates two different types of updates:
The Desired State on the container layer
The Self Update on operating system layer
Desired State
The Desired State is applied at runtime on the container layer.
This type of update mechanism can update vehicle applications, vehicle services and other containers together with configuration resources or data files at runtime.
If the applications support it, the rollout can also use high-availability strategies, such as rolling deployments. You can find out more about more about
the Container Update Agent here.
Self Update
The Self Update is applied on reboot of the device only.
This type of update mechanism is used for system-level updates which require the operating system to be rebooted to take effect.
You can find out more about the Self Update Agent in the tutorial.
3.3.1 - Configuration
Config file
The default location for the VUM service on the Leda Distro image can be found at /etc/update-manager/config.json.
The location of the config file is specified with the --cfg-file [PATH] flag when starting the binary.
Minimal configuration
A minimal configuration (that is used by the Leda Distro) is the following:
“domain”: specifies the prefix for the MQTT topic, e.g. in this case it’s set to vehicle, so all VUM related topic are prefixed with vehicleupdate/[TOPIC]
“agents”: configures the update agents that would be available to VUM. Here the “readTimeout” key specifies how long should VUM wait for a response from the configured agent.
“thingsEnabled”: whether VUM should use the Kanto Things API for communication or not.
Full configuration
An example configuration file for VUM with all available options is the following one:
Here keys (other the ones above) are self-explanatory. The “connection” section object specifies configuration options for the MQTT connection.
Allowed log leves (in order of increasing verbosity)are: ERROR, WARN, INFO, DEBUG, TRACE.
3.3.2 - Message Flow
Note: This part of the Leda OSS stack is still in active development and there might be differences between the documented and the current version.
As described in Vehicle Update Manager takes a full update message for all domains, identifies the domains affected, the current component versions,
actions to be taken, etc., and delegates those actions to the correct update agent (e.g. self-update/container update).
The update manager (UM) in Leda-distro is configured as specified in UM’s config.json,
which on the final image is usually located in /etc/update-manager/config.json. The standard two domains supported are containers and self-update,
with the latter requiring a reboot on a successful update.
Note: UM allows a custom prefix for all of its topics to be defined (“domain”) in its config.json On the Leda Distro image the default prefix is “vehicle”.
If you decide to change it, replace “vehicle” in all MQTT topics mentioned below with your custom prefix.
A full specification of UM’s API and the relevant MQTT topics can be found in its documentation.
Update Message
The general structure of the update message is as follows:
Where multiple domains and components per domain (each with multiple configuration key-value pairs) are allowed. To trigger an update, publish
your full update message on the vehicleupdate/desiredstate MQTT topic. When UM receives your message, it splits it across the required domains and
publishes messages to the topics that the domain-specific agents are monitoring.
Similarly, update progress can be monitored on the vehicleupdate/desiredstatefeedback topic.
Self-update
The messages for triggering a self-update (image update) are the same as in The Self Update Tutorial.
The only difference here is that when you publish a self-update message on the vehicleupdate/desiredstate topic,
UM will automatically take care to forward your message to the self-update agent, including
forwarding back the update feedback on the vehicleupdate/-namespaced topics.
Containers update (desired state)
Similarly to the self-update, you should start by understanding the operation of the Container Update Agent.
After constructing the desired state message you can publish it on the vehicleupdate/desiredstate and UM will, again, forward it to CUA automatically,
based on the domain specified in the update message.
Combined update messages
The real strength of UM is deploying updates accross multiple domains with a single update message. For example, if you’d like to deploy an image update bundle
(self-update) and a single hello-world container image with the environment variable FOO=BAR set, you can construct the following message:
And publish the message on the MQTT topic vehicleupdate/desiredstate. UM will take actions to identify the affected update domains and publish the correct
messages on the respective topics. All feedback from the specific update agents will be forwarded back to the UM and published on the vehicleupdate/desiredstatefeedback
topic. All these messages will use the same activityId so they can be correlated with each other.
3.4 - Self Updates
In general, the self-update mechanism for operating system level updates is done with two separate partitions. While one partition is the actively booted partition and in use, the other partition can be updated by writing a partition image to it, as it is unused or inactive.
Once the download and writing is done, a reboot is triggered and the boot loader will now switch to the newly updated partition.
If the booting of the updated partition fails, the self update mechanism can revert back to the previous partition or boot to a rescue partition.
As updating the running operating system cannot be done at runtime, the approach requires additional disk space, a second partition and also requires the device to be rebooted for the updates to take effect.
In a vehicle, the self-updater cannot decide on its own when to do a reboot, as the vehicle must be in a safe condition (eg parked, state of charge etc.). Hence, the trigger for performaing the switch to another slot and a subsequent reboot is handed over to a higher level component, such as the vehicle update manager, which may in turn rely on driver feedback or other conditions.
Implementation with RAUC Update Service
RAUC is a lightweight update client that runs on your embedded device and reliably controls the procedure of updating your device with a new firmware revision.
For general usage of the RAUC tool, please see the RAUC User manual
Reference configuration
The project contains an example reference implementation and configuration using RAUC, which allows the evaluation of the concepts, mechanisms and involved software components in an emulated, virtual environment.
The Leda quickstart image contains the following disk partitions:
a small rescue partition
a full SDV installation with a container runtime, pre-loaded SDV container images and deployment specifications and additional developer tools such as nerdctl and kantui.
a minimal SDV installation with a container runtime, but no additional examples or developer tools. This partition is used to demonstrate the self-update functionality.
additional boot and data partitions for keeping system state information
Note: All three rootfs partitions (rootfs) initially contain the same identical copies of the base operating system. Both SDV Root partitions will use the same shared data partition for the container persistent state.
3.4.1 - Self Update Tutorial
This chapter describes the steps necessary to perform a local (without cloud) self update of the operating system.
Self-Update using RAUC Update Bundles
On host: Update bundle sdv-rauc-bundle-qemux86-64.raucb is in current folder
Note: In the development environment, the update RAUC Update Bundle is located in the BitBake machine-specific output folder
Example location is tmp/deploy/images/qemux86-64
On host: Start a dummy web server for serving the update file
python3 -m http.server --bind 192.168.7.1
On host: open two new terminals - one for monitoring and one for triggering the self-update
Terminal 1: To view the progress, watch the MQTT topics selfupdate/desiredstate and selfupdate/desiredstatefeedback:
Initial response message on startup from self update agent in topic selfupdate/currentstate, or upon request by sending message to selfupdate/currentstate/get
{"activityId":"1234567890","timestamp":1687786390,"payload":{"status":"IDENTIFYING","message":"Self-update agent has received new desired state request and is evaluating it.","actions":[]}}
{"activityId":"1234567890","timestamp":1687786390,"payload":{"status":"IDENTIFIED","message":"Self-update agent is about to perform an OS image update.","actions":[{"component":{"id":"self-update:os-image","version":"v0.0.10-194-g3d48cb8"},"status":"IDENTIFIED","progress":0,"message":"Self-update agent is about to perform an OS image update."}]}}
External trigger to download command on topic selfupdate/desiredstate/command:
{"activityId":"1234567890","timestamp":1687786931,"payload":{"status":"DOWNLOADING","message":"Self-update agent is performing an OS image update.","actions":[{"component":{"id":"self-update:os-image","version":"v0.0.10-194-g3d48cb8"},"status":"DOWNLOADING","progress":0,"message":"Downloading 0.0 MiB..."}]}}
{"activityId":"1234567890","timestamp":1687786936,"payload":{"status":"DOWNLOAD_SUCCESS","message":"Self-update agent is performing an OS image update.","actions":[{"component":{"id":"self-update:os-image","version":"v0.0.10-194-g3d48cb8"},"status":"DOWNLOAD_SUCCESS","progress":100,"message":"Downloaded 106.3 MiB..."}]}}
External trigger to update command on topic selfupdate/desiredstate/command:
{"activityId":"1234567890","timestamp":1687787145,"payload":{"status":"UPDATING","message":"Self-update agent is performing an OS image update.","actions":[{"component":{"id":"self-update:os-image","version":"v0.0.10-194-g3d48cb8"},"status":"UPDATING","progress":0,"message":"Checking bundle version and version in desired state request."}]}}
{"activityId":"1234567890","timestamp":1687787302,"payload":{"status":"ACTIVATING","message":"Self-update agent is performing an OS image activation.","actions":[{"component":{"id":"self-update:os-image","version":"v0.0.10-194-g3d48cb8"},"status":"UPDATING","progress":0,"message":"Self-update agent is performing an OS image activation."}]}}
{"activityId":"1234567890","timestamp":1687787303,"payload":{"status":"ACTIVATION_SUCCESS","message":"Self-update agent has activated the new OS image.","actions":[{"component":{"id":"self-update:os-image","version":"v0.0.10-194-g3d48cb8"},"status":"UPDATED","progress":0,"message":"Self-update agent has activated the new OS image."}]}}
External trigger to cleanup command on topic selfupdate/desiredstate/command:
{"activityId":"1234567890","timestamp":1687787382,"payload":{"status":"CLEANUP_SUCCESS","message":"Self-update agent has cleaned up after itself.","actions":[{"component":{"id":"self-update:os-image","version":"v0.0.10-194-g3d48cb8"},"status":"UPDATE_SUCCESS","progress":0,"message":"Self-update agent has activated the new OS image."}]}}
{"activityId":"1234567890","timestamp":1687787382,"payload":{"status":"COMPLETE","message":"Self-update completed.","actions":[{"component":{"id":"self-update:os-image","version":"v0.0.10-194-g3d48cb8"},"status":"UPDATE_SUCCESS","progress":0,"message":"Self-update agent has activated the new OS image."}]}}
Rollback command
External trigger to rollback command on topic selfupdate/desiredstate/command:
Downloading (when it is waiting for DOWNLOAD command)
Installing (when it is waiting for UPDATE command)
Installed (when it is waiting for ACTIVATE command)
Failed (when it is waiting for CLEANUP command)
3.4.2 - RAUC Integration
Leda integrates RAUC as a reference implementation and example configuration. It allows the evaluation of the concepts, mechanisms and involved software components in an emulated, virtual environment or on physical devices.
Checking the RAUC Status
Get the current RAUC boot status:
rauc status
Example output:
root@qemux86-64:~# rauc status=== System Info===Compatible: Eclipse Leda qemu86-64
Variant:
Booted from: rootfs.1 (SDV_B)===Bootloader===Activated: rootfs.1 (SDV_B)=== Slot States===o [rootfs.1](/dev/sda5, ext4, inactive) bootname: SDV_B
mounted: /
boot status: good
x [rootfs.0](/dev/sda4, ext4, booted) bootname: SDV_A
boot status: good
Forcing to boot the other slot
To manually force the device to boot into another slot, mark the current booted slot as bad, mark the other partitions as active and perform a reboot:
rauc status mark-bad booted
rauc status mark-active other
reboot now
Testing the rescue system
By marking both root slots as bad, the bootloader is supposed to boot the rescue system:
rauc status mark-bad rootfs.0
rauc status mark-bad rootfs.1
reboot now
Example output of rauc:
o [rootfs.1](/dev/sda5, ext4, inactive) bootname: B
boot status: bad
o [rootfs.0](/dev/sda4, ext4, booted) bootname: A
mounted: /
boot status: bad
Customizations
The configurations can be customized by applying or patching the following files:
The GRUB bootloader has a configuration file which describes which partitions are bootable, which partition they are located at and a reference to RAUC’s slot name.
The configuration also contains RAUC specific logic and variables required for a proper integration. Please see the full grub.cfg in the source repository and RAUC Documentation - Integration - GRUB for details.
Excerpt:
...
menuentry "SDV Slot A (OK=$SDV_A_OK TRY=$SDV_A_TRY)" {
linux (hd0,4)/boot/bzImage root=/dev/vda4 $CMDLINE rauc.slot=SDV_A
}
menuentry "SDV Slot B (OK=$SDV_B_OK TRY=$SDV_B_TRY)" {
linux (hd0,5)/boot/bzImage root=/dev/vda5 $CMDLINE rauc.slot=SDV_B
}
U-Boot Bootloader Configuration
Similarly to GRUB, integration of RAUC with U-Boot requires custom boot scripting. A highly detailed explaination can, again, be found in the official RAUC Documentation - Integration - U-Boot.
Meta-Leda provides such integration recipes and scripts for all U-boot based targets, for which a Leda Quickstart image is available (qemuarm64, qemuarm and rpi4-64). For example:
Note: A custom U-Boot device defconfig might be required for some devices to be integrated with RAUC. Leda Quickstart images patch the default defconfigs for qemuarm64 and qemuarm to save the U-Boot environment in a VFAT BOOT partition.
Disk Partitioning with OpenEmbedded Image Creator (WIC)
The OpenEmbedded Image Creator is used in BitBake to actually create full disk images with multiple partitions.
These disk images are machine specific and the structure of the partitions are configured in OpenEmbedded Kickstart files (*.wks).
Excerpt qemux86-grub-efi.wks
Note: The excerpt is exemplary, please see the sources for a full representation and documentation.
bootloader --ptable gpt
part --fixed-size 50M --source rawcopy --sourceparams="file=efi-boot.vfat" --fstype=vfat --label boot --active
part --fixed-size 10M --source rawcopy --sourceparams="file=grubenv.vfat" --fstype=vfat --label grubenv
part /rescue --source rootfs --fstype=ext4 --label rescue
part / --source rootfs --fstype=ext4 --label root_a
part / --source rootfs --fstype=ext4 --label root_b
part /data --fixed-size 4G --fstype=ext4 --label data
3.4.3 - API Reference
The self update agent (SUA) is a component responsible for the OS Update process
SUA is communicating on MQTT interface via usage of defined messages. Internally, SUA uses RAUC to perform the update
Following sequence diagram shows the happy path example of communication between components.
Process Overview
sequenceDiagram
participant m as MQTT Broker
participant s as SUA
participant r as RAUC
s -->> m: connect
loop Wait for OTA trigger
Note left of s: Initial start
s ->> m: Current state (installed version from booted partition)
Note left of s: Trigger for OTA
m ->> s: Desired state request (new version and url to bundle)
s ->> m: Feedback (update actions are identified)
Note left of s: Command for Download
m ->> s: Download command
s ->> s: Download bundle
s ->> m: Feedback (downloading/downloaded/failed)
Note left of s: Command for Update
m ->> s: Update command
s ->> r: Flash image to partition
r ->> r: Flashing...
s ->> m: Feedback (updating with percentage)
r ->> s: Flash completed/failed
s ->> m: Feedback (updated/failed)
Note left of s: Command for Activate
m ->> s: Activate command
s ->> r: Switch partitions (booted <-> other)
r ->> s: Switch completed/failed
s ->> m: Feedback (activated/failed)
Note left of s: Command for Cleanup
m ->> s: Cleanup command
s ->> s: Remove temporary files
s ->> m: Cleanup completed + status from previously failed state (completed/failed)
end
stateDiagram
Uninitialized --> Connected: Connected
Connected --> Identified: Start (OTA trigger)
Identified --> Downloading: Command download
Identified --> Failed: If OTA trigger is invalid
Downloading --> Updating: Command update
Downloading --> Failed: If download has failed
Updating --> Activate: Command activate
Updating --> Failed: If update has failed
Activate --> Cleanup: Command cleanup
Activate --> Failed: If activate has failed
Failed --> Cleanup: Command cleanup
Cleanup --> Idle
Important: Uninitialized state is the default entry state or state in case connection is lost.
To simplify reading of the diagram arrows from other states to Unitialized have been removed.
MQTT communication is done over 5 MQTT topics:
Trigger OTA
Topic
Direction
Description
selfupdate/desiredstate
IN
This message triggers the update process
The payload shall contain all data necessary to obtain the update bundle and to install it
Trigger self-update step/action
Topic
Direction
Description
selfupdate/desiredstate/command
IN
This message triggers the single step in update process (download/flash/activate/cleanup)
Report current state
Topic
Direction
Description
selfupdate/currentstate
OUT
This message is being sent either once on SUA start or as an answer to response received by selfupdate/currentstate/get
It contains information about the currently installed OS version
Get current state
Topic
Direction
Description
selfupdate/currentstate/get
IN
This message can be received at any point of time
Indicates that SUA should send back the version of the installed OS as current state.
Report status of self-update process
Topic
Direction
Description
selfupdate/desiredstatefeedback
OUT
This message is being sent by SUA to share the current progress of the triggered update process
This is the OUT counterpart of selfupdate/desiredstate input message
Checkout
SUA links to some 3rd party libraries, which are fetched as submodules, therefore the cloning shall be performed with recursive option:
Leda is using Kanto Container Management as the upper-layer container runtime and container orchestration engine.
Besides the command line tool kanto-cm, Kanto also has remote interfaces to manage containers.
Remote Interface
Kanto’s container-management service offers a remote interface via local messaging (MQTT) to interact with a digital twin on the cloud side.
This feature can be easily enabled by setting "things": { "enabled": true } in /etc/container-management/config.toml.
When one of the cloud connector components, such as leda-contrib-cloud-connector or Kanto’s azure-connector, is connected to a cloud backend, the container-management will publish its own information using Eclipse Ditto and Eclipse Hono messages. For this, container-management only needs the device Id, gateway Id and tenant Id.
3.5.1 - Cloud Connectivity
Simulation of cloud connectivity
Container Management starts and subscribes to edge/thing/response
Cloud Connector starts and publishes the following message to edge/thing/response as soon as the connection is online:
namespace is azure.edge for Kanto’s Azure Cloud Connector
gatewayId indicates the hostname of the Azure IoT Hub
deviceId is the identifier for the device, this can either be part of the Azure Connection String or part of the device authentication certificate (CN)
tenantId is a configuration setting in the cloud connector
Note: You can simulate the cloud connector trigger by issueing the MQTT message manually on command line:
The container update agent is a component of kanto container management, that can be enabled in the Container Management’s config.json.
When it receives a desired state message on the containersupdate/desiredstate topic it compares the containers (with their current versions and configuration)
that are managed by Kanto Container Management and those described in the desired state messages. When it has identified the differences between the two,
it resolves them by deleting, downloading, or re-creating containers.
The desired state message
A basic desired state message has a similar structure to all update messages. To deploy the hello-world docker container (removing all other containers
currently deployed on the device), you can publish the following desired state message:
You can configure port mappings, environment variables, device mapping, logging, and more, by adding additional key-value pairs
to the “config” array of the given container. For example, if you want to set the environment variable FOO="BAR" inside the container, you can
specify:
A full list of all key-value pairs with their defaults can be found in this doc for CUA.
System containers
If a container is not specified in the desired state message, it would be deleted by CUA when the message is received. This might be undesirable for containers
that are supposed to run as system services from the first boot of the device through its operation. Such a container might be the Self Update Agent container
on the Leda Distro image, which we do not want to specify in every desired state message and deleting/recreating-it during an update might lead to unexpected behaviour.
That’s why in Container Management’s config.json
in the CUA section, you can specify in the “system_containers” array the names of those containers that would like to be treated as such.
MQTT Topics
Since the MQTT interface of the update agent is abstract, the following message flows are similar to those for the self-update agent mentioned in its tutorial
Getting the current state
On initialization, CUA will publish the current state of all containers on the containersupdate/currentstate topic,
the activityId for such a message would be initial-current-state-<TIMESTAMP>. This message can be understood as the “current container inventory”.
An example inventory from a running Leda image is currentstate-leda.json.
You can request an update of the current state at any point by publishing an empty message on the: containersupdate/currentstate/get:
The updated inventory will, again, be published on the containersupdate/currentstate topic with correlation ID of <UUID>.
Deploying a desired state message
A desired state message describing the containers and their environments of a typical Leda Distro deployment is leda-desired-state.json.
To trigger a desired state deployment directly from CUA, publish the message above on containersupdate/desiredstate, e.g. by running:
You can monitor the update feedback from CUA, by listening on the topic containersupdate/desiredstatefeedback.
Note: Since the desired state feedback can be quite verbose and happens in real time during the update it could be hard to understand manually.
However it’s structured json, so it could be easily machine-parsed and monitored for specific key-value pairs.
3.5.3 - Orchestration
Container Management
The container management will respond to the cloud connectivity status message by initially sending a list of containers:
Container Management responds with a list of containers in the topic e/<tenantId>/<gatewayId>:<deviceId>:edge:containers
Container-level metrics, such as CPU utilization or memory usage, can be retrieved on-demand and continuously by enabling the container metrics events.
This is done by sending a request to the topic command//<namespaceId>:<gatewayId>:<deviceId>:edge:containers/req/<correlationId>/request:
When deploying containerized applications, the container runtime will pull container images from a (remote) container registry.
The pulled container images and their layers are then stored in a local storage.
Private Container Registries
To be able to pull container images, the container runtime needs access to the container registry.
Some container registries require authentication.
The Kanto Container Manager can be configured to use credentials when accessing remote container registries.
In the Leda images, the sdv-kanto-ctl tools allows to easily add authentication to the container manager configuration:
For example, to access container images from GitHub Packages in a private repository, you need a GitHub Personal Access Token (PAT) with the read: packages scope.
Then, add the repository as shown below:
sdv-kanto-ctl will make the necessary modifications to /etc/container-management/config.json and restarts the container-management.service systemd unit,
so that the changes take effect. You may need to recreate or restart the container if a previous pull failed.
The seat adjuster is an example to showcase how to create a vehicle application which senses and actuates signals in the vehicle
for Eclipse Leda with help of Eclipse Velocitas and Eclipse Kuksa
. The aim is not to build the best available seat adjuster application possible but to show how one can use the applied technologies
to build a companion app for the interaction with a vehicle.
If you are new to the concepts around Eclipse SDV and the mentioned projects
we recommend to read the SDV Tutorial first.
Description
The idea of the seat adjuster application is to have a custom application to move the driver seat to positions defined
in a driver profile hosted by a third-party web service.
The setup contains the following components:
Cloud or mobile trigger: not part of the Leda image, but we simulate it by issuing MQTT messages
Seat Adjuster : Developed with Eclipse Velocitas to be deployed by user
Eclipse Kuksa.val - KUKSA Databroker (pre-installed with Eclipse Leda)
Mock Service: Example provider for Eclipse Kuksa.VAL which mocks the behavior of the vehicle.
Seat ECU and the separate Seat Motor hardware can be emulated using a virtual CAN-Bus, which is beyond the scope of this guide.
The seat adjuster application interacts with the vehicle through a Vehicle Abstraction Layer created by the KUKSA Databroker,
which uses the Vehicle Signal Specification (VSS)
to express the current value and in case of actuators also the desired state of the vehicle signal.
By developing against the abstraction layer, the application becomes independent from the actual physical seat.
To control the position of the driver seat, the seat adjuster sets the target value of the Vehicle.Cabin.Seat.Row1.Pos1.Position signal in the KUKSA Databroker.
The architecture assumes so-called actuation providers that apply the changes to the actual vehicle as indicated in the target value, e.g.,
through interaction with the responsible ECUs.
For this tutorial, we do not expect you to interface with an actual vehicle and thus abstract the vehicle by using the Kuksa.Val vehicle mock service.
This vehicle mock service allows the definition of behavior toward the KUKSA Databroker like we would expect from the vehicle, for example,
setting the current value after reacting to changes to the target value of a signal.
Notify subscriber of changed target Vehicle.Cabin.Seat.Row1.Pos1.Position" --> mockservice
As interface to the user, we assume a client that can, for example, be a local app in the infotainment domain with a user interface
or an off-board application sending the request from a backend.
Either way, the client controls our seat adjuster application through a JSON encoded message over MQTT using the topic setPosition/request.
The position parameter can be any value between 0 and 1000.
Getting Seat Position
When the seat moves, the provider gets this information, for example, from the seat ECU over the CAN-bus.
We use the mock service as a provider and configure it to set the current value for the Vehicle.Cabin.Seat.Row1.Pos1.Position signal in the KUKSA Databroker
after the target value for the signal changes.
To receive the changes to the seat position, the seat adjuster application already subscribed to the current value of the signals and thus gets notified.
As a result, the seat adjuster constructs a JSON message and sends the new seat position to the MQTT-topic seatadjuster/currentPosition
where any client can consume it.
The seat adjuster also sends responses to each request received at the MQTT-topic seatadjuster/request with a message to the MQTT-topic seatadjuster/response
indicating whether it accepted the incoming request and set the target value or whether there was an error like the vehicle currently moving.
We use Eclipse Velocitas to develop the seat application against the API of the Kuksa.val Databroker:
In the first step, you create a copy of the Eclipse Velocitas template repository.
You create the copy by opening the repository in GitHub and selecting: Use this template -> Create a new repository.
In the next step, you choose under which organization to place the created repository and whether it should be public.
If you set the repository to private, you have to perform additional configuration steps mentioned below.
In addition to the Python template used in this guide, there is a C++ template available.
Execute Development Container in VSCode
You then checkout the repository on your development machine and open it in VSCode. From VSCode
you can execute the development container (DevContainer) configured in the repository.
For this to function, you need to install the following tools on your computer:
In the best case, VSCode may detect that the repository contains a DevContainer configuration and ask you whether to execute it.
Alternatively, you can press F1 in VSCode and then enter DevContainers: Reopen in container to start the DevContainer.
In either case, VSCode should reopen and then connect to the DevContainer.
Because of the DevContainer, we do not need to make further modifications to the developer machine.
Develop the application
In the next step, we work on the actual application. You find the skeleton code in /app/src/main.py of the Eclipse Velocitas template and thus the DevContainer.
Eclipse Velocitas provides the code
to realize the described seat adjuster application.
One way to get the code is to use a pre-configured task in VSCode by pressing ‘F1’ and then typing ‘Run Task’.
As an alternative, you can check the latest version of the seat adjuster example code
in the Eclipse Velocitas SDK repository
in the Velocitas SDK directory.
There is a chance that the latest code for the seat-adjuster example in the main-branch of the Eclipse Velocitas SDK
is a bit different compared to the code snippets below.
Let us walk through some lines of the code where the logic is in the vapp.py while the entry point is in main.py.
In the on_start(self) function we subscribe to any changes of the current value of the VSS signal Vehicle.Cabin.Seat.Row1.Pos1.Position in the KUKSA Databroker.
asyncdefon_start(self):"""Run when the vehicle app starts"""awaitself.Vehicle.Cabin.Seat.Row1.Pos1.Position.subscribe(self.on_seat_position_changed)
When the seat position changes, the on_seat_position_changed function is triggered and publishes the new seat position value as MQTT-message to the topic seatadjuster/currentPosition.
In addition, we have the function on_set_position_request_received which is triggered for every MQTT-message to the topic seatadjuster/setPosition/request.
If the vehicle speed is zero, meaning that the vehicle does not move, we set the target value in the KUKSA Databroker for the position signal of the seat
to the value requested in the incoming MQTT message.
The get() and set() functions are created based on a VSS model, and we assume that the KUKSA Databroker instance uses the same VSS model.
In many cases, like the default Eclipse Leda, one may rely on the upstream VSS model, but some scenarios require further signals, e.g., by applying an overlay.
You can configure the used VSS model in the app/AppManifest.json file. This file includes an interface definition with the entry for the default vehicle_signal_interface.
The VSS signals in this guide are part of VSS in version 3.0.0.
The DevContainer generates the respective Eclipse Velocitas SDK based on this configuration.
For more details see the Eclipse Velocitas Model Generator.
At this point, you may wonder how the application actually knows to which MQTT broker to connect and where to find the correct instance of the KUKSA Databroker.
This service discovery is abstracted within the Velocitas SDK and involves the usage of so-called middleware to find and call the other components.
As of writing this page, Eclipse Velocitas supports DAPR as middleware or uses the native approach to configure the correct address directly.
The details of how to set and configure the used middleware are part of the deployment.
Signal Description: The signal indicates the seat position on the vehicle x-axis, where the value 0 is the frontmost position supported by the seat.
The value is the distance measured in millimeters.
The example implementation supports values between 0 and 1000 millimeters.
Note: This range of valid values is not reflected in the standard Vehicle Signal Specification. OEMs would overlay the VSS tree with actual Min/Max values,
depending on the seat hardware available in the vehicle model.
Start Runtime in DevContainer to test application
You may skip the application testing since we already provide the example code.
But it still makes sense to get a general idea of how to test and debug the code with the tooling in the DevContainer.
As mentioned before, the execution and, thus, the testing of the application requires a set of other components to be available
like the KUKSA Databroker or an MQTT-broker.
Furthermore, the deployment, the configuration, and the behavior of the application may change depending on the used (container) management solution.
Therefore, Eclipse Velocitas allows the deployment of the required components and the application with the container management approach of choice inside the DevContainer.
We use the Eclipse Kanto runtime here since we later deploy the seat adjuster application to Eclipse Leda, which uses Eclipse Kanto for container management.
Once the runtime is available, we add our application by executing:
You can now test the application by interacting with it through the local MQTT broker.
To send and receive MQTT messages, use the VSMQTT plugin with a cloud icon
in the left side of the VSCode instance connected to the DevContainer.
We do not get into details for the topics and messages here since we will run the application in Eclipse Leda again later in this guide.
Once you finish the application testing and development, you can shutdown the runtime with:
velocitas exec runtime-kanto down
Eclipse Velocitas provides Tasks to abstract the mentioned calls of the velocitas CLI. As an alternative you can thus press F1 -> Run Task
and scroll for the respective task like Kanto runtime Up.
Commit and Release Application
When you are confident about the application, you want to be able to distribute it.
Here, pre-configured workflows from Eclipse Velocitas for GitHub Actions are helpful.
You now commit your changes and push them to your copy of the Eclipse Velocitas template repository in GitHub.
Before you create the commit, we recommend running the pre-commit task, which performs similar checks and linting as the CI workflow from Eclipse Velocitas.
You can trigger the pre-commit as a task in VSCode:
Press F1
Write Tasks: Run Task and press enter
Write Pre Commit Action and press enter
The pre commit action should start in a terminal inside VSCode.
You can check the available tasks configured by Eclipse Velocitas in .vscode/tasks.json.
If the pre-commit was successful, you may push your changes and open the repository in the browser.
In the meantime, the push should trigger the CI workflow and the Build multiarch image workflow, which you can track in the Actions tab.
If you set your copy of the template repository to private, the CI workflow may fail due to missing permissions to write container images to GitHub packages.
You can grant more Workflow permissions in the Settings tab of the repository under Actions-> General.
To deploy your application to a target and if the two workflows have finished successfully, you can perform a release in GitHub.
The subsequent release workflow will make the application available as a built container in the container registry of GitHub (Code -> Packages).
To do the release in GitHub, go to the Code tab and click Releases on the right side of the page.
Then you can Draft a new release, create a new tag and title for the release, and click Publish Release, which triggers the Release workflow.
We now want to deploy the application to a target device.
You may follow the remainder of this guide on a separate device like a RaspberryPi, but you can emulate such a device on your development machine too.
Either way, we use Eclipse Leda in version 0.1.0-M2 as the target system, which is a Linux-based distribution with pre-installed SDV components like the KUKSA Databroker
and Eclipse Kanto for container management.
For more details on how to download and run Eclipse Leda, follow the respective guides:
We recommend to get started with the QEMU setup.
In any case, you now need to configure Eclipse Kanto to execute the application.
For this, it helps to get an overview of which containers are currently running in Eclipse Kanto. You can get this either through the command:
kantui
or
kanto-cm list
From this list, ensure that at least the KUKSA Databroker runs, which should be the case since it is are pre-configured
with the Eclipse Leda release.
In Eclipse Kanto, you can manage a container with the command line application kanto-cm or container manifest files describing a desired container execution.
The advantage of using the container manifests is that the configuration is persisted across a reboot of the system and is easier to use
to describe a desired software state for the overall vehicle.
Eclipse Leda has the kanto-auto-deployer systemd service, which applies any changes to the manifests in /data/var/containers/manifests to Eclipse Kanto.
Thus, the typical way to add or adapt containers is to modify the corresponding container manifest.
Disable other containers
The release 0.1.0-M2 of Eclipse Leda comes with a number of pre-configured and automatically executed containers.
One of these containers is the feedercan that feeds changing values from a recording for signals such as Vehicle.Speed to the KUKSA Databroker.
These values interfere with the seat adjuster application, which only moves the seat if the vehicle speed is zero.
Another interfering container is the seatservice-example which reacts to changes in the signal Vehicle.Cabin.Seat.Row1.Pos1.Position
and which we replace later with the mock service.
Therefore, we need to stop the feedercan and the seatservice-example container.
This is possible in kantui by selecting the respective entry and pressing R.
In addition, you need to remove the corresponding container manifests in /data/var/containers/manifests to avoid that the Eclipse Kanto
auto-deployer re-deploys these containers. Another approach is to change the ending of the not-needed manifests to something other than .json.
If the feedercan container still runs, the seat adjuster application app will later respond with the following error message:
seatadjuster/setPosition/response{"requestId":"12345","result":{"status":1,"message":"Not allowed to move seat because vehicle speed is 9.0 and not 0"}}
Since they consume resources and are not needed for the seat adjustment, you may remove the containers and manifests for cloudconnector,
hvacservice-example, sua, or vum as well.
As an alternative to using kanto-cm, you can add a container manifest to the directoy watched by the kanto-auto-deployer (data/var/containers/manifests).
To add the container manifest, create a new file inside this folder.
touch seat-adjuster.json
nano seat-adjuster.json
and copy the manifest from below. You can save the file with strg+s and close the window with strg+q.
You can create the file on the development machine and copy it via scp too:
The example deployment descriptor below is available in
meta-leda-components
too.
An interesting aspect of the snippet is the config.env section at the bottom of the container manifest.
There, we define a number of environment variables for the container
which configures the Eclipse Velocitas SDK to use the native middleware and where to find the MQTT-broker and the KUKSA Databroker to use.
We did the same in kanto-cm call behind the parameter --e=.
If the GitHub packages in which you stored the container image are private, Eclipse Kanto needs a valid access token to download the container image.
You can create a personal access token in the Developer Settings of your GitHub account. Select Personal access token -> Tokens (classic)
and generate a new token that at least has the read:packages permission. Copy the generated token to a secure location or to Eclipse Kanto
because GitHub will not show it again.
You can now configure Eclipse Kanto in Eclipse Leda to use the token by executing:
sdv-kanto-ctl add-registry -h <registryhostname> -u <your_username> -p <your_password>. In the case of GitHub, the registryhostname is ghcr.io
, the username is your GitHub handle, and the password is the generated token.
See Container Registries for more details.
To make sure that Eclipse Kanto detects the changes in the manifests folder, you can restart the respective system services:
systemctl restart kanto-auto-deployer
Mock Service
As explained in the description of the code, the seat adjuster application sets the target value for the seat positions in the KUSKSA Datbroker
and waits for the current position to update.
For this to function, there needs to be a component that reacts to this change by moving the seat and updating the current value accordingly.
Because we cannot assume that you have an actual ECU availabe for running this guide, we mock the vehicle behavior
with the vehicle mock service from the Eclipse Kuksa project.
The mock service allows the definition of custom interaction sequences with the KUKSA Databroker. For instance, one can react to changes to specific signals
or update signals with a time trigger. You can define the sequences in a Python file like the example mock.py below.
The snippet shows how to use a change to the target value for the seat position signal as a trigger to update the current value to the target value step-wise
over a duration of 10 seconds.
For the deployment, you create another container manifest in /data/var/containers/manifest with the content from below.
The container manifest also mounts a custom mock.py into the container to replace the configuration of the default mock.py.
With the container manifest below, Eclipse Kanto instead mounts from /data/var/mock/mock.py.
Therefore, you need to create this directory and the file with the content from below.
You may now check with kantui or kanto-cm list whether all components (databroker, seatadjuster-app, and mock-service) are running well.
The next step is to interact with the seat adjuster.
seat-application.json
This is the Eclipse Kanto container manifest for the seat adjuster application.
The container manifest for the mockservice may look like the following snippet. Note, that the files referenced in the source of the mount_points
needs to be present in the file system of your Eclipse Leda instance.
We interact with the seat application through MQTT messages to emulate the behavior of an offboard application.
To see the responses from the seat adjuster app, subscribe to the MQTT topic `seatadjuster/#``.
mosquitto_sub -t 'seatadjuster/#' -v
To initiate the moving of the seat, publish an MQTT message for the seat adjuster application to set the position to 1000 (which is the equivalent of 100%):
You may need to open a second terminal session to send the message.
In the QEMU setup, you can do this through an SSH connection from the host machine by running ssh -p 2222 root@localhost.
After publishing the setPosition-message, the expected output for the seatadjuster/# subscription should look like this:
If you encounter an issue or want to look deeper into the state of the container, you can check the logs by executing:
kanto-cm --name <container-name> logs
Run Kuksa Client
Besides trusting the log information and the MQTT messages that the seat position in the KUKSA Databroker has changed you can read the values
directly from the KUKSA Databroker with the KUKSA Client.
Through the sdv-ctr-exec it becomes possible to interact with the CLI of the Eclipse KUKSA Client:
Congratulations, you have reached the end of the seat adjuster guide. Based on the used code, you can now continue to realize other applications by using other signals.
You may need to adapt your mock.py accordingly.
In addition, you can connect the seat service to a CAN-environment.
Within the seat adjuster guide, we so far mocked the behavior of the actual vehicle.
In the following, we give an overview of how to create a virtual CAN-bus and interact with it to send CAN-frames for moving a seat.
Instead of the mock service you use the seat service as a provider, which is another pre-installed container
acting as the connection between the KUKSA Databroker and the underlying hardware.
More specifically, it subscribes to the target value of the Vehicle.Cabin.Seat.Row1.Pos1.Position signal,
can send CAN-frames, and updates the current value of the signal in small steps until it is equal to the target value.
For more details, visit the Kuksa.val.services repository,
which hosts the code for the seat service.
With a new installation of Eclipse Leda, the seat adjuster comes by default.
If you performed the steps from the deploy the seat adjuster in Eclipse Leda guide,
you need to re-add the seatadjuster container manifest and remove the mockservice.
More details on how to do this are available in that guide.
The default configuration of the Seat Service is using simulated VCAN. If you want to switch to a physical CAN-Bus interface,
the container needs to have access to the CAN-Bus hardware.
Such a CAN-Bus device might be a Raspberry Pi setup with an MCP251x-based CAN-Hat extension or a QEMU image with an emulated kvaser_pci device
(enabled on the Leda QEMU Quickstart images by default).
This setup would require some adjustments to the container manifest in order for the container to have access to the physical CAN-Bus.
Make Seat Service container privileged and run on the host network interface:
Remove all port mappings and extra hosts (set "extra_hosts": [] and "port_mappings": []) for the container as it’s now running in host-networking mode
(host_ip variable no longer available) and all ports are directly exposed.
Set the address to the databroker to localhost:30555:
Attention: Safety considerations are not in scope for this example tutorial. This example is for demonstrating the general approach.
Actual safety requirements must be handled within the Seat ECU as the lowest level component to guard against non-safe use of the seat motors.
Non-ASIL domains are not certified for safety requirements. Please pay attention when following the physical CAN tutorial and attaching physical actuators to
not harm anybody by accidental movements of seat motors or any other actuator.
However, the Seat Adjuster example application contains a rudimentary “Safe State” condition check: it will only allow to move the seat
when the vehicle is not moving.
The condition is using VSS path notation: Vehicle.Speed == 0 (see main.py#L82 in v0.9.0)
Note: The Kuksa.VAL CAN Feeder, which is deployed by default on Eclipse Leda is constantly updating the Vehicle.Speed
You need to disable the feedercan container (see step 7 of Getting started), otherwise the Seat Adjuster application
will decline the request and not move the seat.
In the Dog Mode use case, an existing vehicle service (such as HVAC for Heating, Ventilation and Air Conditioning) is used for another use case.
When a driver enables the dog mode, the vehicle will keep the climate in a status to accomodates the pet while the driver is gone for a few minutes.
The focus on this example is to show how an additional application can reuse existing functionality for new use cases. The vehicle service being used does not need to be adapted for the new use case. The new use case is deployed as an additional functionality, separated from the rest of the existing system.
Architecture Overview
Cloud or mobile trigger: not part of the Leda image, but can be simulated by issueing MQTT messages
Eclipse Velocitas - Vehicle Application: Dog Mode (to be deployed by user as part of the Velocitas tutorial)
Eclipse Kuksa.VAL - Example Service: HVAC Service (pre-installed)
Eclipse Kuksa.VAL - Data Broker (pre-installed)
Getting started
Follow the Velocitas tutorial: build and deploy your clone of the dog mode example
Download and run the Leda quickstart image
Deploy the application to the container runtime, either manually by using kanto-cm create or by providing a deployment descriptor in /var/containers/manifests. An example deployment descriptor can be found in meta-leda-components. Details on the deployment can be found in Leda Vehicle Applications
Ensure the databroker and the service containers are running and you know how to check their log files
To generically interact with the Vehicle Signals which are managed in the Eclipse Kuksa.VAL Databroker,
you can either use the natively installed databroker-cli command line tool, or use the CLI tool from an updated and released containerized image.
Kuksa Databroker CLI
To install a new version of the Kuksa Databroker CLI container, follow these steps:
However, if you want to add additional custom signals or mappings from CAN-Bus for the
Kuksa.VAL dbc2val feeder,
the VSS data model needs to be customized and regenerated.
The following steps can be performed on a development machine to regenerate VSS data model with custom a vspec mapping.
Concepts
Setup workspace
Defining the VSS Overlay
Regenerate VSpec JSON
Generate a candump
Databroker and dbc2val containers
Testing with data
Concepts
VSS Overlay
The VSS Overlay concept allows to override the
standard signals in the specification with custom signals. It defines metadata attributes like signal name, datatype, description etc.
In addition, the vspec file allows to add custom metadata, such as the dbc node in the following example:
You need the following files in your workspace folder:
./custom.dbc - The vehicle-specific DBC file.
You can use the Tesla Model 3 example
or check out the opendbc project.
./custom.vspec - The VSS overlay from the previous step
Defining the VSS Overlay
The definition of an VSS overlay is a manual process.
It requires research, browsing the existing VSS catalog and deep knowledge of the vehicle signals.
Especially knowing the semantic of a signal and how to map it between DBC and VSS is a complex task.
Note: The Leda team is not aware of any advanced tooling to support the automation of this task.
Create a new file custom.vspec. Use YAML format
For each identified signal:
Look up if there already is a corresponding signal in VSS. You may use the Digital.Auto Playground or the spec directly.
Add a new top-level entry to the custom.vspec file. The key is the full VSS path name in dot notation.
Add the corresponding dbc node
Add the signal attribute and enter the name of the CAN-Bus signal name in the DBC
Add additional attributes such as interval_ms, message or transform.
Note: The attributes signal, interval_ms and transform are evaluated by dbc2val.
The attribute message is only evaluated by the below demo script and is optional.
Example:
# CAN Message: Kombi_01Vehicle.Speed:type:sensordatatype:floatdbc:message:Kombi_01signal:KBI_angez_Geschwinterval_ms:1000# CAN Message: FS_Position_01Vehicle.Cabin.Seat.Row1.Pos1.Position:type:sensordatatype:floatdbc:message:FS_Position_01signal:FSS_Laenge_Posinterval_ms:1000
These two extensions will be added to the combined VSS tree:
Regenerating VSpec
The script vspec2json.py from COVESA VSS Tools can then be used to merge the overlay file with the standard specification.
For Leda devices, you can use kanto-cm to run the tool as a container:
# Copy custom.dbc and custom.vspec to /home/root# Run in /home/rootkanto-cm create --name vspec2json --rp no --mp="/home/root:/data" ghcr.io/eclipse-leda/leda-vss-vspec2json:main
kanto-cm start --a --i --name vspec2json
For developer workstations, there is a convenient pre-built Docker container:
docker run --name vspec2json --rm -v `pwd`:/data ghcr.io/eclipse-leda/leda-vss-vspec2json:main
Or, if you want to run vspec2json from the sources, clone the repository and invoke it like this:
With the resulting file custom_vss_dbc.json and the corresponding DBC file, the dbc2val feeder can relay the signals to the databroker.
dbc2val can either read from a CAN-Dump file (generated by candump from can-utils) in an endless loop, or can listen on actual virtual or physical CAN interfaces.
The output should look like this:
$ ls
custom.dbc custom.vspec
$ docker run --name vspec2json --rm -v `pwd`:/data ghcr.io/eclipse-leda/leda-vss-vspec2json:main
INFO Output to json format
INFO Known extended attributes: dbc
INFO Added 54 units from /vss/spec/units.yaml
INFO Loading vspec from /vss/spec/VehicleSignalSpecification.vspec...
INFO Applying VSS overlay from /data/custom.vspec...
INFO Autocreating implicit branch Vehicle
INFO Autocreating implicit branch Cabin
INFO Autocreating implicit branch Seat
INFO Autocreating implicit branch Row1
INFO Autocreating implicit branch Pos1
INFO Calling exporter...
INFO Generating JSON output...
INFO Serializing pretty JSON...
INFO All done.
$ ls
custom.dbc custom.vspec custom_vss_dbc.json
Databroker Container
Ensure the databroker container is up and running:
On developer workstation:
docker run --name databroker --detach --rm -p 55555:55555/tcp ghcr.io/eclipse/kuksa.val/databroker:0.3.1
On Leda device (if not already running)
kanto-cm start --name databroker
Testing with data
To see actual data, we need to use the candump or another CAN source and feed that data into the databroker.
After that is running, we can use the databroker-cli tool to subscribe to the example VSS signals.
Generate a candump
To generate a candump for testing purposes, start the candump tool and listen for some packets.
In the following example, the first 20 CAN frames are being recorded and the command will exit.
candump -L -n 20 vcan0 > candump.log
If you do not have an external CAN source, you may want to simulate CAN frames.
There is a Python library for parsing DBC files, which also let’s you encode and send the actual CAN messages.
An example script could look like this:
Note: Due to GPL-3 licensing, the Leda quickstart image does not contain some Python standard libraries. This script will not run on a Leda quickstart image.
import random
import timefrom pprint import pprint
import yaml
import cantools
import can
can_bus= can.interface.Bus('vcan0', bustype='socketcan')db= cantools.database.load_file('custom.dbc')with open("custom.vspec", "r") as stream:
try:
vspec= yaml.safe_load(stream)for key in vspec:
message_name=vspec[key]['dbc']['message']signal_name=vspec[key]['dbc']['signal']example_message= db.get_message_by_name(message_name)# Initialize an empty messagedata={}for signal in example_message.signals:
data[signal.name]= False
pprint("Message: %s" % example_message)# Send 10 frames with random datafor x in range(10):
data[signal_name]= random.uniform(0,100)encoded_data= example_message.encode(data)message= can.Message(arbitration_id=example_message.frame_id, data=encoded_data) pprint("CAN Frame: %s" % message) can_bus.send(message)# Wait up to 1 second time.sleep(random.random()) except yaml.YAMLError as exc:
print(exc)
# CAN must be set up up front, e.g.# modprobe vcan# ip link add dev vcan0 type vcan# ip link set vcan0 upkuksa.val.feeders/dbc2val/dbcfeeder.py \
--canport vcan0 \
--use-socketcan \
--server-type kuksa_databroker \
--dbcfile /custom/custom.dbc \
--mapping /custom/custom_vss_dbc.json
dbc2val on Leda device
To run the dbc2val feeder on Leda, you can use kanto-cm (instead of docker) to create the respective containers.
Note: Due to Issue #73,
the container ghcr.io/eclipse/kuksa.val.feeders/dbc2val:v0.1.1 cannot be used with SocketCAN.
Please use a later release or build the container from the sources after fixing the bug.
Alternatively, use the candump file instead of SocketCAN.
Remove any existing dbc2val container:
kanto-cm remove --force --name dbc2val
Create the new container in Kanto Container Management:
Note: The host networking and privileged is used to allow the container access to the CAN sockets.
Start the container:
kanto-cm start --a --i --name dbc2val
Check the logs to verify container is running:
kanto-cm logs --name dbc2val
Querying via CLI
To be able to see the changes, you may want to use the Kuksa Databroker CLI:
docker run --rm -it --network host ghcr.io/eclipse/kuksa.val/databroker-cli:0.3.1
Now, depending on the way how the dbc2val feeder has been started (candump vs. socketcan), you will either already see data from the candump loop.
4.4 - CarSim
The CarSim example provides basic Vehicle Signals based on a physical model simulation and feeds them to the databroker.
Architecture Overview
Description
CarSim is a simple physical model implementation, based on the kinematic bicycle model.
It can be used as a mock implementation in development, testing and simulation scenarios.
It takes three external inputs:
accelerator position
brake position
steering wheel angle
It propagates the physical model in time with a pre-defined step interval (10ms), recalculates the acceleration components,
speed and position, and finally publishes the numeric values as standard VSS datapoints to the databroker.
To simulate the input from a human driver, the optional DriverSim component can be run in parallel.
DriverSim toggles between two different types of driver style in a pre-defined time interval:
Good driver - slowly accelerates and moves the steering angle accordingly and then slowly brakes.
Bad driver - accelerates hard (full throttle), moves the steering wheel randomly in both directions, brakes hard.
Background
Decoupled Design
CarSim and DriverSim only communicate through the databroker by using standardized Vehicle Signals.
Each component can be replaced individually at runtime, e.g. by more advanced or real implementations.
There is no need to adapt, recompile or redeploy any of the other applications.
This is important for decoupling and standardizing vehicle signals,
to enable future vehicle application platforms to evolve.
Loose coupling and standardizing of vehicle signal interfaces enable thirdparty applications to use signals
in higher-level applications or value-add services.
Both implementors (imagine separate organizations), can agree to use the Vehicle Signal Specification
to decouple the development lifecycle for vehicle applications and vehicle services. This decoupling approach
reduces the time and effort for proprietary design specifications processes tremendously.
Vehicle Signals
The CarSim application reads the following input signals from the databroker:
For local deployment without a cloud backend, deployment specifications for Eclipse Velocitas Vehicle Apps may be put directly onto the device.
Create a Kanto deployment specification for your vehicle app. You may copy one of the existing JSON files in /data/var/containers/manifests as a template
Copy the specification file to the device, e.g. scp -P 2222 myapp.json root@localhost:/data/var/containers/manifests/
Apply the specification: systemctl restart kanto-auto-deployer
To update an existing container when the configuration has changed, delete the container and restart kanto-auto-deployer:
Attention: The current implementation requires all fields to be present in the JSON, even if the values are not set or used. Do not remove any fields, as it may break the functionality.
In order to verify that the device and the cloud connector can successfully receive messages sent by the cloud backend, we will send a dummy message to the device.
First, let’s check that the cloud connection is active.
Login as root
Run sdv-health and check for the SDV Connectivity section:
sdv-health
Start watching the output of the cloud connector:
kantui
Select the cloud-connector container and press L to watch the logs
Note: When an unknown type of message is received, the cloud connector will log an error:
2022/04/13 16:04:41.911727 [agent] ERROR Handler returned error err="cannot deserialize cloud message: invalid character 'H' looking for beginning of value
Start watching on the MQTT message broker:
mosquitto_sub -h localhost -t '#' --pretty -v
Note: When a known type of message is received, the cloud connector will forward the message to the MQTT broker into the corresponding topic $appId/$cmdName
Sending a Device Message
Go to the Web Console of Azure IoT Hub
Select the device
Click on “Send Message”
Enter a C2D payload and click “Send”
Alternatively, on command line, use the Azure CLI client. Replace DeviceId and IotHubName with the appropriate names of your IoT Hub and device.
Vehicle.IsBrokenDown (Vehicle breakdown or any similar event causing vehicle to stop on the road, that might pose a risk to other road users. True = Vehicle broken down on the road, due to e.g. engine problems, flat tire, out of gas, brake problems. False = Vehicle not broken down.)
Vehicle.IsMoving (Indicates whether the vehicle is stationary or moving.)
Vehicle.PowerOptimizeLevel (Power optimization level for this branch/subsystem. A higher number indicates more aggressive power optimization. Level 0 indicates that all functionality is enabled, no power optimization enabled. Level 10 indicates most aggressive power optimization mode, only essential functionality enabled.)
Do you think this Vehicle Signal specification needs enhancement? Do you want to discuss with experts? Try the following ressources to get in touch with the VSS community:
The UUID for Vehicle.Connectivity is 89c267fccea35f3da9871cca2b4dc4df
Children
This vehicle signal is a branch or structure and thus has sub-pages:
Vehicle.Connectivity.IsConnectivityAvailable (Indicates if connectivity between vehicle and cloud is available. True = Connectivity is available. False = Connectivity is not available.)
Feedback
Do you think this Vehicle Signal specification needs enhancement? Do you want to discuss with experts? Try the following ressources to get in touch with the VSS community:
Indicates if connectivity between vehicle and cloud is available. True = Connectivity is available. False = Connectivity is not available.
Comment:
This signal can be used by onboard vehicle services to decide what features that shall be offered to the driver, for example disable the ‘check for update’ button if vehicle does not have connectivity.
Navigation
flowchart LR
Vehicle-->Connectivity
Connectivity-->IsConnectivityAvailable
$ databroker-cli
sdv.databroker.v1 > connect
[connect] OK
sdv.databroker.v1 > get Vehicle.Connectivity.IsConnectivityAvailable
[get] OK
Vehicle.Connectivity.IsConnectivityAvailable: ( NotAvailable )sdv.databroker.v1 > set Vehicle.Connectivity.IsConnectivityAvailable false[set] OK
Digital Auto: Playground
playground.digital.auto provides an in-browser, rapid prototyping environment utilizing the COVESA APIs for connected vehicles.
The UUID for Vehicle.Connectivity.IsConnectivityAvailable is b6d11be2a6565996b68ffb07a96595a7
Feedback
Do you think this Vehicle Signal specification needs enhancement? Do you want to discuss with experts? Try the following ressources to get in touch with the VSS community:
Do you think this Vehicle Signal specification needs enhancement? Do you want to discuss with experts? Try the following ressources to get in touch with the VSS community:
$ databroker-cli
sdv.databroker.v1 > connect
[connect] OK
sdv.databroker.v1 > get Vehicle.Exterior.AirTemperature
[get] OK
Vehicle.Exterior.AirTemperature: ( NotAvailable )sdv.databroker.v1 > set Vehicle.Exterior.AirTemperature 0[set] OK
Digital Auto: Playground
playground.digital.auto provides an in-browser, rapid prototyping environment utilizing the COVESA APIs for connected vehicles.
The UUID for Vehicle.Exterior.AirTemperature is a38d3f5dfeb35317aca8b90453dc1a75
Feedback
Do you think this Vehicle Signal specification needs enhancement? Do you want to discuss with experts? Try the following ressources to get in touch with the VSS community:
$ databroker-cli
sdv.databroker.v1 > connect
[connect] OK
sdv.databroker.v1 > get Vehicle.Exterior.Humidity
[get] OK
Vehicle.Exterior.Humidity: ( NotAvailable )sdv.databroker.v1 > set Vehicle.Exterior.Humidity 0[set] OK
Digital Auto: Playground
playground.digital.auto provides an in-browser, rapid prototyping environment utilizing the COVESA APIs for connected vehicles.
The UUID for Vehicle.Exterior.Humidity is 6c785ec5d9a5534f98be7ce198d25d6b
Feedback
Do you think this Vehicle Signal specification needs enhancement? Do you want to discuss with experts? Try the following ressources to get in touch with the VSS community:
$ databroker-cli
sdv.databroker.v1 > connect
[connect] OK
sdv.databroker.v1 > get Vehicle.Exterior.LightIntensity
[get] OK
Vehicle.Exterior.LightIntensity: ( NotAvailable )sdv.databroker.v1 > set Vehicle.Exterior.LightIntensity 0[set] OK
Digital Auto: Playground
playground.digital.auto provides an in-browser, rapid prototyping environment utilizing the COVESA APIs for connected vehicles.
The UUID for Vehicle.Exterior.LightIntensity is 9b46b70490f853e891e1cc35dd08dddc
Feedback
Do you think this Vehicle Signal specification needs enhancement? Do you want to discuss with experts? Try the following ressources to get in touch with the VSS community:
Vehicle.Service.IsServiceDue (Indicates if vehicle needs service (of any kind). True = Service needed now or in the near future. False = No known need for service.)
Do you think this Vehicle Signal specification needs enhancement? Do you want to discuss with experts? Try the following ressources to get in touch with the VSS community:
$ databroker-cli
sdv.databroker.v1 > connect
[connect] OK
sdv.databroker.v1 > get Vehicle.Service.DistanceToService
[get] OK
Vehicle.Service.DistanceToService: ( NotAvailable )sdv.databroker.v1 > set Vehicle.Service.DistanceToService 0[set] OK
Digital Auto: Playground
playground.digital.auto provides an in-browser, rapid prototyping environment utilizing the COVESA APIs for connected vehicles.
The UUID for Vehicle.Service.DistanceToService is 6f4347ce149759819572c8c3a17e8d93
Feedback
Do you think this Vehicle Signal specification needs enhancement? Do you want to discuss with experts? Try the following ressources to get in touch with the VSS community:
$ databroker-cli
sdv.databroker.v1 > connect
[connect] OK
sdv.databroker.v1 > get Vehicle.Service.IsServiceDue
[get] OK
Vehicle.Service.IsServiceDue: ( NotAvailable )sdv.databroker.v1 > set Vehicle.Service.IsServiceDue false[set] OK
Digital Auto: Playground
playground.digital.auto provides an in-browser, rapid prototyping environment utilizing the COVESA APIs for connected vehicles.
The UUID for Vehicle.Service.IsServiceDue is 3e28f85ccccd5702b9adbe9a761ea1b4
Feedback
Do you think this Vehicle Signal specification needs enhancement? Do you want to discuss with experts? Try the following ressources to get in touch with the VSS community:
$ databroker-cli
sdv.databroker.v1 > connect
[connect] OK
sdv.databroker.v1 > get Vehicle.Service.TimeToService
[get] OK
Vehicle.Service.TimeToService: ( NotAvailable )sdv.databroker.v1 > set Vehicle.Service.TimeToService 0[set] OK
Digital Auto: Playground
playground.digital.auto provides an in-browser, rapid prototyping environment utilizing the COVESA APIs for connected vehicles.
The UUID for Vehicle.Service.TimeToService is c968be91a5685fa9ae30b84a0f91934e
Feedback
Do you think this Vehicle Signal specification needs enhancement? Do you want to discuss with experts? Try the following ressources to get in touch with the VSS community:
Vehicle.Driver.DistractionLevel (Distraction level of the driver will be the level how much the driver is distracted, by multiple factors. E.g. Driving situation, acustical or optical signales inside the cockpit, phone calls.)
Vehicle.Driver.FatigueLevel (Fatigueness level of driver. Evaluated by multiple factors like trip time, behaviour of steering, eye status.)
Do you think this Vehicle Signal specification needs enhancement? Do you want to discuss with experts? Try the following ressources to get in touch with the VSS community:
$ databroker-cli
sdv.databroker.v1 > connect
[connect] OK
sdv.databroker.v1 > get Vehicle.Driver.AttentiveProbability
[get] OK
Vehicle.Driver.AttentiveProbability: ( NotAvailable )sdv.databroker.v1 > set Vehicle.Driver.AttentiveProbability 0[set] OK
Digital Auto: Playground
playground.digital.auto provides an in-browser, rapid prototyping environment utilizing the COVESA APIs for connected vehicles.
The UUID for Vehicle.Driver.AttentiveProbability is fcd202467afb533fbbf9e7da89cc1cee
Feedback
Do you think this Vehicle Signal specification needs enhancement? Do you want to discuss with experts? Try the following ressources to get in touch with the VSS community:
The following is a list of VSS supported built-in datatypes:
Name
Type
Min
Max
uint8
unsigned 8-bit integer
0
255
int8
signed 8-bit integer
-128
127
uint16
unsigned 16-bit integer
0
65535
int16
signed 16-bit integer
-32768
32767
uint32
unsigned 32-bit integer
0
4294967295
int32
signed 32-bit integer
-2147483648
2147483647
uint64
unsigned 64-bit integer
0
2^64 - 1
int64
signed 64-bit integer
-2^63
2^63 - 1
boolean
boolean value
0/false
1/true
float
floating point number
-3.4e -38
3.4e 38
double
double precision floating point number
-1.7e -300
1.7e 300
string
character string
n/a
n/a
Min, max and default values defined in a Vehicle Signal Specification must be in the supported range of the data type.
5.1.4.2 - DistractionLevel
Full qualified VSS Path:
Vehicle.Driver.DistractionLevel
Description:
Distraction level of the driver will be the level how much the driver is distracted, by multiple factors. E.g. Driving situation, acustical or optical signales inside the cockpit, phone calls.
Navigation
flowchart LR
Vehicle-->Driver
Driver-->DistractionLevel
$ databroker-cli
sdv.databroker.v1 > connect
[connect] OK
sdv.databroker.v1 > get Vehicle.Driver.DistractionLevel
[get] OK
Vehicle.Driver.DistractionLevel: ( NotAvailable )sdv.databroker.v1 > set Vehicle.Driver.DistractionLevel 0[set] OK
Digital Auto: Playground
playground.digital.auto provides an in-browser, rapid prototyping environment utilizing the COVESA APIs for connected vehicles.
The UUID for Vehicle.Driver.DistractionLevel is cb35ec0b924e58979e1469146d65c3fa
Feedback
Do you think this Vehicle Signal specification needs enhancement? Do you want to discuss with experts? Try the following ressources to get in touch with the VSS community:
$ databroker-cli
sdv.databroker.v1 > connect
[connect] OK
sdv.databroker.v1 > get Vehicle.Driver.FatigueLevel
[get] OK
Vehicle.Driver.FatigueLevel: ( NotAvailable )sdv.databroker.v1 > set Vehicle.Driver.FatigueLevel 0[set] OK
Digital Auto: Playground
playground.digital.auto provides an in-browser, rapid prototyping environment utilizing the COVESA APIs for connected vehicles.
The UUID for Vehicle.Driver.FatigueLevel is 49b1626295705a79ae20d8a270c48b6b
Feedback
Do you think this Vehicle Signal specification needs enhancement? Do you want to discuss with experts? Try the following ressources to get in touch with the VSS community:
$ databroker-cli
sdv.databroker.v1 > connect
[connect] OK
sdv.databroker.v1 > get Vehicle.Driver.HeartRate
[get] OK
Vehicle.Driver.HeartRate: ( NotAvailable )sdv.databroker.v1 > set Vehicle.Driver.HeartRate 0[set] OK
Digital Auto: Playground
playground.digital.auto provides an in-browser, rapid prototyping environment utilizing the COVESA APIs for connected vehicles.
The UUID for Vehicle.Driver.HeartRate is d71516905f785c4da867a2f86e774d93
Feedback
Do you think this Vehicle Signal specification needs enhancement? Do you want to discuss with experts? Try the following ressources to get in touch with the VSS community:
$ databroker-cli
sdv.databroker.v1 > connect
[connect] OK
sdv.databroker.v1 > get Vehicle.Driver.IsEyesOnRoad
[get] OK
Vehicle.Driver.IsEyesOnRoad: ( NotAvailable )sdv.databroker.v1 > set Vehicle.Driver.IsEyesOnRoad false[set] OK
Digital Auto: Playground
playground.digital.auto provides an in-browser, rapid prototyping environment utilizing the COVESA APIs for connected vehicles.
The UUID for Vehicle.Driver.IsEyesOnRoad is 625e5009f1145aa0b797ee6c335ca2fe
Feedback
Do you think this Vehicle Signal specification needs enhancement? Do you want to discuss with experts? Try the following ressources to get in touch with the VSS community:
Do you think this Vehicle Signal specification needs enhancement? Do you want to discuss with experts? Try the following ressources to get in touch with the VSS community:
$ databroker-cli
sdv.databroker.v1 > connect
[connect] OK
sdv.databroker.v1 > get Vehicle.Driver.Identifier.Issuer
[get] OK
Vehicle.Driver.Identifier.Issuer: ( NotAvailable )sdv.databroker.v1 > set Vehicle.Driver.Identifier.Issuer Foo
[set] OK
Digital Auto: Playground
playground.digital.auto provides an in-browser, rapid prototyping environment utilizing the COVESA APIs for connected vehicles.
The UUID for Vehicle.Driver.Identifier.Issuer is ee7988d26d7156d2a030ecc506ea97e7
Feedback
Do you think this Vehicle Signal specification needs enhancement? Do you want to discuss with experts? Try the following ressources to get in touch with the VSS community:
$ databroker-cli
sdv.databroker.v1 > connect
[connect] OK
sdv.databroker.v1 > get Vehicle.Driver.Identifier.Subject
[get] OK
Vehicle.Driver.Identifier.Subject: ( NotAvailable )sdv.databroker.v1 > set Vehicle.Driver.Identifier.Subject Foo
[set] OK
Digital Auto: Playground
playground.digital.auto provides an in-browser, rapid prototyping environment utilizing the COVESA APIs for connected vehicles.
The UUID for Vehicle.Driver.Identifier.Subject is b41ec688af265f10824bc9635989ac55
Feedback
Do you think this Vehicle Signal specification needs enhancement? Do you want to discuss with experts? Try the following ressources to get in touch with the VSS community:
Do you think this Vehicle Signal specification needs enhancement? Do you want to discuss with experts? Try the following ressources to get in touch with the VSS community:
$ databroker-cli
sdv.databroker.v1 > connect
[connect] OK
sdv.databroker.v1 > get Vehicle.OBD.AbsoluteLoad
[get] OK
Vehicle.OBD.AbsoluteLoad: ( NotAvailable )sdv.databroker.v1 > set Vehicle.OBD.AbsoluteLoad 0[set] OK
Digital Auto: Playground
playground.digital.auto provides an in-browser, rapid prototyping environment utilizing the COVESA APIs for connected vehicles.
The UUID for Vehicle.OBD.AbsoluteLoad is b3dd889a42ce5de9a7904b7196ae325c
Feedback
Do you think this Vehicle Signal specification needs enhancement? Do you want to discuss with experts? Try the following ressources to get in touch with the VSS community:
$ databroker-cli
sdv.databroker.v1 > connect
[connect] OK
sdv.databroker.v1 > get Vehicle.OBD.AcceleratorPositionD
[get] OK
Vehicle.OBD.AcceleratorPositionD: ( NotAvailable )sdv.databroker.v1 > set Vehicle.OBD.AcceleratorPositionD 0[set] OK
Digital Auto: Playground
playground.digital.auto provides an in-browser, rapid prototyping environment utilizing the COVESA APIs for connected vehicles.
The UUID for Vehicle.OBD.AcceleratorPositionD is 7e63256081ac5a7b8a28a6fa3c2c2ff9
Feedback
Do you think this Vehicle Signal specification needs enhancement? Do you want to discuss with experts? Try the following ressources to get in touch with the VSS community:
$ databroker-cli
sdv.databroker.v1 > connect
[connect] OK
sdv.databroker.v1 > get Vehicle.OBD.AcceleratorPositionE
[get] OK
Vehicle.OBD.AcceleratorPositionE: ( NotAvailable )sdv.databroker.v1 > set Vehicle.OBD.AcceleratorPositionE 0[set] OK
Digital Auto: Playground
playground.digital.auto provides an in-browser, rapid prototyping environment utilizing the COVESA APIs for connected vehicles.
The UUID for Vehicle.OBD.AcceleratorPositionE is 4104e7fc25355e25b4522d233565d84b
Feedback
Do you think this Vehicle Signal specification needs enhancement? Do you want to discuss with experts? Try the following ressources to get in touch with the VSS community:
$ databroker-cli
sdv.databroker.v1 > connect
[connect] OK
sdv.databroker.v1 > get Vehicle.OBD.AcceleratorPositionF
[get] OK
Vehicle.OBD.AcceleratorPositionF: ( NotAvailable )sdv.databroker.v1 > set Vehicle.OBD.AcceleratorPositionF 0[set] OK
Digital Auto: Playground
playground.digital.auto provides an in-browser, rapid prototyping environment utilizing the COVESA APIs for connected vehicles.
The UUID for Vehicle.OBD.AcceleratorPositionF is 95f5c2a209a857ff930e2f8e32ac2d3f
Feedback
Do you think this Vehicle Signal specification needs enhancement? Do you want to discuss with experts? Try the following ressources to get in touch with the VSS community:
$ databroker-cli
sdv.databroker.v1 > connect
[connect] OK
sdv.databroker.v1 > get Vehicle.OBD.AmbientAirTemperature
[get] OK
Vehicle.OBD.AmbientAirTemperature: ( NotAvailable )sdv.databroker.v1 > set Vehicle.OBD.AmbientAirTemperature 0[set] OK
Digital Auto: Playground
playground.digital.auto provides an in-browser, rapid prototyping environment utilizing the COVESA APIs for connected vehicles.
The UUID for Vehicle.OBD.AmbientAirTemperature is 220a90f183c5583ea8b8b6454d774517
Feedback
Do you think this Vehicle Signal specification needs enhancement? Do you want to discuss with experts? Try the following ressources to get in touch with the VSS community:
$ databroker-cli
sdv.databroker.v1 > connect
[connect] OK
sdv.databroker.v1 > get Vehicle.OBD.CommandedEquivalenceRatio
[get] OK
Vehicle.OBD.CommandedEquivalenceRatio: ( NotAvailable )sdv.databroker.v1 > set Vehicle.OBD.CommandedEquivalenceRatio 0[set] OK
Digital Auto: Playground
playground.digital.auto provides an in-browser, rapid prototyping environment utilizing the COVESA APIs for connected vehicles.
The UUID for Vehicle.OBD.CommandedEquivalenceRatio is 104e39e816f65fa791d0afa24603292b
Feedback
Do you think this Vehicle Signal specification needs enhancement? Do you want to discuss with experts? Try the following ressources to get in touch with the VSS community:
$ databroker-cli
sdv.databroker.v1 > connect
[connect] OK
sdv.databroker.v1 > get Vehicle.OBD.ControlModuleVoltage
[get] OK
Vehicle.OBD.ControlModuleVoltage: ( NotAvailable )sdv.databroker.v1 > set Vehicle.OBD.ControlModuleVoltage 0[set] OK
Digital Auto: Playground
playground.digital.auto provides an in-browser, rapid prototyping environment utilizing the COVESA APIs for connected vehicles.
The UUID for Vehicle.OBD.ControlModuleVoltage is 59e072b932605ffc88a299c874d885c4
Feedback
Do you think this Vehicle Signal specification needs enhancement? Do you want to discuss with experts? Try the following ressources to get in touch with the VSS community:
Do you think this Vehicle Signal specification needs enhancement? Do you want to discuss with experts? Try the following ressources to get in touch with the VSS community:
$ databroker-cli
sdv.databroker.v1 > connect
[connect] OK
sdv.databroker.v1 > get Vehicle.OBD.DriveCycleStatus.DTCCount
[get] OK
Vehicle.OBD.DriveCycleStatus.DTCCount: ( NotAvailable )sdv.databroker.v1 > set Vehicle.OBD.DriveCycleStatus.DTCCount 0[set] OK
Digital Auto: Playground
playground.digital.auto provides an in-browser, rapid prototyping environment utilizing the COVESA APIs for connected vehicles.
The UUID for Vehicle.OBD.DriveCycleStatus.DTCCount is 312856f746ff560e8098c19196964d3b
Feedback
Do you think this Vehicle Signal specification needs enhancement? Do you want to discuss with experts? Try the following ressources to get in touch with the VSS community:
$ databroker-cli
sdv.databroker.v1 > connect
[connect] OK
sdv.databroker.v1 > get Vehicle.OBD.DriveCycleStatus.IgnitionType
[get] OK
Vehicle.OBD.DriveCycleStatus.IgnitionType: ( NotAvailable )sdv.databroker.v1 > set Vehicle.OBD.DriveCycleStatus.IgnitionType Foo
[set] OK
Digital Auto: Playground
playground.digital.auto provides an in-browser, rapid prototyping environment utilizing the COVESA APIs for connected vehicles.
The UUID for Vehicle.OBD.DriveCycleStatus.IgnitionType is 1aeb7b6d025f5a8693104824abaa1c49
Feedback
Do you think this Vehicle Signal specification needs enhancement? Do you want to discuss with experts? Try the following ressources to get in touch with the VSS community:
$ databroker-cli
sdv.databroker.v1 > connect
[connect] OK
sdv.databroker.v1 > get Vehicle.OBD.DriveCycleStatus.IsMILOn
[get] OK
Vehicle.OBD.DriveCycleStatus.IsMILOn: ( NotAvailable )sdv.databroker.v1 > set Vehicle.OBD.DriveCycleStatus.IsMILOn false[set] OK
Digital Auto: Playground
playground.digital.auto provides an in-browser, rapid prototyping environment utilizing the COVESA APIs for connected vehicles.
The UUID for Vehicle.OBD.DriveCycleStatus.IsMILOn is e367394c9a075eef8fd66499e3d9cf14
Feedback
Do you think this Vehicle Signal specification needs enhancement? Do you want to discuss with experts? Try the following ressources to get in touch with the VSS community:
$ databroker-cli
sdv.databroker.v1 > connect
[connect] OK
sdv.databroker.v1 > get Vehicle.OBD.EthanolPercent
[get] OK
Vehicle.OBD.EthanolPercent: ( NotAvailable )sdv.databroker.v1 > set Vehicle.OBD.EthanolPercent 0[set] OK
Digital Auto: Playground
playground.digital.auto provides an in-browser, rapid prototyping environment utilizing the COVESA APIs for connected vehicles.
The UUID for Vehicle.OBD.EthanolPercent is a207e7de17e1520c894b412af6f2522c
Feedback
Do you think this Vehicle Signal specification needs enhancement? Do you want to discuss with experts? Try the following ressources to get in touch with the VSS community:
$ databroker-cli
sdv.databroker.v1 > connect
[connect] OK
sdv.databroker.v1 > get Vehicle.OBD.EVAPVaporPressureAbsolute
[get] OK
Vehicle.OBD.EVAPVaporPressureAbsolute: ( NotAvailable )sdv.databroker.v1 > set Vehicle.OBD.EVAPVaporPressureAbsolute 0[set] OK
Digital Auto: Playground
playground.digital.auto provides an in-browser, rapid prototyping environment utilizing the COVESA APIs for connected vehicles.
The UUID for Vehicle.OBD.EVAPVaporPressureAbsolute is ef188a1e1a1356f7bc425081e3e00805
Feedback
Do you think this Vehicle Signal specification needs enhancement? Do you want to discuss with experts? Try the following ressources to get in touch with the VSS community:
$ databroker-cli
sdv.databroker.v1 > connect
[connect] OK
sdv.databroker.v1 > get Vehicle.OBD.EVAPVaporPressureAlternate
[get] OK
Vehicle.OBD.EVAPVaporPressureAlternate: ( NotAvailable )sdv.databroker.v1 > set Vehicle.OBD.EVAPVaporPressureAlternate 0[set] OK
Digital Auto: Playground
playground.digital.auto provides an in-browser, rapid prototyping environment utilizing the COVESA APIs for connected vehicles.
The UUID for Vehicle.OBD.EVAPVaporPressureAlternate is 68eaba3c79975d61bc35b92cd3e5e8d0
Feedback
Do you think this Vehicle Signal specification needs enhancement? Do you want to discuss with experts? Try the following ressources to get in touch with the VSS community:
$ databroker-cli
sdv.databroker.v1 > connect
[connect] OK
sdv.databroker.v1 > get Vehicle.OBD.FuelInjectionTiming
[get] OK
Vehicle.OBD.FuelInjectionTiming: ( NotAvailable )sdv.databroker.v1 > set Vehicle.OBD.FuelInjectionTiming 0[set] OK
Digital Auto: Playground
playground.digital.auto provides an in-browser, rapid prototyping environment utilizing the COVESA APIs for connected vehicles.
The UUID for Vehicle.OBD.FuelInjectionTiming is ab4869446f5357d6936838983e1b8949
Feedback
Do you think this Vehicle Signal specification needs enhancement? Do you want to discuss with experts? Try the following ressources to get in touch with the VSS community:
$ databroker-cli
sdv.databroker.v1 > connect
[connect] OK
sdv.databroker.v1 > get Vehicle.OBD.FuelRailPressureAbsolute
[get] OK
Vehicle.OBD.FuelRailPressureAbsolute: ( NotAvailable )sdv.databroker.v1 > set Vehicle.OBD.FuelRailPressureAbsolute 0[set] OK
Digital Auto: Playground
playground.digital.auto provides an in-browser, rapid prototyping environment utilizing the COVESA APIs for connected vehicles.
The UUID for Vehicle.OBD.FuelRailPressureAbsolute is 83c88b13d30153949eeca1b1180a9061
Feedback
Do you think this Vehicle Signal specification needs enhancement? Do you want to discuss with experts? Try the following ressources to get in touch with the VSS community:
$ databroker-cli
sdv.databroker.v1 > connect
[connect] OK
sdv.databroker.v1 > get Vehicle.OBD.FuelRate
[get] OK
Vehicle.OBD.FuelRate: ( NotAvailable )sdv.databroker.v1 > set Vehicle.OBD.FuelRate 0[set] OK
Digital Auto: Playground
playground.digital.auto provides an in-browser, rapid prototyping environment utilizing the COVESA APIs for connected vehicles.
The UUID for Vehicle.OBD.FuelRate is 4ab7c2b710f95ceb9c7d01d19dabac38
Feedback
Do you think this Vehicle Signal specification needs enhancement? Do you want to discuss with experts? Try the following ressources to get in touch with the VSS community:
$ databroker-cli
sdv.databroker.v1 > connect
[connect] OK
sdv.databroker.v1 > get Vehicle.OBD.FuelType
[get] OK
Vehicle.OBD.FuelType: ( NotAvailable )sdv.databroker.v1 > set Vehicle.OBD.FuelType Foo
[set] OK
Digital Auto: Playground
playground.digital.auto provides an in-browser, rapid prototyping environment utilizing the COVESA APIs for connected vehicles.
The UUID for Vehicle.OBD.FuelType is aefb45bdd8035904b0c8f3ffcedc53a9
Feedback
Do you think this Vehicle Signal specification needs enhancement? Do you want to discuss with experts? Try the following ressources to get in touch with the VSS community:
$ databroker-cli
sdv.databroker.v1 > connect
[connect] OK
sdv.databroker.v1 > get Vehicle.OBD.HybridBatteryRemaining
[get] OK
Vehicle.OBD.HybridBatteryRemaining: ( NotAvailable )sdv.databroker.v1 > set Vehicle.OBD.HybridBatteryRemaining 0[set] OK
Digital Auto: Playground
playground.digital.auto provides an in-browser, rapid prototyping environment utilizing the COVESA APIs for connected vehicles.
The UUID for Vehicle.OBD.HybridBatteryRemaining is c9517b6243df5e8d8f3aa3e57f71ec37
Feedback
Do you think this Vehicle Signal specification needs enhancement? Do you want to discuss with experts? Try the following ressources to get in touch with the VSS community:
$ databroker-cli
sdv.databroker.v1 > connect
[connect] OK
sdv.databroker.v1 > get Vehicle.OBD.LongTermO2Trim1
[get] OK
Vehicle.OBD.LongTermO2Trim1: ( NotAvailable )sdv.databroker.v1 > set Vehicle.OBD.LongTermO2Trim1 0[set] OK
Digital Auto: Playground
playground.digital.auto provides an in-browser, rapid prototyping environment utilizing the COVESA APIs for connected vehicles.
The UUID for Vehicle.OBD.LongTermO2Trim1 is 9a9586e29a02567e9920cb9b0aa2e3f5
Feedback
Do you think this Vehicle Signal specification needs enhancement? Do you want to discuss with experts? Try the following ressources to get in touch with the VSS community:
$ databroker-cli
sdv.databroker.v1 > connect
[connect] OK
sdv.databroker.v1 > get Vehicle.OBD.LongTermO2Trim2
[get] OK
Vehicle.OBD.LongTermO2Trim2: ( NotAvailable )sdv.databroker.v1 > set Vehicle.OBD.LongTermO2Trim2 0[set] OK
Digital Auto: Playground
playground.digital.auto provides an in-browser, rapid prototyping environment utilizing the COVESA APIs for connected vehicles.
The UUID for Vehicle.OBD.LongTermO2Trim2 is e579f6c930605b389e8ce2d7edd92999
Feedback
Do you think this Vehicle Signal specification needs enhancement? Do you want to discuss with experts? Try the following ressources to get in touch with the VSS community:
$ databroker-cli
sdv.databroker.v1 > connect
[connect] OK
sdv.databroker.v1 > get Vehicle.OBD.LongTermO2Trim3
[get] OK
Vehicle.OBD.LongTermO2Trim3: ( NotAvailable )sdv.databroker.v1 > set Vehicle.OBD.LongTermO2Trim3 0[set] OK
Digital Auto: Playground
playground.digital.auto provides an in-browser, rapid prototyping environment utilizing the COVESA APIs for connected vehicles.
The UUID for Vehicle.OBD.LongTermO2Trim3 is 50ea51ad343a5e59b1d214053e522a45
Feedback
Do you think this Vehicle Signal specification needs enhancement? Do you want to discuss with experts? Try the following ressources to get in touch with the VSS community:
$ databroker-cli
sdv.databroker.v1 > connect
[connect] OK
sdv.databroker.v1 > get Vehicle.OBD.LongTermO2Trim4
[get] OK
Vehicle.OBD.LongTermO2Trim4: ( NotAvailable )sdv.databroker.v1 > set Vehicle.OBD.LongTermO2Trim4 0[set] OK
Digital Auto: Playground
playground.digital.auto provides an in-browser, rapid prototyping environment utilizing the COVESA APIs for connected vehicles.
The UUID for Vehicle.OBD.LongTermO2Trim4 is f9c20edd12f456e5ace21581cea484bd
Feedback
Do you think this Vehicle Signal specification needs enhancement? Do you want to discuss with experts? Try the following ressources to get in touch with the VSS community:
$ databroker-cli
sdv.databroker.v1 > connect
[connect] OK
sdv.databroker.v1 > get Vehicle.OBD.MaxMAF
[get] OK
Vehicle.OBD.MaxMAF: ( NotAvailable )sdv.databroker.v1 > set Vehicle.OBD.MaxMAF 0[set] OK
Digital Auto: Playground
playground.digital.auto provides an in-browser, rapid prototyping environment utilizing the COVESA APIs for connected vehicles.
The UUID for Vehicle.OBD.MaxMAF is e21826479f715ee7afe8dc485f109b11
Feedback
Do you think this Vehicle Signal specification needs enhancement? Do you want to discuss with experts? Try the following ressources to get in touch with the VSS community:
$ databroker-cli
sdv.databroker.v1 > connect
[connect] OK
sdv.databroker.v1 > get Vehicle.OBD.OilTemperature
[get] OK
Vehicle.OBD.OilTemperature: ( NotAvailable )sdv.databroker.v1 > set Vehicle.OBD.OilTemperature 0[set] OK
Digital Auto: Playground
playground.digital.auto provides an in-browser, rapid prototyping environment utilizing the COVESA APIs for connected vehicles.
The UUID for Vehicle.OBD.OilTemperature is ef3dfc11085d5077b363b1a4e8e4a84e
Feedback
Do you think this Vehicle Signal specification needs enhancement? Do you want to discuss with experts? Try the following ressources to get in touch with the VSS community:
$ databroker-cli
sdv.databroker.v1 > connect
[connect] OK
sdv.databroker.v1 > get Vehicle.OBD.PidsC
[get] OK
Vehicle.OBD.PidsC: ( NotAvailable )sdv.databroker.v1 > set Vehicle.OBD.PidsC 0[set] OK
Digital Auto: Playground
playground.digital.auto provides an in-browser, rapid prototyping environment utilizing the COVESA APIs for connected vehicles.
The UUID for Vehicle.OBD.PidsC is 7c3a3f0ecc5d593aa996892668afe4b0
Feedback
Do you think this Vehicle Signal specification needs enhancement? Do you want to discuss with experts? Try the following ressources to get in touch with the VSS community:
$ databroker-cli
sdv.databroker.v1 > connect
[connect] OK
sdv.databroker.v1 > get Vehicle.OBD.RelativeAcceleratorPosition
[get] OK
Vehicle.OBD.RelativeAcceleratorPosition: ( NotAvailable )sdv.databroker.v1 > set Vehicle.OBD.RelativeAcceleratorPosition 0[set] OK
Digital Auto: Playground
playground.digital.auto provides an in-browser, rapid prototyping environment utilizing the COVESA APIs for connected vehicles.
The UUID for Vehicle.OBD.RelativeAcceleratorPosition is e25de9aacad3549285b4fb234f10be8f
Feedback
Do you think this Vehicle Signal specification needs enhancement? Do you want to discuss with experts? Try the following ressources to get in touch with the VSS community:
$ databroker-cli
sdv.databroker.v1 > connect
[connect] OK
sdv.databroker.v1 > get Vehicle.OBD.RelativeThrottlePosition
[get] OK
Vehicle.OBD.RelativeThrottlePosition: ( NotAvailable )sdv.databroker.v1 > set Vehicle.OBD.RelativeThrottlePosition 0[set] OK
Digital Auto: Playground
playground.digital.auto provides an in-browser, rapid prototyping environment utilizing the COVESA APIs for connected vehicles.
The UUID for Vehicle.OBD.RelativeThrottlePosition is 54ecf7dd671c5053aac4bc1bb061d64b
Feedback
Do you think this Vehicle Signal specification needs enhancement? Do you want to discuss with experts? Try the following ressources to get in touch with the VSS community:
$ databroker-cli
sdv.databroker.v1 > connect
[connect] OK
sdv.databroker.v1 > get Vehicle.OBD.RunTimeMIL
[get] OK
Vehicle.OBD.RunTimeMIL: ( NotAvailable )sdv.databroker.v1 > set Vehicle.OBD.RunTimeMIL 0[set] OK
Digital Auto: Playground
playground.digital.auto provides an in-browser, rapid prototyping environment utilizing the COVESA APIs for connected vehicles.
The UUID for Vehicle.OBD.RunTimeMIL is 555604a484535f60adf8894a6bd895b6
Feedback
Do you think this Vehicle Signal specification needs enhancement? Do you want to discuss with experts? Try the following ressources to get in touch with the VSS community:
$ databroker-cli
sdv.databroker.v1 > connect
[connect] OK
sdv.databroker.v1 > get Vehicle.OBD.ShortTermO2Trim1
[get] OK
Vehicle.OBD.ShortTermO2Trim1: ( NotAvailable )sdv.databroker.v1 > set Vehicle.OBD.ShortTermO2Trim1 0[set] OK
Digital Auto: Playground
playground.digital.auto provides an in-browser, rapid prototyping environment utilizing the COVESA APIs for connected vehicles.
The UUID for Vehicle.OBD.ShortTermO2Trim1 is be7ed33a854557ba802da0c51f9f4564
Feedback
Do you think this Vehicle Signal specification needs enhancement? Do you want to discuss with experts? Try the following ressources to get in touch with the VSS community:
$ databroker-cli
sdv.databroker.v1 > connect
[connect] OK
sdv.databroker.v1 > get Vehicle.OBD.ShortTermO2Trim2
[get] OK
Vehicle.OBD.ShortTermO2Trim2: ( NotAvailable )sdv.databroker.v1 > set Vehicle.OBD.ShortTermO2Trim2 0[set] OK
Digital Auto: Playground
playground.digital.auto provides an in-browser, rapid prototyping environment utilizing the COVESA APIs for connected vehicles.
The UUID for Vehicle.OBD.ShortTermO2Trim2 is c8b962f8990e51d294621408ceaa21d9
Feedback
Do you think this Vehicle Signal specification needs enhancement? Do you want to discuss with experts? Try the following ressources to get in touch with the VSS community:
$ databroker-cli
sdv.databroker.v1 > connect
[connect] OK
sdv.databroker.v1 > get Vehicle.OBD.ShortTermO2Trim3
[get] OK
Vehicle.OBD.ShortTermO2Trim3: ( NotAvailable )sdv.databroker.v1 > set Vehicle.OBD.ShortTermO2Trim3 0[set] OK
Digital Auto: Playground
playground.digital.auto provides an in-browser, rapid prototyping environment utilizing the COVESA APIs for connected vehicles.
The UUID for Vehicle.OBD.ShortTermO2Trim3 is af58212df970568b9edcc5e58fa36f8d
Feedback
Do you think this Vehicle Signal specification needs enhancement? Do you want to discuss with experts? Try the following ressources to get in touch with the VSS community:
$ databroker-cli
sdv.databroker.v1 > connect
[connect] OK
sdv.databroker.v1 > get Vehicle.OBD.ShortTermO2Trim4
[get] OK
Vehicle.OBD.ShortTermO2Trim4: ( NotAvailable )sdv.databroker.v1 > set Vehicle.OBD.ShortTermO2Trim4 0[set] OK
Digital Auto: Playground
playground.digital.auto provides an in-browser, rapid prototyping environment utilizing the COVESA APIs for connected vehicles.
The UUID for Vehicle.OBD.ShortTermO2Trim4 is 8ef0516c0c965fd6aecbacd6b9120a5b
Feedback
Do you think this Vehicle Signal specification needs enhancement? Do you want to discuss with experts? Try the following ressources to get in touch with the VSS community:
$ databroker-cli
sdv.databroker.v1 > connect
[connect] OK
sdv.databroker.v1 > get Vehicle.OBD.ThrottleActuator
[get] OK
Vehicle.OBD.ThrottleActuator: ( NotAvailable )sdv.databroker.v1 > set Vehicle.OBD.ThrottleActuator 0[set] OK
Digital Auto: Playground
playground.digital.auto provides an in-browser, rapid prototyping environment utilizing the COVESA APIs for connected vehicles.
The UUID for Vehicle.OBD.ThrottleActuator is 49a19905a1005ee3abe0c0a84d7112d1
Feedback
Do you think this Vehicle Signal specification needs enhancement? Do you want to discuss with experts? Try the following ressources to get in touch with the VSS community:
$ databroker-cli
sdv.databroker.v1 > connect
[connect] OK
sdv.databroker.v1 > get Vehicle.OBD.ThrottlePositionB
[get] OK
Vehicle.OBD.ThrottlePositionB: ( NotAvailable )sdv.databroker.v1 > set Vehicle.OBD.ThrottlePositionB 0[set] OK
Digital Auto: Playground
playground.digital.auto provides an in-browser, rapid prototyping environment utilizing the COVESA APIs for connected vehicles.
The UUID for Vehicle.OBD.ThrottlePositionB is 701712a565ed5bf8b6630487a7152c87
Feedback
Do you think this Vehicle Signal specification needs enhancement? Do you want to discuss with experts? Try the following ressources to get in touch with the VSS community:
$ databroker-cli
sdv.databroker.v1 > connect
[connect] OK
sdv.databroker.v1 > get Vehicle.OBD.ThrottlePositionC
[get] OK
Vehicle.OBD.ThrottlePositionC: ( NotAvailable )sdv.databroker.v1 > set Vehicle.OBD.ThrottlePositionC 0[set] OK
Digital Auto: Playground
playground.digital.auto provides an in-browser, rapid prototyping environment utilizing the COVESA APIs for connected vehicles.
The UUID for Vehicle.OBD.ThrottlePositionC is 06f162dc00a85f628f9d5d1bc952665c
Feedback
Do you think this Vehicle Signal specification needs enhancement? Do you want to discuss with experts? Try the following ressources to get in touch with the VSS community:
$ databroker-cli
sdv.databroker.v1 > connect
[connect] OK
sdv.databroker.v1 > get Vehicle.OBD.TimeSinceDTCCleared
[get] OK
Vehicle.OBD.TimeSinceDTCCleared: ( NotAvailable )sdv.databroker.v1 > set Vehicle.OBD.TimeSinceDTCCleared 0[set] OK
Digital Auto: Playground
playground.digital.auto provides an in-browser, rapid prototyping environment utilizing the COVESA APIs for connected vehicles.
The UUID for Vehicle.OBD.TimeSinceDTCCleared is 66ea3984a2585dcdaaf6452eef835c0d
Feedback
Do you think this Vehicle Signal specification needs enhancement? Do you want to discuss with experts? Try the following ressources to get in touch with the VSS community:
$ databroker-cli
sdv.databroker.v1 > connect
[connect] OK
sdv.databroker.v1 > get Vehicle.OBD.BarometricPressure
[get] OK
Vehicle.OBD.BarometricPressure: ( NotAvailable )sdv.databroker.v1 > set Vehicle.OBD.BarometricPressure 0[set] OK
Digital Auto: Playground
playground.digital.auto provides an in-browser, rapid prototyping environment utilizing the COVESA APIs for connected vehicles.
The UUID for Vehicle.OBD.BarometricPressure is 1966bfff4d235767bfd9a21afb445ac7
Feedback
Do you think this Vehicle Signal specification needs enhancement? Do you want to discuss with experts? Try the following ressources to get in touch with the VSS community:
Do you think this Vehicle Signal specification needs enhancement? Do you want to discuss with experts? Try the following ressources to get in touch with the VSS community:
Do you think this Vehicle Signal specification needs enhancement? Do you want to discuss with experts? Try the following ressources to get in touch with the VSS community:
$ databroker-cli
sdv.databroker.v1 > connect
[connect] OK
sdv.databroker.v1 > get Vehicle.OBD.Catalyst.Bank1.Temperature1
[get] OK
Vehicle.OBD.Catalyst.Bank1.Temperature1: ( NotAvailable )sdv.databroker.v1 > set Vehicle.OBD.Catalyst.Bank1.Temperature1 0[set] OK
Digital Auto: Playground
playground.digital.auto provides an in-browser, rapid prototyping environment utilizing the COVESA APIs for connected vehicles.
The UUID for Vehicle.OBD.Catalyst.Bank1.Temperature1 is 5a770f13939e5d069682d408f160a895
Feedback
Do you think this Vehicle Signal specification needs enhancement? Do you want to discuss with experts? Try the following ressources to get in touch with the VSS community:
$ databroker-cli
sdv.databroker.v1 > connect
[connect] OK
sdv.databroker.v1 > get Vehicle.OBD.Catalyst.Bank1.Temperature2
[get] OK
Vehicle.OBD.Catalyst.Bank1.Temperature2: ( NotAvailable )sdv.databroker.v1 > set Vehicle.OBD.Catalyst.Bank1.Temperature2 0[set] OK
Digital Auto: Playground
playground.digital.auto provides an in-browser, rapid prototyping environment utilizing the COVESA APIs for connected vehicles.
The UUID for Vehicle.OBD.Catalyst.Bank1.Temperature2 is ca9419a5d23b5937af23b51d823722fa
Feedback
Do you think this Vehicle Signal specification needs enhancement? Do you want to discuss with experts? Try the following ressources to get in touch with the VSS community:
Do you think this Vehicle Signal specification needs enhancement? Do you want to discuss with experts? Try the following ressources to get in touch with the VSS community:
$ databroker-cli
sdv.databroker.v1 > connect
[connect] OK
sdv.databroker.v1 > get Vehicle.OBD.Catalyst.Bank2.Temperature2
[get] OK
Vehicle.OBD.Catalyst.Bank2.Temperature2: ( NotAvailable )sdv.databroker.v1 > set Vehicle.OBD.Catalyst.Bank2.Temperature2 0[set] OK
Digital Auto: Playground
playground.digital.auto provides an in-browser, rapid prototyping environment utilizing the COVESA APIs for connected vehicles.
The UUID for Vehicle.OBD.Catalyst.Bank2.Temperature2 is f60c68f0ebca5fcf97086ce04e16d661
Feedback
Do you think this Vehicle Signal specification needs enhancement? Do you want to discuss with experts? Try the following ressources to get in touch with the VSS community:
$ databroker-cli
sdv.databroker.v1 > connect
[connect] OK
sdv.databroker.v1 > get Vehicle.OBD.Catalyst.Bank2.Temperature1
[get] OK
Vehicle.OBD.Catalyst.Bank2.Temperature1: ( NotAvailable )sdv.databroker.v1 > set Vehicle.OBD.Catalyst.Bank2.Temperature1 0[set] OK
Digital Auto: Playground
playground.digital.auto provides an in-browser, rapid prototyping environment utilizing the COVESA APIs for connected vehicles.
The UUID for Vehicle.OBD.Catalyst.Bank2.Temperature1 is 011658e4ee89502c9a33877c92dbf888
Feedback
Do you think this Vehicle Signal specification needs enhancement? Do you want to discuss with experts? Try the following ressources to get in touch with the VSS community:
$ databroker-cli
sdv.databroker.v1 > connect
[connect] OK
sdv.databroker.v1 > get Vehicle.OBD.CommandedEGR
[get] OK
Vehicle.OBD.CommandedEGR: ( NotAvailable )sdv.databroker.v1 > set Vehicle.OBD.CommandedEGR 0[set] OK
Digital Auto: Playground
playground.digital.auto provides an in-browser, rapid prototyping environment utilizing the COVESA APIs for connected vehicles.
The UUID for Vehicle.OBD.CommandedEGR is 0265890a4a695ee6952c9b9f565ddaa5
Feedback
Do you think this Vehicle Signal specification needs enhancement? Do you want to discuss with experts? Try the following ressources to get in touch with the VSS community:
$ databroker-cli
sdv.databroker.v1 > connect
[connect] OK
sdv.databroker.v1 > get Vehicle.OBD.CommandedEVAP
[get] OK
Vehicle.OBD.CommandedEVAP: ( NotAvailable )sdv.databroker.v1 > set Vehicle.OBD.CommandedEVAP 0[set] OK
Digital Auto: Playground
playground.digital.auto provides an in-browser, rapid prototyping environment utilizing the COVESA APIs for connected vehicles.
The UUID for Vehicle.OBD.CommandedEVAP is 5e6295d04a9159b88f4698b561b86842
Feedback
Do you think this Vehicle Signal specification needs enhancement? Do you want to discuss with experts? Try the following ressources to get in touch with the VSS community:
$ databroker-cli
sdv.databroker.v1 > connect
[connect] OK
sdv.databroker.v1 > get Vehicle.OBD.DistanceSinceDTCClear
[get] OK
Vehicle.OBD.DistanceSinceDTCClear: ( NotAvailable )sdv.databroker.v1 > set Vehicle.OBD.DistanceSinceDTCClear 0[set] OK
Digital Auto: Playground
playground.digital.auto provides an in-browser, rapid prototyping environment utilizing the COVESA APIs for connected vehicles.
The UUID for Vehicle.OBD.DistanceSinceDTCClear is 0da628e2c69d561eb86216ddcb6e7b2a
Feedback
Do you think this Vehicle Signal specification needs enhancement? Do you want to discuss with experts? Try the following ressources to get in touch with the VSS community:
$ databroker-cli
sdv.databroker.v1 > connect
[connect] OK
sdv.databroker.v1 > get Vehicle.OBD.EGRError
[get] OK
Vehicle.OBD.EGRError: ( NotAvailable )sdv.databroker.v1 > set Vehicle.OBD.EGRError 0[set] OK
Digital Auto: Playground
playground.digital.auto provides an in-browser, rapid prototyping environment utilizing the COVESA APIs for connected vehicles.
The UUID for Vehicle.OBD.EGRError is 80a7000c5c7b5444b5571a26264061e5
Feedback
Do you think this Vehicle Signal specification needs enhancement? Do you want to discuss with experts? Try the following ressources to get in touch with the VSS community:
$ databroker-cli
sdv.databroker.v1 > connect
[connect] OK
sdv.databroker.v1 > get Vehicle.OBD.EVAPVaporPressure
[get] OK
Vehicle.OBD.EVAPVaporPressure: ( NotAvailable )sdv.databroker.v1 > set Vehicle.OBD.EVAPVaporPressure 0[set] OK
Digital Auto: Playground
playground.digital.auto provides an in-browser, rapid prototyping environment utilizing the COVESA APIs for connected vehicles.
The UUID for Vehicle.OBD.EVAPVaporPressure is 70b5dae2ffd0561eab73efed8ad2f0ad
Feedback
Do you think this Vehicle Signal specification needs enhancement? Do you want to discuss with experts? Try the following ressources to get in touch with the VSS community:
$ databroker-cli
sdv.databroker.v1 > connect
[connect] OK
sdv.databroker.v1 > get Vehicle.OBD.FuelLevel
[get] OK
Vehicle.OBD.FuelLevel: ( NotAvailable )sdv.databroker.v1 > set Vehicle.OBD.FuelLevel 0[set] OK
Digital Auto: Playground
playground.digital.auto provides an in-browser, rapid prototyping environment utilizing the COVESA APIs for connected vehicles.
The UUID for Vehicle.OBD.FuelLevel is fd39813424ee5cd08c44714b35697287
Feedback
Do you think this Vehicle Signal specification needs enhancement? Do you want to discuss with experts? Try the following ressources to get in touch with the VSS community:
$ databroker-cli
sdv.databroker.v1 > connect
[connect] OK
sdv.databroker.v1 > get Vehicle.OBD.WarmupsSinceDTCClear
[get] OK
Vehicle.OBD.WarmupsSinceDTCClear: ( NotAvailable )sdv.databroker.v1 > set Vehicle.OBD.WarmupsSinceDTCClear 0[set] OK
Digital Auto: Playground
playground.digital.auto provides an in-browser, rapid prototyping environment utilizing the COVESA APIs for connected vehicles.
The UUID for Vehicle.OBD.WarmupsSinceDTCClear is a63ba60721785fc591e3dd067c4dc2ae
Feedback
Do you think this Vehicle Signal specification needs enhancement? Do you want to discuss with experts? Try the following ressources to get in touch with the VSS community:
$ databroker-cli
sdv.databroker.v1 > connect
[connect] OK
sdv.databroker.v1 > get Vehicle.OBD.DistanceWithMIL
[get] OK
Vehicle.OBD.DistanceWithMIL: ( NotAvailable )sdv.databroker.v1 > set Vehicle.OBD.DistanceWithMIL 0[set] OK
Digital Auto: Playground
playground.digital.auto provides an in-browser, rapid prototyping environment utilizing the COVESA APIs for connected vehicles.
The UUID for Vehicle.OBD.DistanceWithMIL is a9a522e343f25522b08f11e81bb91349
Feedback
Do you think this Vehicle Signal specification needs enhancement? Do you want to discuss with experts? Try the following ressources to get in touch with the VSS community:
$ databroker-cli
sdv.databroker.v1 > connect
[connect] OK
sdv.databroker.v1 > get Vehicle.OBD.FuelRailPressureDirect
[get] OK
Vehicle.OBD.FuelRailPressureDirect: ( NotAvailable )sdv.databroker.v1 > set Vehicle.OBD.FuelRailPressureDirect 0[set] OK
Digital Auto: Playground
playground.digital.auto provides an in-browser, rapid prototyping environment utilizing the COVESA APIs for connected vehicles.
The UUID for Vehicle.OBD.FuelRailPressureDirect is 039cb7bf1a8356a98d09eaf4fc029fe9
Feedback
Do you think this Vehicle Signal specification needs enhancement? Do you want to discuss with experts? Try the following ressources to get in touch with the VSS community:
$ databroker-cli
sdv.databroker.v1 > connect
[connect] OK
sdv.databroker.v1 > get Vehicle.OBD.FuelRailPressureVac
[get] OK
Vehicle.OBD.FuelRailPressureVac: ( NotAvailable )sdv.databroker.v1 > set Vehicle.OBD.FuelRailPressureVac 0[set] OK
Digital Auto: Playground
playground.digital.auto provides an in-browser, rapid prototyping environment utilizing the COVESA APIs for connected vehicles.
The UUID for Vehicle.OBD.FuelRailPressureVac is b3b0adf44aa3572fa07e7434993e6458
Feedback
Do you think this Vehicle Signal specification needs enhancement? Do you want to discuss with experts? Try the following ressources to get in touch with the VSS community:
$ databroker-cli
sdv.databroker.v1 > connect
[connect] OK
sdv.databroker.v1 > get Vehicle.OBD.IsPTOActive
[get] OK
Vehicle.OBD.IsPTOActive: ( NotAvailable )sdv.databroker.v1 > set Vehicle.OBD.IsPTOActive false[set] OK
Digital Auto: Playground
playground.digital.auto provides an in-browser, rapid prototyping environment utilizing the COVESA APIs for connected vehicles.
The UUID for Vehicle.OBD.IsPTOActive is ce291dc40bba5a969e57b17f11ae23a9
Feedback
Do you think this Vehicle Signal specification needs enhancement? Do you want to discuss with experts? Try the following ressources to get in touch with the VSS community:
Do you think this Vehicle Signal specification needs enhancement? Do you want to discuss with experts? Try the following ressources to get in touch with the VSS community:
Do you think this Vehicle Signal specification needs enhancement? Do you want to discuss with experts? Try the following ressources to get in touch with the VSS community:
$ databroker-cli
sdv.databroker.v1 > connect
[connect] OK
sdv.databroker.v1 > get Vehicle.OBD.O2WR.Sensor4.Current
[get] OK
Vehicle.OBD.O2WR.Sensor4.Current: ( NotAvailable )sdv.databroker.v1 > set Vehicle.OBD.O2WR.Sensor4.Current 0[set] OK
Digital Auto: Playground
playground.digital.auto provides an in-browser, rapid prototyping environment utilizing the COVESA APIs for connected vehicles.
The UUID for Vehicle.OBD.O2WR.Sensor4.Current is f16b31fde63a516db04cb44feaa7c27b
Feedback
Do you think this Vehicle Signal specification needs enhancement? Do you want to discuss with experts? Try the following ressources to get in touch with the VSS community:
$ databroker-cli
sdv.databroker.v1 > connect
[connect] OK
sdv.databroker.v1 > get Vehicle.OBD.O2WR.Sensor4.Lambda
[get] OK
Vehicle.OBD.O2WR.Sensor4.Lambda: ( NotAvailable )sdv.databroker.v1 > set Vehicle.OBD.O2WR.Sensor4.Lambda 0[set] OK
Digital Auto: Playground
playground.digital.auto provides an in-browser, rapid prototyping environment utilizing the COVESA APIs for connected vehicles.
The UUID for Vehicle.OBD.O2WR.Sensor4.Lambda is be09013f423c588eae9c06da9ddf290f
Feedback
Do you think this Vehicle Signal specification needs enhancement? Do you want to discuss with experts? Try the following ressources to get in touch with the VSS community:
$ databroker-cli
sdv.databroker.v1 > connect
[connect] OK
sdv.databroker.v1 > get Vehicle.OBD.O2WR.Sensor4.Voltage
[get] OK
Vehicle.OBD.O2WR.Sensor4.Voltage: ( NotAvailable )sdv.databroker.v1 > set Vehicle.OBD.O2WR.Sensor4.Voltage 0[set] OK
Digital Auto: Playground
playground.digital.auto provides an in-browser, rapid prototyping environment utilizing the COVESA APIs for connected vehicles.
The UUID for Vehicle.OBD.O2WR.Sensor4.Voltage is abeca90ba22d5c32a34ee907cedf3192
Feedback
Do you think this Vehicle Signal specification needs enhancement? Do you want to discuss with experts? Try the following ressources to get in touch with the VSS community:
Do you think this Vehicle Signal specification needs enhancement? Do you want to discuss with experts? Try the following ressources to get in touch with the VSS community:
$ databroker-cli
sdv.databroker.v1 > connect
[connect] OK
sdv.databroker.v1 > get Vehicle.OBD.O2WR.Sensor5.Current
[get] OK
Vehicle.OBD.O2WR.Sensor5.Current: ( NotAvailable )sdv.databroker.v1 > set Vehicle.OBD.O2WR.Sensor5.Current 0[set] OK
Digital Auto: Playground
playground.digital.auto provides an in-browser, rapid prototyping environment utilizing the COVESA APIs for connected vehicles.
The UUID for Vehicle.OBD.O2WR.Sensor5.Current is 40494cb5826554929f5ecadd5b9173fd
Feedback
Do you think this Vehicle Signal specification needs enhancement? Do you want to discuss with experts? Try the following ressources to get in touch with the VSS community:
$ databroker-cli
sdv.databroker.v1 > connect
[connect] OK
sdv.databroker.v1 > get Vehicle.OBD.O2WR.Sensor5.Lambda
[get] OK
Vehicle.OBD.O2WR.Sensor5.Lambda: ( NotAvailable )sdv.databroker.v1 > set Vehicle.OBD.O2WR.Sensor5.Lambda 0[set] OK
Digital Auto: Playground
playground.digital.auto provides an in-browser, rapid prototyping environment utilizing the COVESA APIs for connected vehicles.
The UUID for Vehicle.OBD.O2WR.Sensor5.Lambda is 16a957200f5c51f89824bbb76a23b9c0
Feedback
Do you think this Vehicle Signal specification needs enhancement? Do you want to discuss with experts? Try the following ressources to get in touch with the VSS community:
$ databroker-cli
sdv.databroker.v1 > connect
[connect] OK
sdv.databroker.v1 > get Vehicle.OBD.O2WR.Sensor5.Voltage
[get] OK
Vehicle.OBD.O2WR.Sensor5.Voltage: ( NotAvailable )sdv.databroker.v1 > set Vehicle.OBD.O2WR.Sensor5.Voltage 0[set] OK
Digital Auto: Playground
playground.digital.auto provides an in-browser, rapid prototyping environment utilizing the COVESA APIs for connected vehicles.
The UUID for Vehicle.OBD.O2WR.Sensor5.Voltage is 699c4db2439f51af8465e823687018b8
Feedback
Do you think this Vehicle Signal specification needs enhancement? Do you want to discuss with experts? Try the following ressources to get in touch with the VSS community:
Do you think this Vehicle Signal specification needs enhancement? Do you want to discuss with experts? Try the following ressources to get in touch with the VSS community:
$ databroker-cli
sdv.databroker.v1 > connect
[connect] OK
sdv.databroker.v1 > get Vehicle.OBD.O2WR.Sensor6.Current
[get] OK
Vehicle.OBD.O2WR.Sensor6.Current: ( NotAvailable )sdv.databroker.v1 > set Vehicle.OBD.O2WR.Sensor6.Current 0[set] OK
Digital Auto: Playground
playground.digital.auto provides an in-browser, rapid prototyping environment utilizing the COVESA APIs for connected vehicles.
The UUID for Vehicle.OBD.O2WR.Sensor6.Current is 06a38b6b4784545bb637279e96d48eb5
Feedback
Do you think this Vehicle Signal specification needs enhancement? Do you want to discuss with experts? Try the following ressources to get in touch with the VSS community:
$ databroker-cli
sdv.databroker.v1 > connect
[connect] OK
sdv.databroker.v1 > get Vehicle.OBD.O2WR.Sensor6.Lambda
[get] OK
Vehicle.OBD.O2WR.Sensor6.Lambda: ( NotAvailable )sdv.databroker.v1 > set Vehicle.OBD.O2WR.Sensor6.Lambda 0[set] OK
Digital Auto: Playground
playground.digital.auto provides an in-browser, rapid prototyping environment utilizing the COVESA APIs for connected vehicles.
The UUID for Vehicle.OBD.O2WR.Sensor6.Lambda is fdae9bb9a3a45b4680450f0347cf6d66
Feedback
Do you think this Vehicle Signal specification needs enhancement? Do you want to discuss with experts? Try the following ressources to get in touch with the VSS community:
$ databroker-cli
sdv.databroker.v1 > connect
[connect] OK
sdv.databroker.v1 > get Vehicle.OBD.O2WR.Sensor6.Voltage
[get] OK
Vehicle.OBD.O2WR.Sensor6.Voltage: ( NotAvailable )sdv.databroker.v1 > set Vehicle.OBD.O2WR.Sensor6.Voltage 0[set] OK
Digital Auto: Playground
playground.digital.auto provides an in-browser, rapid prototyping environment utilizing the COVESA APIs for connected vehicles.
The UUID for Vehicle.OBD.O2WR.Sensor6.Voltage is 304c181c76d55c3abe75382a935c7bde
Feedback
Do you think this Vehicle Signal specification needs enhancement? Do you want to discuss with experts? Try the following ressources to get in touch with the VSS community:
Do you think this Vehicle Signal specification needs enhancement? Do you want to discuss with experts? Try the following ressources to get in touch with the VSS community:
$ databroker-cli
sdv.databroker.v1 > connect
[connect] OK
sdv.databroker.v1 > get Vehicle.OBD.O2WR.Sensor7.Current
[get] OK
Vehicle.OBD.O2WR.Sensor7.Current: ( NotAvailable )sdv.databroker.v1 > set Vehicle.OBD.O2WR.Sensor7.Current 0[set] OK
Digital Auto: Playground
playground.digital.auto provides an in-browser, rapid prototyping environment utilizing the COVESA APIs for connected vehicles.
The UUID for Vehicle.OBD.O2WR.Sensor7.Current is 6ed46315325d540eb95c86ec61eef8e4
Feedback
Do you think this Vehicle Signal specification needs enhancement? Do you want to discuss with experts? Try the following ressources to get in touch with the VSS community:
$ databroker-cli
sdv.databroker.v1 > connect
[connect] OK
sdv.databroker.v1 > get Vehicle.OBD.O2WR.Sensor7.Lambda
[get] OK
Vehicle.OBD.O2WR.Sensor7.Lambda: ( NotAvailable )sdv.databroker.v1 > set Vehicle.OBD.O2WR.Sensor7.Lambda 0[set] OK
Digital Auto: Playground
playground.digital.auto provides an in-browser, rapid prototyping environment utilizing the COVESA APIs for connected vehicles.
The UUID for Vehicle.OBD.O2WR.Sensor7.Lambda is 9221a5289157538b9dcaa0d961c335fa
Feedback
Do you think this Vehicle Signal specification needs enhancement? Do you want to discuss with experts? Try the following ressources to get in touch with the VSS community:
$ databroker-cli
sdv.databroker.v1 > connect
[connect] OK
sdv.databroker.v1 > get Vehicle.OBD.O2WR.Sensor7.Voltage
[get] OK
Vehicle.OBD.O2WR.Sensor7.Voltage: ( NotAvailable )sdv.databroker.v1 > set Vehicle.OBD.O2WR.Sensor7.Voltage 0[set] OK
Digital Auto: Playground
playground.digital.auto provides an in-browser, rapid prototyping environment utilizing the COVESA APIs for connected vehicles.
The UUID for Vehicle.OBD.O2WR.Sensor7.Voltage is 0ad1d79dcce65c00ac48421b5b54ca0e
Feedback
Do you think this Vehicle Signal specification needs enhancement? Do you want to discuss with experts? Try the following ressources to get in touch with the VSS community:
Do you think this Vehicle Signal specification needs enhancement? Do you want to discuss with experts? Try the following ressources to get in touch with the VSS community:
$ databroker-cli
sdv.databroker.v1 > connect
[connect] OK
sdv.databroker.v1 > get Vehicle.OBD.O2WR.Sensor8.Current
[get] OK
Vehicle.OBD.O2WR.Sensor8.Current: ( NotAvailable )sdv.databroker.v1 > set Vehicle.OBD.O2WR.Sensor8.Current 0[set] OK
Digital Auto: Playground
playground.digital.auto provides an in-browser, rapid prototyping environment utilizing the COVESA APIs for connected vehicles.
The UUID for Vehicle.OBD.O2WR.Sensor8.Current is 96de3c3b036c50c2978ab2aa490d4d9e
Feedback
Do you think this Vehicle Signal specification needs enhancement? Do you want to discuss with experts? Try the following ressources to get in touch with the VSS community:
$ databroker-cli
sdv.databroker.v1 > connect
[connect] OK
sdv.databroker.v1 > get Vehicle.OBD.O2WR.Sensor8.Lambda
[get] OK
Vehicle.OBD.O2WR.Sensor8.Lambda: ( NotAvailable )sdv.databroker.v1 > set Vehicle.OBD.O2WR.Sensor8.Lambda 0[set] OK
Digital Auto: Playground
playground.digital.auto provides an in-browser, rapid prototyping environment utilizing the COVESA APIs for connected vehicles.
The UUID for Vehicle.OBD.O2WR.Sensor8.Lambda is c56db1195fa3519ab6718ab57d2cd543
Feedback
Do you think this Vehicle Signal specification needs enhancement? Do you want to discuss with experts? Try the following ressources to get in touch with the VSS community:
$ databroker-cli
sdv.databroker.v1 > connect
[connect] OK
sdv.databroker.v1 > get Vehicle.OBD.O2WR.Sensor8.Voltage
[get] OK
Vehicle.OBD.O2WR.Sensor8.Voltage: ( NotAvailable )sdv.databroker.v1 > set Vehicle.OBD.O2WR.Sensor8.Voltage 0[set] OK
Digital Auto: Playground
playground.digital.auto provides an in-browser, rapid prototyping environment utilizing the COVESA APIs for connected vehicles.
The UUID for Vehicle.OBD.O2WR.Sensor8.Voltage is ab7d6c739f025782bba640e58123f0c8
Feedback
Do you think this Vehicle Signal specification needs enhancement? Do you want to discuss with experts? Try the following ressources to get in touch with the VSS community:
Do you think this Vehicle Signal specification needs enhancement? Do you want to discuss with experts? Try the following ressources to get in touch with the VSS community:
$ databroker-cli
sdv.databroker.v1 > connect
[connect] OK
sdv.databroker.v1 > get Vehicle.OBD.O2WR.Sensor1.Current
[get] OK
Vehicle.OBD.O2WR.Sensor1.Current: ( NotAvailable )sdv.databroker.v1 > set Vehicle.OBD.O2WR.Sensor1.Current 0[set] OK
Digital Auto: Playground
playground.digital.auto provides an in-browser, rapid prototyping environment utilizing the COVESA APIs for connected vehicles.
The UUID for Vehicle.OBD.O2WR.Sensor1.Current is bb4c70d9d2ae56c8a9a3be446db6f54c
Feedback
Do you think this Vehicle Signal specification needs enhancement? Do you want to discuss with experts? Try the following ressources to get in touch with the VSS community:
$ databroker-cli
sdv.databroker.v1 > connect
[connect] OK
sdv.databroker.v1 > get Vehicle.OBD.O2WR.Sensor1.Lambda
[get] OK
Vehicle.OBD.O2WR.Sensor1.Lambda: ( NotAvailable )sdv.databroker.v1 > set Vehicle.OBD.O2WR.Sensor1.Lambda 0[set] OK
Digital Auto: Playground
playground.digital.auto provides an in-browser, rapid prototyping environment utilizing the COVESA APIs for connected vehicles.
The UUID for Vehicle.OBD.O2WR.Sensor1.Lambda is b809083454a5516f995477c59bf4d3c6
Feedback
Do you think this Vehicle Signal specification needs enhancement? Do you want to discuss with experts? Try the following ressources to get in touch with the VSS community:
$ databroker-cli
sdv.databroker.v1 > connect
[connect] OK
sdv.databroker.v1 > get Vehicle.OBD.O2WR.Sensor1.Voltage
[get] OK
Vehicle.OBD.O2WR.Sensor1.Voltage: ( NotAvailable )sdv.databroker.v1 > set Vehicle.OBD.O2WR.Sensor1.Voltage 0[set] OK
Digital Auto: Playground
playground.digital.auto provides an in-browser, rapid prototyping environment utilizing the COVESA APIs for connected vehicles.
The UUID for Vehicle.OBD.O2WR.Sensor1.Voltage is 396251cbfa5a57ffb1dd743298dfcdf9
Feedback
Do you think this Vehicle Signal specification needs enhancement? Do you want to discuss with experts? Try the following ressources to get in touch with the VSS community:
Do you think this Vehicle Signal specification needs enhancement? Do you want to discuss with experts? Try the following ressources to get in touch with the VSS community:
$ databroker-cli
sdv.databroker.v1 > connect
[connect] OK
sdv.databroker.v1 > get Vehicle.OBD.O2WR.Sensor2.Current
[get] OK
Vehicle.OBD.O2WR.Sensor2.Current: ( NotAvailable )sdv.databroker.v1 > set Vehicle.OBD.O2WR.Sensor2.Current 0[set] OK
Digital Auto: Playground
playground.digital.auto provides an in-browser, rapid prototyping environment utilizing the COVESA APIs for connected vehicles.
The UUID for Vehicle.OBD.O2WR.Sensor2.Current is 442ab33180ca5028a37a487056ba4a51
Feedback
Do you think this Vehicle Signal specification needs enhancement? Do you want to discuss with experts? Try the following ressources to get in touch with the VSS community:
$ databroker-cli
sdv.databroker.v1 > connect
[connect] OK
sdv.databroker.v1 > get Vehicle.OBD.O2WR.Sensor2.Lambda
[get] OK
Vehicle.OBD.O2WR.Sensor2.Lambda: ( NotAvailable )sdv.databroker.v1 > set Vehicle.OBD.O2WR.Sensor2.Lambda 0[set] OK
Digital Auto: Playground
playground.digital.auto provides an in-browser, rapid prototyping environment utilizing the COVESA APIs for connected vehicles.
The UUID for Vehicle.OBD.O2WR.Sensor2.Lambda is ce55aed0e8705a49970566db71ebcf90
Feedback
Do you think this Vehicle Signal specification needs enhancement? Do you want to discuss with experts? Try the following ressources to get in touch with the VSS community:
$ databroker-cli
sdv.databroker.v1 > connect
[connect] OK
sdv.databroker.v1 > get Vehicle.OBD.O2WR.Sensor2.Voltage
[get] OK
Vehicle.OBD.O2WR.Sensor2.Voltage: ( NotAvailable )sdv.databroker.v1 > set Vehicle.OBD.O2WR.Sensor2.Voltage 0[set] OK
Digital Auto: Playground
playground.digital.auto provides an in-browser, rapid prototyping environment utilizing the COVESA APIs for connected vehicles.
The UUID for Vehicle.OBD.O2WR.Sensor2.Voltage is a784675c3b765d42ad023d8ee412be26
Feedback
Do you think this Vehicle Signal specification needs enhancement? Do you want to discuss with experts? Try the following ressources to get in touch with the VSS community:
Do you think this Vehicle Signal specification needs enhancement? Do you want to discuss with experts? Try the following ressources to get in touch with the VSS community:
$ databroker-cli
sdv.databroker.v1 > connect
[connect] OK
sdv.databroker.v1 > get Vehicle.OBD.O2WR.Sensor3.Current
[get] OK
Vehicle.OBD.O2WR.Sensor3.Current: ( NotAvailable )sdv.databroker.v1 > set Vehicle.OBD.O2WR.Sensor3.Current 0[set] OK
Digital Auto: Playground
playground.digital.auto provides an in-browser, rapid prototyping environment utilizing the COVESA APIs for connected vehicles.
The UUID for Vehicle.OBD.O2WR.Sensor3.Current is c942468e349e5aaebde4d90ee0bc3814
Feedback
Do you think this Vehicle Signal specification needs enhancement? Do you want to discuss with experts? Try the following ressources to get in touch with the VSS community:
$ databroker-cli
sdv.databroker.v1 > connect
[connect] OK
sdv.databroker.v1 > get Vehicle.OBD.O2WR.Sensor3.Lambda
[get] OK
Vehicle.OBD.O2WR.Sensor3.Lambda: ( NotAvailable )sdv.databroker.v1 > set Vehicle.OBD.O2WR.Sensor3.Lambda 0[set] OK
Digital Auto: Playground
playground.digital.auto provides an in-browser, rapid prototyping environment utilizing the COVESA APIs for connected vehicles.
The UUID for Vehicle.OBD.O2WR.Sensor3.Lambda is f2ae7c781b0a5dcf8db91558e3cf4c13
Feedback
Do you think this Vehicle Signal specification needs enhancement? Do you want to discuss with experts? Try the following ressources to get in touch with the VSS community:
$ databroker-cli
sdv.databroker.v1 > connect
[connect] OK
sdv.databroker.v1 > get Vehicle.OBD.O2WR.Sensor3.Voltage
[get] OK
Vehicle.OBD.O2WR.Sensor3.Voltage: ( NotAvailable )sdv.databroker.v1 > set Vehicle.OBD.O2WR.Sensor3.Voltage 0[set] OK
Digital Auto: Playground
playground.digital.auto provides an in-browser, rapid prototyping environment utilizing the COVESA APIs for connected vehicles.
The UUID for Vehicle.OBD.O2WR.Sensor3.Voltage is a78f7621a3f75df2adc1dc940219834a
Feedback
Do you think this Vehicle Signal specification needs enhancement? Do you want to discuss with experts? Try the following ressources to get in touch with the VSS community:
$ databroker-cli
sdv.databroker.v1 > connect
[connect] OK
sdv.databroker.v1 > get Vehicle.OBD.OBDStandards
[get] OK
Vehicle.OBD.OBDStandards: ( NotAvailable )sdv.databroker.v1 > set Vehicle.OBD.OBDStandards 0[set] OK
Digital Auto: Playground
playground.digital.auto provides an in-browser, rapid prototyping environment utilizing the COVESA APIs for connected vehicles.
The UUID for Vehicle.OBD.OBDStandards is 1aa8d7d055cf5a29a31b04a12124f673
Feedback
Do you think this Vehicle Signal specification needs enhancement? Do you want to discuss with experts? Try the following ressources to get in touch with the VSS community:
$ databroker-cli
sdv.databroker.v1 > connect
[connect] OK
sdv.databroker.v1 > get Vehicle.OBD.OxygenSensorsIn4Banks
[get] OK
Vehicle.OBD.OxygenSensorsIn4Banks: ( NotAvailable )sdv.databroker.v1 > set Vehicle.OBD.OxygenSensorsIn4Banks 0[set] OK
Digital Auto: Playground
playground.digital.auto provides an in-browser, rapid prototyping environment utilizing the COVESA APIs for connected vehicles.
The UUID for Vehicle.OBD.OxygenSensorsIn4Banks is 41d3377813d651aa9b9344ba9fd2f880
Feedback
Do you think this Vehicle Signal specification needs enhancement? Do you want to discuss with experts? Try the following ressources to get in touch with the VSS community:
$ databroker-cli
sdv.databroker.v1 > connect
[connect] OK
sdv.databroker.v1 > get Vehicle.OBD.PidsB
[get] OK
Vehicle.OBD.PidsB: ( NotAvailable )sdv.databroker.v1 > set Vehicle.OBD.PidsB 0[set] OK
Digital Auto: Playground
playground.digital.auto provides an in-browser, rapid prototyping environment utilizing the COVESA APIs for connected vehicles.
The UUID for Vehicle.OBD.PidsB is 00193c560a0a5525baa45681e07b50f6
Feedback
Do you think this Vehicle Signal specification needs enhancement? Do you want to discuss with experts? Try the following ressources to get in touch with the VSS community:
$ databroker-cli
sdv.databroker.v1 > connect
[connect] OK
sdv.databroker.v1 > get Vehicle.OBD.RunTime
[get] OK
Vehicle.OBD.RunTime: ( NotAvailable )sdv.databroker.v1 > set Vehicle.OBD.RunTime 0[set] OK
Digital Auto: Playground
playground.digital.auto provides an in-browser, rapid prototyping environment utilizing the COVESA APIs for connected vehicles.
The UUID for Vehicle.OBD.RunTime is acf70773752256d1a227ab48257624b5
Feedback
Do you think this Vehicle Signal specification needs enhancement? Do you want to discuss with experts? Try the following ressources to get in touch with the VSS community:
$ databroker-cli
sdv.databroker.v1 > connect
[connect] OK
sdv.databroker.v1 > get Vehicle.OBD.AirStatus
[get] OK
Vehicle.OBD.AirStatus: ( NotAvailable )sdv.databroker.v1 > set Vehicle.OBD.AirStatus Foo
[set] OK
Digital Auto: Playground
playground.digital.auto provides an in-browser, rapid prototyping environment utilizing the COVESA APIs for connected vehicles.
The UUID for Vehicle.OBD.AirStatus is 548f65bf59ed505a86dfaa1c33342e4d
Feedback
Do you think this Vehicle Signal specification needs enhancement? Do you want to discuss with experts? Try the following ressources to get in touch with the VSS community:
$ databroker-cli
sdv.databroker.v1 > connect
[connect] OK
sdv.databroker.v1 > get Vehicle.OBD.CoolantTemperature
[get] OK
Vehicle.OBD.CoolantTemperature: ( NotAvailable )sdv.databroker.v1 > set Vehicle.OBD.CoolantTemperature 0[set] OK
Digital Auto: Playground
playground.digital.auto provides an in-browser, rapid prototyping environment utilizing the COVESA APIs for connected vehicles.
The UUID for Vehicle.OBD.CoolantTemperature is 824892cdc72d5f92a38ef3136576edc8
Feedback
Do you think this Vehicle Signal specification needs enhancement? Do you want to discuss with experts? Try the following ressources to get in touch with the VSS community:
$ databroker-cli
sdv.databroker.v1 > connect
[connect] OK
sdv.databroker.v1 > get Vehicle.OBD.DTCList
[get] OK
Vehicle.OBD.DTCList: ( NotAvailable )sdv.databroker.v1 > set Vehicle.OBD.DTCList 0[set] OK
Digital Auto: Playground
playground.digital.auto provides an in-browser, rapid prototyping environment utilizing the COVESA APIs for connected vehicles.
The UUID for Vehicle.OBD.DTCList is eee1b64e69845d5ab5e793b74631f9dc
Feedback
Do you think this Vehicle Signal specification needs enhancement? Do you want to discuss with experts? Try the following ressources to get in touch with the VSS community:
$ databroker-cli
sdv.databroker.v1 > connect
[connect] OK
sdv.databroker.v1 > get Vehicle.OBD.EngineLoad
[get] OK
Vehicle.OBD.EngineLoad: ( NotAvailable )sdv.databroker.v1 > set Vehicle.OBD.EngineLoad 0[set] OK
Digital Auto: Playground
playground.digital.auto provides an in-browser, rapid prototyping environment utilizing the COVESA APIs for connected vehicles.
The UUID for Vehicle.OBD.EngineLoad is a8fda8a1b4c6534aa49c447bafc1c700
Feedback
Do you think this Vehicle Signal specification needs enhancement? Do you want to discuss with experts? Try the following ressources to get in touch with the VSS community:
$ databroker-cli
sdv.databroker.v1 > connect
[connect] OK
sdv.databroker.v1 > get Vehicle.OBD.EngineSpeed
[get] OK
Vehicle.OBD.EngineSpeed: ( NotAvailable )sdv.databroker.v1 > set Vehicle.OBD.EngineSpeed 0[set] OK
Digital Auto: Playground
playground.digital.auto provides an in-browser, rapid prototyping environment utilizing the COVESA APIs for connected vehicles.
The UUID for Vehicle.OBD.EngineSpeed is b682eea93b3e5874ab3b52e95a1fad37
Feedback
Do you think this Vehicle Signal specification needs enhancement? Do you want to discuss with experts? Try the following ressources to get in touch with the VSS community:
$ databroker-cli
sdv.databroker.v1 > connect
[connect] OK
sdv.databroker.v1 > get Vehicle.OBD.FreezeDTC
[get] OK
Vehicle.OBD.FreezeDTC: ( NotAvailable )sdv.databroker.v1 > set Vehicle.OBD.FreezeDTC Foo
[set] OK
Digital Auto: Playground
playground.digital.auto provides an in-browser, rapid prototyping environment utilizing the COVESA APIs for connected vehicles.
The UUID for Vehicle.OBD.FreezeDTC is 5b87fae8dda4522aae209ae528960782
Feedback
Do you think this Vehicle Signal specification needs enhancement? Do you want to discuss with experts? Try the following ressources to get in touch with the VSS community:
$ databroker-cli
sdv.databroker.v1 > connect
[connect] OK
sdv.databroker.v1 > get Vehicle.OBD.FuelPressure
[get] OK
Vehicle.OBD.FuelPressure: ( NotAvailable )sdv.databroker.v1 > set Vehicle.OBD.FuelPressure 0[set] OK
Digital Auto: Playground
playground.digital.auto provides an in-browser, rapid prototyping environment utilizing the COVESA APIs for connected vehicles.
The UUID for Vehicle.OBD.FuelPressure is 34e6b0689f025d7b9bfa1fc49bb30c0f
Feedback
Do you think this Vehicle Signal specification needs enhancement? Do you want to discuss with experts? Try the following ressources to get in touch with the VSS community:
$ databroker-cli
sdv.databroker.v1 > connect
[connect] OK
sdv.databroker.v1 > get Vehicle.OBD.FuelStatus
[get] OK
Vehicle.OBD.FuelStatus: ( NotAvailable )sdv.databroker.v1 > set Vehicle.OBD.FuelStatus Foo
[set] OK
Digital Auto: Playground
playground.digital.auto provides an in-browser, rapid prototyping environment utilizing the COVESA APIs for connected vehicles.
The UUID for Vehicle.OBD.FuelStatus is 15fa2f3f667a5f5786eda5c83435ef16
Feedback
Do you think this Vehicle Signal specification needs enhancement? Do you want to discuss with experts? Try the following ressources to get in touch with the VSS community:
$ databroker-cli
sdv.databroker.v1 > connect
[connect] OK
sdv.databroker.v1 > get Vehicle.OBD.IntakeTemp
[get] OK
Vehicle.OBD.IntakeTemp: ( NotAvailable )sdv.databroker.v1 > set Vehicle.OBD.IntakeTemp 0[set] OK
Digital Auto: Playground
playground.digital.auto provides an in-browser, rapid prototyping environment utilizing the COVESA APIs for connected vehicles.
The UUID for Vehicle.OBD.IntakeTemp is 7c108305178b5854b430a23e125588bd
Feedback
Do you think this Vehicle Signal specification needs enhancement? Do you want to discuss with experts? Try the following ressources to get in touch with the VSS community:
$ databroker-cli
sdv.databroker.v1 > connect
[connect] OK
sdv.databroker.v1 > get Vehicle.OBD.LongTermFuelTrim1
[get] OK
Vehicle.OBD.LongTermFuelTrim1: ( NotAvailable )sdv.databroker.v1 > set Vehicle.OBD.LongTermFuelTrim1 0[set] OK
Digital Auto: Playground
playground.digital.auto provides an in-browser, rapid prototyping environment utilizing the COVESA APIs for connected vehicles.
The UUID for Vehicle.OBD.LongTermFuelTrim1 is 1c203b11667150f0b4ee1be26a60c084
Feedback
Do you think this Vehicle Signal specification needs enhancement? Do you want to discuss with experts? Try the following ressources to get in touch with the VSS community:
$ databroker-cli
sdv.databroker.v1 > connect
[connect] OK
sdv.databroker.v1 > get Vehicle.OBD.LongTermFuelTrim2
[get] OK
Vehicle.OBD.LongTermFuelTrim2: ( NotAvailable )sdv.databroker.v1 > set Vehicle.OBD.LongTermFuelTrim2 0[set] OK
Digital Auto: Playground
playground.digital.auto provides an in-browser, rapid prototyping environment utilizing the COVESA APIs for connected vehicles.
The UUID for Vehicle.OBD.LongTermFuelTrim2 is b02aff2efce05632b5694a256e5b9ec7
Feedback
Do you think this Vehicle Signal specification needs enhancement? Do you want to discuss with experts? Try the following ressources to get in touch with the VSS community:
$ databroker-cli
sdv.databroker.v1 > connect
[connect] OK
sdv.databroker.v1 > get Vehicle.OBD.MAF
[get] OK
Vehicle.OBD.MAF: ( NotAvailable )sdv.databroker.v1 > set Vehicle.OBD.MAF 0[set] OK
Digital Auto: Playground
playground.digital.auto provides an in-browser, rapid prototyping environment utilizing the COVESA APIs for connected vehicles.
The UUID for Vehicle.OBD.MAF is f3acdf89fb865313883d5d3126f15518
Feedback
Do you think this Vehicle Signal specification needs enhancement? Do you want to discuss with experts? Try the following ressources to get in touch with the VSS community:
$ databroker-cli
sdv.databroker.v1 > connect
[connect] OK
sdv.databroker.v1 > get Vehicle.OBD.MAP
[get] OK
Vehicle.OBD.MAP: ( NotAvailable )sdv.databroker.v1 > set Vehicle.OBD.MAP 0[set] OK
Digital Auto: Playground
playground.digital.auto provides an in-browser, rapid prototyping environment utilizing the COVESA APIs for connected vehicles.
The UUID for Vehicle.OBD.MAP is 335991b1b53f56f097fea7b05d4db83b
Feedback
Do you think this Vehicle Signal specification needs enhancement? Do you want to discuss with experts? Try the following ressources to get in touch with the VSS community:
Do you think this Vehicle Signal specification needs enhancement? Do you want to discuss with experts? Try the following ressources to get in touch with the VSS community:
Do you think this Vehicle Signal specification needs enhancement? Do you want to discuss with experts? Try the following ressources to get in touch with the VSS community:
$ databroker-cli
sdv.databroker.v1 > connect
[connect] OK
sdv.databroker.v1 > get Vehicle.OBD.O2.Sensor4.ShortTermFuelTrim
[get] OK
Vehicle.OBD.O2.Sensor4.ShortTermFuelTrim: ( NotAvailable )sdv.databroker.v1 > set Vehicle.OBD.O2.Sensor4.ShortTermFuelTrim 0[set] OK
Digital Auto: Playground
playground.digital.auto provides an in-browser, rapid prototyping environment utilizing the COVESA APIs for connected vehicles.
The UUID for Vehicle.OBD.O2.Sensor4.ShortTermFuelTrim is b71dcf9d850c5d5686f14ad46cd2cae3
Feedback
Do you think this Vehicle Signal specification needs enhancement? Do you want to discuss with experts? Try the following ressources to get in touch with the VSS community:
$ databroker-cli
sdv.databroker.v1 > connect
[connect] OK
sdv.databroker.v1 > get Vehicle.OBD.O2.Sensor4.Voltage
[get] OK
Vehicle.OBD.O2.Sensor4.Voltage: ( NotAvailable )sdv.databroker.v1 > set Vehicle.OBD.O2.Sensor4.Voltage 0[set] OK
Digital Auto: Playground
playground.digital.auto provides an in-browser, rapid prototyping environment utilizing the COVESA APIs for connected vehicles.
The UUID for Vehicle.OBD.O2.Sensor4.Voltage is 772cbfab91be59f7bbf3ec4140ffbcc4
Feedback
Do you think this Vehicle Signal specification needs enhancement? Do you want to discuss with experts? Try the following ressources to get in touch with the VSS community:
Do you think this Vehicle Signal specification needs enhancement? Do you want to discuss with experts? Try the following ressources to get in touch with the VSS community:
$ databroker-cli
sdv.databroker.v1 > connect
[connect] OK
sdv.databroker.v1 > get Vehicle.OBD.O2.Sensor5.ShortTermFuelTrim
[get] OK
Vehicle.OBD.O2.Sensor5.ShortTermFuelTrim: ( NotAvailable )sdv.databroker.v1 > set Vehicle.OBD.O2.Sensor5.ShortTermFuelTrim 0[set] OK
Digital Auto: Playground
playground.digital.auto provides an in-browser, rapid prototyping environment utilizing the COVESA APIs for connected vehicles.
The UUID for Vehicle.OBD.O2.Sensor5.ShortTermFuelTrim is 7604de26198b51e28a441f79b1d84242
Feedback
Do you think this Vehicle Signal specification needs enhancement? Do you want to discuss with experts? Try the following ressources to get in touch with the VSS community:
$ databroker-cli
sdv.databroker.v1 > connect
[connect] OK
sdv.databroker.v1 > get Vehicle.OBD.O2.Sensor5.Voltage
[get] OK
Vehicle.OBD.O2.Sensor5.Voltage: ( NotAvailable )sdv.databroker.v1 > set Vehicle.OBD.O2.Sensor5.Voltage 0[set] OK
Digital Auto: Playground
playground.digital.auto provides an in-browser, rapid prototyping environment utilizing the COVESA APIs for connected vehicles.
The UUID for Vehicle.OBD.O2.Sensor5.Voltage is 155a0816093b5aee8012ed2a8d532b7f
Feedback
Do you think this Vehicle Signal specification needs enhancement? Do you want to discuss with experts? Try the following ressources to get in touch with the VSS community:
Do you think this Vehicle Signal specification needs enhancement? Do you want to discuss with experts? Try the following ressources to get in touch with the VSS community:
$ databroker-cli
sdv.databroker.v1 > connect
[connect] OK
sdv.databroker.v1 > get Vehicle.OBD.O2.Sensor6.ShortTermFuelTrim
[get] OK
Vehicle.OBD.O2.Sensor6.ShortTermFuelTrim: ( NotAvailable )sdv.databroker.v1 > set Vehicle.OBD.O2.Sensor6.ShortTermFuelTrim 0[set] OK
Digital Auto: Playground
playground.digital.auto provides an in-browser, rapid prototyping environment utilizing the COVESA APIs for connected vehicles.
The UUID for Vehicle.OBD.O2.Sensor6.ShortTermFuelTrim is 2fb034769cab5089986d90bf7f9000ca
Feedback
Do you think this Vehicle Signal specification needs enhancement? Do you want to discuss with experts? Try the following ressources to get in touch with the VSS community:
$ databroker-cli
sdv.databroker.v1 > connect
[connect] OK
sdv.databroker.v1 > get Vehicle.OBD.O2.Sensor6.Voltage
[get] OK
Vehicle.OBD.O2.Sensor6.Voltage: ( NotAvailable )sdv.databroker.v1 > set Vehicle.OBD.O2.Sensor6.Voltage 0[set] OK
Digital Auto: Playground
playground.digital.auto provides an in-browser, rapid prototyping environment utilizing the COVESA APIs for connected vehicles.
The UUID for Vehicle.OBD.O2.Sensor6.Voltage is 85430592fb795e848d7bb91e6b9f1e00
Feedback
Do you think this Vehicle Signal specification needs enhancement? Do you want to discuss with experts? Try the following ressources to get in touch with the VSS community:
Do you think this Vehicle Signal specification needs enhancement? Do you want to discuss with experts? Try the following ressources to get in touch with the VSS community:
$ databroker-cli
sdv.databroker.v1 > connect
[connect] OK
sdv.databroker.v1 > get Vehicle.OBD.O2.Sensor7.ShortTermFuelTrim
[get] OK
Vehicle.OBD.O2.Sensor7.ShortTermFuelTrim: ( NotAvailable )sdv.databroker.v1 > set Vehicle.OBD.O2.Sensor7.ShortTermFuelTrim 0[set] OK
Digital Auto: Playground
playground.digital.auto provides an in-browser, rapid prototyping environment utilizing the COVESA APIs for connected vehicles.
The UUID for Vehicle.OBD.O2.Sensor7.ShortTermFuelTrim is 81f34b16b5e05d1ab159de9474eaf5bc
Feedback
Do you think this Vehicle Signal specification needs enhancement? Do you want to discuss with experts? Try the following ressources to get in touch with the VSS community:
$ databroker-cli
sdv.databroker.v1 > connect
[connect] OK
sdv.databroker.v1 > get Vehicle.OBD.O2.Sensor7.Voltage
[get] OK
Vehicle.OBD.O2.Sensor7.Voltage: ( NotAvailable )sdv.databroker.v1 > set Vehicle.OBD.O2.Sensor7.Voltage 0[set] OK
Digital Auto: Playground
playground.digital.auto provides an in-browser, rapid prototyping environment utilizing the COVESA APIs for connected vehicles.
The UUID for Vehicle.OBD.O2.Sensor7.Voltage is 23984a68e63f532bab18679e1174130d
Feedback
Do you think this Vehicle Signal specification needs enhancement? Do you want to discuss with experts? Try the following ressources to get in touch with the VSS community:
Do you think this Vehicle Signal specification needs enhancement? Do you want to discuss with experts? Try the following ressources to get in touch with the VSS community:
$ databroker-cli
sdv.databroker.v1 > connect
[connect] OK
sdv.databroker.v1 > get Vehicle.OBD.O2.Sensor8.ShortTermFuelTrim
[get] OK
Vehicle.OBD.O2.Sensor8.ShortTermFuelTrim: ( NotAvailable )sdv.databroker.v1 > set Vehicle.OBD.O2.Sensor8.ShortTermFuelTrim 0[set] OK
Digital Auto: Playground
playground.digital.auto provides an in-browser, rapid prototyping environment utilizing the COVESA APIs for connected vehicles.
The UUID for Vehicle.OBD.O2.Sensor8.ShortTermFuelTrim is 1699eb2267615e258259e480be0fa606
Feedback
Do you think this Vehicle Signal specification needs enhancement? Do you want to discuss with experts? Try the following ressources to get in touch with the VSS community:
$ databroker-cli
sdv.databroker.v1 > connect
[connect] OK
sdv.databroker.v1 > get Vehicle.OBD.O2.Sensor8.Voltage
[get] OK
Vehicle.OBD.O2.Sensor8.Voltage: ( NotAvailable )sdv.databroker.v1 > set Vehicle.OBD.O2.Sensor8.Voltage 0[set] OK
Digital Auto: Playground
playground.digital.auto provides an in-browser, rapid prototyping environment utilizing the COVESA APIs for connected vehicles.
The UUID for Vehicle.OBD.O2.Sensor8.Voltage is 23e057b3629a5136bb585638725fe0a2
Feedback
Do you think this Vehicle Signal specification needs enhancement? Do you want to discuss with experts? Try the following ressources to get in touch with the VSS community:
Do you think this Vehicle Signal specification needs enhancement? Do you want to discuss with experts? Try the following ressources to get in touch with the VSS community:
$ databroker-cli
sdv.databroker.v1 > connect
[connect] OK
sdv.databroker.v1 > get Vehicle.OBD.O2.Sensor1.ShortTermFuelTrim
[get] OK
Vehicle.OBD.O2.Sensor1.ShortTermFuelTrim: ( NotAvailable )sdv.databroker.v1 > set Vehicle.OBD.O2.Sensor1.ShortTermFuelTrim 0[set] OK
Digital Auto: Playground
playground.digital.auto provides an in-browser, rapid prototyping environment utilizing the COVESA APIs for connected vehicles.
The UUID for Vehicle.OBD.O2.Sensor1.ShortTermFuelTrim is ee366d40132456c0bce8cac3a837f16a
Feedback
Do you think this Vehicle Signal specification needs enhancement? Do you want to discuss with experts? Try the following ressources to get in touch with the VSS community:
$ databroker-cli
sdv.databroker.v1 > connect
[connect] OK
sdv.databroker.v1 > get Vehicle.OBD.O2.Sensor1.Voltage
[get] OK
Vehicle.OBD.O2.Sensor1.Voltage: ( NotAvailable )sdv.databroker.v1 > set Vehicle.OBD.O2.Sensor1.Voltage 0[set] OK
Digital Auto: Playground
playground.digital.auto provides an in-browser, rapid prototyping environment utilizing the COVESA APIs for connected vehicles.
The UUID for Vehicle.OBD.O2.Sensor1.Voltage is e95f4ea667265ee3a68ab57b86ecbf66
Feedback
Do you think this Vehicle Signal specification needs enhancement? Do you want to discuss with experts? Try the following ressources to get in touch with the VSS community:
Do you think this Vehicle Signal specification needs enhancement? Do you want to discuss with experts? Try the following ressources to get in touch with the VSS community:
$ databroker-cli
sdv.databroker.v1 > connect
[connect] OK
sdv.databroker.v1 > get Vehicle.OBD.O2.Sensor2.ShortTermFuelTrim
[get] OK
Vehicle.OBD.O2.Sensor2.ShortTermFuelTrim: ( NotAvailable )sdv.databroker.v1 > set Vehicle.OBD.O2.Sensor2.ShortTermFuelTrim 0[set] OK
Digital Auto: Playground
playground.digital.auto provides an in-browser, rapid prototyping environment utilizing the COVESA APIs for connected vehicles.
The UUID for Vehicle.OBD.O2.Sensor2.ShortTermFuelTrim is 92e6e172777457a9866ca045d0d79853
Feedback
Do you think this Vehicle Signal specification needs enhancement? Do you want to discuss with experts? Try the following ressources to get in touch with the VSS community:
$ databroker-cli
sdv.databroker.v1 > connect
[connect] OK
sdv.databroker.v1 > get Vehicle.OBD.O2.Sensor2.Voltage
[get] OK
Vehicle.OBD.O2.Sensor2.Voltage: ( NotAvailable )sdv.databroker.v1 > set Vehicle.OBD.O2.Sensor2.Voltage 0[set] OK
Digital Auto: Playground
playground.digital.auto provides an in-browser, rapid prototyping environment utilizing the COVESA APIs for connected vehicles.
The UUID for Vehicle.OBD.O2.Sensor2.Voltage is 5f1781bde96b53ce9b810a5a56b7c8ed
Feedback
Do you think this Vehicle Signal specification needs enhancement? Do you want to discuss with experts? Try the following ressources to get in touch with the VSS community:
Do you think this Vehicle Signal specification needs enhancement? Do you want to discuss with experts? Try the following ressources to get in touch with the VSS community:
$ databroker-cli
sdv.databroker.v1 > connect
[connect] OK
sdv.databroker.v1 > get Vehicle.OBD.O2.Sensor3.ShortTermFuelTrim
[get] OK
Vehicle.OBD.O2.Sensor3.ShortTermFuelTrim: ( NotAvailable )sdv.databroker.v1 > set Vehicle.OBD.O2.Sensor3.ShortTermFuelTrim 0[set] OK
Digital Auto: Playground
playground.digital.auto provides an in-browser, rapid prototyping environment utilizing the COVESA APIs for connected vehicles.
The UUID for Vehicle.OBD.O2.Sensor3.ShortTermFuelTrim is 66c300d35eb85e7387dc42528cca48d9
Feedback
Do you think this Vehicle Signal specification needs enhancement? Do you want to discuss with experts? Try the following ressources to get in touch with the VSS community:
$ databroker-cli
sdv.databroker.v1 > connect
[connect] OK
sdv.databroker.v1 > get Vehicle.OBD.O2.Sensor3.Voltage
[get] OK
Vehicle.OBD.O2.Sensor3.Voltage: ( NotAvailable )sdv.databroker.v1 > set Vehicle.OBD.O2.Sensor3.Voltage 0[set] OK
Digital Auto: Playground
playground.digital.auto provides an in-browser, rapid prototyping environment utilizing the COVESA APIs for connected vehicles.
The UUID for Vehicle.OBD.O2.Sensor3.Voltage is a86a1986f0fe5d25b6c438a00438ff60
Feedback
Do you think this Vehicle Signal specification needs enhancement? Do you want to discuss with experts? Try the following ressources to get in touch with the VSS community:
$ databroker-cli
sdv.databroker.v1 > connect
[connect] OK
sdv.databroker.v1 > get Vehicle.OBD.OxygenSensorsIn2Banks
[get] OK
Vehicle.OBD.OxygenSensorsIn2Banks: ( NotAvailable )sdv.databroker.v1 > set Vehicle.OBD.OxygenSensorsIn2Banks 0[set] OK
Digital Auto: Playground
playground.digital.auto provides an in-browser, rapid prototyping environment utilizing the COVESA APIs for connected vehicles.
The UUID for Vehicle.OBD.OxygenSensorsIn2Banks is 0a9ba3f0a9b256d78bafd62ee8ce73cd
Feedback
Do you think this Vehicle Signal specification needs enhancement? Do you want to discuss with experts? Try the following ressources to get in touch with the VSS community:
$ databroker-cli
sdv.databroker.v1 > connect
[connect] OK
sdv.databroker.v1 > get Vehicle.OBD.PidsA
[get] OK
Vehicle.OBD.PidsA: ( NotAvailable )sdv.databroker.v1 > set Vehicle.OBD.PidsA 0[set] OK
Digital Auto: Playground
playground.digital.auto provides an in-browser, rapid prototyping environment utilizing the COVESA APIs for connected vehicles.
The UUID for Vehicle.OBD.PidsA is ba1c1b9034955d2d97249c3b4516beef
Feedback
Do you think this Vehicle Signal specification needs enhancement? Do you want to discuss with experts? Try the following ressources to get in touch with the VSS community:
$ databroker-cli
sdv.databroker.v1 > connect
[connect] OK
sdv.databroker.v1 > get Vehicle.OBD.ShortTermFuelTrim1
[get] OK
Vehicle.OBD.ShortTermFuelTrim1: ( NotAvailable )sdv.databroker.v1 > set Vehicle.OBD.ShortTermFuelTrim1 0[set] OK
Digital Auto: Playground
playground.digital.auto provides an in-browser, rapid prototyping environment utilizing the COVESA APIs for connected vehicles.
The UUID for Vehicle.OBD.ShortTermFuelTrim1 is 569c983874335fb392d4e82a002654cb
Feedback
Do you think this Vehicle Signal specification needs enhancement? Do you want to discuss with experts? Try the following ressources to get in touch with the VSS community:
$ databroker-cli
sdv.databroker.v1 > connect
[connect] OK
sdv.databroker.v1 > get Vehicle.OBD.ShortTermFuelTrim2
[get] OK
Vehicle.OBD.ShortTermFuelTrim2: ( NotAvailable )sdv.databroker.v1 > set Vehicle.OBD.ShortTermFuelTrim2 0[set] OK
Digital Auto: Playground
playground.digital.auto provides an in-browser, rapid prototyping environment utilizing the COVESA APIs for connected vehicles.
The UUID for Vehicle.OBD.ShortTermFuelTrim2 is 53a39620773a523a8182169027169ec2
Feedback
Do you think this Vehicle Signal specification needs enhancement? Do you want to discuss with experts? Try the following ressources to get in touch with the VSS community:
$ databroker-cli
sdv.databroker.v1 > connect
[connect] OK
sdv.databroker.v1 > get Vehicle.OBD.Speed
[get] OK
Vehicle.OBD.Speed: ( NotAvailable )sdv.databroker.v1 > set Vehicle.OBD.Speed 0[set] OK
Digital Auto: Playground
playground.digital.auto provides an in-browser, rapid prototyping environment utilizing the COVESA APIs for connected vehicles.
The UUID for Vehicle.OBD.Speed is 91ed0bb43eb054759813cd784b071764
Feedback
Do you think this Vehicle Signal specification needs enhancement? Do you want to discuss with experts? Try the following ressources to get in touch with the VSS community:
Do you think this Vehicle Signal specification needs enhancement? Do you want to discuss with experts? Try the following ressources to get in touch with the VSS community:
$ databroker-cli
sdv.databroker.v1 > connect
[connect] OK
sdv.databroker.v1 > get Vehicle.OBD.Status.DTCCount
[get] OK
Vehicle.OBD.Status.DTCCount: ( NotAvailable )sdv.databroker.v1 > set Vehicle.OBD.Status.DTCCount 0[set] OK
Digital Auto: Playground
playground.digital.auto provides an in-browser, rapid prototyping environment utilizing the COVESA APIs for connected vehicles.
The UUID for Vehicle.OBD.Status.DTCCount is 4afdf65e788c5f69baf682597e69fb67
Feedback
Do you think this Vehicle Signal specification needs enhancement? Do you want to discuss with experts? Try the following ressources to get in touch with the VSS community:
$ databroker-cli
sdv.databroker.v1 > connect
[connect] OK
sdv.databroker.v1 > get Vehicle.OBD.Status.IgnitionType
[get] OK
Vehicle.OBD.Status.IgnitionType: ( NotAvailable )sdv.databroker.v1 > set Vehicle.OBD.Status.IgnitionType Foo
[set] OK
Digital Auto: Playground
playground.digital.auto provides an in-browser, rapid prototyping environment utilizing the COVESA APIs for connected vehicles.
The UUID for Vehicle.OBD.Status.IgnitionType is 7ffd71caac8e5bd18f93366afdfe534d
Feedback
Do you think this Vehicle Signal specification needs enhancement? Do you want to discuss with experts? Try the following ressources to get in touch with the VSS community:
$ databroker-cli
sdv.databroker.v1 > connect
[connect] OK
sdv.databroker.v1 > get Vehicle.OBD.Status.IsMILOn
[get] OK
Vehicle.OBD.Status.IsMILOn: ( NotAvailable )sdv.databroker.v1 > set Vehicle.OBD.Status.IsMILOn false[set] OK
Digital Auto: Playground
playground.digital.auto provides an in-browser, rapid prototyping environment utilizing the COVESA APIs for connected vehicles.
The UUID for Vehicle.OBD.Status.IsMILOn is 8744bcb275205630932320b66185502c
Feedback
Do you think this Vehicle Signal specification needs enhancement? Do you want to discuss with experts? Try the following ressources to get in touch with the VSS community:
$ databroker-cli
sdv.databroker.v1 > connect
[connect] OK
sdv.databroker.v1 > get Vehicle.OBD.ThrottlePosition
[get] OK
Vehicle.OBD.ThrottlePosition: ( NotAvailable )sdv.databroker.v1 > set Vehicle.OBD.ThrottlePosition 0[set] OK
Digital Auto: Playground
playground.digital.auto provides an in-browser, rapid prototyping environment utilizing the COVESA APIs for connected vehicles.
The UUID for Vehicle.OBD.ThrottlePosition is ec1d372020205bb4a846a014b33801e1
Feedback
Do you think this Vehicle Signal specification needs enhancement? Do you want to discuss with experts? Try the following ressources to get in touch with the VSS community:
$ databroker-cli
sdv.databroker.v1 > connect
[connect] OK
sdv.databroker.v1 > get Vehicle.OBD.TimingAdvance
[get] OK
Vehicle.OBD.TimingAdvance: ( NotAvailable )sdv.databroker.v1 > set Vehicle.OBD.TimingAdvance 0[set] OK
Digital Auto: Playground
playground.digital.auto provides an in-browser, rapid prototyping environment utilizing the COVESA APIs for connected vehicles.
The UUID for Vehicle.OBD.TimingAdvance is 35533b7e327d5f839b17c932b630767c
Feedback
Do you think this Vehicle Signal specification needs enhancement? Do you want to discuss with experts? Try the following ressources to get in touch with the VSS community:
Do you think this Vehicle Signal specification needs enhancement? Do you want to discuss with experts? Try the following ressources to get in touch with the VSS community:
Do you think this Vehicle Signal specification needs enhancement? Do you want to discuss with experts? Try the following ressources to get in touch with the VSS community:
$ databroker-cli
sdv.databroker.v1 > connect
[connect] OK
sdv.databroker.v1 > get Vehicle.Chassis.Accelerator.PedalPosition
[get] OK
Vehicle.Chassis.Accelerator.PedalPosition: ( NotAvailable )sdv.databroker.v1 > set Vehicle.Chassis.Accelerator.PedalPosition 0[set] OK
Digital Auto: Playground
playground.digital.auto provides an in-browser, rapid prototyping environment utilizing the COVESA APIs for connected vehicles.
The UUID for Vehicle.Chassis.Accelerator.PedalPosition is 2fabd8b61db45f62b4e97e7a612b4a73
Feedback
Do you think this Vehicle Signal specification needs enhancement? Do you want to discuss with experts? Try the following ressources to get in touch with the VSS community:
$ databroker-cli
sdv.databroker.v1 > connect
[connect] OK
sdv.databroker.v1 > get Vehicle.Chassis.AxleCount
[get] OK
Vehicle.Chassis.AxleCount: ( NotAvailable )sdv.databroker.v1 > set Vehicle.Chassis.AxleCount 2[set] OK
Digital Auto: Playground
playground.digital.auto provides an in-browser, rapid prototyping environment utilizing the COVESA APIs for connected vehicles.
The UUID for Vehicle.Chassis.AxleCount is 86d084c9148d5f22b5402a030413ed79
Feedback
Do you think this Vehicle Signal specification needs enhancement? Do you want to discuss with experts? Try the following ressources to get in touch with the VSS community:
Do you think this Vehicle Signal specification needs enhancement? Do you want to discuss with experts? Try the following ressources to get in touch with the VSS community:
$ databroker-cli
sdv.databroker.v1 > connect
[connect] OK
sdv.databroker.v1 > get Vehicle.Chassis.Brake.IsDriverEmergencyBrakingDetected
[get] OK
Vehicle.Chassis.Brake.IsDriverEmergencyBrakingDetected: ( NotAvailable )sdv.databroker.v1 > set Vehicle.Chassis.Brake.IsDriverEmergencyBrakingDetected false[set] OK
Digital Auto: Playground
playground.digital.auto provides an in-browser, rapid prototyping environment utilizing the COVESA APIs for connected vehicles.
The UUID for Vehicle.Chassis.Brake.IsDriverEmergencyBrakingDetected is 0d462892aeac5062a62ee7d07306f6a6
Feedback
Do you think this Vehicle Signal specification needs enhancement? Do you want to discuss with experts? Try the following ressources to get in touch with the VSS community:
$ databroker-cli
sdv.databroker.v1 > connect
[connect] OK
sdv.databroker.v1 > get Vehicle.Chassis.Brake.PedalPosition
[get] OK
Vehicle.Chassis.Brake.PedalPosition: ( NotAvailable )sdv.databroker.v1 > set Vehicle.Chassis.Brake.PedalPosition 0[set] OK
Digital Auto: Playground
playground.digital.auto provides an in-browser, rapid prototyping environment utilizing the COVESA APIs for connected vehicles.
The UUID for Vehicle.Chassis.Brake.PedalPosition is 0477d3a4a831564ea473976cf34374f2
Feedback
Do you think this Vehicle Signal specification needs enhancement? Do you want to discuss with experts? Try the following ressources to get in touch with the VSS community:
Do you think this Vehicle Signal specification needs enhancement? Do you want to discuss with experts? Try the following ressources to get in touch with the VSS community:
$ databroker-cli
sdv.databroker.v1 > connect
[connect] OK
sdv.databroker.v1 > get Vehicle.Chassis.ParkingBrake.IsEngaged
[get] OK
Vehicle.Chassis.ParkingBrake.IsEngaged: ( NotAvailable )sdv.databroker.v1 > set Vehicle.Chassis.ParkingBrake.IsEngaged false[set] OK
Digital Auto: Playground
playground.digital.auto provides an in-browser, rapid prototyping environment utilizing the COVESA APIs for connected vehicles.
The UUID for Vehicle.Chassis.ParkingBrake.IsEngaged is faa7f94e6a5555c6b2d62e3328520ce0
Feedback
Do you think this Vehicle Signal specification needs enhancement? Do you want to discuss with experts? Try the following ressources to get in touch with the VSS community:
Do you think this Vehicle Signal specification needs enhancement? Do you want to discuss with experts? Try the following ressources to get in touch with the VSS community:
$ databroker-cli
sdv.databroker.v1 > connect
[connect] OK
sdv.databroker.v1 > get Vehicle.Chassis.SteeringWheel.Angle
[get] OK
Vehicle.Chassis.SteeringWheel.Angle: ( NotAvailable )sdv.databroker.v1 > set Vehicle.Chassis.SteeringWheel.Angle 0[set] OK
Digital Auto: Playground
playground.digital.auto provides an in-browser, rapid prototyping environment utilizing the COVESA APIs for connected vehicles.
The UUID for Vehicle.Chassis.SteeringWheel.Angle is 92cd3b3d37585b2291806fe5127d9393
Feedback
Do you think this Vehicle Signal specification needs enhancement? Do you want to discuss with experts? Try the following ressources to get in touch with the VSS community:
$ databroker-cli
sdv.databroker.v1 > connect
[connect] OK
sdv.databroker.v1 > get Vehicle.Chassis.SteeringWheel.Extension
[get] OK
Vehicle.Chassis.SteeringWheel.Extension: ( NotAvailable )sdv.databroker.v1 > set Vehicle.Chassis.SteeringWheel.Extension 0[set] OK
Digital Auto: Playground
playground.digital.auto provides an in-browser, rapid prototyping environment utilizing the COVESA APIs for connected vehicles.
The UUID for Vehicle.Chassis.SteeringWheel.Extension is 6a84cc3604fc5960a1fb384fe63fae72
Feedback
Do you think this Vehicle Signal specification needs enhancement? Do you want to discuss with experts? Try the following ressources to get in touch with the VSS community:
$ databroker-cli
sdv.databroker.v1 > connect
[connect] OK
sdv.databroker.v1 > get Vehicle.Chassis.SteeringWheel.Position
[get] OK
Vehicle.Chassis.SteeringWheel.Position: ( NotAvailable )sdv.databroker.v1 > set Vehicle.Chassis.SteeringWheel.Position FRONT_LEFT
[set] OK
Digital Auto: Playground
playground.digital.auto provides an in-browser, rapid prototyping environment utilizing the COVESA APIs for connected vehicles.
The UUID for Vehicle.Chassis.SteeringWheel.Position is 314d6eeeba195098b36ae7f476d27824
Feedback
Do you think this Vehicle Signal specification needs enhancement? Do you want to discuss with experts? Try the following ressources to get in touch with the VSS community:
$ databroker-cli
sdv.databroker.v1 > connect
[connect] OK
sdv.databroker.v1 > get Vehicle.Chassis.SteeringWheel.Tilt
[get] OK
Vehicle.Chassis.SteeringWheel.Tilt: ( NotAvailable )sdv.databroker.v1 > set Vehicle.Chassis.SteeringWheel.Tilt 0[set] OK
Digital Auto: Playground
playground.digital.auto provides an in-browser, rapid prototyping environment utilizing the COVESA APIs for connected vehicles.
The UUID for Vehicle.Chassis.SteeringWheel.Tilt is 33e979769f91521d8080384447d06c00
Feedback
Do you think this Vehicle Signal specification needs enhancement? Do you want to discuss with experts? Try the following ressources to get in touch with the VSS community:
Do you think this Vehicle Signal specification needs enhancement? Do you want to discuss with experts? Try the following ressources to get in touch with the VSS community:
The UUID for Vehicle.Chassis.Axle.Row1 is d7e93a94af0752aaab36819f6be4f67a
Children
This vehicle signal is a branch or structure and thus has sub-pages:
Vehicle.Chassis.Axle.Row1.SteeringAngle (Single track two-axle model steering angle. Angle according to ISO 8855. Positive = degrees to the left. Negative = degrees to the right.)
Do you think this Vehicle Signal specification needs enhancement? Do you want to discuss with experts? Try the following ressources to get in touch with the VSS community:
$ databroker-cli
sdv.databroker.v1 > connect
[connect] OK
sdv.databroker.v1 > get Vehicle.Chassis.Axle.Row1.SteeringAngle
[get] OK
Vehicle.Chassis.Axle.Row1.SteeringAngle: ( NotAvailable )sdv.databroker.v1 > set Vehicle.Chassis.Axle.Row1.SteeringAngle 0[set] OK
Digital Auto: Playground
playground.digital.auto provides an in-browser, rapid prototyping environment utilizing the COVESA APIs for connected vehicles.
The UUID for Vehicle.Chassis.Axle.Row1.SteeringAngle is 91310e9ef88450c68791fbb07d83f104
Feedback
Do you think this Vehicle Signal specification needs enhancement? Do you want to discuss with experts? Try the following ressources to get in touch with the VSS community:
$ databroker-cli
sdv.databroker.v1 > connect
[connect] OK
sdv.databroker.v1 > get Vehicle.Chassis.Axle.Row1.TireAspectRatio
[get] OK
Vehicle.Chassis.Axle.Row1.TireAspectRatio: ( NotAvailable )sdv.databroker.v1 > set Vehicle.Chassis.Axle.Row1.TireAspectRatio 0[set] OK
Digital Auto: Playground
playground.digital.auto provides an in-browser, rapid prototyping environment utilizing the COVESA APIs for connected vehicles.
The UUID for Vehicle.Chassis.Axle.Row1.TireAspectRatio is 716fec24167e5c36b2b97daaf091f911
Feedback
Do you think this Vehicle Signal specification needs enhancement? Do you want to discuss with experts? Try the following ressources to get in touch with the VSS community:
$ databroker-cli
sdv.databroker.v1 > connect
[connect] OK
sdv.databroker.v1 > get Vehicle.Chassis.Axle.Row1.TireDiameter
[get] OK
Vehicle.Chassis.Axle.Row1.TireDiameter: ( NotAvailable )sdv.databroker.v1 > set Vehicle.Chassis.Axle.Row1.TireDiameter 0[set] OK
Digital Auto: Playground
playground.digital.auto provides an in-browser, rapid prototyping environment utilizing the COVESA APIs for connected vehicles.
The UUID for Vehicle.Chassis.Axle.Row1.TireDiameter is ed9f037c1b5d53c78c90b71179db1f4f
Feedback
Do you think this Vehicle Signal specification needs enhancement? Do you want to discuss with experts? Try the following ressources to get in touch with the VSS community:
$ databroker-cli
sdv.databroker.v1 > connect
[connect] OK
sdv.databroker.v1 > get Vehicle.Chassis.Axle.Row1.TireWidth
[get] OK
Vehicle.Chassis.Axle.Row1.TireWidth: ( NotAvailable )sdv.databroker.v1 > set Vehicle.Chassis.Axle.Row1.TireWidth 0[set] OK
Digital Auto: Playground
playground.digital.auto provides an in-browser, rapid prototyping environment utilizing the COVESA APIs for connected vehicles.
The UUID for Vehicle.Chassis.Axle.Row1.TireWidth is 3444d8773c215cd7a076d688eb7f1afc
Feedback
Do you think this Vehicle Signal specification needs enhancement? Do you want to discuss with experts? Try the following ressources to get in touch with the VSS community:
Do you think this Vehicle Signal specification needs enhancement? Do you want to discuss with experts? Try the following ressources to get in touch with the VSS community:
Do you think this Vehicle Signal specification needs enhancement? Do you want to discuss with experts? Try the following ressources to get in touch with the VSS community:
Do you think this Vehicle Signal specification needs enhancement? Do you want to discuss with experts? Try the following ressources to get in touch with the VSS community:
$ databroker-cli
sdv.databroker.v1 > connect
[connect] OK
sdv.databroker.v1 > get Vehicle.Chassis.Axle.Row1.Wheel.Left.Brake.FluidLevel
[get] OK
Vehicle.Chassis.Axle.Row1.Wheel.Left.Brake.FluidLevel: ( NotAvailable )sdv.databroker.v1 > set Vehicle.Chassis.Axle.Row1.Wheel.Left.Brake.FluidLevel 0[set] OK
Digital Auto: Playground
playground.digital.auto provides an in-browser, rapid prototyping environment utilizing the COVESA APIs for connected vehicles.
The UUID for Vehicle.Chassis.Axle.Row1.Wheel.Left.Brake.FluidLevel is 63aa9c4973ef50b18bd7214c9f2634c5
Feedback
Do you think this Vehicle Signal specification needs enhancement? Do you want to discuss with experts? Try the following ressources to get in touch with the VSS community:
$ databroker-cli
sdv.databroker.v1 > connect
[connect] OK
sdv.databroker.v1 > get Vehicle.Chassis.Axle.Row1.Wheel.Left.Brake.IsBrakesWorn
[get] OK
Vehicle.Chassis.Axle.Row1.Wheel.Left.Brake.IsBrakesWorn: ( NotAvailable )sdv.databroker.v1 > set Vehicle.Chassis.Axle.Row1.Wheel.Left.Brake.IsBrakesWorn false[set] OK
Digital Auto: Playground
playground.digital.auto provides an in-browser, rapid prototyping environment utilizing the COVESA APIs for connected vehicles.
The UUID for Vehicle.Chassis.Axle.Row1.Wheel.Left.Brake.IsBrakesWorn is 901771088eb35dec9e69b56a8cb3e8f5
Feedback
Do you think this Vehicle Signal specification needs enhancement? Do you want to discuss with experts? Try the following ressources to get in touch with the VSS community:
$ databroker-cli
sdv.databroker.v1 > connect
[connect] OK
sdv.databroker.v1 > get Vehicle.Chassis.Axle.Row1.Wheel.Left.Brake.IsFluidLevelLow
[get] OK
Vehicle.Chassis.Axle.Row1.Wheel.Left.Brake.IsFluidLevelLow: ( NotAvailable )sdv.databroker.v1 > set Vehicle.Chassis.Axle.Row1.Wheel.Left.Brake.IsFluidLevelLow false[set] OK
Digital Auto: Playground
playground.digital.auto provides an in-browser, rapid prototyping environment utilizing the COVESA APIs for connected vehicles.
The UUID for Vehicle.Chassis.Axle.Row1.Wheel.Left.Brake.IsFluidLevelLow is 713da56818e55714ac441e10870b3753
Feedback
Do you think this Vehicle Signal specification needs enhancement? Do you want to discuss with experts? Try the following ressources to get in touch with the VSS community:
$ databroker-cli
sdv.databroker.v1 > connect
[connect] OK
sdv.databroker.v1 > get Vehicle.Chassis.Axle.Row1.Wheel.Left.Brake.PadWear
[get] OK
Vehicle.Chassis.Axle.Row1.Wheel.Left.Brake.PadWear: ( NotAvailable )sdv.databroker.v1 > set Vehicle.Chassis.Axle.Row1.Wheel.Left.Brake.PadWear 0[set] OK
Digital Auto: Playground
playground.digital.auto provides an in-browser, rapid prototyping environment utilizing the COVESA APIs for connected vehicles.
The UUID for Vehicle.Chassis.Axle.Row1.Wheel.Left.Brake.PadWear is b4ed36f8143d512fadaca3e641739ee2
Feedback
Do you think this Vehicle Signal specification needs enhancement? Do you want to discuss with experts? Try the following ressources to get in touch with the VSS community:
$ databroker-cli
sdv.databroker.v1 > connect
[connect] OK
sdv.databroker.v1 > get Vehicle.Chassis.Axle.Row1.Wheel.Left.Speed
[get] OK
Vehicle.Chassis.Axle.Row1.Wheel.Left.Speed: ( NotAvailable )sdv.databroker.v1 > set Vehicle.Chassis.Axle.Row1.Wheel.Left.Speed 0[set] OK
Digital Auto: Playground
playground.digital.auto provides an in-browser, rapid prototyping environment utilizing the COVESA APIs for connected vehicles.
The UUID for Vehicle.Chassis.Axle.Row1.Wheel.Left.Speed is 47897f20b2745b6aa2d0f76f1ecf824a
Feedback
Do you think this Vehicle Signal specification needs enhancement? Do you want to discuss with experts? Try the following ressources to get in touch with the VSS community:
Do you think this Vehicle Signal specification needs enhancement? Do you want to discuss with experts? Try the following ressources to get in touch with the VSS community:
$ databroker-cli
sdv.databroker.v1 > connect
[connect] OK
sdv.databroker.v1 > get Vehicle.Chassis.Axle.Row1.Wheel.Left.Tire.IsPressureLow
[get] OK
Vehicle.Chassis.Axle.Row1.Wheel.Left.Tire.IsPressureLow: ( NotAvailable )sdv.databroker.v1 > set Vehicle.Chassis.Axle.Row1.Wheel.Left.Tire.IsPressureLow false[set] OK
Digital Auto: Playground
playground.digital.auto provides an in-browser, rapid prototyping environment utilizing the COVESA APIs for connected vehicles.
The UUID for Vehicle.Chassis.Axle.Row1.Wheel.Left.Tire.IsPressureLow is 4088315cfaa05c28b51c3d3462c65339
Feedback
Do you think this Vehicle Signal specification needs enhancement? Do you want to discuss with experts? Try the following ressources to get in touch with the VSS community:
$ databroker-cli
sdv.databroker.v1 > connect
[connect] OK
sdv.databroker.v1 > get Vehicle.Chassis.Axle.Row1.Wheel.Left.Tire.Pressure
[get] OK
Vehicle.Chassis.Axle.Row1.Wheel.Left.Tire.Pressure: ( NotAvailable )sdv.databroker.v1 > set Vehicle.Chassis.Axle.Row1.Wheel.Left.Tire.Pressure 0[set] OK
Digital Auto: Playground
playground.digital.auto provides an in-browser, rapid prototyping environment utilizing the COVESA APIs for connected vehicles.
The UUID for Vehicle.Chassis.Axle.Row1.Wheel.Left.Tire.Pressure is 9fa3f176fd975d28a68f70c7d72e370f
Feedback
Do you think this Vehicle Signal specification needs enhancement? Do you want to discuss with experts? Try the following ressources to get in touch with the VSS community:
$ databroker-cli
sdv.databroker.v1 > connect
[connect] OK
sdv.databroker.v1 > get Vehicle.Chassis.Axle.Row1.Wheel.Left.Tire.Temperature
[get] OK
Vehicle.Chassis.Axle.Row1.Wheel.Left.Tire.Temperature: ( NotAvailable )sdv.databroker.v1 > set Vehicle.Chassis.Axle.Row1.Wheel.Left.Tire.Temperature 0[set] OK
Digital Auto: Playground
playground.digital.auto provides an in-browser, rapid prototyping environment utilizing the COVESA APIs for connected vehicles.
The UUID for Vehicle.Chassis.Axle.Row1.Wheel.Left.Tire.Temperature is 093d8fb119755f6bafa979e4eae201a0
Feedback
Do you think this Vehicle Signal specification needs enhancement? Do you want to discuss with experts? Try the following ressources to get in touch with the VSS community:
Do you think this Vehicle Signal specification needs enhancement? Do you want to discuss with experts? Try the following ressources to get in touch with the VSS community:
Do you think this Vehicle Signal specification needs enhancement? Do you want to discuss with experts? Try the following ressources to get in touch with the VSS community:
$ databroker-cli
sdv.databroker.v1 > connect
[connect] OK
sdv.databroker.v1 > get Vehicle.Chassis.Axle.Row1.Wheel.Right.Brake.FluidLevel
[get] OK
Vehicle.Chassis.Axle.Row1.Wheel.Right.Brake.FluidLevel: ( NotAvailable )sdv.databroker.v1 > set Vehicle.Chassis.Axle.Row1.Wheel.Right.Brake.FluidLevel 0[set] OK
Digital Auto: Playground
playground.digital.auto provides an in-browser, rapid prototyping environment utilizing the COVESA APIs for connected vehicles.
The UUID for Vehicle.Chassis.Axle.Row1.Wheel.Right.Brake.FluidLevel is 386bfddee4605e419d59755a51835650
Feedback
Do you think this Vehicle Signal specification needs enhancement? Do you want to discuss with experts? Try the following ressources to get in touch with the VSS community:
$ databroker-cli
sdv.databroker.v1 > connect
[connect] OK
sdv.databroker.v1 > get Vehicle.Chassis.Axle.Row1.Wheel.Right.Brake.IsBrakesWorn
[get] OK
Vehicle.Chassis.Axle.Row1.Wheel.Right.Brake.IsBrakesWorn: ( NotAvailable )sdv.databroker.v1 > set Vehicle.Chassis.Axle.Row1.Wheel.Right.Brake.IsBrakesWorn false[set] OK
Digital Auto: Playground
playground.digital.auto provides an in-browser, rapid prototyping environment utilizing the COVESA APIs for connected vehicles.
The UUID for Vehicle.Chassis.Axle.Row1.Wheel.Right.Brake.IsBrakesWorn is 4c669b71c91e57dd8fd804ee68174b9c
Feedback
Do you think this Vehicle Signal specification needs enhancement? Do you want to discuss with experts? Try the following ressources to get in touch with the VSS community:
$ databroker-cli
sdv.databroker.v1 > connect
[connect] OK
sdv.databroker.v1 > get Vehicle.Chassis.Axle.Row1.Wheel.Right.Brake.IsFluidLevelLow
[get] OK
Vehicle.Chassis.Axle.Row1.Wheel.Right.Brake.IsFluidLevelLow: ( NotAvailable )sdv.databroker.v1 > set Vehicle.Chassis.Axle.Row1.Wheel.Right.Brake.IsFluidLevelLow false[set] OK
Digital Auto: Playground
playground.digital.auto provides an in-browser, rapid prototyping environment utilizing the COVESA APIs for connected vehicles.
The UUID for Vehicle.Chassis.Axle.Row1.Wheel.Right.Brake.IsFluidLevelLow is bb2057bc31c25beda1da0610ca62bd51
Feedback
Do you think this Vehicle Signal specification needs enhancement? Do you want to discuss with experts? Try the following ressources to get in touch with the VSS community:
$ databroker-cli
sdv.databroker.v1 > connect
[connect] OK
sdv.databroker.v1 > get Vehicle.Chassis.Axle.Row1.Wheel.Right.Brake.PadWear
[get] OK
Vehicle.Chassis.Axle.Row1.Wheel.Right.Brake.PadWear: ( NotAvailable )sdv.databroker.v1 > set Vehicle.Chassis.Axle.Row1.Wheel.Right.Brake.PadWear 0[set] OK
Digital Auto: Playground
playground.digital.auto provides an in-browser, rapid prototyping environment utilizing the COVESA APIs for connected vehicles.
The UUID for Vehicle.Chassis.Axle.Row1.Wheel.Right.Brake.PadWear is f3c53c8c5628527a8501e12778dae6c7
Feedback
Do you think this Vehicle Signal specification needs enhancement? Do you want to discuss with experts? Try the following ressources to get in touch with the VSS community:
$ databroker-cli
sdv.databroker.v1 > connect
[connect] OK
sdv.databroker.v1 > get Vehicle.Chassis.Axle.Row1.Wheel.Right.Speed
[get] OK
Vehicle.Chassis.Axle.Row1.Wheel.Right.Speed: ( NotAvailable )sdv.databroker.v1 > set Vehicle.Chassis.Axle.Row1.Wheel.Right.Speed 0[set] OK
Digital Auto: Playground
playground.digital.auto provides an in-browser, rapid prototyping environment utilizing the COVESA APIs for connected vehicles.
The UUID for Vehicle.Chassis.Axle.Row1.Wheel.Right.Speed is c288d064d56e53bfb94cef8670872587
Feedback
Do you think this Vehicle Signal specification needs enhancement? Do you want to discuss with experts? Try the following ressources to get in touch with the VSS community:
Do you think this Vehicle Signal specification needs enhancement? Do you want to discuss with experts? Try the following ressources to get in touch with the VSS community:
$ databroker-cli
sdv.databroker.v1 > connect
[connect] OK
sdv.databroker.v1 > get Vehicle.Chassis.Axle.Row1.Wheel.Right.Tire.IsPressureLow
[get] OK
Vehicle.Chassis.Axle.Row1.Wheel.Right.Tire.IsPressureLow: ( NotAvailable )sdv.databroker.v1 > set Vehicle.Chassis.Axle.Row1.Wheel.Right.Tire.IsPressureLow false[set] OK
Digital Auto: Playground
playground.digital.auto provides an in-browser, rapid prototyping environment utilizing the COVESA APIs for connected vehicles.
The UUID for Vehicle.Chassis.Axle.Row1.Wheel.Right.Tire.IsPressureLow is 93fa1125894e53259af5b7e1d991c8da
Feedback
Do you think this Vehicle Signal specification needs enhancement? Do you want to discuss with experts? Try the following ressources to get in touch with the VSS community:
$ databroker-cli
sdv.databroker.v1 > connect
[connect] OK
sdv.databroker.v1 > get Vehicle.Chassis.Axle.Row1.Wheel.Right.Tire.Pressure
[get] OK
Vehicle.Chassis.Axle.Row1.Wheel.Right.Tire.Pressure: ( NotAvailable )sdv.databroker.v1 > set Vehicle.Chassis.Axle.Row1.Wheel.Right.Tire.Pressure 0[set] OK
Digital Auto: Playground
playground.digital.auto provides an in-browser, rapid prototyping environment utilizing the COVESA APIs for connected vehicles.
The UUID for Vehicle.Chassis.Axle.Row1.Wheel.Right.Tire.Pressure is ea8038b63e6650ffb1a20539e915064a
Feedback
Do you think this Vehicle Signal specification needs enhancement? Do you want to discuss with experts? Try the following ressources to get in touch with the VSS community:
$ databroker-cli
sdv.databroker.v1 > connect
[connect] OK
sdv.databroker.v1 > get Vehicle.Chassis.Axle.Row1.Wheel.Right.Tire.Temperature
[get] OK
Vehicle.Chassis.Axle.Row1.Wheel.Right.Tire.Temperature: ( NotAvailable )sdv.databroker.v1 > set Vehicle.Chassis.Axle.Row1.Wheel.Right.Tire.Temperature 0[set] OK
Digital Auto: Playground
playground.digital.auto provides an in-browser, rapid prototyping environment utilizing the COVESA APIs for connected vehicles.
The UUID for Vehicle.Chassis.Axle.Row1.Wheel.Right.Tire.Temperature is 58d4cee188d353d7996e855d48bb92df
Feedback
Do you think this Vehicle Signal specification needs enhancement? Do you want to discuss with experts? Try the following ressources to get in touch with the VSS community:
$ databroker-cli
sdv.databroker.v1 > connect
[connect] OK
sdv.databroker.v1 > get Vehicle.Chassis.Axle.Row1.WheelCount
[get] OK
Vehicle.Chassis.Axle.Row1.WheelCount: ( NotAvailable )sdv.databroker.v1 > set Vehicle.Chassis.Axle.Row1.WheelCount 0[set] OK
Digital Auto: Playground
playground.digital.auto provides an in-browser, rapid prototyping environment utilizing the COVESA APIs for connected vehicles.
The UUID for Vehicle.Chassis.Axle.Row1.WheelCount is 7232effafb7d5c908a9bafe1cef2ff3e
Feedback
Do you think this Vehicle Signal specification needs enhancement? Do you want to discuss with experts? Try the following ressources to get in touch with the VSS community:
$ databroker-cli
sdv.databroker.v1 > connect
[connect] OK
sdv.databroker.v1 > get Vehicle.Chassis.Axle.Row1.WheelDiameter
[get] OK
Vehicle.Chassis.Axle.Row1.WheelDiameter: ( NotAvailable )sdv.databroker.v1 > set Vehicle.Chassis.Axle.Row1.WheelDiameter 0[set] OK
Digital Auto: Playground
playground.digital.auto provides an in-browser, rapid prototyping environment utilizing the COVESA APIs for connected vehicles.
The UUID for Vehicle.Chassis.Axle.Row1.WheelDiameter is 60d4b948ae8a5485bd77c45e1f648c13
Feedback
Do you think this Vehicle Signal specification needs enhancement? Do you want to discuss with experts? Try the following ressources to get in touch with the VSS community:
$ databroker-cli
sdv.databroker.v1 > connect
[connect] OK
sdv.databroker.v1 > get Vehicle.Chassis.Axle.Row1.WheelWidth
[get] OK
Vehicle.Chassis.Axle.Row1.WheelWidth: ( NotAvailable )sdv.databroker.v1 > set Vehicle.Chassis.Axle.Row1.WheelWidth 0[set] OK
Digital Auto: Playground
playground.digital.auto provides an in-browser, rapid prototyping environment utilizing the COVESA APIs for connected vehicles.
The UUID for Vehicle.Chassis.Axle.Row1.WheelWidth is 5b92bdab1e035ff4ba000330e20f826b
Feedback
Do you think this Vehicle Signal specification needs enhancement? Do you want to discuss with experts? Try the following ressources to get in touch with the VSS community:
The UUID for Vehicle.Chassis.Axle.Row2 is 8ef77768446659b6b5020a06c7b23c8b
Children
This vehicle signal is a branch or structure and thus has sub-pages:
Vehicle.Chassis.Axle.Row2.SteeringAngle (Single track two-axle model steering angle. Angle according to ISO 8855. Positive = degrees to the left. Negative = degrees to the right.)
Do you think this Vehicle Signal specification needs enhancement? Do you want to discuss with experts? Try the following ressources to get in touch with the VSS community:
$ databroker-cli
sdv.databroker.v1 > connect
[connect] OK
sdv.databroker.v1 > get Vehicle.Chassis.Axle.Row2.SteeringAngle
[get] OK
Vehicle.Chassis.Axle.Row2.SteeringAngle: ( NotAvailable )sdv.databroker.v1 > set Vehicle.Chassis.Axle.Row2.SteeringAngle 0[set] OK
Digital Auto: Playground
playground.digital.auto provides an in-browser, rapid prototyping environment utilizing the COVESA APIs for connected vehicles.
The UUID for Vehicle.Chassis.Axle.Row2.SteeringAngle is bf1960525e725d2ca145ce12ba939ea3
Feedback
Do you think this Vehicle Signal specification needs enhancement? Do you want to discuss with experts? Try the following ressources to get in touch with the VSS community:
$ databroker-cli
sdv.databroker.v1 > connect
[connect] OK
sdv.databroker.v1 > get Vehicle.Chassis.Axle.Row2.TireAspectRatio
[get] OK
Vehicle.Chassis.Axle.Row2.TireAspectRatio: ( NotAvailable )sdv.databroker.v1 > set Vehicle.Chassis.Axle.Row2.TireAspectRatio 0[set] OK
Digital Auto: Playground
playground.digital.auto provides an in-browser, rapid prototyping environment utilizing the COVESA APIs for connected vehicles.
The UUID for Vehicle.Chassis.Axle.Row2.TireAspectRatio is 9b4515273bf1554dab746212db05d352
Feedback
Do you think this Vehicle Signal specification needs enhancement? Do you want to discuss with experts? Try the following ressources to get in touch with the VSS community:
$ databroker-cli
sdv.databroker.v1 > connect
[connect] OK
sdv.databroker.v1 > get Vehicle.Chassis.Axle.Row2.TireDiameter
[get] OK
Vehicle.Chassis.Axle.Row2.TireDiameter: ( NotAvailable )sdv.databroker.v1 > set Vehicle.Chassis.Axle.Row2.TireDiameter 0[set] OK
Digital Auto: Playground
playground.digital.auto provides an in-browser, rapid prototyping environment utilizing the COVESA APIs for connected vehicles.
The UUID for Vehicle.Chassis.Axle.Row2.TireDiameter is 4dc46ee7fe0a5240a6eb67f9bf43a1ea
Feedback
Do you think this Vehicle Signal specification needs enhancement? Do you want to discuss with experts? Try the following ressources to get in touch with the VSS community:
$ databroker-cli
sdv.databroker.v1 > connect
[connect] OK
sdv.databroker.v1 > get Vehicle.Chassis.Axle.Row2.TireWidth
[get] OK
Vehicle.Chassis.Axle.Row2.TireWidth: ( NotAvailable )sdv.databroker.v1 > set Vehicle.Chassis.Axle.Row2.TireWidth 0[set] OK
Digital Auto: Playground
playground.digital.auto provides an in-browser, rapid prototyping environment utilizing the COVESA APIs for connected vehicles.
The UUID for Vehicle.Chassis.Axle.Row2.TireWidth is 76a9071697b25fb8ab42393dfb77f0ef
Feedback
Do you think this Vehicle Signal specification needs enhancement? Do you want to discuss with experts? Try the following ressources to get in touch with the VSS community:
Do you think this Vehicle Signal specification needs enhancement? Do you want to discuss with experts? Try the following ressources to get in touch with the VSS community:
Do you think this Vehicle Signal specification needs enhancement? Do you want to discuss with experts? Try the following ressources to get in touch with the VSS community:
Do you think this Vehicle Signal specification needs enhancement? Do you want to discuss with experts? Try the following ressources to get in touch with the VSS community:
$ databroker-cli
sdv.databroker.v1 > connect
[connect] OK
sdv.databroker.v1 > get Vehicle.Chassis.Axle.Row2.Wheel.Right.Brake.FluidLevel
[get] OK
Vehicle.Chassis.Axle.Row2.Wheel.Right.Brake.FluidLevel: ( NotAvailable )sdv.databroker.v1 > set Vehicle.Chassis.Axle.Row2.Wheel.Right.Brake.FluidLevel 0[set] OK
Digital Auto: Playground
playground.digital.auto provides an in-browser, rapid prototyping environment utilizing the COVESA APIs for connected vehicles.
The UUID for Vehicle.Chassis.Axle.Row2.Wheel.Right.Brake.FluidLevel is 83e5e261302d5ab38c9ee4dddc18c8ae
Feedback
Do you think this Vehicle Signal specification needs enhancement? Do you want to discuss with experts? Try the following ressources to get in touch with the VSS community:
$ databroker-cli
sdv.databroker.v1 > connect
[connect] OK
sdv.databroker.v1 > get Vehicle.Chassis.Axle.Row2.Wheel.Right.Brake.IsBrakesWorn
[get] OK
Vehicle.Chassis.Axle.Row2.Wheel.Right.Brake.IsBrakesWorn: ( NotAvailable )sdv.databroker.v1 > set Vehicle.Chassis.Axle.Row2.Wheel.Right.Brake.IsBrakesWorn false[set] OK
Digital Auto: Playground
playground.digital.auto provides an in-browser, rapid prototyping environment utilizing the COVESA APIs for connected vehicles.
The UUID for Vehicle.Chassis.Axle.Row2.Wheel.Right.Brake.IsBrakesWorn is 9b5963e98a9c5b229a61df76ef5c86e0
Feedback
Do you think this Vehicle Signal specification needs enhancement? Do you want to discuss with experts? Try the following ressources to get in touch with the VSS community:
$ databroker-cli
sdv.databroker.v1 > connect
[connect] OK
sdv.databroker.v1 > get Vehicle.Chassis.Axle.Row2.Wheel.Right.Brake.IsFluidLevelLow
[get] OK
Vehicle.Chassis.Axle.Row2.Wheel.Right.Brake.IsFluidLevelLow: ( NotAvailable )sdv.databroker.v1 > set Vehicle.Chassis.Axle.Row2.Wheel.Right.Brake.IsFluidLevelLow false[set] OK
Digital Auto: Playground
playground.digital.auto provides an in-browser, rapid prototyping environment utilizing the COVESA APIs for connected vehicles.
The UUID for Vehicle.Chassis.Axle.Row2.Wheel.Right.Brake.IsFluidLevelLow is 727823c7e0d551f48f26a5dd4f0578bd
Feedback
Do you think this Vehicle Signal specification needs enhancement? Do you want to discuss with experts? Try the following ressources to get in touch with the VSS community:
$ databroker-cli
sdv.databroker.v1 > connect
[connect] OK
sdv.databroker.v1 > get Vehicle.Chassis.Axle.Row2.Wheel.Right.Brake.PadWear
[get] OK
Vehicle.Chassis.Axle.Row2.Wheel.Right.Brake.PadWear: ( NotAvailable )sdv.databroker.v1 > set Vehicle.Chassis.Axle.Row2.Wheel.Right.Brake.PadWear 0[set] OK
Digital Auto: Playground
playground.digital.auto provides an in-browser, rapid prototyping environment utilizing the COVESA APIs for connected vehicles.
The UUID for Vehicle.Chassis.Axle.Row2.Wheel.Right.Brake.PadWear is 63a564bca18a5b1fabd7d3cff1af0e6d
Feedback
Do you think this Vehicle Signal specification needs enhancement? Do you want to discuss with experts? Try the following ressources to get in touch with the VSS community:
$ databroker-cli
sdv.databroker.v1 > connect
[connect] OK
sdv.databroker.v1 > get Vehicle.Chassis.Axle.Row2.Wheel.Right.Speed
[get] OK
Vehicle.Chassis.Axle.Row2.Wheel.Right.Speed: ( NotAvailable )sdv.databroker.v1 > set Vehicle.Chassis.Axle.Row2.Wheel.Right.Speed 0[set] OK
Digital Auto: Playground
playground.digital.auto provides an in-browser, rapid prototyping environment utilizing the COVESA APIs for connected vehicles.
The UUID for Vehicle.Chassis.Axle.Row2.Wheel.Right.Speed is 85b41a82f4775fcea57dcc6218fb6d7b
Feedback
Do you think this Vehicle Signal specification needs enhancement? Do you want to discuss with experts? Try the following ressources to get in touch with the VSS community:
Do you think this Vehicle Signal specification needs enhancement? Do you want to discuss with experts? Try the following ressources to get in touch with the VSS community:
$ databroker-cli
sdv.databroker.v1 > connect
[connect] OK
sdv.databroker.v1 > get Vehicle.Chassis.Axle.Row2.Wheel.Right.Tire.IsPressureLow
[get] OK
Vehicle.Chassis.Axle.Row2.Wheel.Right.Tire.IsPressureLow: ( NotAvailable )sdv.databroker.v1 > set Vehicle.Chassis.Axle.Row2.Wheel.Right.Tire.IsPressureLow false[set] OK
Digital Auto: Playground
playground.digital.auto provides an in-browser, rapid prototyping environment utilizing the COVESA APIs for connected vehicles.
The UUID for Vehicle.Chassis.Axle.Row2.Wheel.Right.Tire.IsPressureLow is da2f63312a455d92abd5edc405f01903
Feedback
Do you think this Vehicle Signal specification needs enhancement? Do you want to discuss with experts? Try the following ressources to get in touch with the VSS community:
$ databroker-cli
sdv.databroker.v1 > connect
[connect] OK
sdv.databroker.v1 > get Vehicle.Chassis.Axle.Row2.Wheel.Right.Tire.Pressure
[get] OK
Vehicle.Chassis.Axle.Row2.Wheel.Right.Tire.Pressure: ( NotAvailable )sdv.databroker.v1 > set Vehicle.Chassis.Axle.Row2.Wheel.Right.Tire.Pressure 0[set] OK
Digital Auto: Playground
playground.digital.auto provides an in-browser, rapid prototyping environment utilizing the COVESA APIs for connected vehicles.
The UUID for Vehicle.Chassis.Axle.Row2.Wheel.Right.Tire.Pressure is 0cd3dd4be36c5fcda49d6360556ba7c8
Feedback
Do you think this Vehicle Signal specification needs enhancement? Do you want to discuss with experts? Try the following ressources to get in touch with the VSS community:
$ databroker-cli
sdv.databroker.v1 > connect
[connect] OK
sdv.databroker.v1 > get Vehicle.Chassis.Axle.Row2.Wheel.Right.Tire.Temperature
[get] OK
Vehicle.Chassis.Axle.Row2.Wheel.Right.Tire.Temperature: ( NotAvailable )sdv.databroker.v1 > set Vehicle.Chassis.Axle.Row2.Wheel.Right.Tire.Temperature 0[set] OK
Digital Auto: Playground
playground.digital.auto provides an in-browser, rapid prototyping environment utilizing the COVESA APIs for connected vehicles.
The UUID for Vehicle.Chassis.Axle.Row2.Wheel.Right.Tire.Temperature is 7c08b5778bc05265bb8d4e08fdca29cf
Feedback
Do you think this Vehicle Signal specification needs enhancement? Do you want to discuss with experts? Try the following ressources to get in touch with the VSS community:
Do you think this Vehicle Signal specification needs enhancement? Do you want to discuss with experts? Try the following ressources to get in touch with the VSS community:
$ databroker-cli
sdv.databroker.v1 > connect
[connect] OK
sdv.databroker.v1 > get Vehicle.Chassis.Axle.Row2.Wheel.Left.Speed
[get] OK
Vehicle.Chassis.Axle.Row2.Wheel.Left.Speed: ( NotAvailable )sdv.databroker.v1 > set Vehicle.Chassis.Axle.Row2.Wheel.Left.Speed 0[set] OK
Digital Auto: Playground
playground.digital.auto provides an in-browser, rapid prototyping environment utilizing the COVESA APIs for connected vehicles.
The UUID for Vehicle.Chassis.Axle.Row2.Wheel.Left.Speed is 427abdd04fc355769697d998a47d3f58
Feedback
Do you think this Vehicle Signal specification needs enhancement? Do you want to discuss with experts? Try the following ressources to get in touch with the VSS community:
Do you think this Vehicle Signal specification needs enhancement? Do you want to discuss with experts? Try the following ressources to get in touch with the VSS community:
$ databroker-cli
sdv.databroker.v1 > connect
[connect] OK
sdv.databroker.v1 > get Vehicle.Chassis.Axle.Row2.Wheel.Left.Tire.IsPressureLow
[get] OK
Vehicle.Chassis.Axle.Row2.Wheel.Left.Tire.IsPressureLow: ( NotAvailable )sdv.databroker.v1 > set Vehicle.Chassis.Axle.Row2.Wheel.Left.Tire.IsPressureLow false[set] OK
Digital Auto: Playground
playground.digital.auto provides an in-browser, rapid prototyping environment utilizing the COVESA APIs for connected vehicles.
The UUID for Vehicle.Chassis.Axle.Row2.Wheel.Left.Tire.IsPressureLow is d895b1e23a4f59ec92735fc317e44769
Feedback
Do you think this Vehicle Signal specification needs enhancement? Do you want to discuss with experts? Try the following ressources to get in touch with the VSS community:
$ databroker-cli
sdv.databroker.v1 > connect
[connect] OK
sdv.databroker.v1 > get Vehicle.Chassis.Axle.Row2.Wheel.Left.Tire.Pressure
[get] OK
Vehicle.Chassis.Axle.Row2.Wheel.Left.Tire.Pressure: ( NotAvailable )sdv.databroker.v1 > set Vehicle.Chassis.Axle.Row2.Wheel.Left.Tire.Pressure 0[set] OK
Digital Auto: Playground
playground.digital.auto provides an in-browser, rapid prototyping environment utilizing the COVESA APIs for connected vehicles.
The UUID for Vehicle.Chassis.Axle.Row2.Wheel.Left.Tire.Pressure is ea414012c36e54fc84ec1d421f370ddd
Feedback
Do you think this Vehicle Signal specification needs enhancement? Do you want to discuss with experts? Try the following ressources to get in touch with the VSS community:
$ databroker-cli
sdv.databroker.v1 > connect
[connect] OK
sdv.databroker.v1 > get Vehicle.Chassis.Axle.Row2.Wheel.Left.Tire.Temperature
[get] OK
Vehicle.Chassis.Axle.Row2.Wheel.Left.Tire.Temperature: ( NotAvailable )sdv.databroker.v1 > set Vehicle.Chassis.Axle.Row2.Wheel.Left.Tire.Temperature 0[set] OK
Digital Auto: Playground
playground.digital.auto provides an in-browser, rapid prototyping environment utilizing the COVESA APIs for connected vehicles.
The UUID for Vehicle.Chassis.Axle.Row2.Wheel.Left.Tire.Temperature is 06ab6b3fe7bb5f7c9e2e104ee0e7cfd5
Feedback
Do you think this Vehicle Signal specification needs enhancement? Do you want to discuss with experts? Try the following ressources to get in touch with the VSS community:
Do you think this Vehicle Signal specification needs enhancement? Do you want to discuss with experts? Try the following ressources to get in touch with the VSS community:
$ databroker-cli
sdv.databroker.v1 > connect
[connect] OK
sdv.databroker.v1 > get Vehicle.Chassis.Axle.Row2.Wheel.Left.Brake.FluidLevel
[get] OK
Vehicle.Chassis.Axle.Row2.Wheel.Left.Brake.FluidLevel: ( NotAvailable )sdv.databroker.v1 > set Vehicle.Chassis.Axle.Row2.Wheel.Left.Brake.FluidLevel 0[set] OK
Digital Auto: Playground
playground.digital.auto provides an in-browser, rapid prototyping environment utilizing the COVESA APIs for connected vehicles.
The UUID for Vehicle.Chassis.Axle.Row2.Wheel.Left.Brake.FluidLevel is 4b0d4f80b8855973a55ffee80fdfc4ba
Feedback
Do you think this Vehicle Signal specification needs enhancement? Do you want to discuss with experts? Try the following ressources to get in touch with the VSS community:
$ databroker-cli
sdv.databroker.v1 > connect
[connect] OK
sdv.databroker.v1 > get Vehicle.Chassis.Axle.Row2.Wheel.Left.Brake.IsBrakesWorn
[get] OK
Vehicle.Chassis.Axle.Row2.Wheel.Left.Brake.IsBrakesWorn: ( NotAvailable )sdv.databroker.v1 > set Vehicle.Chassis.Axle.Row2.Wheel.Left.Brake.IsBrakesWorn false[set] OK
Digital Auto: Playground
playground.digital.auto provides an in-browser, rapid prototyping environment utilizing the COVESA APIs for connected vehicles.
The UUID for Vehicle.Chassis.Axle.Row2.Wheel.Left.Brake.IsBrakesWorn is 3d9bae5bf0705de99789ecea26b99a5c
Feedback
Do you think this Vehicle Signal specification needs enhancement? Do you want to discuss with experts? Try the following ressources to get in touch with the VSS community:
$ databroker-cli
sdv.databroker.v1 > connect
[connect] OK
sdv.databroker.v1 > get Vehicle.Chassis.Axle.Row2.Wheel.Left.Brake.IsFluidLevelLow
[get] OK
Vehicle.Chassis.Axle.Row2.Wheel.Left.Brake.IsFluidLevelLow: ( NotAvailable )sdv.databroker.v1 > set Vehicle.Chassis.Axle.Row2.Wheel.Left.Brake.IsFluidLevelLow false[set] OK
Digital Auto: Playground
playground.digital.auto provides an in-browser, rapid prototyping environment utilizing the COVESA APIs for connected vehicles.
The UUID for Vehicle.Chassis.Axle.Row2.Wheel.Left.Brake.IsFluidLevelLow is 01f57161b0bf539fad1d2bfa9d9a9fc4
Feedback
Do you think this Vehicle Signal specification needs enhancement? Do you want to discuss with experts? Try the following ressources to get in touch with the VSS community:
$ databroker-cli
sdv.databroker.v1 > connect
[connect] OK
sdv.databroker.v1 > get Vehicle.Chassis.Axle.Row2.Wheel.Left.Brake.PadWear
[get] OK
Vehicle.Chassis.Axle.Row2.Wheel.Left.Brake.PadWear: ( NotAvailable )sdv.databroker.v1 > set Vehicle.Chassis.Axle.Row2.Wheel.Left.Brake.PadWear 0[set] OK
Digital Auto: Playground
playground.digital.auto provides an in-browser, rapid prototyping environment utilizing the COVESA APIs for connected vehicles.
The UUID for Vehicle.Chassis.Axle.Row2.Wheel.Left.Brake.PadWear is 8eff72d583015e1e94eab98bf8f0497e
Feedback
Do you think this Vehicle Signal specification needs enhancement? Do you want to discuss with experts? Try the following ressources to get in touch with the VSS community:
$ databroker-cli
sdv.databroker.v1 > connect
[connect] OK
sdv.databroker.v1 > get Vehicle.Chassis.Axle.Row2.WheelCount
[get] OK
Vehicle.Chassis.Axle.Row2.WheelCount: ( NotAvailable )sdv.databroker.v1 > set Vehicle.Chassis.Axle.Row2.WheelCount 0[set] OK
Digital Auto: Playground
playground.digital.auto provides an in-browser, rapid prototyping environment utilizing the COVESA APIs for connected vehicles.
The UUID for Vehicle.Chassis.Axle.Row2.WheelCount is ac6fe103410153d382306426d14213ab
Feedback
Do you think this Vehicle Signal specification needs enhancement? Do you want to discuss with experts? Try the following ressources to get in touch with the VSS community:
$ databroker-cli
sdv.databroker.v1 > connect
[connect] OK
sdv.databroker.v1 > get Vehicle.Chassis.Axle.Row2.WheelDiameter
[get] OK
Vehicle.Chassis.Axle.Row2.WheelDiameter: ( NotAvailable )sdv.databroker.v1 > set Vehicle.Chassis.Axle.Row2.WheelDiameter 0[set] OK
Digital Auto: Playground
playground.digital.auto provides an in-browser, rapid prototyping environment utilizing the COVESA APIs for connected vehicles.
The UUID for Vehicle.Chassis.Axle.Row2.WheelDiameter is af27b1d18a5455e593692a9929909bb9
Feedback
Do you think this Vehicle Signal specification needs enhancement? Do you want to discuss with experts? Try the following ressources to get in touch with the VSS community:
$ databroker-cli
sdv.databroker.v1 > connect
[connect] OK
sdv.databroker.v1 > get Vehicle.Chassis.Axle.Row2.WheelWidth
[get] OK
Vehicle.Chassis.Axle.Row2.WheelWidth: ( NotAvailable )sdv.databroker.v1 > set Vehicle.Chassis.Axle.Row2.WheelWidth 0[set] OK
Digital Auto: Playground
playground.digital.auto provides an in-browser, rapid prototyping environment utilizing the COVESA APIs for connected vehicles.
The UUID for Vehicle.Chassis.Axle.Row2.WheelWidth is 889d279053c051979ebbe301bacac206
Feedback
Do you think this Vehicle Signal specification needs enhancement? Do you want to discuss with experts? Try the following ressources to get in touch with the VSS community:
$ databroker-cli
sdv.databroker.v1 > connect
[connect] OK
sdv.databroker.v1 > get Vehicle.Chassis.Track
[get] OK
Vehicle.Chassis.Track: ( NotAvailable )sdv.databroker.v1 > set Vehicle.Chassis.Track 0[set] OK
Digital Auto: Playground
playground.digital.auto provides an in-browser, rapid prototyping environment utilizing the COVESA APIs for connected vehicles.
The UUID for Vehicle.Chassis.Track is f66cc4e6d7cf5e1da0d58af902dbb36b
Feedback
Do you think this Vehicle Signal specification needs enhancement? Do you want to discuss with experts? Try the following ressources to get in touch with the VSS community:
$ databroker-cli
sdv.databroker.v1 > connect
[connect] OK
sdv.databroker.v1 > get Vehicle.Chassis.Wheelbase
[get] OK
Vehicle.Chassis.Wheelbase: ( NotAvailable )sdv.databroker.v1 > set Vehicle.Chassis.Wheelbase 0[set] OK
Digital Auto: Playground
playground.digital.auto provides an in-browser, rapid prototyping environment utilizing the COVESA APIs for connected vehicles.
The UUID for Vehicle.Chassis.Wheelbase is 11677e0433935dc7aa9c1806c96a8a6b
Feedback
Do you think this Vehicle Signal specification needs enhancement? Do you want to discuss with experts? Try the following ressources to get in touch with the VSS community:
Vehicle.ADAS.PowerOptimizeLevel (Power optimization level for this branch/subsystem. A higher number indicates more aggressive power optimization. Level 0 indicates that all functionality is enabled, no power optimization enabled. Level 10 indicates most aggressive power optimization mode, only essential functionality enabled.)
Do you think this Vehicle Signal specification needs enhancement? Do you want to discuss with experts? Try the following ressources to get in touch with the VSS community:
Vehicle.ADAS.EBA.IsEngaged (Indicates if EBA is currently regulating brake pressure. True = Engaged. False = Not Engaged.)
Vehicle.ADAS.EBA.IsError (Indicates if EBA incurred an error condition. True = Error. False = No Error.)
Feedback
Do you think this Vehicle Signal specification needs enhancement? Do you want to discuss with experts? Try the following ressources to get in touch with the VSS community:
$ databroker-cli
sdv.databroker.v1 > connect
[connect] OK
sdv.databroker.v1 > get Vehicle.ADAS.EBA.IsEnabled
[get] OK
Vehicle.ADAS.EBA.IsEnabled: ( NotAvailable )sdv.databroker.v1 > set Vehicle.ADAS.EBA.IsEnabled false[set] OK
Digital Auto: Playground
playground.digital.auto provides an in-browser, rapid prototyping environment utilizing the COVESA APIs for connected vehicles.
The UUID for Vehicle.ADAS.EBA.IsEnabled is 3ae9171b69555fb08855054ab38e9b17
Feedback
Do you think this Vehicle Signal specification needs enhancement? Do you want to discuss with experts? Try the following ressources to get in touch with the VSS community:
$ databroker-cli
sdv.databroker.v1 > connect
[connect] OK
sdv.databroker.v1 > get Vehicle.ADAS.EBA.IsEngaged
[get] OK
Vehicle.ADAS.EBA.IsEngaged: ( NotAvailable )sdv.databroker.v1 > set Vehicle.ADAS.EBA.IsEngaged false[set] OK
Digital Auto: Playground
playground.digital.auto provides an in-browser, rapid prototyping environment utilizing the COVESA APIs for connected vehicles.
The UUID for Vehicle.ADAS.EBA.IsEngaged is 86360c44ead354d18af7ff14176151f6
Feedback
Do you think this Vehicle Signal specification needs enhancement? Do you want to discuss with experts? Try the following ressources to get in touch with the VSS community:
$ databroker-cli
sdv.databroker.v1 > connect
[connect] OK
sdv.databroker.v1 > get Vehicle.ADAS.EBA.IsError
[get] OK
Vehicle.ADAS.EBA.IsError: ( NotAvailable )sdv.databroker.v1 > set Vehicle.ADAS.EBA.IsError false[set] OK
Digital Auto: Playground
playground.digital.auto provides an in-browser, rapid prototyping environment utilizing the COVESA APIs for connected vehicles.
The UUID for Vehicle.ADAS.EBA.IsError is bae0fe856398502ba4a09283867c6c81
Feedback
Do you think this Vehicle Signal specification needs enhancement? Do you want to discuss with experts? Try the following ressources to get in touch with the VSS community:
Vehicle.ADAS.EBD.IsEngaged (Indicates if EBD is currently regulating vehicle brakeforce distribution. True = Engaged. False = Not Engaged.)
Vehicle.ADAS.EBD.IsError (Indicates if EBD incurred an error condition. True = Error. False = No Error.)
Feedback
Do you think this Vehicle Signal specification needs enhancement? Do you want to discuss with experts? Try the following ressources to get in touch with the VSS community:
$ databroker-cli
sdv.databroker.v1 > connect
[connect] OK
sdv.databroker.v1 > get Vehicle.ADAS.EBD.IsEnabled
[get] OK
Vehicle.ADAS.EBD.IsEnabled: ( NotAvailable )sdv.databroker.v1 > set Vehicle.ADAS.EBD.IsEnabled false[set] OK
Digital Auto: Playground
playground.digital.auto provides an in-browser, rapid prototyping environment utilizing the COVESA APIs for connected vehicles.
The UUID for Vehicle.ADAS.EBD.IsEnabled is 30f88d3e68575b67853b14ce5f7a08e5
Feedback
Do you think this Vehicle Signal specification needs enhancement? Do you want to discuss with experts? Try the following ressources to get in touch with the VSS community:
$ databroker-cli
sdv.databroker.v1 > connect
[connect] OK
sdv.databroker.v1 > get Vehicle.ADAS.EBD.IsEngaged
[get] OK
Vehicle.ADAS.EBD.IsEngaged: ( NotAvailable )sdv.databroker.v1 > set Vehicle.ADAS.EBD.IsEngaged false[set] OK
Digital Auto: Playground
playground.digital.auto provides an in-browser, rapid prototyping environment utilizing the COVESA APIs for connected vehicles.
The UUID for Vehicle.ADAS.EBD.IsEngaged is 67aa2a598f635edda6eb944af99b06db
Feedback
Do you think this Vehicle Signal specification needs enhancement? Do you want to discuss with experts? Try the following ressources to get in touch with the VSS community:
$ databroker-cli
sdv.databroker.v1 > connect
[connect] OK
sdv.databroker.v1 > get Vehicle.ADAS.EBD.IsError
[get] OK
Vehicle.ADAS.EBD.IsError: ( NotAvailable )sdv.databroker.v1 > set Vehicle.ADAS.EBD.IsError false[set] OK
Digital Auto: Playground
playground.digital.auto provides an in-browser, rapid prototyping environment utilizing the COVESA APIs for connected vehicles.
The UUID for Vehicle.ADAS.EBD.IsError is 918157073be95015ae38913cd7a9796a
Feedback
Do you think this Vehicle Signal specification needs enhancement? Do you want to discuss with experts? Try the following ressources to get in touch with the VSS community:
Vehicle.ADAS.ESC.IsEngaged (Indicates if ESC is currently regulating vehicle stability. True = Engaged. False = Not Engaged.)
Vehicle.ADAS.ESC.IsError (Indicates if ESC incurred an error condition. True = Error. False = No Error.)
Vehicle.ADAS.ESC.IsStrongCrossWindDetected (Indicates if the ESC system is detecting strong cross winds. True = Strong cross winds detected. False = No strong cross winds detected.)
Do you think this Vehicle Signal specification needs enhancement? Do you want to discuss with experts? Try the following ressources to get in touch with the VSS community:
$ databroker-cli
sdv.databroker.v1 > connect
[connect] OK
sdv.databroker.v1 > get Vehicle.ADAS.ESC.IsEnabled
[get] OK
Vehicle.ADAS.ESC.IsEnabled: ( NotAvailable )sdv.databroker.v1 > set Vehicle.ADAS.ESC.IsEnabled false[set] OK
Digital Auto: Playground
playground.digital.auto provides an in-browser, rapid prototyping environment utilizing the COVESA APIs for connected vehicles.
The UUID for Vehicle.ADAS.ESC.IsEnabled is 3f4f39b8d8c05c97a6de685282ba74b7
Feedback
Do you think this Vehicle Signal specification needs enhancement? Do you want to discuss with experts? Try the following ressources to get in touch with the VSS community:
$ databroker-cli
sdv.databroker.v1 > connect
[connect] OK
sdv.databroker.v1 > get Vehicle.ADAS.ESC.IsEngaged
[get] OK
Vehicle.ADAS.ESC.IsEngaged: ( NotAvailable )sdv.databroker.v1 > set Vehicle.ADAS.ESC.IsEngaged false[set] OK
Digital Auto: Playground
playground.digital.auto provides an in-browser, rapid prototyping environment utilizing the COVESA APIs for connected vehicles.
The UUID for Vehicle.ADAS.ESC.IsEngaged is 2088953a28385353a9d46b3a3dc11cac
Feedback
Do you think this Vehicle Signal specification needs enhancement? Do you want to discuss with experts? Try the following ressources to get in touch with the VSS community:
$ databroker-cli
sdv.databroker.v1 > connect
[connect] OK
sdv.databroker.v1 > get Vehicle.ADAS.ESC.IsError
[get] OK
Vehicle.ADAS.ESC.IsError: ( NotAvailable )sdv.databroker.v1 > set Vehicle.ADAS.ESC.IsError false[set] OK
Digital Auto: Playground
playground.digital.auto provides an in-browser, rapid prototyping environment utilizing the COVESA APIs for connected vehicles.
The UUID for Vehicle.ADAS.ESC.IsError is 6c237535654b5bc7a70f6a70c760b9d4
Feedback
Do you think this Vehicle Signal specification needs enhancement? Do you want to discuss with experts? Try the following ressources to get in touch with the VSS community:
$ databroker-cli
sdv.databroker.v1 > connect
[connect] OK
sdv.databroker.v1 > get Vehicle.ADAS.ESC.IsStrongCrossWindDetected
[get] OK
Vehicle.ADAS.ESC.IsStrongCrossWindDetected: ( NotAvailable )sdv.databroker.v1 > set Vehicle.ADAS.ESC.IsStrongCrossWindDetected false[set] OK
Digital Auto: Playground
playground.digital.auto provides an in-browser, rapid prototyping environment utilizing the COVESA APIs for connected vehicles.
The UUID for Vehicle.ADAS.ESC.IsStrongCrossWindDetected is ebfd609531345c37914b89e553df80cb
Feedback
Do you think this Vehicle Signal specification needs enhancement? Do you want to discuss with experts? Try the following ressources to get in touch with the VSS community:
The UUID for Vehicle.ADAS.ESC.RoadFriction is 71a32e4eb131532c82195508d93807ed
Children
This vehicle signal is a branch or structure and thus has sub-pages:
Vehicle.ADAS.ESC.RoadFriction.LowerBound (Lower bound road friction, as calculated by the ESC system. 5% possibility that road friction is below this value. 0 = no friction, 100 = maximum friction.)
Vehicle.ADAS.ESC.RoadFriction.MostProbable (Most probable road friction, as calculated by the ESC system. Exact meaning of most probable is implementation specific. 0 = no friction, 100 = maximum friction.)
Vehicle.ADAS.ESC.RoadFriction.UpperBound (Upper bound road friction, as calculated by the ESC system. 95% possibility that road friction is below this value. 0 = no friction, 100 = maximum friction.)
Feedback
Do you think this Vehicle Signal specification needs enhancement? Do you want to discuss with experts? Try the following ressources to get in touch with the VSS community:
Lower bound road friction, as calculated by the ESC system. 5% possibility that road friction is below this value. 0 = no friction, 100 = maximum friction.
Navigation
flowchart LR
Vehicle-->ADAS
ADAS-->ESC
ESC-->RoadFriction
RoadFriction-->LowerBound
$ databroker-cli
sdv.databroker.v1 > connect
[connect] OK
sdv.databroker.v1 > get Vehicle.ADAS.ESC.RoadFriction.LowerBound
[get] OK
Vehicle.ADAS.ESC.RoadFriction.LowerBound: ( NotAvailable )sdv.databroker.v1 > set Vehicle.ADAS.ESC.RoadFriction.LowerBound 0[set] OK
Digital Auto: Playground
playground.digital.auto provides an in-browser, rapid prototyping environment utilizing the COVESA APIs for connected vehicles.
The UUID for Vehicle.ADAS.ESC.RoadFriction.LowerBound is 634289f58b5d511ea9979f04a9d0f2ab
Feedback
Do you think this Vehicle Signal specification needs enhancement? Do you want to discuss with experts? Try the following ressources to get in touch with the VSS community:
The following is a list of VSS supported built-in datatypes:
Name
Type
Min
Max
uint8
unsigned 8-bit integer
0
255
int8
signed 8-bit integer
-128
127
uint16
unsigned 16-bit integer
0
65535
int16
signed 16-bit integer
-32768
32767
uint32
unsigned 32-bit integer
0
4294967295
int32
signed 32-bit integer
-2147483648
2147483647
uint64
unsigned 64-bit integer
0
2^64 - 1
int64
signed 64-bit integer
-2^63
2^63 - 1
boolean
boolean value
0/false
1/true
float
floating point number
-3.4e -38
3.4e 38
double
double precision floating point number
-1.7e -300
1.7e 300
string
character string
n/a
n/a
Min, max and default values defined in a Vehicle Signal Specification must be in the supported range of the data type.
5.1.7.3.5.2 - MostProbable
Full qualified VSS Path:
Vehicle.ADAS.ESC.RoadFriction.MostProbable
Description:
Most probable road friction, as calculated by the ESC system. Exact meaning of most probable is implementation specific. 0 = no friction, 100 = maximum friction.
Navigation
flowchart LR
Vehicle-->ADAS
ADAS-->ESC
ESC-->RoadFriction
RoadFriction-->MostProbable
$ databroker-cli
sdv.databroker.v1 > connect
[connect] OK
sdv.databroker.v1 > get Vehicle.ADAS.ESC.RoadFriction.MostProbable
[get] OK
Vehicle.ADAS.ESC.RoadFriction.MostProbable: ( NotAvailable )sdv.databroker.v1 > set Vehicle.ADAS.ESC.RoadFriction.MostProbable 0[set] OK
Digital Auto: Playground
playground.digital.auto provides an in-browser, rapid prototyping environment utilizing the COVESA APIs for connected vehicles.
The UUID for Vehicle.ADAS.ESC.RoadFriction.MostProbable is b0eb72430cd95bfbba0d187fcb6e2a62
Feedback
Do you think this Vehicle Signal specification needs enhancement? Do you want to discuss with experts? Try the following ressources to get in touch with the VSS community:
The following is a list of VSS supported built-in datatypes:
Name
Type
Min
Max
uint8
unsigned 8-bit integer
0
255
int8
signed 8-bit integer
-128
127
uint16
unsigned 16-bit integer
0
65535
int16
signed 16-bit integer
-32768
32767
uint32
unsigned 32-bit integer
0
4294967295
int32
signed 32-bit integer
-2147483648
2147483647
uint64
unsigned 64-bit integer
0
2^64 - 1
int64
signed 64-bit integer
-2^63
2^63 - 1
boolean
boolean value
0/false
1/true
float
floating point number
-3.4e -38
3.4e 38
double
double precision floating point number
-1.7e -300
1.7e 300
string
character string
n/a
n/a
Min, max and default values defined in a Vehicle Signal Specification must be in the supported range of the data type.
5.1.7.3.5.3 - UpperBound
Full qualified VSS Path:
Vehicle.ADAS.ESC.RoadFriction.UpperBound
Description:
Upper bound road friction, as calculated by the ESC system. 95% possibility that road friction is below this value. 0 = no friction, 100 = maximum friction.
Navigation
flowchart LR
Vehicle-->ADAS
ADAS-->ESC
ESC-->RoadFriction
RoadFriction-->UpperBound
$ databroker-cli
sdv.databroker.v1 > connect
[connect] OK
sdv.databroker.v1 > get Vehicle.ADAS.ESC.RoadFriction.UpperBound
[get] OK
Vehicle.ADAS.ESC.RoadFriction.UpperBound: ( NotAvailable )sdv.databroker.v1 > set Vehicle.ADAS.ESC.RoadFriction.UpperBound 0[set] OK
Digital Auto: Playground
playground.digital.auto provides an in-browser, rapid prototyping environment utilizing the COVESA APIs for connected vehicles.
The UUID for Vehicle.ADAS.ESC.RoadFriction.UpperBound is ad0415a799575fcd8d1f49bed9a2baeb
Feedback
Do you think this Vehicle Signal specification needs enhancement? Do you want to discuss with experts? Try the following ressources to get in touch with the VSS community:
The following is a list of VSS supported built-in datatypes:
Name
Type
Min
Max
uint8
unsigned 8-bit integer
0
255
int8
signed 8-bit integer
-128
127
uint16
unsigned 16-bit integer
0
65535
int16
signed 16-bit integer
-32768
32767
uint32
unsigned 32-bit integer
0
4294967295
int32
signed 32-bit integer
-2147483648
2147483647
uint64
unsigned 64-bit integer
0
2^64 - 1
int64
signed 64-bit integer
-2^63
2^63 - 1
boolean
boolean value
0/false
1/true
float
floating point number
-3.4e -38
3.4e 38
double
double precision floating point number
-1.7e -300
1.7e 300
string
character string
n/a
n/a
Min, max and default values defined in a Vehicle Signal Specification must be in the supported range of the data type.
5.1.7.4 - PowerOptimizeLevel
Full qualified VSS Path:
Vehicle.ADAS.PowerOptimizeLevel
Description:
Power optimization level for this branch/subsystem. A higher number indicates more aggressive power optimization. Level 0 indicates that all functionality is enabled, no power optimization enabled. Level 10 indicates most aggressive power optimization mode, only essential functionality enabled.
Navigation
flowchart LR
Vehicle-->ADAS
ADAS-->PowerOptimizeLevel
$ databroker-cli
sdv.databroker.v1 > connect
[connect] OK
sdv.databroker.v1 > get Vehicle.ADAS.PowerOptimizeLevel
[get] OK
Vehicle.ADAS.PowerOptimizeLevel: ( NotAvailable )sdv.databroker.v1 > set Vehicle.ADAS.PowerOptimizeLevel 0[set] OK
Digital Auto: Playground
playground.digital.auto provides an in-browser, rapid prototyping environment utilizing the COVESA APIs for connected vehicles.
The UUID for Vehicle.ADAS.PowerOptimizeLevel is 044ad42893e65993bfc439455fb08faa
Feedback
Do you think this Vehicle Signal specification needs enhancement? Do you want to discuss with experts? Try the following ressources to get in touch with the VSS community:
Vehicle.ADAS.ABS.IsEngaged (Indicates if ABS is currently regulating brake pressure. True = Engaged. False = Not Engaged.)
Vehicle.ADAS.ABS.IsError (Indicates if ABS incurred an error condition. True = Error. False = No Error.)
Feedback
Do you think this Vehicle Signal specification needs enhancement? Do you want to discuss with experts? Try the following ressources to get in touch with the VSS community:
$ databroker-cli
sdv.databroker.v1 > connect
[connect] OK
sdv.databroker.v1 > get Vehicle.ADAS.ABS.IsEnabled
[get] OK
Vehicle.ADAS.ABS.IsEnabled: ( NotAvailable )sdv.databroker.v1 > set Vehicle.ADAS.ABS.IsEnabled false[set] OK
Digital Auto: Playground
playground.digital.auto provides an in-browser, rapid prototyping environment utilizing the COVESA APIs for connected vehicles.
The UUID for Vehicle.ADAS.ABS.IsEnabled is cad374fbfdc65df9b777508f04d5b073
Feedback
Do you think this Vehicle Signal specification needs enhancement? Do you want to discuss with experts? Try the following ressources to get in touch with the VSS community:
$ databroker-cli
sdv.databroker.v1 > connect
[connect] OK
sdv.databroker.v1 > get Vehicle.ADAS.ABS.IsEngaged
[get] OK
Vehicle.ADAS.ABS.IsEngaged: ( NotAvailable )sdv.databroker.v1 > set Vehicle.ADAS.ABS.IsEngaged false[set] OK
Digital Auto: Playground
playground.digital.auto provides an in-browser, rapid prototyping environment utilizing the COVESA APIs for connected vehicles.
The UUID for Vehicle.ADAS.ABS.IsEngaged is 6dd21979a2225e31940dc2ece1aa9a04
Feedback
Do you think this Vehicle Signal specification needs enhancement? Do you want to discuss with experts? Try the following ressources to get in touch with the VSS community:
$ databroker-cli
sdv.databroker.v1 > connect
[connect] OK
sdv.databroker.v1 > get Vehicle.ADAS.ABS.IsError
[get] OK
Vehicle.ADAS.ABS.IsError: ( NotAvailable )sdv.databroker.v1 > set Vehicle.ADAS.ABS.IsError false[set] OK
Digital Auto: Playground
playground.digital.auto provides an in-browser, rapid prototyping environment utilizing the COVESA APIs for connected vehicles.
The UUID for Vehicle.ADAS.ABS.IsError is 13cfabb3122254128234f9a696f14678
Feedback
Do you think this Vehicle Signal specification needs enhancement? Do you want to discuss with experts? Try the following ressources to get in touch with the VSS community:
The following is a list of VSS supported built-in datatypes:
Name
Type
Min
Max
uint8
unsigned 8-bit integer
0
255
int8
signed 8-bit integer
-128
127
uint16
unsigned 16-bit integer
0
65535
int16
signed 16-bit integer
-32768
32767
uint32
unsigned 32-bit integer
0
4294967295
int32
signed 32-bit integer
-2147483648
2147483647
uint64
unsigned 64-bit integer
0
2^64 - 1
int64
signed 64-bit integer
-2^63
2^63 - 1
boolean
boolean value
0/false
1/true
float
floating point number
-3.4e -38
3.4e 38
double
double precision floating point number
-1.7e -300
1.7e 300
string
character string
n/a
n/a
Min, max and default values defined in a Vehicle Signal Specification must be in the supported range of the data type.
5.1.7.6 - ActiveAutonomyLevel
Full qualified VSS Path:
Vehicle.ADAS.ActiveAutonomyLevel
Description:
Indicates the currently active level of autonomy according to SAE J3016 taxonomy.
Comment:
Follows https://www.sae.org/news/2019/01/sae-updates-j3016-automated-driving-graphic taxonomy. For SAE levels 3 and 4 the system is required to alert the driver before it will disengage. Level 4 systems are required to reach a safe state even if a driver does not take over. Only level 5 systems are required to not rely on a driver at all. While level 2 systems require the driver to be monitoring the system at all times, many level 2 systems, often termed “level 2.5” systems, do warn the driver shortly before reaching their operational limits, therefore we also support the DISENGAGING state for SAE_2.
Navigation
flowchart LR
Vehicle-->ADAS
ADAS-->ActiveAutonomyLevel
$ databroker-cli
sdv.databroker.v1 > connect
[connect] OK
sdv.databroker.v1 > get Vehicle.ADAS.ActiveAutonomyLevel
[get] OK
Vehicle.ADAS.ActiveAutonomyLevel: ( NotAvailable )sdv.databroker.v1 > set Vehicle.ADAS.ActiveAutonomyLevel Foo
[set] OK
Digital Auto: Playground
playground.digital.auto provides an in-browser, rapid prototyping environment utilizing the COVESA APIs for connected vehicles.
The UUID for Vehicle.ADAS.ActiveAutonomyLevel is b101c6928fc55948b1cc485e568ecd8d
Feedback
Do you think this Vehicle Signal specification needs enhancement? Do you want to discuss with experts? Try the following ressources to get in touch with the VSS community:
The UUID for Vehicle.ADAS.CruiseControl is c4d751cf74f9576dbba3cc820991c1fb
Children
This vehicle signal is a branch or structure and thus has sub-pages:
Vehicle.ADAS.CruiseControl.IsActive (Indicates if cruise control system is active (i.e. actively controls speed). True = Active. False = Inactive.)
Vehicle.ADAS.CruiseControl.IsEnabled (Indicates if cruise control system is enabled (e.g. ready to receive configurations and settings) True = Enabled. False = Disabled.)
Do you think this Vehicle Signal specification needs enhancement? Do you want to discuss with experts? Try the following ressources to get in touch with the VSS community:
$ databroker-cli
sdv.databroker.v1 > connect
[connect] OK
sdv.databroker.v1 > get Vehicle.ADAS.CruiseControl.IsActive
[get] OK
Vehicle.ADAS.CruiseControl.IsActive: ( NotAvailable )sdv.databroker.v1 > set Vehicle.ADAS.CruiseControl.IsActive false[set] OK
Digital Auto: Playground
playground.digital.auto provides an in-browser, rapid prototyping environment utilizing the COVESA APIs for connected vehicles.
The UUID for Vehicle.ADAS.CruiseControl.IsActive is 78ab5ce923dc5aa1a6622bcb948e1561
Feedback
Do you think this Vehicle Signal specification needs enhancement? Do you want to discuss with experts? Try the following ressources to get in touch with the VSS community:
$ databroker-cli
sdv.databroker.v1 > connect
[connect] OK
sdv.databroker.v1 > get Vehicle.ADAS.CruiseControl.IsEnabled
[get] OK
Vehicle.ADAS.CruiseControl.IsEnabled: ( NotAvailable )sdv.databroker.v1 > set Vehicle.ADAS.CruiseControl.IsEnabled false[set] OK
Digital Auto: Playground
playground.digital.auto provides an in-browser, rapid prototyping environment utilizing the COVESA APIs for connected vehicles.
The UUID for Vehicle.ADAS.CruiseControl.IsEnabled is 018417f6c8535315895d0f54d209035a
Feedback
Do you think this Vehicle Signal specification needs enhancement? Do you want to discuss with experts? Try the following ressources to get in touch with the VSS community:
$ databroker-cli
sdv.databroker.v1 > connect
[connect] OK
sdv.databroker.v1 > get Vehicle.ADAS.CruiseControl.IsError
[get] OK
Vehicle.ADAS.CruiseControl.IsError: ( NotAvailable )sdv.databroker.v1 > set Vehicle.ADAS.CruiseControl.IsError false[set] OK
Digital Auto: Playground
playground.digital.auto provides an in-browser, rapid prototyping environment utilizing the COVESA APIs for connected vehicles.
The UUID for Vehicle.ADAS.CruiseControl.IsError is 22923d4a36bc5192a08e40fe9e5ed458
Feedback
Do you think this Vehicle Signal specification needs enhancement? Do you want to discuss with experts? Try the following ressources to get in touch with the VSS community:
$ databroker-cli
sdv.databroker.v1 > connect
[connect] OK
sdv.databroker.v1 > get Vehicle.ADAS.CruiseControl.SpeedSet
[get] OK
Vehicle.ADAS.CruiseControl.SpeedSet: ( NotAvailable )sdv.databroker.v1 > set Vehicle.ADAS.CruiseControl.SpeedSet 0[set] OK
Digital Auto: Playground
playground.digital.auto provides an in-browser, rapid prototyping environment utilizing the COVESA APIs for connected vehicles.
The UUID for Vehicle.ADAS.CruiseControl.SpeedSet is b3f3a53ccd825e4da5cb1226f94dc005
Feedback
Do you think this Vehicle Signal specification needs enhancement? Do you want to discuss with experts? Try the following ressources to get in touch with the VSS community:
Do you think this Vehicle Signal specification needs enhancement? Do you want to discuss with experts? Try the following ressources to get in touch with the VSS community:
$ databroker-cli
sdv.databroker.v1 > connect
[connect] OK
sdv.databroker.v1 > get Vehicle.ADAS.LaneDepartureDetection.IsEnabled
[get] OK
Vehicle.ADAS.LaneDepartureDetection.IsEnabled: ( NotAvailable )sdv.databroker.v1 > set Vehicle.ADAS.LaneDepartureDetection.IsEnabled false[set] OK
Digital Auto: Playground
playground.digital.auto provides an in-browser, rapid prototyping environment utilizing the COVESA APIs for connected vehicles.
The UUID for Vehicle.ADAS.LaneDepartureDetection.IsEnabled is c099ae97260f5c418977cd14631e95be
Feedback
Do you think this Vehicle Signal specification needs enhancement? Do you want to discuss with experts? Try the following ressources to get in touch with the VSS community:
$ databroker-cli
sdv.databroker.v1 > connect
[connect] OK
sdv.databroker.v1 > get Vehicle.ADAS.LaneDepartureDetection.IsError
[get] OK
Vehicle.ADAS.LaneDepartureDetection.IsError: ( NotAvailable )sdv.databroker.v1 > set Vehicle.ADAS.LaneDepartureDetection.IsError false[set] OK
Digital Auto: Playground
playground.digital.auto provides an in-browser, rapid prototyping environment utilizing the COVESA APIs for connected vehicles.
The UUID for Vehicle.ADAS.LaneDepartureDetection.IsError is 73b2fc4f6a4952e4b7886671450e7798
Feedback
Do you think this Vehicle Signal specification needs enhancement? Do you want to discuss with experts? Try the following ressources to get in touch with the VSS community:
$ databroker-cli
sdv.databroker.v1 > connect
[connect] OK
sdv.databroker.v1 > get Vehicle.ADAS.LaneDepartureDetection.IsWarning
[get] OK
Vehicle.ADAS.LaneDepartureDetection.IsWarning: ( NotAvailable )sdv.databroker.v1 > set Vehicle.ADAS.LaneDepartureDetection.IsWarning false[set] OK
Digital Auto: Playground
playground.digital.auto provides an in-browser, rapid prototyping environment utilizing the COVESA APIs for connected vehicles.
The UUID for Vehicle.ADAS.LaneDepartureDetection.IsWarning is c32fcd1d56035cb08acfd380be224c6a
Feedback
Do you think this Vehicle Signal specification needs enhancement? Do you want to discuss with experts? Try the following ressources to get in touch with the VSS community:
Do you think this Vehicle Signal specification needs enhancement? Do you want to discuss with experts? Try the following ressources to get in touch with the VSS community:
$ databroker-cli
sdv.databroker.v1 > connect
[connect] OK
sdv.databroker.v1 > get Vehicle.ADAS.ObstacleDetection.IsEnabled
[get] OK
Vehicle.ADAS.ObstacleDetection.IsEnabled: ( NotAvailable )sdv.databroker.v1 > set Vehicle.ADAS.ObstacleDetection.IsEnabled false[set] OK
Digital Auto: Playground
playground.digital.auto provides an in-browser, rapid prototyping environment utilizing the COVESA APIs for connected vehicles.
The UUID for Vehicle.ADAS.ObstacleDetection.IsEnabled is cc0cd497285e5034a1cccb25f02e9db9
Feedback
Do you think this Vehicle Signal specification needs enhancement? Do you want to discuss with experts? Try the following ressources to get in touch with the VSS community:
$ databroker-cli
sdv.databroker.v1 > connect
[connect] OK
sdv.databroker.v1 > get Vehicle.ADAS.ObstacleDetection.IsError
[get] OK
Vehicle.ADAS.ObstacleDetection.IsError: ( NotAvailable )sdv.databroker.v1 > set Vehicle.ADAS.ObstacleDetection.IsError false[set] OK
Digital Auto: Playground
playground.digital.auto provides an in-browser, rapid prototyping environment utilizing the COVESA APIs for connected vehicles.
The UUID for Vehicle.ADAS.ObstacleDetection.IsError is 368b74e2468d5217925a478ed6e34f9f
Feedback
Do you think this Vehicle Signal specification needs enhancement? Do you want to discuss with experts? Try the following ressources to get in touch with the VSS community:
$ databroker-cli
sdv.databroker.v1 > connect
[connect] OK
sdv.databroker.v1 > get Vehicle.ADAS.ObstacleDetection.IsWarning
[get] OK
Vehicle.ADAS.ObstacleDetection.IsWarning: ( NotAvailable )sdv.databroker.v1 > set Vehicle.ADAS.ObstacleDetection.IsWarning false[set] OK
Digital Auto: Playground
playground.digital.auto provides an in-browser, rapid prototyping environment utilizing the COVESA APIs for connected vehicles.
The UUID for Vehicle.ADAS.ObstacleDetection.IsWarning is b0b1eab51f135ffcb2a17a7603415fec
Feedback
Do you think this Vehicle Signal specification needs enhancement? Do you want to discuss with experts? Try the following ressources to get in touch with the VSS community:
$ databroker-cli
sdv.databroker.v1 > connect
[connect] OK
sdv.databroker.v1 > get Vehicle.ADAS.SupportedAutonomyLevel
[get] OK
Vehicle.ADAS.SupportedAutonomyLevel: ( NotAvailable )sdv.databroker.v1 > set Vehicle.ADAS.SupportedAutonomyLevel Foo
[set] OK
Digital Auto: Playground
playground.digital.auto provides an in-browser, rapid prototyping environment utilizing the COVESA APIs for connected vehicles.
The UUID for Vehicle.ADAS.SupportedAutonomyLevel is 020410189ab4517cb85ceda268b40f51
Feedback
Do you think this Vehicle Signal specification needs enhancement? Do you want to discuss with experts? Try the following ressources to get in touch with the VSS community:
Vehicle.ADAS.TCS.IsEngaged (Indicates if TCS is currently regulating traction. True = Engaged. False = Not Engaged.)
Vehicle.ADAS.TCS.IsError (Indicates if TCS incurred an error condition. True = Error. False = No Error.)
Feedback
Do you think this Vehicle Signal specification needs enhancement? Do you want to discuss with experts? Try the following ressources to get in touch with the VSS community:
$ databroker-cli
sdv.databroker.v1 > connect
[connect] OK
sdv.databroker.v1 > get Vehicle.ADAS.TCS.IsEngaged
[get] OK
Vehicle.ADAS.TCS.IsEngaged: ( NotAvailable )sdv.databroker.v1 > set Vehicle.ADAS.TCS.IsEngaged false[set] OK
Digital Auto: Playground
playground.digital.auto provides an in-browser, rapid prototyping environment utilizing the COVESA APIs for connected vehicles.
The UUID for Vehicle.ADAS.TCS.IsEngaged is b33d70009ad5589fbffe17fa7e827242
Feedback
Do you think this Vehicle Signal specification needs enhancement? Do you want to discuss with experts? Try the following ressources to get in touch with the VSS community:
$ databroker-cli
sdv.databroker.v1 > connect
[connect] OK
sdv.databroker.v1 > get Vehicle.ADAS.TCS.IsError
[get] OK
Vehicle.ADAS.TCS.IsError: ( NotAvailable )sdv.databroker.v1 > set Vehicle.ADAS.TCS.IsError false[set] OK
Digital Auto: Playground
playground.digital.auto provides an in-browser, rapid prototyping environment utilizing the COVESA APIs for connected vehicles.
The UUID for Vehicle.ADAS.TCS.IsError is 08f88723ba63558b8c804b8fe8e3f149
Feedback
Do you think this Vehicle Signal specification needs enhancement? Do you want to discuss with experts? Try the following ressources to get in touch with the VSS community:
$ databroker-cli
sdv.databroker.v1 > connect
[connect] OK
sdv.databroker.v1 > get Vehicle.ADAS.TCS.IsEnabled
[get] OK
Vehicle.ADAS.TCS.IsEnabled: ( NotAvailable )sdv.databroker.v1 > set Vehicle.ADAS.TCS.IsEnabled false[set] OK
Digital Auto: Playground
playground.digital.auto provides an in-browser, rapid prototyping environment utilizing the COVESA APIs for connected vehicles.
The UUID for Vehicle.ADAS.TCS.IsEnabled is 1d2dda19b11758a19ba7c1d5cd2d7956
Feedback
Do you think this Vehicle Signal specification needs enhancement? Do you want to discuss with experts? Try the following ressources to get in touch with the VSS community:
Vehicle.Cabin.PowerOptimizeLevel (Power optimization level for this branch/subsystem. A higher number indicates more aggressive power optimization. Level 0 indicates that all functionality is enabled, no power optimization enabled. Level 10 indicates most aggressive power optimization mode, only essential functionality enabled.)
Do you think this Vehicle Signal specification needs enhancement? Do you want to discuss with experts? Try the following ressources to get in touch with the VSS community:
Do you think this Vehicle Signal specification needs enhancement? Do you want to discuss with experts? Try the following ressources to get in touch with the VSS community:
$ databroker-cli
sdv.databroker.v1 > connect
[connect] OK
sdv.databroker.v1 > get Vehicle.Cabin.Convertible.Status
[get] OK
Vehicle.Cabin.Convertible.Status: ( NotAvailable )sdv.databroker.v1 > set Vehicle.Cabin.Convertible.Status Foo
[set] OK
Digital Auto: Playground
playground.digital.auto provides an in-browser, rapid prototyping environment utilizing the COVESA APIs for connected vehicles.
The UUID for Vehicle.Cabin.Convertible.Status is c8812698198a56d7a1adcc8bbe87845f
Feedback
Do you think this Vehicle Signal specification needs enhancement? Do you want to discuss with experts? Try the following ressources to get in touch with the VSS community:
$ databroker-cli
sdv.databroker.v1 > connect
[connect] OK
sdv.databroker.v1 > get Vehicle.Cabin.DriverPosition
[get] OK
Vehicle.Cabin.DriverPosition: ( NotAvailable )sdv.databroker.v1 > set Vehicle.Cabin.DriverPosition 1[set] OK
Digital Auto: Playground
playground.digital.auto provides an in-browser, rapid prototyping environment utilizing the COVESA APIs for connected vehicles.
The UUID for Vehicle.Cabin.DriverPosition is bca9ccd50358584d8d20865694b0d15f
Feedback
Do you think this Vehicle Signal specification needs enhancement? Do you want to discuss with experts? Try the following ressources to get in touch with the VSS community:
The following is a list of VSS supported built-in datatypes:
Name
Type
Min
Max
uint8
unsigned 8-bit integer
0
255
int8
signed 8-bit integer
-128
127
uint16
unsigned 16-bit integer
0
65535
int16
signed 16-bit integer
-32768
32767
uint32
unsigned 32-bit integer
0
4294967295
int32
signed 32-bit integer
-2147483648
2147483647
uint64
unsigned 64-bit integer
0
2^64 - 1
int64
signed 64-bit integer
-2^63
2^63 - 1
boolean
boolean value
0/false
1/true
float
floating point number
-3.4e -38
3.4e 38
double
double precision floating point number
-1.7e -300
1.7e 300
string
character string
n/a
n/a
Min, max and default values defined in a Vehicle Signal Specification must be in the supported range of the data type.
5.1.8.3 - PowerOptimizeLevel
Full qualified VSS Path:
Vehicle.Cabin.PowerOptimizeLevel
Description:
Power optimization level for this branch/subsystem. A higher number indicates more aggressive power optimization. Level 0 indicates that all functionality is enabled, no power optimization enabled. Level 10 indicates most aggressive power optimization mode, only essential functionality enabled.
Navigation
flowchart LR
Vehicle-->Cabin
Cabin-->PowerOptimizeLevel
$ databroker-cli
sdv.databroker.v1 > connect
[connect] OK
sdv.databroker.v1 > get Vehicle.Cabin.PowerOptimizeLevel
[get] OK
Vehicle.Cabin.PowerOptimizeLevel: ( NotAvailable )sdv.databroker.v1 > set Vehicle.Cabin.PowerOptimizeLevel 0[set] OK
Digital Auto: Playground
playground.digital.auto provides an in-browser, rapid prototyping environment utilizing the COVESA APIs for connected vehicles.
The UUID for Vehicle.Cabin.PowerOptimizeLevel is 728b62b170055bd8b1530ec423dd5a9a
Feedback
Do you think this Vehicle Signal specification needs enhancement? Do you want to discuss with experts? Try the following ressources to get in touch with the VSS community:
$ databroker-cli
sdv.databroker.v1 > connect
[connect] OK
sdv.databroker.v1 > get Vehicle.Cabin.SeatPosCount
[get] OK
Vehicle.Cabin.SeatPosCount: ( NotAvailable )sdv.databroker.v1 > set Vehicle.Cabin.SeatPosCount [2, 3][set] OK
Digital Auto: Playground
playground.digital.auto provides an in-browser, rapid prototyping environment utilizing the COVESA APIs for connected vehicles.
The UUID for Vehicle.Cabin.SeatPosCount is 8dd40ecd47ab51c79ed9c74ae4296d7e
Feedback
Do you think this Vehicle Signal specification needs enhancement? Do you want to discuss with experts? Try the following ressources to get in touch with the VSS community:
$ databroker-cli
sdv.databroker.v1 > connect
[connect] OK
sdv.databroker.v1 > get Vehicle.Cabin.SeatRowCount
[get] OK
Vehicle.Cabin.SeatRowCount: ( NotAvailable )sdv.databroker.v1 > set Vehicle.Cabin.SeatRowCount 2[set] OK
Digital Auto: Playground
playground.digital.auto provides an in-browser, rapid prototyping environment utilizing the COVESA APIs for connected vehicles.
The UUID for Vehicle.Cabin.SeatRowCount is 1002a7a4a954581b9cbc72fa438c5292
Feedback
Do you think this Vehicle Signal specification needs enhancement? Do you want to discuss with experts? Try the following ressources to get in touch with the VSS community:
$ databroker-cli
sdv.databroker.v1 > connect
[connect] OK
sdv.databroker.v1 > get Vehicle.Cabin.DoorCount
[get] OK
Vehicle.Cabin.DoorCount: ( NotAvailable )sdv.databroker.v1 > set Vehicle.Cabin.DoorCount 4[set] OK
Digital Auto: Playground
playground.digital.auto provides an in-browser, rapid prototyping environment utilizing the COVESA APIs for connected vehicles.
The UUID for Vehicle.Cabin.DoorCount is c293fbef75725c57a9918dd5a34055c4
Feedback
Do you think this Vehicle Signal specification needs enhancement? Do you want to discuss with experts? Try the following ressources to get in touch with the VSS community:
Do you think this Vehicle Signal specification needs enhancement? Do you want to discuss with experts? Try the following ressources to get in touch with the VSS community:
Do you think this Vehicle Signal specification needs enhancement? Do you want to discuss with experts? Try the following ressources to get in touch with the VSS community:
Vehicle.Cabin.Seat.Row2.Pos3.Height (Seat position on vehicle z-axis. Position is relative within available movable range of the seating. 0 = Lowermost position supported.)
Vehicle.Cabin.Seat.Row2.Pos3.Position (Seat position on vehicle x-axis. Position is relative to the frontmost position supported by the seat. 0 = Frontmost position supported.)
Vehicle.Cabin.Seat.Row2.Pos3.Tilt (Tilting of seat (seating and backrest) relative to vehicle x-axis. 0 = seat bottom is flat, seat bottom and vehicle x-axis are parallel. Positive degrees = seat tilted backwards, seat x-axis tilted upward, seat z-axis is tilted backward.)
Feedback
Do you think this Vehicle Signal specification needs enhancement? Do you want to discuss with experts? Try the following ressources to get in touch with the VSS community:
Do you think this Vehicle Signal specification needs enhancement? Do you want to discuss with experts? Try the following ressources to get in touch with the VSS community:
$ databroker-cli
sdv.databroker.v1 > connect
[connect] OK
sdv.databroker.v1 > get Vehicle.Cabin.Seat.Row2.Pos3.Airbag.IsDeployed
[get] OK
Vehicle.Cabin.Seat.Row2.Pos3.Airbag.IsDeployed: ( NotAvailable )sdv.databroker.v1 > set Vehicle.Cabin.Seat.Row2.Pos3.Airbag.IsDeployed false[set] OK
Digital Auto: Playground
playground.digital.auto provides an in-browser, rapid prototyping environment utilizing the COVESA APIs for connected vehicles.
The UUID for Vehicle.Cabin.Seat.Row2.Pos3.Airbag.IsDeployed is 6802243fcb3155b196cca3a825c12bcb
Feedback
Do you think this Vehicle Signal specification needs enhancement? Do you want to discuss with experts? Try the following ressources to get in touch with the VSS community:
Do you think this Vehicle Signal specification needs enhancement? Do you want to discuss with experts? Try the following ressources to get in touch with the VSS community:
$ databroker-cli
sdv.databroker.v1 > connect
[connect] OK
sdv.databroker.v1 > get Vehicle.Cabin.Seat.Row2.Pos3.Headrest.Angle
[get] OK
Vehicle.Cabin.Seat.Row2.Pos3.Headrest.Angle: ( NotAvailable )sdv.databroker.v1 > set Vehicle.Cabin.Seat.Row2.Pos3.Headrest.Angle 0[set] OK
Digital Auto: Playground
playground.digital.auto provides an in-browser, rapid prototyping environment utilizing the COVESA APIs for connected vehicles.
The UUID for Vehicle.Cabin.Seat.Row2.Pos3.Headrest.Angle is bf6f63ab87e453af965c90f0495ea972
Feedback
Do you think this Vehicle Signal specification needs enhancement? Do you want to discuss with experts? Try the following ressources to get in touch with the VSS community:
$ databroker-cli
sdv.databroker.v1 > connect
[connect] OK
sdv.databroker.v1 > get Vehicle.Cabin.Seat.Row2.Pos3.Headrest.Height
[get] OK
Vehicle.Cabin.Seat.Row2.Pos3.Headrest.Height: ( NotAvailable )sdv.databroker.v1 > set Vehicle.Cabin.Seat.Row2.Pos3.Headrest.Height 0[set] OK
Digital Auto: Playground
playground.digital.auto provides an in-browser, rapid prototyping environment utilizing the COVESA APIs for connected vehicles.
The UUID for Vehicle.Cabin.Seat.Row2.Pos3.Headrest.Height is 2ae8b66df4045f46a96acbcdd6d2d452
Feedback
Do you think this Vehicle Signal specification needs enhancement? Do you want to discuss with experts? Try the following ressources to get in touch with the VSS community:
Do you think this Vehicle Signal specification needs enhancement? Do you want to discuss with experts? Try the following ressources to get in touch with the VSS community:
Do you think this Vehicle Signal specification needs enhancement? Do you want to discuss with experts? Try the following ressources to get in touch with the VSS community:
$ databroker-cli
sdv.databroker.v1 > connect
[connect] OK
sdv.databroker.v1 > get Vehicle.Cabin.Seat.Row2.Pos3.Switch.Headrest.IsBackwardEngaged
[get] OK
Vehicle.Cabin.Seat.Row2.Pos3.Switch.Headrest.IsBackwardEngaged: ( NotAvailable )sdv.databroker.v1 > set Vehicle.Cabin.Seat.Row2.Pos3.Switch.Headrest.IsBackwardEngaged false[set] OK
Digital Auto: Playground
playground.digital.auto provides an in-browser, rapid prototyping environment utilizing the COVESA APIs for connected vehicles.
The UUID for Vehicle.Cabin.Seat.Row2.Pos3.Switch.Headrest.IsBackwardEngaged is 04e14e79404b5ff7ac9067841f81bbc9
Feedback
Do you think this Vehicle Signal specification needs enhancement? Do you want to discuss with experts? Try the following ressources to get in touch with the VSS community:
$ databroker-cli
sdv.databroker.v1 > connect
[connect] OK
sdv.databroker.v1 > get Vehicle.Cabin.Seat.Row2.Pos3.Switch.Headrest.IsDownEngaged
[get] OK
Vehicle.Cabin.Seat.Row2.Pos3.Switch.Headrest.IsDownEngaged: ( NotAvailable )sdv.databroker.v1 > set Vehicle.Cabin.Seat.Row2.Pos3.Switch.Headrest.IsDownEngaged false[set] OK
Digital Auto: Playground
playground.digital.auto provides an in-browser, rapid prototyping environment utilizing the COVESA APIs for connected vehicles.
The UUID for Vehicle.Cabin.Seat.Row2.Pos3.Switch.Headrest.IsDownEngaged is 61a58c7fa7ed5e08a17067193bb9c951
Feedback
Do you think this Vehicle Signal specification needs enhancement? Do you want to discuss with experts? Try the following ressources to get in touch with the VSS community:
$ databroker-cli
sdv.databroker.v1 > connect
[connect] OK
sdv.databroker.v1 > get Vehicle.Cabin.Seat.Row2.Pos3.Switch.Headrest.IsForwardEngaged
[get] OK
Vehicle.Cabin.Seat.Row2.Pos3.Switch.Headrest.IsForwardEngaged: ( NotAvailable )sdv.databroker.v1 > set Vehicle.Cabin.Seat.Row2.Pos3.Switch.Headrest.IsForwardEngaged false[set] OK
Digital Auto: Playground
playground.digital.auto provides an in-browser, rapid prototyping environment utilizing the COVESA APIs for connected vehicles.
The UUID for Vehicle.Cabin.Seat.Row2.Pos3.Switch.Headrest.IsForwardEngaged is 3c94aab710ff5e8f8a48fdbf6dc7b989
Feedback
Do you think this Vehicle Signal specification needs enhancement? Do you want to discuss with experts? Try the following ressources to get in touch with the VSS community:
$ databroker-cli
sdv.databroker.v1 > connect
[connect] OK
sdv.databroker.v1 > get Vehicle.Cabin.Seat.Row2.Pos3.Switch.Headrest.IsUpEngaged
[get] OK
Vehicle.Cabin.Seat.Row2.Pos3.Switch.Headrest.IsUpEngaged: ( NotAvailable )sdv.databroker.v1 > set Vehicle.Cabin.Seat.Row2.Pos3.Switch.Headrest.IsUpEngaged false[set] OK
Digital Auto: Playground
playground.digital.auto provides an in-browser, rapid prototyping environment utilizing the COVESA APIs for connected vehicles.
The UUID for Vehicle.Cabin.Seat.Row2.Pos3.Switch.Headrest.IsUpEngaged is e40c92c141f6562382f4f29d783cfa26
Feedback
Do you think this Vehicle Signal specification needs enhancement? Do you want to discuss with experts? Try the following ressources to get in touch with the VSS community:
Do you think this Vehicle Signal specification needs enhancement? Do you want to discuss with experts? Try the following ressources to get in touch with the VSS community:
$ databroker-cli
sdv.databroker.v1 > connect
[connect] OK
sdv.databroker.v1 > get Vehicle.Cabin.Seat.Row2.Pos3.Switch.Massage.IsDecreaseEngaged
[get] OK
Vehicle.Cabin.Seat.Row2.Pos3.Switch.Massage.IsDecreaseEngaged: ( NotAvailable )sdv.databroker.v1 > set Vehicle.Cabin.Seat.Row2.Pos3.Switch.Massage.IsDecreaseEngaged false[set] OK
Digital Auto: Playground
playground.digital.auto provides an in-browser, rapid prototyping environment utilizing the COVESA APIs for connected vehicles.
The UUID for Vehicle.Cabin.Seat.Row2.Pos3.Switch.Massage.IsDecreaseEngaged is 7226bc97842452099d5484baad0af620
Feedback
Do you think this Vehicle Signal specification needs enhancement? Do you want to discuss with experts? Try the following ressources to get in touch with the VSS community:
$ databroker-cli
sdv.databroker.v1 > connect
[connect] OK
sdv.databroker.v1 > get Vehicle.Cabin.Seat.Row2.Pos3.Switch.Massage.IsIncreaseEngaged
[get] OK
Vehicle.Cabin.Seat.Row2.Pos3.Switch.Massage.IsIncreaseEngaged: ( NotAvailable )sdv.databroker.v1 > set Vehicle.Cabin.Seat.Row2.Pos3.Switch.Massage.IsIncreaseEngaged false[set] OK
Digital Auto: Playground
playground.digital.auto provides an in-browser, rapid prototyping environment utilizing the COVESA APIs for connected vehicles.
The UUID for Vehicle.Cabin.Seat.Row2.Pos3.Switch.Massage.IsIncreaseEngaged is fb062e9f85fd568cbd774b36fbf5113f
Feedback
Do you think this Vehicle Signal specification needs enhancement? Do you want to discuss with experts? Try the following ressources to get in touch with the VSS community:
Do you think this Vehicle Signal specification needs enhancement? Do you want to discuss with experts? Try the following ressources to get in touch with the VSS community:
$ databroker-cli
sdv.databroker.v1 > connect
[connect] OK
sdv.databroker.v1 > get Vehicle.Cabin.Seat.Row2.Pos3.Switch.Backrest.IsReclineBackwardEngaged
[get] OK
Vehicle.Cabin.Seat.Row2.Pos3.Switch.Backrest.IsReclineBackwardEngaged: ( NotAvailable )sdv.databroker.v1 > set Vehicle.Cabin.Seat.Row2.Pos3.Switch.Backrest.IsReclineBackwardEngaged false[set] OK
Digital Auto: Playground
playground.digital.auto provides an in-browser, rapid prototyping environment utilizing the COVESA APIs for connected vehicles.
The UUID for Vehicle.Cabin.Seat.Row2.Pos3.Switch.Backrest.IsReclineBackwardEngaged is eed918c7f0b558a99bbe804582a31b64
Feedback
Do you think this Vehicle Signal specification needs enhancement? Do you want to discuss with experts? Try the following ressources to get in touch with the VSS community:
$ databroker-cli
sdv.databroker.v1 > connect
[connect] OK
sdv.databroker.v1 > get Vehicle.Cabin.Seat.Row2.Pos3.Switch.Backrest.IsReclineForwardEngaged
[get] OK
Vehicle.Cabin.Seat.Row2.Pos3.Switch.Backrest.IsReclineForwardEngaged: ( NotAvailable )sdv.databroker.v1 > set Vehicle.Cabin.Seat.Row2.Pos3.Switch.Backrest.IsReclineForwardEngaged false[set] OK
Digital Auto: Playground
playground.digital.auto provides an in-browser, rapid prototyping environment utilizing the COVESA APIs for connected vehicles.
The UUID for Vehicle.Cabin.Seat.Row2.Pos3.Switch.Backrest.IsReclineForwardEngaged is 0cc4f8336f0d585f93f4ab5c89e133d8
Feedback
Do you think this Vehicle Signal specification needs enhancement? Do you want to discuss with experts? Try the following ressources to get in touch with the VSS community:
Do you think this Vehicle Signal specification needs enhancement? Do you want to discuss with experts? Try the following ressources to get in touch with the VSS community:
$ databroker-cli
sdv.databroker.v1 > connect
[connect] OK
sdv.databroker.v1 > get Vehicle.Cabin.Seat.Row2.Pos3.Switch.Backrest.Lumbar.IsDownEngaged
[get] OK
Vehicle.Cabin.Seat.Row2.Pos3.Switch.Backrest.Lumbar.IsDownEngaged: ( NotAvailable )sdv.databroker.v1 > set Vehicle.Cabin.Seat.Row2.Pos3.Switch.Backrest.Lumbar.IsDownEngaged false[set] OK
Digital Auto: Playground
playground.digital.auto provides an in-browser, rapid prototyping environment utilizing the COVESA APIs for connected vehicles.
The UUID for Vehicle.Cabin.Seat.Row2.Pos3.Switch.Backrest.Lumbar.IsDownEngaged is dcd08d675e7e5f4eafe85311a3e40f1e
Feedback
Do you think this Vehicle Signal specification needs enhancement? Do you want to discuss with experts? Try the following ressources to get in touch with the VSS community:
$ databroker-cli
sdv.databroker.v1 > connect
[connect] OK
sdv.databroker.v1 > get Vehicle.Cabin.Seat.Row2.Pos3.Switch.Backrest.Lumbar.IsLessSupportEngaged
[get] OK
Vehicle.Cabin.Seat.Row2.Pos3.Switch.Backrest.Lumbar.IsLessSupportEngaged: ( NotAvailable )sdv.databroker.v1 > set Vehicle.Cabin.Seat.Row2.Pos3.Switch.Backrest.Lumbar.IsLessSupportEngaged false[set] OK
Digital Auto: Playground
playground.digital.auto provides an in-browser, rapid prototyping environment utilizing the COVESA APIs for connected vehicles.
The UUID for Vehicle.Cabin.Seat.Row2.Pos3.Switch.Backrest.Lumbar.IsLessSupportEngaged is 866f9a7d358e5eb5985c9c675b4f7eb4
Feedback
Do you think this Vehicle Signal specification needs enhancement? Do you want to discuss with experts? Try the following ressources to get in touch with the VSS community:
$ databroker-cli
sdv.databroker.v1 > connect
[connect] OK
sdv.databroker.v1 > get Vehicle.Cabin.Seat.Row2.Pos3.Switch.Backrest.Lumbar.IsMoreSupportEngaged
[get] OK
Vehicle.Cabin.Seat.Row2.Pos3.Switch.Backrest.Lumbar.IsMoreSupportEngaged: ( NotAvailable )sdv.databroker.v1 > set Vehicle.Cabin.Seat.Row2.Pos3.Switch.Backrest.Lumbar.IsMoreSupportEngaged false[set] OK
Digital Auto: Playground
playground.digital.auto provides an in-browser, rapid prototyping environment utilizing the COVESA APIs for connected vehicles.
The UUID for Vehicle.Cabin.Seat.Row2.Pos3.Switch.Backrest.Lumbar.IsMoreSupportEngaged is cf9c077f2f4d5573a6022f5f08e807d3
Feedback
Do you think this Vehicle Signal specification needs enhancement? Do you want to discuss with experts? Try the following ressources to get in touch with the VSS community:
$ databroker-cli
sdv.databroker.v1 > connect
[connect] OK
sdv.databroker.v1 > get Vehicle.Cabin.Seat.Row2.Pos3.Switch.Backrest.Lumbar.IsUpEngaged
[get] OK
Vehicle.Cabin.Seat.Row2.Pos3.Switch.Backrest.Lumbar.IsUpEngaged: ( NotAvailable )sdv.databroker.v1 > set Vehicle.Cabin.Seat.Row2.Pos3.Switch.Backrest.Lumbar.IsUpEngaged false[set] OK
Digital Auto: Playground
playground.digital.auto provides an in-browser, rapid prototyping environment utilizing the COVESA APIs for connected vehicles.
The UUID for Vehicle.Cabin.Seat.Row2.Pos3.Switch.Backrest.Lumbar.IsUpEngaged is f0fd5a54865452bcbf2939d8acd4273c
Feedback
Do you think this Vehicle Signal specification needs enhancement? Do you want to discuss with experts? Try the following ressources to get in touch with the VSS community:
Do you think this Vehicle Signal specification needs enhancement? Do you want to discuss with experts? Try the following ressources to get in touch with the VSS community:
$ databroker-cli
sdv.databroker.v1 > connect
[connect] OK
sdv.databroker.v1 > get Vehicle.Cabin.Seat.Row2.Pos3.Switch.Backrest.SideBolster.IsLessSupportEngaged
[get] OK
Vehicle.Cabin.Seat.Row2.Pos3.Switch.Backrest.SideBolster.IsLessSupportEngaged: ( NotAvailable )sdv.databroker.v1 > set Vehicle.Cabin.Seat.Row2.Pos3.Switch.Backrest.SideBolster.IsLessSupportEngaged false[set] OK
Digital Auto: Playground
playground.digital.auto provides an in-browser, rapid prototyping environment utilizing the COVESA APIs for connected vehicles.
The UUID for Vehicle.Cabin.Seat.Row2.Pos3.Switch.Backrest.SideBolster.IsLessSupportEngaged is e99b4f4b07af511b9d86454eec1c483c
Feedback
Do you think this Vehicle Signal specification needs enhancement? Do you want to discuss with experts? Try the following ressources to get in touch with the VSS community:
$ databroker-cli
sdv.databroker.v1 > connect
[connect] OK
sdv.databroker.v1 > get Vehicle.Cabin.Seat.Row2.Pos3.Switch.Backrest.SideBolster.IsMoreSupportEngaged
[get] OK
Vehicle.Cabin.Seat.Row2.Pos3.Switch.Backrest.SideBolster.IsMoreSupportEngaged: ( NotAvailable )sdv.databroker.v1 > set Vehicle.Cabin.Seat.Row2.Pos3.Switch.Backrest.SideBolster.IsMoreSupportEngaged false[set] OK
Digital Auto: Playground
playground.digital.auto provides an in-browser, rapid prototyping environment utilizing the COVESA APIs for connected vehicles.
The UUID for Vehicle.Cabin.Seat.Row2.Pos3.Switch.Backrest.SideBolster.IsMoreSupportEngaged is 92341df5af725c8282f6f93644f1ec9f
Feedback
Do you think this Vehicle Signal specification needs enhancement? Do you want to discuss with experts? Try the following ressources to get in touch with the VSS community:
$ databroker-cli
sdv.databroker.v1 > connect
[connect] OK
sdv.databroker.v1 > get Vehicle.Cabin.Seat.Row2.Pos3.Switch.IsBackwardEngaged
[get] OK
Vehicle.Cabin.Seat.Row2.Pos3.Switch.IsBackwardEngaged: ( NotAvailable )sdv.databroker.v1 > set Vehicle.Cabin.Seat.Row2.Pos3.Switch.IsBackwardEngaged false[set] OK
Digital Auto: Playground
playground.digital.auto provides an in-browser, rapid prototyping environment utilizing the COVESA APIs for connected vehicles.
The UUID for Vehicle.Cabin.Seat.Row2.Pos3.Switch.IsBackwardEngaged is 267429a5f95d5f47ac47ec301755df32
Feedback
Do you think this Vehicle Signal specification needs enhancement? Do you want to discuss with experts? Try the following ressources to get in touch with the VSS community:
$ databroker-cli
sdv.databroker.v1 > connect
[connect] OK
sdv.databroker.v1 > get Vehicle.Cabin.Seat.Row2.Pos3.Switch.IsCoolerEngaged
[get] OK
Vehicle.Cabin.Seat.Row2.Pos3.Switch.IsCoolerEngaged: ( NotAvailable )sdv.databroker.v1 > set Vehicle.Cabin.Seat.Row2.Pos3.Switch.IsCoolerEngaged false[set] OK
Digital Auto: Playground
playground.digital.auto provides an in-browser, rapid prototyping environment utilizing the COVESA APIs for connected vehicles.
The UUID for Vehicle.Cabin.Seat.Row2.Pos3.Switch.IsCoolerEngaged is ffff3283b2cf5f7292e241ec2ee27e77
Feedback
Do you think this Vehicle Signal specification needs enhancement? Do you want to discuss with experts? Try the following ressources to get in touch with the VSS community:
$ databroker-cli
sdv.databroker.v1 > connect
[connect] OK
sdv.databroker.v1 > get Vehicle.Cabin.Seat.Row2.Pos3.Switch.IsDownEngaged
[get] OK
Vehicle.Cabin.Seat.Row2.Pos3.Switch.IsDownEngaged: ( NotAvailable )sdv.databroker.v1 > set Vehicle.Cabin.Seat.Row2.Pos3.Switch.IsDownEngaged false[set] OK
Digital Auto: Playground
playground.digital.auto provides an in-browser, rapid prototyping environment utilizing the COVESA APIs for connected vehicles.
The UUID for Vehicle.Cabin.Seat.Row2.Pos3.Switch.IsDownEngaged is 73d2e688696a507b826230d5b53c429f
Feedback
Do you think this Vehicle Signal specification needs enhancement? Do you want to discuss with experts? Try the following ressources to get in touch with the VSS community:
$ databroker-cli
sdv.databroker.v1 > connect
[connect] OK
sdv.databroker.v1 > get Vehicle.Cabin.Seat.Row2.Pos3.Switch.IsForwardEngaged
[get] OK
Vehicle.Cabin.Seat.Row2.Pos3.Switch.IsForwardEngaged: ( NotAvailable )sdv.databroker.v1 > set Vehicle.Cabin.Seat.Row2.Pos3.Switch.IsForwardEngaged false[set] OK
Digital Auto: Playground
playground.digital.auto provides an in-browser, rapid prototyping environment utilizing the COVESA APIs for connected vehicles.
The UUID for Vehicle.Cabin.Seat.Row2.Pos3.Switch.IsForwardEngaged is 397a8afd0dd1533b8899248596ae7566
Feedback
Do you think this Vehicle Signal specification needs enhancement? Do you want to discuss with experts? Try the following ressources to get in touch with the VSS community:
$ databroker-cli
sdv.databroker.v1 > connect
[connect] OK
sdv.databroker.v1 > get Vehicle.Cabin.Seat.Row2.Pos3.Switch.IsTiltBackwardEngaged
[get] OK
Vehicle.Cabin.Seat.Row2.Pos3.Switch.IsTiltBackwardEngaged: ( NotAvailable )sdv.databroker.v1 > set Vehicle.Cabin.Seat.Row2.Pos3.Switch.IsTiltBackwardEngaged false[set] OK
Digital Auto: Playground
playground.digital.auto provides an in-browser, rapid prototyping environment utilizing the COVESA APIs for connected vehicles.
The UUID for Vehicle.Cabin.Seat.Row2.Pos3.Switch.IsTiltBackwardEngaged is 4490bc9063715f238c00c1eea91fa964
Feedback
Do you think this Vehicle Signal specification needs enhancement? Do you want to discuss with experts? Try the following ressources to get in touch with the VSS community:
$ databroker-cli
sdv.databroker.v1 > connect
[connect] OK
sdv.databroker.v1 > get Vehicle.Cabin.Seat.Row2.Pos3.Switch.IsTiltForwardEngaged
[get] OK
Vehicle.Cabin.Seat.Row2.Pos3.Switch.IsTiltForwardEngaged: ( NotAvailable )sdv.databroker.v1 > set Vehicle.Cabin.Seat.Row2.Pos3.Switch.IsTiltForwardEngaged false[set] OK
Digital Auto: Playground
playground.digital.auto provides an in-browser, rapid prototyping environment utilizing the COVESA APIs for connected vehicles.
The UUID for Vehicle.Cabin.Seat.Row2.Pos3.Switch.IsTiltForwardEngaged is 98d34a35ab82571e88e2d647b5a772f4
Feedback
Do you think this Vehicle Signal specification needs enhancement? Do you want to discuss with experts? Try the following ressources to get in touch with the VSS community:
$ databroker-cli
sdv.databroker.v1 > connect
[connect] OK
sdv.databroker.v1 > get Vehicle.Cabin.Seat.Row2.Pos3.Switch.IsUpEngaged
[get] OK
Vehicle.Cabin.Seat.Row2.Pos3.Switch.IsUpEngaged: ( NotAvailable )sdv.databroker.v1 > set Vehicle.Cabin.Seat.Row2.Pos3.Switch.IsUpEngaged false[set] OK
Digital Auto: Playground
playground.digital.auto provides an in-browser, rapid prototyping environment utilizing the COVESA APIs for connected vehicles.
The UUID for Vehicle.Cabin.Seat.Row2.Pos3.Switch.IsUpEngaged is 26752cad0db150a2aa6737b825e96256
Feedback
Do you think this Vehicle Signal specification needs enhancement? Do you want to discuss with experts? Try the following ressources to get in touch with the VSS community:
$ databroker-cli
sdv.databroker.v1 > connect
[connect] OK
sdv.databroker.v1 > get Vehicle.Cabin.Seat.Row2.Pos3.Switch.IsWarmerEngaged
[get] OK
Vehicle.Cabin.Seat.Row2.Pos3.Switch.IsWarmerEngaged: ( NotAvailable )sdv.databroker.v1 > set Vehicle.Cabin.Seat.Row2.Pos3.Switch.IsWarmerEngaged false[set] OK
Digital Auto: Playground
playground.digital.auto provides an in-browser, rapid prototyping environment utilizing the COVESA APIs for connected vehicles.
The UUID for Vehicle.Cabin.Seat.Row2.Pos3.Switch.IsWarmerEngaged is 820cc2c323b45ef989d5bcb8aac9527e
Feedback
Do you think this Vehicle Signal specification needs enhancement? Do you want to discuss with experts? Try the following ressources to get in touch with the VSS community:
Do you think this Vehicle Signal specification needs enhancement? Do you want to discuss with experts? Try the following ressources to get in touch with the VSS community:
$ databroker-cli
sdv.databroker.v1 > connect
[connect] OK
sdv.databroker.v1 > get Vehicle.Cabin.Seat.Row2.Pos3.Switch.Seating.IsBackwardEngaged
[get] OK
Vehicle.Cabin.Seat.Row2.Pos3.Switch.Seating.IsBackwardEngaged: ( NotAvailable )sdv.databroker.v1 > set Vehicle.Cabin.Seat.Row2.Pos3.Switch.Seating.IsBackwardEngaged false[set] OK
Digital Auto: Playground
playground.digital.auto provides an in-browser, rapid prototyping environment utilizing the COVESA APIs for connected vehicles.
The UUID for Vehicle.Cabin.Seat.Row2.Pos3.Switch.Seating.IsBackwardEngaged is 2999a262b18e5476ab621e0cba4045e8
Feedback
Do you think this Vehicle Signal specification needs enhancement? Do you want to discuss with experts? Try the following ressources to get in touch with the VSS community:
$ databroker-cli
sdv.databroker.v1 > connect
[connect] OK
sdv.databroker.v1 > get Vehicle.Cabin.Seat.Row2.Pos3.Switch.Seating.IsForwardEngaged
[get] OK
Vehicle.Cabin.Seat.Row2.Pos3.Switch.Seating.IsForwardEngaged: ( NotAvailable )sdv.databroker.v1 > set Vehicle.Cabin.Seat.Row2.Pos3.Switch.Seating.IsForwardEngaged false[set] OK
Digital Auto: Playground
playground.digital.auto provides an in-browser, rapid prototyping environment utilizing the COVESA APIs for connected vehicles.
The UUID for Vehicle.Cabin.Seat.Row2.Pos3.Switch.Seating.IsForwardEngaged is d32a5d6d85ff5b64b0157ae215cee44e
Feedback
Do you think this Vehicle Signal specification needs enhancement? Do you want to discuss with experts? Try the following ressources to get in touch with the VSS community:
Do you think this Vehicle Signal specification needs enhancement? Do you want to discuss with experts? Try the following ressources to get in touch with the VSS community:
Do you think this Vehicle Signal specification needs enhancement? Do you want to discuss with experts? Try the following ressources to get in touch with the VSS community:
$ databroker-cli
sdv.databroker.v1 > connect
[connect] OK
sdv.databroker.v1 > get Vehicle.Cabin.Seat.Row2.Pos3.Backrest.Lumbar.Height
[get] OK
Vehicle.Cabin.Seat.Row2.Pos3.Backrest.Lumbar.Height: ( NotAvailable )sdv.databroker.v1 > set Vehicle.Cabin.Seat.Row2.Pos3.Backrest.Lumbar.Height 0[set] OK
Digital Auto: Playground
playground.digital.auto provides an in-browser, rapid prototyping environment utilizing the COVESA APIs for connected vehicles.
The UUID for Vehicle.Cabin.Seat.Row2.Pos3.Backrest.Lumbar.Height is 38b30eb99fd35c5693c18361c566c6e9
Feedback
Do you think this Vehicle Signal specification needs enhancement? Do you want to discuss with experts? Try the following ressources to get in touch with the VSS community:
$ databroker-cli
sdv.databroker.v1 > connect
[connect] OK
sdv.databroker.v1 > get Vehicle.Cabin.Seat.Row2.Pos3.Backrest.Lumbar.Support
[get] OK
Vehicle.Cabin.Seat.Row2.Pos3.Backrest.Lumbar.Support: ( NotAvailable )sdv.databroker.v1 > set Vehicle.Cabin.Seat.Row2.Pos3.Backrest.Lumbar.Support 0[set] OK
Digital Auto: Playground
playground.digital.auto provides an in-browser, rapid prototyping environment utilizing the COVESA APIs for connected vehicles.
The UUID for Vehicle.Cabin.Seat.Row2.Pos3.Backrest.Lumbar.Support is b227f493bab0503589b3a54c30ade03c
Feedback
Do you think this Vehicle Signal specification needs enhancement? Do you want to discuss with experts? Try the following ressources to get in touch with the VSS community:
The following is a list of VSS supported built-in datatypes:
Name
Type
Min
Max
uint8
unsigned 8-bit integer
0
255
int8
signed 8-bit integer
-128
127
uint16
unsigned 16-bit integer
0
65535
int16
signed 16-bit integer
-32768
32767
uint32
unsigned 32-bit integer
0
4294967295
int32
signed 32-bit integer
-2147483648
2147483647
uint64
unsigned 64-bit integer
0
2^64 - 1
int64
signed 64-bit integer
-2^63
2^63 - 1
boolean
boolean value
0/false
1/true
float
floating point number
-3.4e -38
3.4e 38
double
double precision floating point number
-1.7e -300
1.7e 300
string
character string
n/a
n/a
Min, max and default values defined in a Vehicle Signal Specification must be in the supported range of the data type.
5.1.8.7.1.1.4.2 - Recline
Full qualified VSS Path:
Vehicle.Cabin.Seat.Row2.Pos3.Backrest.Recline
Description:
Backrest recline compared to seat z-axis (seat vertical axis). 0 degrees = Upright/Vertical backrest. Negative degrees for forward recline. Positive degrees for backward recline.
Comment:
Seat z-axis depends on seat tilt. This means that movement of backrest due to seat tilting will not affect Backrest.Recline as long as the angle between Seating and Backrest are constant. Absolute recline relative to vehicle z-axis can be calculated as Tilt + Backrest.Recline.
Navigation
flowchart LR
Vehicle-->Cabin
Cabin-->Seat
Seat-->Row2
Row2-->Pos3
Pos3-->Backrest
Backrest-->Recline
$ databroker-cli
sdv.databroker.v1 > connect
[connect] OK
sdv.databroker.v1 > get Vehicle.Cabin.Seat.Row2.Pos3.Backrest.Recline
[get] OK
Vehicle.Cabin.Seat.Row2.Pos3.Backrest.Recline: ( NotAvailable )sdv.databroker.v1 > set Vehicle.Cabin.Seat.Row2.Pos3.Backrest.Recline 0[set] OK
Digital Auto: Playground
playground.digital.auto provides an in-browser, rapid prototyping environment utilizing the COVESA APIs for connected vehicles.
The UUID for Vehicle.Cabin.Seat.Row2.Pos3.Backrest.Recline is 867a9d4d4e685407906d561946921c24
Feedback
Do you think this Vehicle Signal specification needs enhancement? Do you want to discuss with experts? Try the following ressources to get in touch with the VSS community:
Do you think this Vehicle Signal specification needs enhancement? Do you want to discuss with experts? Try the following ressources to get in touch with the VSS community:
$ databroker-cli
sdv.databroker.v1 > connect
[connect] OK
sdv.databroker.v1 > get Vehicle.Cabin.Seat.Row2.Pos3.Backrest.SideBolster.Support
[get] OK
Vehicle.Cabin.Seat.Row2.Pos3.Backrest.SideBolster.Support: ( NotAvailable )sdv.databroker.v1 > set Vehicle.Cabin.Seat.Row2.Pos3.Backrest.SideBolster.Support 0[set] OK
Digital Auto: Playground
playground.digital.auto provides an in-browser, rapid prototyping environment utilizing the COVESA APIs for connected vehicles.
The UUID for Vehicle.Cabin.Seat.Row2.Pos3.Backrest.SideBolster.Support is b4cef1fd83d653aca5c941865bbf96b7
Feedback
Do you think this Vehicle Signal specification needs enhancement? Do you want to discuss with experts? Try the following ressources to get in touch with the VSS community:
$ databroker-cli
sdv.databroker.v1 > connect
[connect] OK
sdv.databroker.v1 > get Vehicle.Cabin.Seat.Row2.Pos3.Heating
[get] OK
Vehicle.Cabin.Seat.Row2.Pos3.Heating: ( NotAvailable )sdv.databroker.v1 > set Vehicle.Cabin.Seat.Row2.Pos3.Heating 0[set] OK
Digital Auto: Playground
playground.digital.auto provides an in-browser, rapid prototyping environment utilizing the COVESA APIs for connected vehicles.
The UUID for Vehicle.Cabin.Seat.Row2.Pos3.Heating is 2a175561eed05247b3048263c0122fa1
Feedback
Do you think this Vehicle Signal specification needs enhancement? Do you want to discuss with experts? Try the following ressources to get in touch with the VSS community:
$ databroker-cli
sdv.databroker.v1 > connect
[connect] OK
sdv.databroker.v1 > get Vehicle.Cabin.Seat.Row2.Pos3.Height
[get] OK
Vehicle.Cabin.Seat.Row2.Pos3.Height: ( NotAvailable )sdv.databroker.v1 > set Vehicle.Cabin.Seat.Row2.Pos3.Height 0[set] OK
Digital Auto: Playground
playground.digital.auto provides an in-browser, rapid prototyping environment utilizing the COVESA APIs for connected vehicles.
The UUID for Vehicle.Cabin.Seat.Row2.Pos3.Height is 077a21fca4d857dd81debfd81119bc73
Feedback
Do you think this Vehicle Signal specification needs enhancement? Do you want to discuss with experts? Try the following ressources to get in touch with the VSS community:
$ databroker-cli
sdv.databroker.v1 > connect
[connect] OK
sdv.databroker.v1 > get Vehicle.Cabin.Seat.Row2.Pos3.IsBelted
[get] OK
Vehicle.Cabin.Seat.Row2.Pos3.IsBelted: ( NotAvailable )sdv.databroker.v1 > set Vehicle.Cabin.Seat.Row2.Pos3.IsBelted false[set] OK
Digital Auto: Playground
playground.digital.auto provides an in-browser, rapid prototyping environment utilizing the COVESA APIs for connected vehicles.
The UUID for Vehicle.Cabin.Seat.Row2.Pos3.IsBelted is 815f9e1dc05b5078aaefc3868319b18b
Feedback
Do you think this Vehicle Signal specification needs enhancement? Do you want to discuss with experts? Try the following ressources to get in touch with the VSS community:
$ databroker-cli
sdv.databroker.v1 > connect
[connect] OK
sdv.databroker.v1 > get Vehicle.Cabin.Seat.Row2.Pos3.IsOccupied
[get] OK
Vehicle.Cabin.Seat.Row2.Pos3.IsOccupied: ( NotAvailable )sdv.databroker.v1 > set Vehicle.Cabin.Seat.Row2.Pos3.IsOccupied false[set] OK
Digital Auto: Playground
playground.digital.auto provides an in-browser, rapid prototyping environment utilizing the COVESA APIs for connected vehicles.
The UUID for Vehicle.Cabin.Seat.Row2.Pos3.IsOccupied is 018a7ef68dd75f0ea391c7d8191acd9d
Feedback
Do you think this Vehicle Signal specification needs enhancement? Do you want to discuss with experts? Try the following ressources to get in touch with the VSS community:
$ databroker-cli
sdv.databroker.v1 > connect
[connect] OK
sdv.databroker.v1 > get Vehicle.Cabin.Seat.Row2.Pos3.Massage
[get] OK
Vehicle.Cabin.Seat.Row2.Pos3.Massage: ( NotAvailable )sdv.databroker.v1 > set Vehicle.Cabin.Seat.Row2.Pos3.Massage 0[set] OK
Digital Auto: Playground
playground.digital.auto provides an in-browser, rapid prototyping environment utilizing the COVESA APIs for connected vehicles.
The UUID for Vehicle.Cabin.Seat.Row2.Pos3.Massage is fffccf6ae6365b83ab093031f573e452
Feedback
Do you think this Vehicle Signal specification needs enhancement? Do you want to discuss with experts? Try the following ressources to get in touch with the VSS community:
Do you think this Vehicle Signal specification needs enhancement? Do you want to discuss with experts? Try the following ressources to get in touch with the VSS community:
Do you think this Vehicle Signal specification needs enhancement? Do you want to discuss with experts? Try the following ressources to get in touch with the VSS community:
$ databroker-cli
sdv.databroker.v1 > connect
[connect] OK
sdv.databroker.v1 > get Vehicle.Cabin.Seat.Row2.Pos3.Occupant.Identifier.Issuer
[get] OK
Vehicle.Cabin.Seat.Row2.Pos3.Occupant.Identifier.Issuer: ( NotAvailable )sdv.databroker.v1 > set Vehicle.Cabin.Seat.Row2.Pos3.Occupant.Identifier.Issuer Foo
[set] OK
Digital Auto: Playground
playground.digital.auto provides an in-browser, rapid prototyping environment utilizing the COVESA APIs for connected vehicles.
The UUID for Vehicle.Cabin.Seat.Row2.Pos3.Occupant.Identifier.Issuer is d96b225635b959a1aea0d6febb955ae8
Feedback
Do you think this Vehicle Signal specification needs enhancement? Do you want to discuss with experts? Try the following ressources to get in touch with the VSS community:
$ databroker-cli
sdv.databroker.v1 > connect
[connect] OK
sdv.databroker.v1 > get Vehicle.Cabin.Seat.Row2.Pos3.Occupant.Identifier.Subject
[get] OK
Vehicle.Cabin.Seat.Row2.Pos3.Occupant.Identifier.Subject: ( NotAvailable )sdv.databroker.v1 > set Vehicle.Cabin.Seat.Row2.Pos3.Occupant.Identifier.Subject Foo
[set] OK
Digital Auto: Playground
playground.digital.auto provides an in-browser, rapid prototyping environment utilizing the COVESA APIs for connected vehicles.
The UUID for Vehicle.Cabin.Seat.Row2.Pos3.Occupant.Identifier.Subject is ea36896f5572580b9d8379a6256f61b5
Feedback
Do you think this Vehicle Signal specification needs enhancement? Do you want to discuss with experts? Try the following ressources to get in touch with the VSS community:
$ databroker-cli
sdv.databroker.v1 > connect
[connect] OK
sdv.databroker.v1 > get Vehicle.Cabin.Seat.Row2.Pos3.Position
[get] OK
Vehicle.Cabin.Seat.Row2.Pos3.Position: ( NotAvailable )sdv.databroker.v1 > set Vehicle.Cabin.Seat.Row2.Pos3.Position 0[set] OK
Digital Auto: Playground
playground.digital.auto provides an in-browser, rapid prototyping environment utilizing the COVESA APIs for connected vehicles.
The UUID for Vehicle.Cabin.Seat.Row2.Pos3.Position is 64eb763cc10358b49968797fbf50c092
Feedback
Do you think this Vehicle Signal specification needs enhancement? Do you want to discuss with experts? Try the following ressources to get in touch with the VSS community:
The following is a list of VSS supported built-in datatypes:
Name
Type
Min
Max
uint8
unsigned 8-bit integer
0
255
int8
signed 8-bit integer
-128
127
uint16
unsigned 16-bit integer
0
65535
int16
signed 16-bit integer
-32768
32767
uint32
unsigned 32-bit integer
0
4294967295
int32
signed 32-bit integer
-2147483648
2147483647
uint64
unsigned 64-bit integer
0
2^64 - 1
int64
signed 64-bit integer
-2^63
2^63 - 1
boolean
boolean value
0/false
1/true
float
floating point number
-3.4e -38
3.4e 38
double
double precision floating point number
-1.7e -300
1.7e 300
string
character string
n/a
n/a
Min, max and default values defined in a Vehicle Signal Specification must be in the supported range of the data type.
5.1.8.7.1.1.12 - Seating
Full qualified VSS Path:
Vehicle.Cabin.Seat.Row2.Pos3.Seating
Description:
Describes signals related to the seat bottom of the seat.
Comment:
Seating is here considered as the part of the seat that supports the thighs. Additional cushions (if any) for support of lower legs is not covered by this branch.
Navigation
flowchart LR
Vehicle-->Cabin
Cabin-->Seat
Seat-->Row2
Row2-->Pos3
Pos3-->Seating
Digital Auto: Playground
playground.digital.auto provides an in-browser, rapid prototyping environment utilizing the COVESA APIs for connected vehicles.
Do you think this Vehicle Signal specification needs enhancement? Do you want to discuss with experts? Try the following ressources to get in touch with the VSS community:
$ databroker-cli
sdv.databroker.v1 > connect
[connect] OK
sdv.databroker.v1 > get Vehicle.Cabin.Seat.Row2.Pos3.Seating.Length
[get] OK
Vehicle.Cabin.Seat.Row2.Pos3.Seating.Length: ( NotAvailable )sdv.databroker.v1 > set Vehicle.Cabin.Seat.Row2.Pos3.Seating.Length 0[set] OK
Digital Auto: Playground
playground.digital.auto provides an in-browser, rapid prototyping environment utilizing the COVESA APIs for connected vehicles.
The UUID for Vehicle.Cabin.Seat.Row2.Pos3.Seating.Length is b188311a9fd95b9195b28ab7be00d68f
Feedback
Do you think this Vehicle Signal specification needs enhancement? Do you want to discuss with experts? Try the following ressources to get in touch with the VSS community:
The following is a list of VSS supported built-in datatypes:
Name
Type
Min
Max
uint8
unsigned 8-bit integer
0
255
int8
signed 8-bit integer
-128
127
uint16
unsigned 16-bit integer
0
65535
int16
signed 16-bit integer
-32768
32767
uint32
unsigned 32-bit integer
0
4294967295
int32
signed 32-bit integer
-2147483648
2147483647
uint64
unsigned 64-bit integer
0
2^64 - 1
int64
signed 64-bit integer
-2^63
2^63 - 1
boolean
boolean value
0/false
1/true
float
floating point number
-3.4e -38
3.4e 38
double
double precision floating point number
-1.7e -300
1.7e 300
string
character string
n/a
n/a
Min, max and default values defined in a Vehicle Signal Specification must be in the supported range of the data type.
5.1.8.7.1.1.13 - Tilt
Full qualified VSS Path:
Vehicle.Cabin.Seat.Row2.Pos3.Tilt
Description:
Tilting of seat (seating and backrest) relative to vehicle x-axis. 0 = seat bottom is flat, seat bottom and vehicle x-axis are parallel. Positive degrees = seat tilted backwards, seat x-axis tilted upward, seat z-axis is tilted backward.
Comment:
In VSS it is assumed that tilting a seat affects both seating (seat bottom) and backrest, i.e. the angle between seating and backrest will not be affected when changing Tilt.
Navigation
flowchart LR
Vehicle-->Cabin
Cabin-->Seat
Seat-->Row2
Row2-->Pos3
Pos3-->Tilt
$ databroker-cli
sdv.databroker.v1 > connect
[connect] OK
sdv.databroker.v1 > get Vehicle.Cabin.Seat.Row2.Pos3.Tilt
[get] OK
Vehicle.Cabin.Seat.Row2.Pos3.Tilt: ( NotAvailable )sdv.databroker.v1 > set Vehicle.Cabin.Seat.Row2.Pos3.Tilt 0[set] OK
Digital Auto: Playground
playground.digital.auto provides an in-browser, rapid prototyping environment utilizing the COVESA APIs for connected vehicles.
The UUID for Vehicle.Cabin.Seat.Row2.Pos3.Tilt is 5702e9961d4353eea849901a12886cf1
Feedback
Do you think this Vehicle Signal specification needs enhancement? Do you want to discuss with experts? Try the following ressources to get in touch with the VSS community:
Vehicle.Cabin.Seat.Row2.Pos2.Height (Seat position on vehicle z-axis. Position is relative within available movable range of the seating. 0 = Lowermost position supported.)
Vehicle.Cabin.Seat.Row2.Pos2.Position (Seat position on vehicle x-axis. Position is relative to the frontmost position supported by the seat. 0 = Frontmost position supported.)
Vehicle.Cabin.Seat.Row2.Pos2.Tilt (Tilting of seat (seating and backrest) relative to vehicle x-axis. 0 = seat bottom is flat, seat bottom and vehicle x-axis are parallel. Positive degrees = seat tilted backwards, seat x-axis tilted upward, seat z-axis is tilted backward.)
Feedback
Do you think this Vehicle Signal specification needs enhancement? Do you want to discuss with experts? Try the following ressources to get in touch with the VSS community:
Do you think this Vehicle Signal specification needs enhancement? Do you want to discuss with experts? Try the following ressources to get in touch with the VSS community:
$ databroker-cli
sdv.databroker.v1 > connect
[connect] OK
sdv.databroker.v1 > get Vehicle.Cabin.Seat.Row2.Pos2.Airbag.IsDeployed
[get] OK
Vehicle.Cabin.Seat.Row2.Pos2.Airbag.IsDeployed: ( NotAvailable )sdv.databroker.v1 > set Vehicle.Cabin.Seat.Row2.Pos2.Airbag.IsDeployed false[set] OK
Digital Auto: Playground
playground.digital.auto provides an in-browser, rapid prototyping environment utilizing the COVESA APIs for connected vehicles.
The UUID for Vehicle.Cabin.Seat.Row2.Pos2.Airbag.IsDeployed is 668f397bc95358989119fb1cfdfa8a01
Feedback
Do you think this Vehicle Signal specification needs enhancement? Do you want to discuss with experts? Try the following ressources to get in touch with the VSS community:
Do you think this Vehicle Signal specification needs enhancement? Do you want to discuss with experts? Try the following ressources to get in touch with the VSS community:
$ databroker-cli
sdv.databroker.v1 > connect
[connect] OK
sdv.databroker.v1 > get Vehicle.Cabin.Seat.Row2.Pos2.Headrest.Angle
[get] OK
Vehicle.Cabin.Seat.Row2.Pos2.Headrest.Angle: ( NotAvailable )sdv.databroker.v1 > set Vehicle.Cabin.Seat.Row2.Pos2.Headrest.Angle 0[set] OK
Digital Auto: Playground
playground.digital.auto provides an in-browser, rapid prototyping environment utilizing the COVESA APIs for connected vehicles.
The UUID for Vehicle.Cabin.Seat.Row2.Pos2.Headrest.Angle is d3d4f0a7f5c15072b80f88c2743b77be
Feedback
Do you think this Vehicle Signal specification needs enhancement? Do you want to discuss with experts? Try the following ressources to get in touch with the VSS community:
$ databroker-cli
sdv.databroker.v1 > connect
[connect] OK
sdv.databroker.v1 > get Vehicle.Cabin.Seat.Row2.Pos2.Headrest.Height
[get] OK
Vehicle.Cabin.Seat.Row2.Pos2.Headrest.Height: ( NotAvailable )sdv.databroker.v1 > set Vehicle.Cabin.Seat.Row2.Pos2.Headrest.Height 0[set] OK
Digital Auto: Playground
playground.digital.auto provides an in-browser, rapid prototyping environment utilizing the COVESA APIs for connected vehicles.
The UUID for Vehicle.Cabin.Seat.Row2.Pos2.Headrest.Height is 1e955420a3d6591e84aa2b6bbd2bed18
Feedback
Do you think this Vehicle Signal specification needs enhancement? Do you want to discuss with experts? Try the following ressources to get in touch with the VSS community:
The following is a list of VSS supported built-in datatypes:
Name
Type
Min
Max
uint8
unsigned 8-bit integer
0
255
int8
signed 8-bit integer
-128
127
uint16
unsigned 16-bit integer
0
65535
int16
signed 16-bit integer
-32768
32767
uint32
unsigned 32-bit integer
0
4294967295
int32
signed 32-bit integer
-2147483648
2147483647
uint64
unsigned 64-bit integer
0
2^64 - 1
int64
signed 64-bit integer
-2^63
2^63 - 1
boolean
boolean value
0/false
1/true
float
floating point number
-3.4e -38
3.4e 38
double
double precision floating point number
-1.7e -300
1.7e 300
string
character string
n/a
n/a
Min, max and default values defined in a Vehicle Signal Specification must be in the supported range of the data type.
5.1.8.7.1.2.3 - Seating
Full qualified VSS Path:
Vehicle.Cabin.Seat.Row2.Pos2.Seating
Description:
Describes signals related to the seat bottom of the seat.
Comment:
Seating is here considered as the part of the seat that supports the thighs. Additional cushions (if any) for support of lower legs is not covered by this branch.
Navigation
flowchart LR
Vehicle-->Cabin
Cabin-->Seat
Seat-->Row2
Row2-->Pos2
Pos2-->Seating
Digital Auto: Playground
playground.digital.auto provides an in-browser, rapid prototyping environment utilizing the COVESA APIs for connected vehicles.
Do you think this Vehicle Signal specification needs enhancement? Do you want to discuss with experts? Try the following ressources to get in touch with the VSS community:
$ databroker-cli
sdv.databroker.v1 > connect
[connect] OK
sdv.databroker.v1 > get Vehicle.Cabin.Seat.Row2.Pos2.Seating.Length
[get] OK
Vehicle.Cabin.Seat.Row2.Pos2.Seating.Length: ( NotAvailable )sdv.databroker.v1 > set Vehicle.Cabin.Seat.Row2.Pos2.Seating.Length 0[set] OK
Digital Auto: Playground
playground.digital.auto provides an in-browser, rapid prototyping environment utilizing the COVESA APIs for connected vehicles.
The UUID for Vehicle.Cabin.Seat.Row2.Pos2.Seating.Length is fbdac9db983b5f52a900d24cf2d424c4
Feedback
Do you think this Vehicle Signal specification needs enhancement? Do you want to discuss with experts? Try the following ressources to get in touch with the VSS community:
Do you think this Vehicle Signal specification needs enhancement? Do you want to discuss with experts? Try the following ressources to get in touch with the VSS community:
Do you think this Vehicle Signal specification needs enhancement? Do you want to discuss with experts? Try the following ressources to get in touch with the VSS community:
$ databroker-cli
sdv.databroker.v1 > connect
[connect] OK
sdv.databroker.v1 > get Vehicle.Cabin.Seat.Row2.Pos2.Switch.Headrest.IsBackwardEngaged
[get] OK
Vehicle.Cabin.Seat.Row2.Pos2.Switch.Headrest.IsBackwardEngaged: ( NotAvailable )sdv.databroker.v1 > set Vehicle.Cabin.Seat.Row2.Pos2.Switch.Headrest.IsBackwardEngaged false[set] OK
Digital Auto: Playground
playground.digital.auto provides an in-browser, rapid prototyping environment utilizing the COVESA APIs for connected vehicles.
The UUID for Vehicle.Cabin.Seat.Row2.Pos2.Switch.Headrest.IsBackwardEngaged is 5a6c05fe3aa854199b3a2d83a91ff07d
Feedback
Do you think this Vehicle Signal specification needs enhancement? Do you want to discuss with experts? Try the following ressources to get in touch with the VSS community:
$ databroker-cli
sdv.databroker.v1 > connect
[connect] OK
sdv.databroker.v1 > get Vehicle.Cabin.Seat.Row2.Pos2.Switch.Headrest.IsDownEngaged
[get] OK
Vehicle.Cabin.Seat.Row2.Pos2.Switch.Headrest.IsDownEngaged: ( NotAvailable )sdv.databroker.v1 > set Vehicle.Cabin.Seat.Row2.Pos2.Switch.Headrest.IsDownEngaged false[set] OK
Digital Auto: Playground
playground.digital.auto provides an in-browser, rapid prototyping environment utilizing the COVESA APIs for connected vehicles.
The UUID for Vehicle.Cabin.Seat.Row2.Pos2.Switch.Headrest.IsDownEngaged is a1bab160e2bf563b991b22c820ae17c4
Feedback
Do you think this Vehicle Signal specification needs enhancement? Do you want to discuss with experts? Try the following ressources to get in touch with the VSS community:
$ databroker-cli
sdv.databroker.v1 > connect
[connect] OK
sdv.databroker.v1 > get Vehicle.Cabin.Seat.Row2.Pos2.Switch.Headrest.IsForwardEngaged
[get] OK
Vehicle.Cabin.Seat.Row2.Pos2.Switch.Headrest.IsForwardEngaged: ( NotAvailable )sdv.databroker.v1 > set Vehicle.Cabin.Seat.Row2.Pos2.Switch.Headrest.IsForwardEngaged false[set] OK
Digital Auto: Playground
playground.digital.auto provides an in-browser, rapid prototyping environment utilizing the COVESA APIs for connected vehicles.
The UUID for Vehicle.Cabin.Seat.Row2.Pos2.Switch.Headrest.IsForwardEngaged is aa43a5239e255308b617306b71723c5b
Feedback
Do you think this Vehicle Signal specification needs enhancement? Do you want to discuss with experts? Try the following ressources to get in touch with the VSS community:
$ databroker-cli
sdv.databroker.v1 > connect
[connect] OK
sdv.databroker.v1 > get Vehicle.Cabin.Seat.Row2.Pos2.Switch.Headrest.IsUpEngaged
[get] OK
Vehicle.Cabin.Seat.Row2.Pos2.Switch.Headrest.IsUpEngaged: ( NotAvailable )sdv.databroker.v1 > set Vehicle.Cabin.Seat.Row2.Pos2.Switch.Headrest.IsUpEngaged false[set] OK
Digital Auto: Playground
playground.digital.auto provides an in-browser, rapid prototyping environment utilizing the COVESA APIs for connected vehicles.
The UUID for Vehicle.Cabin.Seat.Row2.Pos2.Switch.Headrest.IsUpEngaged is 5b096959633953a9b7c4c52af0c85fa9
Feedback
Do you think this Vehicle Signal specification needs enhancement? Do you want to discuss with experts? Try the following ressources to get in touch with the VSS community:
Do you think this Vehicle Signal specification needs enhancement? Do you want to discuss with experts? Try the following ressources to get in touch with the VSS community:
$ databroker-cli
sdv.databroker.v1 > connect
[connect] OK
sdv.databroker.v1 > get Vehicle.Cabin.Seat.Row2.Pos2.Switch.Massage.IsDecreaseEngaged
[get] OK
Vehicle.Cabin.Seat.Row2.Pos2.Switch.Massage.IsDecreaseEngaged: ( NotAvailable )sdv.databroker.v1 > set Vehicle.Cabin.Seat.Row2.Pos2.Switch.Massage.IsDecreaseEngaged false[set] OK
Digital Auto: Playground
playground.digital.auto provides an in-browser, rapid prototyping environment utilizing the COVESA APIs for connected vehicles.
The UUID for Vehicle.Cabin.Seat.Row2.Pos2.Switch.Massage.IsDecreaseEngaged is 20b139513267583e8a4a2374fcde2626
Feedback
Do you think this Vehicle Signal specification needs enhancement? Do you want to discuss with experts? Try the following ressources to get in touch with the VSS community:
$ databroker-cli
sdv.databroker.v1 > connect
[connect] OK
sdv.databroker.v1 > get Vehicle.Cabin.Seat.Row2.Pos2.Switch.Massage.IsIncreaseEngaged
[get] OK
Vehicle.Cabin.Seat.Row2.Pos2.Switch.Massage.IsIncreaseEngaged: ( NotAvailable )sdv.databroker.v1 > set Vehicle.Cabin.Seat.Row2.Pos2.Switch.Massage.IsIncreaseEngaged false[set] OK
Digital Auto: Playground
playground.digital.auto provides an in-browser, rapid prototyping environment utilizing the COVESA APIs for connected vehicles.
The UUID for Vehicle.Cabin.Seat.Row2.Pos2.Switch.Massage.IsIncreaseEngaged is 32fff40566d95d0cb36ed76100e515c3
Feedback
Do you think this Vehicle Signal specification needs enhancement? Do you want to discuss with experts? Try the following ressources to get in touch with the VSS community:
Do you think this Vehicle Signal specification needs enhancement? Do you want to discuss with experts? Try the following ressources to get in touch with the VSS community:
$ databroker-cli
sdv.databroker.v1 > connect
[connect] OK
sdv.databroker.v1 > get Vehicle.Cabin.Seat.Row2.Pos2.Switch.Backrest.IsReclineBackwardEngaged
[get] OK
Vehicle.Cabin.Seat.Row2.Pos2.Switch.Backrest.IsReclineBackwardEngaged: ( NotAvailable )sdv.databroker.v1 > set Vehicle.Cabin.Seat.Row2.Pos2.Switch.Backrest.IsReclineBackwardEngaged false[set] OK
Digital Auto: Playground
playground.digital.auto provides an in-browser, rapid prototyping environment utilizing the COVESA APIs for connected vehicles.
The UUID for Vehicle.Cabin.Seat.Row2.Pos2.Switch.Backrest.IsReclineBackwardEngaged is 366a8acb011b5997a07930a1b7e62e69
Feedback
Do you think this Vehicle Signal specification needs enhancement? Do you want to discuss with experts? Try the following ressources to get in touch with the VSS community:
$ databroker-cli
sdv.databroker.v1 > connect
[connect] OK
sdv.databroker.v1 > get Vehicle.Cabin.Seat.Row2.Pos2.Switch.Backrest.IsReclineForwardEngaged
[get] OK
Vehicle.Cabin.Seat.Row2.Pos2.Switch.Backrest.IsReclineForwardEngaged: ( NotAvailable )sdv.databroker.v1 > set Vehicle.Cabin.Seat.Row2.Pos2.Switch.Backrest.IsReclineForwardEngaged false[set] OK
Digital Auto: Playground
playground.digital.auto provides an in-browser, rapid prototyping environment utilizing the COVESA APIs for connected vehicles.
The UUID for Vehicle.Cabin.Seat.Row2.Pos2.Switch.Backrest.IsReclineForwardEngaged is fd142d6b8b1353118a5c6e6afb635145
Feedback
Do you think this Vehicle Signal specification needs enhancement? Do you want to discuss with experts? Try the following ressources to get in touch with the VSS community:
Do you think this Vehicle Signal specification needs enhancement? Do you want to discuss with experts? Try the following ressources to get in touch with the VSS community:
$ databroker-cli
sdv.databroker.v1 > connect
[connect] OK
sdv.databroker.v1 > get Vehicle.Cabin.Seat.Row2.Pos2.Switch.Backrest.Lumbar.IsDownEngaged
[get] OK
Vehicle.Cabin.Seat.Row2.Pos2.Switch.Backrest.Lumbar.IsDownEngaged: ( NotAvailable )sdv.databroker.v1 > set Vehicle.Cabin.Seat.Row2.Pos2.Switch.Backrest.Lumbar.IsDownEngaged false[set] OK
Digital Auto: Playground
playground.digital.auto provides an in-browser, rapid prototyping environment utilizing the COVESA APIs for connected vehicles.
The UUID for Vehicle.Cabin.Seat.Row2.Pos2.Switch.Backrest.Lumbar.IsDownEngaged is 1092743255ee5cb7a11b172f2d6a9f2e
Feedback
Do you think this Vehicle Signal specification needs enhancement? Do you want to discuss with experts? Try the following ressources to get in touch with the VSS community:
$ databroker-cli
sdv.databroker.v1 > connect
[connect] OK
sdv.databroker.v1 > get Vehicle.Cabin.Seat.Row2.Pos2.Switch.Backrest.Lumbar.IsLessSupportEngaged
[get] OK
Vehicle.Cabin.Seat.Row2.Pos2.Switch.Backrest.Lumbar.IsLessSupportEngaged: ( NotAvailable )sdv.databroker.v1 > set Vehicle.Cabin.Seat.Row2.Pos2.Switch.Backrest.Lumbar.IsLessSupportEngaged false[set] OK
Digital Auto: Playground
playground.digital.auto provides an in-browser, rapid prototyping environment utilizing the COVESA APIs for connected vehicles.
The UUID for Vehicle.Cabin.Seat.Row2.Pos2.Switch.Backrest.Lumbar.IsLessSupportEngaged is 7dc46ce3336f5c6ab31fe33e52a56cb5
Feedback
Do you think this Vehicle Signal specification needs enhancement? Do you want to discuss with experts? Try the following ressources to get in touch with the VSS community:
$ databroker-cli
sdv.databroker.v1 > connect
[connect] OK
sdv.databroker.v1 > get Vehicle.Cabin.Seat.Row2.Pos2.Switch.Backrest.Lumbar.IsMoreSupportEngaged
[get] OK
Vehicle.Cabin.Seat.Row2.Pos2.Switch.Backrest.Lumbar.IsMoreSupportEngaged: ( NotAvailable )sdv.databroker.v1 > set Vehicle.Cabin.Seat.Row2.Pos2.Switch.Backrest.Lumbar.IsMoreSupportEngaged false[set] OK
Digital Auto: Playground
playground.digital.auto provides an in-browser, rapid prototyping environment utilizing the COVESA APIs for connected vehicles.
The UUID for Vehicle.Cabin.Seat.Row2.Pos2.Switch.Backrest.Lumbar.IsMoreSupportEngaged is 475e608bc2aa50f8ad9eea738415d7e3
Feedback
Do you think this Vehicle Signal specification needs enhancement? Do you want to discuss with experts? Try the following ressources to get in touch with the VSS community:
$ databroker-cli
sdv.databroker.v1 > connect
[connect] OK
sdv.databroker.v1 > get Vehicle.Cabin.Seat.Row2.Pos2.Switch.Backrest.Lumbar.IsUpEngaged
[get] OK
Vehicle.Cabin.Seat.Row2.Pos2.Switch.Backrest.Lumbar.IsUpEngaged: ( NotAvailable )sdv.databroker.v1 > set Vehicle.Cabin.Seat.Row2.Pos2.Switch.Backrest.Lumbar.IsUpEngaged false[set] OK
Digital Auto: Playground
playground.digital.auto provides an in-browser, rapid prototyping environment utilizing the COVESA APIs for connected vehicles.
The UUID for Vehicle.Cabin.Seat.Row2.Pos2.Switch.Backrest.Lumbar.IsUpEngaged is 5f6c6804d50955ec8a898a890120a126
Feedback
Do you think this Vehicle Signal specification needs enhancement? Do you want to discuss with experts? Try the following ressources to get in touch with the VSS community:
Do you think this Vehicle Signal specification needs enhancement? Do you want to discuss with experts? Try the following ressources to get in touch with the VSS community:
$ databroker-cli
sdv.databroker.v1 > connect
[connect] OK
sdv.databroker.v1 > get Vehicle.Cabin.Seat.Row2.Pos2.Switch.Backrest.SideBolster.IsLessSupportEngaged
[get] OK
Vehicle.Cabin.Seat.Row2.Pos2.Switch.Backrest.SideBolster.IsLessSupportEngaged: ( NotAvailable )sdv.databroker.v1 > set Vehicle.Cabin.Seat.Row2.Pos2.Switch.Backrest.SideBolster.IsLessSupportEngaged false[set] OK
Digital Auto: Playground
playground.digital.auto provides an in-browser, rapid prototyping environment utilizing the COVESA APIs for connected vehicles.
The UUID for Vehicle.Cabin.Seat.Row2.Pos2.Switch.Backrest.SideBolster.IsLessSupportEngaged is f9edf7174eda59a0a2403450939a4a00
Feedback
Do you think this Vehicle Signal specification needs enhancement? Do you want to discuss with experts? Try the following ressources to get in touch with the VSS community:
$ databroker-cli
sdv.databroker.v1 > connect
[connect] OK
sdv.databroker.v1 > get Vehicle.Cabin.Seat.Row2.Pos2.Switch.Backrest.SideBolster.IsMoreSupportEngaged
[get] OK
Vehicle.Cabin.Seat.Row2.Pos2.Switch.Backrest.SideBolster.IsMoreSupportEngaged: ( NotAvailable )sdv.databroker.v1 > set Vehicle.Cabin.Seat.Row2.Pos2.Switch.Backrest.SideBolster.IsMoreSupportEngaged false[set] OK
Digital Auto: Playground
playground.digital.auto provides an in-browser, rapid prototyping environment utilizing the COVESA APIs for connected vehicles.
The UUID for Vehicle.Cabin.Seat.Row2.Pos2.Switch.Backrest.SideBolster.IsMoreSupportEngaged is 4b8c68ce106155b78b40f09cc000dfdd
Feedback
Do you think this Vehicle Signal specification needs enhancement? Do you want to discuss with experts? Try the following ressources to get in touch with the VSS community:
$ databroker-cli
sdv.databroker.v1 > connect
[connect] OK
sdv.databroker.v1 > get Vehicle.Cabin.Seat.Row2.Pos2.Switch.IsBackwardEngaged
[get] OK
Vehicle.Cabin.Seat.Row2.Pos2.Switch.IsBackwardEngaged: ( NotAvailable )sdv.databroker.v1 > set Vehicle.Cabin.Seat.Row2.Pos2.Switch.IsBackwardEngaged false[set] OK
Digital Auto: Playground
playground.digital.auto provides an in-browser, rapid prototyping environment utilizing the COVESA APIs for connected vehicles.
The UUID for Vehicle.Cabin.Seat.Row2.Pos2.Switch.IsBackwardEngaged is 19c46bf9c19955a1a619fd3311b5236e
Feedback
Do you think this Vehicle Signal specification needs enhancement? Do you want to discuss with experts? Try the following ressources to get in touch with the VSS community:
$ databroker-cli
sdv.databroker.v1 > connect
[connect] OK
sdv.databroker.v1 > get Vehicle.Cabin.Seat.Row2.Pos2.Switch.IsCoolerEngaged
[get] OK
Vehicle.Cabin.Seat.Row2.Pos2.Switch.IsCoolerEngaged: ( NotAvailable )sdv.databroker.v1 > set Vehicle.Cabin.Seat.Row2.Pos2.Switch.IsCoolerEngaged false[set] OK
Digital Auto: Playground
playground.digital.auto provides an in-browser, rapid prototyping environment utilizing the COVESA APIs for connected vehicles.
The UUID for Vehicle.Cabin.Seat.Row2.Pos2.Switch.IsCoolerEngaged is 0d72a18529d55286be69d517c94cbb74
Feedback
Do you think this Vehicle Signal specification needs enhancement? Do you want to discuss with experts? Try the following ressources to get in touch with the VSS community:
$ databroker-cli
sdv.databroker.v1 > connect
[connect] OK
sdv.databroker.v1 > get Vehicle.Cabin.Seat.Row2.Pos2.Switch.IsDownEngaged
[get] OK
Vehicle.Cabin.Seat.Row2.Pos2.Switch.IsDownEngaged: ( NotAvailable )sdv.databroker.v1 > set Vehicle.Cabin.Seat.Row2.Pos2.Switch.IsDownEngaged false[set] OK
Digital Auto: Playground
playground.digital.auto provides an in-browser, rapid prototyping environment utilizing the COVESA APIs for connected vehicles.
The UUID for Vehicle.Cabin.Seat.Row2.Pos2.Switch.IsDownEngaged is 3774266336e05ddbacadd2ef017568b1
Feedback
Do you think this Vehicle Signal specification needs enhancement? Do you want to discuss with experts? Try the following ressources to get in touch with the VSS community:
$ databroker-cli
sdv.databroker.v1 > connect
[connect] OK
sdv.databroker.v1 > get Vehicle.Cabin.Seat.Row2.Pos2.Switch.IsForwardEngaged
[get] OK
Vehicle.Cabin.Seat.Row2.Pos2.Switch.IsForwardEngaged: ( NotAvailable )sdv.databroker.v1 > set Vehicle.Cabin.Seat.Row2.Pos2.Switch.IsForwardEngaged false[set] OK
Digital Auto: Playground
playground.digital.auto provides an in-browser, rapid prototyping environment utilizing the COVESA APIs for connected vehicles.
The UUID for Vehicle.Cabin.Seat.Row2.Pos2.Switch.IsForwardEngaged is 79d68b154c12508d91f28bedafb47a43
Feedback
Do you think this Vehicle Signal specification needs enhancement? Do you want to discuss with experts? Try the following ressources to get in touch with the VSS community:
$ databroker-cli
sdv.databroker.v1 > connect
[connect] OK
sdv.databroker.v1 > get Vehicle.Cabin.Seat.Row2.Pos2.Switch.IsTiltBackwardEngaged
[get] OK
Vehicle.Cabin.Seat.Row2.Pos2.Switch.IsTiltBackwardEngaged: ( NotAvailable )sdv.databroker.v1 > set Vehicle.Cabin.Seat.Row2.Pos2.Switch.IsTiltBackwardEngaged false[set] OK
Digital Auto: Playground
playground.digital.auto provides an in-browser, rapid prototyping environment utilizing the COVESA APIs for connected vehicles.
The UUID for Vehicle.Cabin.Seat.Row2.Pos2.Switch.IsTiltBackwardEngaged is c587834e47e651e3b1556b6f7b4c738d
Feedback
Do you think this Vehicle Signal specification needs enhancement? Do you want to discuss with experts? Try the following ressources to get in touch with the VSS community:
$ databroker-cli
sdv.databroker.v1 > connect
[connect] OK
sdv.databroker.v1 > get Vehicle.Cabin.Seat.Row2.Pos2.Switch.IsTiltForwardEngaged
[get] OK
Vehicle.Cabin.Seat.Row2.Pos2.Switch.IsTiltForwardEngaged: ( NotAvailable )sdv.databroker.v1 > set Vehicle.Cabin.Seat.Row2.Pos2.Switch.IsTiltForwardEngaged false[set] OK
Digital Auto: Playground
playground.digital.auto provides an in-browser, rapid prototyping environment utilizing the COVESA APIs for connected vehicles.
The UUID for Vehicle.Cabin.Seat.Row2.Pos2.Switch.IsTiltForwardEngaged is 90cdb504ff1a5d0bb512fe7034c7bf07
Feedback
Do you think this Vehicle Signal specification needs enhancement? Do you want to discuss with experts? Try the following ressources to get in touch with the VSS community:
$ databroker-cli
sdv.databroker.v1 > connect
[connect] OK
sdv.databroker.v1 > get Vehicle.Cabin.Seat.Row2.Pos2.Switch.IsUpEngaged
[get] OK
Vehicle.Cabin.Seat.Row2.Pos2.Switch.IsUpEngaged: ( NotAvailable )sdv.databroker.v1 > set Vehicle.Cabin.Seat.Row2.Pos2.Switch.IsUpEngaged false[set] OK
Digital Auto: Playground
playground.digital.auto provides an in-browser, rapid prototyping environment utilizing the COVESA APIs for connected vehicles.
The UUID for Vehicle.Cabin.Seat.Row2.Pos2.Switch.IsUpEngaged is 7b1f9f36a4f65e7a8aad6b94c186ec00
Feedback
Do you think this Vehicle Signal specification needs enhancement? Do you want to discuss with experts? Try the following ressources to get in touch with the VSS community:
$ databroker-cli
sdv.databroker.v1 > connect
[connect] OK
sdv.databroker.v1 > get Vehicle.Cabin.Seat.Row2.Pos2.Switch.IsWarmerEngaged
[get] OK
Vehicle.Cabin.Seat.Row2.Pos2.Switch.IsWarmerEngaged: ( NotAvailable )sdv.databroker.v1 > set Vehicle.Cabin.Seat.Row2.Pos2.Switch.IsWarmerEngaged false[set] OK
Digital Auto: Playground
playground.digital.auto provides an in-browser, rapid prototyping environment utilizing the COVESA APIs for connected vehicles.
The UUID for Vehicle.Cabin.Seat.Row2.Pos2.Switch.IsWarmerEngaged is e0a9b4614dbb5c4fbd3e333a73edf8b0
Feedback
Do you think this Vehicle Signal specification needs enhancement? Do you want to discuss with experts? Try the following ressources to get in touch with the VSS community:
Do you think this Vehicle Signal specification needs enhancement? Do you want to discuss with experts? Try the following ressources to get in touch with the VSS community:
$ databroker-cli
sdv.databroker.v1 > connect
[connect] OK
sdv.databroker.v1 > get Vehicle.Cabin.Seat.Row2.Pos2.Switch.Seating.IsBackwardEngaged
[get] OK
Vehicle.Cabin.Seat.Row2.Pos2.Switch.Seating.IsBackwardEngaged: ( NotAvailable )sdv.databroker.v1 > set Vehicle.Cabin.Seat.Row2.Pos2.Switch.Seating.IsBackwardEngaged false[set] OK
Digital Auto: Playground
playground.digital.auto provides an in-browser, rapid prototyping environment utilizing the COVESA APIs for connected vehicles.
The UUID for Vehicle.Cabin.Seat.Row2.Pos2.Switch.Seating.IsBackwardEngaged is 8f8492873cb05b9098e8eb564a43394a
Feedback
Do you think this Vehicle Signal specification needs enhancement? Do you want to discuss with experts? Try the following ressources to get in touch with the VSS community:
$ databroker-cli
sdv.databroker.v1 > connect
[connect] OK
sdv.databroker.v1 > get Vehicle.Cabin.Seat.Row2.Pos2.Switch.Seating.IsForwardEngaged
[get] OK
Vehicle.Cabin.Seat.Row2.Pos2.Switch.Seating.IsForwardEngaged: ( NotAvailable )sdv.databroker.v1 > set Vehicle.Cabin.Seat.Row2.Pos2.Switch.Seating.IsForwardEngaged false[set] OK
Digital Auto: Playground
playground.digital.auto provides an in-browser, rapid prototyping environment utilizing the COVESA APIs for connected vehicles.
The UUID for Vehicle.Cabin.Seat.Row2.Pos2.Switch.Seating.IsForwardEngaged is 4f2b176b4f1657fe8395439df7376d12
Feedback
Do you think this Vehicle Signal specification needs enhancement? Do you want to discuss with experts? Try the following ressources to get in touch with the VSS community:
Do you think this Vehicle Signal specification needs enhancement? Do you want to discuss with experts? Try the following ressources to get in touch with the VSS community:
Do you think this Vehicle Signal specification needs enhancement? Do you want to discuss with experts? Try the following ressources to get in touch with the VSS community:
$ databroker-cli
sdv.databroker.v1 > connect
[connect] OK
sdv.databroker.v1 > get Vehicle.Cabin.Seat.Row2.Pos2.Backrest.SideBolster.Support
[get] OK
Vehicle.Cabin.Seat.Row2.Pos2.Backrest.SideBolster.Support: ( NotAvailable )sdv.databroker.v1 > set Vehicle.Cabin.Seat.Row2.Pos2.Backrest.SideBolster.Support 0[set] OK
Digital Auto: Playground
playground.digital.auto provides an in-browser, rapid prototyping environment utilizing the COVESA APIs for connected vehicles.
The UUID for Vehicle.Cabin.Seat.Row2.Pos2.Backrest.SideBolster.Support is 5b7bbfe5ce975a79a029a839a91ebafb
Feedback
Do you think this Vehicle Signal specification needs enhancement? Do you want to discuss with experts? Try the following ressources to get in touch with the VSS community:
Do you think this Vehicle Signal specification needs enhancement? Do you want to discuss with experts? Try the following ressources to get in touch with the VSS community:
$ databroker-cli
sdv.databroker.v1 > connect
[connect] OK
sdv.databroker.v1 > get Vehicle.Cabin.Seat.Row2.Pos2.Backrest.Lumbar.Height
[get] OK
Vehicle.Cabin.Seat.Row2.Pos2.Backrest.Lumbar.Height: ( NotAvailable )sdv.databroker.v1 > set Vehicle.Cabin.Seat.Row2.Pos2.Backrest.Lumbar.Height 0[set] OK
Digital Auto: Playground
playground.digital.auto provides an in-browser, rapid prototyping environment utilizing the COVESA APIs for connected vehicles.
The UUID for Vehicle.Cabin.Seat.Row2.Pos2.Backrest.Lumbar.Height is 6389ff80f23e5985b734207d97a4a58e
Feedback
Do you think this Vehicle Signal specification needs enhancement? Do you want to discuss with experts? Try the following ressources to get in touch with the VSS community:
$ databroker-cli
sdv.databroker.v1 > connect
[connect] OK
sdv.databroker.v1 > get Vehicle.Cabin.Seat.Row2.Pos2.Backrest.Lumbar.Support
[get] OK
Vehicle.Cabin.Seat.Row2.Pos2.Backrest.Lumbar.Support: ( NotAvailable )sdv.databroker.v1 > set Vehicle.Cabin.Seat.Row2.Pos2.Backrest.Lumbar.Support 0[set] OK
Digital Auto: Playground
playground.digital.auto provides an in-browser, rapid prototyping environment utilizing the COVESA APIs for connected vehicles.
The UUID for Vehicle.Cabin.Seat.Row2.Pos2.Backrest.Lumbar.Support is fcbec0664f315476b901bd4f0b1df006
Feedback
Do you think this Vehicle Signal specification needs enhancement? Do you want to discuss with experts? Try the following ressources to get in touch with the VSS community:
The following is a list of VSS supported built-in datatypes:
Name
Type
Min
Max
uint8
unsigned 8-bit integer
0
255
int8
signed 8-bit integer
-128
127
uint16
unsigned 16-bit integer
0
65535
int16
signed 16-bit integer
-32768
32767
uint32
unsigned 32-bit integer
0
4294967295
int32
signed 32-bit integer
-2147483648
2147483647
uint64
unsigned 64-bit integer
0
2^64 - 1
int64
signed 64-bit integer
-2^63
2^63 - 1
boolean
boolean value
0/false
1/true
float
floating point number
-3.4e -38
3.4e 38
double
double precision floating point number
-1.7e -300
1.7e 300
string
character string
n/a
n/a
Min, max and default values defined in a Vehicle Signal Specification must be in the supported range of the data type.
5.1.8.7.1.2.5.3 - Recline
Full qualified VSS Path:
Vehicle.Cabin.Seat.Row2.Pos2.Backrest.Recline
Description:
Backrest recline compared to seat z-axis (seat vertical axis). 0 degrees = Upright/Vertical backrest. Negative degrees for forward recline. Positive degrees for backward recline.
Comment:
Seat z-axis depends on seat tilt. This means that movement of backrest due to seat tilting will not affect Backrest.Recline as long as the angle between Seating and Backrest are constant. Absolute recline relative to vehicle z-axis can be calculated as Tilt + Backrest.Recline.
Navigation
flowchart LR
Vehicle-->Cabin
Cabin-->Seat
Seat-->Row2
Row2-->Pos2
Pos2-->Backrest
Backrest-->Recline
$ databroker-cli
sdv.databroker.v1 > connect
[connect] OK
sdv.databroker.v1 > get Vehicle.Cabin.Seat.Row2.Pos2.Backrest.Recline
[get] OK
Vehicle.Cabin.Seat.Row2.Pos2.Backrest.Recline: ( NotAvailable )sdv.databroker.v1 > set Vehicle.Cabin.Seat.Row2.Pos2.Backrest.Recline 0[set] OK
Digital Auto: Playground
playground.digital.auto provides an in-browser, rapid prototyping environment utilizing the COVESA APIs for connected vehicles.
The UUID for Vehicle.Cabin.Seat.Row2.Pos2.Backrest.Recline is b260c18880c75c92a635b9dc887fadca
Feedback
Do you think this Vehicle Signal specification needs enhancement? Do you want to discuss with experts? Try the following ressources to get in touch with the VSS community:
$ databroker-cli
sdv.databroker.v1 > connect
[connect] OK
sdv.databroker.v1 > get Vehicle.Cabin.Seat.Row2.Pos2.Heating
[get] OK
Vehicle.Cabin.Seat.Row2.Pos2.Heating: ( NotAvailable )sdv.databroker.v1 > set Vehicle.Cabin.Seat.Row2.Pos2.Heating 0[set] OK
Digital Auto: Playground
playground.digital.auto provides an in-browser, rapid prototyping environment utilizing the COVESA APIs for connected vehicles.
The UUID for Vehicle.Cabin.Seat.Row2.Pos2.Heating is c7eb6ca24426596dab519386d231a9d1
Feedback
Do you think this Vehicle Signal specification needs enhancement? Do you want to discuss with experts? Try the following ressources to get in touch with the VSS community:
$ databroker-cli
sdv.databroker.v1 > connect
[connect] OK
sdv.databroker.v1 > get Vehicle.Cabin.Seat.Row2.Pos2.Height
[get] OK
Vehicle.Cabin.Seat.Row2.Pos2.Height: ( NotAvailable )sdv.databroker.v1 > set Vehicle.Cabin.Seat.Row2.Pos2.Height 0[set] OK
Digital Auto: Playground
playground.digital.auto provides an in-browser, rapid prototyping environment utilizing the COVESA APIs for connected vehicles.
The UUID for Vehicle.Cabin.Seat.Row2.Pos2.Height is 3cf2e042421b540da4aa047680dcdf84
Feedback
Do you think this Vehicle Signal specification needs enhancement? Do you want to discuss with experts? Try the following ressources to get in touch with the VSS community:
$ databroker-cli
sdv.databroker.v1 > connect
[connect] OK
sdv.databroker.v1 > get Vehicle.Cabin.Seat.Row2.Pos2.IsBelted
[get] OK
Vehicle.Cabin.Seat.Row2.Pos2.IsBelted: ( NotAvailable )sdv.databroker.v1 > set Vehicle.Cabin.Seat.Row2.Pos2.IsBelted false[set] OK
Digital Auto: Playground
playground.digital.auto provides an in-browser, rapid prototyping environment utilizing the COVESA APIs for connected vehicles.
The UUID for Vehicle.Cabin.Seat.Row2.Pos2.IsBelted is f2c9c2d624bb5cf4bf9aba5842eb96eb
Feedback
Do you think this Vehicle Signal specification needs enhancement? Do you want to discuss with experts? Try the following ressources to get in touch with the VSS community:
$ databroker-cli
sdv.databroker.v1 > connect
[connect] OK
sdv.databroker.v1 > get Vehicle.Cabin.Seat.Row2.Pos2.IsOccupied
[get] OK
Vehicle.Cabin.Seat.Row2.Pos2.IsOccupied: ( NotAvailable )sdv.databroker.v1 > set Vehicle.Cabin.Seat.Row2.Pos2.IsOccupied false[set] OK
Digital Auto: Playground
playground.digital.auto provides an in-browser, rapid prototyping environment utilizing the COVESA APIs for connected vehicles.
The UUID for Vehicle.Cabin.Seat.Row2.Pos2.IsOccupied is dc1eaa7cab895c5198af0c7f5dea9d79
Feedback
Do you think this Vehicle Signal specification needs enhancement? Do you want to discuss with experts? Try the following ressources to get in touch with the VSS community:
$ databroker-cli
sdv.databroker.v1 > connect
[connect] OK
sdv.databroker.v1 > get Vehicle.Cabin.Seat.Row2.Pos2.Massage
[get] OK
Vehicle.Cabin.Seat.Row2.Pos2.Massage: ( NotAvailable )sdv.databroker.v1 > set Vehicle.Cabin.Seat.Row2.Pos2.Massage 0[set] OK
Digital Auto: Playground
playground.digital.auto provides an in-browser, rapid prototyping environment utilizing the COVESA APIs for connected vehicles.
The UUID for Vehicle.Cabin.Seat.Row2.Pos2.Massage is 77e8a4d481315520927fc0828158772e
Feedback
Do you think this Vehicle Signal specification needs enhancement? Do you want to discuss with experts? Try the following ressources to get in touch with the VSS community:
Do you think this Vehicle Signal specification needs enhancement? Do you want to discuss with experts? Try the following ressources to get in touch with the VSS community:
Do you think this Vehicle Signal specification needs enhancement? Do you want to discuss with experts? Try the following ressources to get in touch with the VSS community:
$ databroker-cli
sdv.databroker.v1 > connect
[connect] OK
sdv.databroker.v1 > get Vehicle.Cabin.Seat.Row2.Pos2.Occupant.Identifier.Issuer
[get] OK
Vehicle.Cabin.Seat.Row2.Pos2.Occupant.Identifier.Issuer: ( NotAvailable )sdv.databroker.v1 > set Vehicle.Cabin.Seat.Row2.Pos2.Occupant.Identifier.Issuer Foo
[set] OK
Digital Auto: Playground
playground.digital.auto provides an in-browser, rapid prototyping environment utilizing the COVESA APIs for connected vehicles.
The UUID for Vehicle.Cabin.Seat.Row2.Pos2.Occupant.Identifier.Issuer is 6f4e6a9f8008536eae03197601a6366a
Feedback
Do you think this Vehicle Signal specification needs enhancement? Do you want to discuss with experts? Try the following ressources to get in touch with the VSS community:
$ databroker-cli
sdv.databroker.v1 > connect
[connect] OK
sdv.databroker.v1 > get Vehicle.Cabin.Seat.Row2.Pos2.Occupant.Identifier.Subject
[get] OK
Vehicle.Cabin.Seat.Row2.Pos2.Occupant.Identifier.Subject: ( NotAvailable )sdv.databroker.v1 > set Vehicle.Cabin.Seat.Row2.Pos2.Occupant.Identifier.Subject Foo
[set] OK
Digital Auto: Playground
playground.digital.auto provides an in-browser, rapid prototyping environment utilizing the COVESA APIs for connected vehicles.
The UUID for Vehicle.Cabin.Seat.Row2.Pos2.Occupant.Identifier.Subject is ae49d70515d55aad9b4719d8162b43c9
Feedback
Do you think this Vehicle Signal specification needs enhancement? Do you want to discuss with experts? Try the following ressources to get in touch with the VSS community:
$ databroker-cli
sdv.databroker.v1 > connect
[connect] OK
sdv.databroker.v1 > get Vehicle.Cabin.Seat.Row2.Pos2.Position
[get] OK
Vehicle.Cabin.Seat.Row2.Pos2.Position: ( NotAvailable )sdv.databroker.v1 > set Vehicle.Cabin.Seat.Row2.Pos2.Position 0[set] OK
Digital Auto: Playground
playground.digital.auto provides an in-browser, rapid prototyping environment utilizing the COVESA APIs for connected vehicles.
The UUID for Vehicle.Cabin.Seat.Row2.Pos2.Position is 7c24fa880576550da14bae1e5eed26b9
Feedback
Do you think this Vehicle Signal specification needs enhancement? Do you want to discuss with experts? Try the following ressources to get in touch with the VSS community:
The following is a list of VSS supported built-in datatypes:
Name
Type
Min
Max
uint8
unsigned 8-bit integer
0
255
int8
signed 8-bit integer
-128
127
uint16
unsigned 16-bit integer
0
65535
int16
signed 16-bit integer
-32768
32767
uint32
unsigned 32-bit integer
0
4294967295
int32
signed 32-bit integer
-2147483648
2147483647
uint64
unsigned 64-bit integer
0
2^64 - 1
int64
signed 64-bit integer
-2^63
2^63 - 1
boolean
boolean value
0/false
1/true
float
floating point number
-3.4e -38
3.4e 38
double
double precision floating point number
-1.7e -300
1.7e 300
string
character string
n/a
n/a
Min, max and default values defined in a Vehicle Signal Specification must be in the supported range of the data type.
5.1.8.7.1.2.13 - Tilt
Full qualified VSS Path:
Vehicle.Cabin.Seat.Row2.Pos2.Tilt
Description:
Tilting of seat (seating and backrest) relative to vehicle x-axis. 0 = seat bottom is flat, seat bottom and vehicle x-axis are parallel. Positive degrees = seat tilted backwards, seat x-axis tilted upward, seat z-axis is tilted backward.
Comment:
In VSS it is assumed that tilting a seat affects both seating (seat bottom) and backrest, i.e. the angle between seating and backrest will not be affected when changing Tilt.
Navigation
flowchart LR
Vehicle-->Cabin
Cabin-->Seat
Seat-->Row2
Row2-->Pos2
Pos2-->Tilt
$ databroker-cli
sdv.databroker.v1 > connect
[connect] OK
sdv.databroker.v1 > get Vehicle.Cabin.Seat.Row2.Pos2.Tilt
[get] OK
Vehicle.Cabin.Seat.Row2.Pos2.Tilt: ( NotAvailable )sdv.databroker.v1 > set Vehicle.Cabin.Seat.Row2.Pos2.Tilt 0[set] OK
Digital Auto: Playground
playground.digital.auto provides an in-browser, rapid prototyping environment utilizing the COVESA APIs for connected vehicles.
The UUID for Vehicle.Cabin.Seat.Row2.Pos2.Tilt is 9f95869d8b0f5d9886bef2cc664414aa
Feedback
Do you think this Vehicle Signal specification needs enhancement? Do you want to discuss with experts? Try the following ressources to get in touch with the VSS community:
Vehicle.Cabin.Seat.Row2.Pos1.Height (Seat position on vehicle z-axis. Position is relative within available movable range of the seating. 0 = Lowermost position supported.)
Vehicle.Cabin.Seat.Row2.Pos1.Position (Seat position on vehicle x-axis. Position is relative to the frontmost position supported by the seat. 0 = Frontmost position supported.)
Vehicle.Cabin.Seat.Row2.Pos1.Tilt (Tilting of seat (seating and backrest) relative to vehicle x-axis. 0 = seat bottom is flat, seat bottom and vehicle x-axis are parallel. Positive degrees = seat tilted backwards, seat x-axis tilted upward, seat z-axis is tilted backward.)
Feedback
Do you think this Vehicle Signal specification needs enhancement? Do you want to discuss with experts? Try the following ressources to get in touch with the VSS community:
Do you think this Vehicle Signal specification needs enhancement? Do you want to discuss with experts? Try the following ressources to get in touch with the VSS community:
$ databroker-cli
sdv.databroker.v1 > connect
[connect] OK
sdv.databroker.v1 > get Vehicle.Cabin.Seat.Row2.Pos1.Airbag.IsDeployed
[get] OK
Vehicle.Cabin.Seat.Row2.Pos1.Airbag.IsDeployed: ( NotAvailable )sdv.databroker.v1 > set Vehicle.Cabin.Seat.Row2.Pos1.Airbag.IsDeployed false[set] OK
Digital Auto: Playground
playground.digital.auto provides an in-browser, rapid prototyping environment utilizing the COVESA APIs for connected vehicles.
The UUID for Vehicle.Cabin.Seat.Row2.Pos1.Airbag.IsDeployed is fea5a0ef57385df68e486ece13546bdf
Feedback
Do you think this Vehicle Signal specification needs enhancement? Do you want to discuss with experts? Try the following ressources to get in touch with the VSS community:
Do you think this Vehicle Signal specification needs enhancement? Do you want to discuss with experts? Try the following ressources to get in touch with the VSS community:
Do you think this Vehicle Signal specification needs enhancement? Do you want to discuss with experts? Try the following ressources to get in touch with the VSS community:
$ databroker-cli
sdv.databroker.v1 > connect
[connect] OK
sdv.databroker.v1 > get Vehicle.Cabin.Seat.Row2.Pos1.Backrest.Lumbar.Height
[get] OK
Vehicle.Cabin.Seat.Row2.Pos1.Backrest.Lumbar.Height: ( NotAvailable )sdv.databroker.v1 > set Vehicle.Cabin.Seat.Row2.Pos1.Backrest.Lumbar.Height 0[set] OK
Digital Auto: Playground
playground.digital.auto provides an in-browser, rapid prototyping environment utilizing the COVESA APIs for connected vehicles.
The UUID for Vehicle.Cabin.Seat.Row2.Pos1.Backrest.Lumbar.Height is 6cdd33ee68a65349bd478c3afbc515c4
Feedback
Do you think this Vehicle Signal specification needs enhancement? Do you want to discuss with experts? Try the following ressources to get in touch with the VSS community:
$ databroker-cli
sdv.databroker.v1 > connect
[connect] OK
sdv.databroker.v1 > get Vehicle.Cabin.Seat.Row2.Pos1.Backrest.Lumbar.Support
[get] OK
Vehicle.Cabin.Seat.Row2.Pos1.Backrest.Lumbar.Support: ( NotAvailable )sdv.databroker.v1 > set Vehicle.Cabin.Seat.Row2.Pos1.Backrest.Lumbar.Support 0[set] OK
Digital Auto: Playground
playground.digital.auto provides an in-browser, rapid prototyping environment utilizing the COVESA APIs for connected vehicles.
The UUID for Vehicle.Cabin.Seat.Row2.Pos1.Backrest.Lumbar.Support is f8fd42a3227d5c6a96834becd1247f5e
Feedback
Do you think this Vehicle Signal specification needs enhancement? Do you want to discuss with experts? Try the following ressources to get in touch with the VSS community:
The following is a list of VSS supported built-in datatypes:
Name
Type
Min
Max
uint8
unsigned 8-bit integer
0
255
int8
signed 8-bit integer
-128
127
uint16
unsigned 16-bit integer
0
65535
int16
signed 16-bit integer
-32768
32767
uint32
unsigned 32-bit integer
0
4294967295
int32
signed 32-bit integer
-2147483648
2147483647
uint64
unsigned 64-bit integer
0
2^64 - 1
int64
signed 64-bit integer
-2^63
2^63 - 1
boolean
boolean value
0/false
1/true
float
floating point number
-3.4e -38
3.4e 38
double
double precision floating point number
-1.7e -300
1.7e 300
string
character string
n/a
n/a
Min, max and default values defined in a Vehicle Signal Specification must be in the supported range of the data type.
5.1.8.7.1.3.2.2 - Recline
Full qualified VSS Path:
Vehicle.Cabin.Seat.Row2.Pos1.Backrest.Recline
Description:
Backrest recline compared to seat z-axis (seat vertical axis). 0 degrees = Upright/Vertical backrest. Negative degrees for forward recline. Positive degrees for backward recline.
Comment:
Seat z-axis depends on seat tilt. This means that movement of backrest due to seat tilting will not affect Backrest.Recline as long as the angle between Seating and Backrest are constant. Absolute recline relative to vehicle z-axis can be calculated as Tilt + Backrest.Recline.
Navigation
flowchart LR
Vehicle-->Cabin
Cabin-->Seat
Seat-->Row2
Row2-->Pos1
Pos1-->Backrest
Backrest-->Recline
$ databroker-cli
sdv.databroker.v1 > connect
[connect] OK
sdv.databroker.v1 > get Vehicle.Cabin.Seat.Row2.Pos1.Backrest.Recline
[get] OK
Vehicle.Cabin.Seat.Row2.Pos1.Backrest.Recline: ( NotAvailable )sdv.databroker.v1 > set Vehicle.Cabin.Seat.Row2.Pos1.Backrest.Recline 0[set] OK
Digital Auto: Playground
playground.digital.auto provides an in-browser, rapid prototyping environment utilizing the COVESA APIs for connected vehicles.
The UUID for Vehicle.Cabin.Seat.Row2.Pos1.Backrest.Recline is 4e793f7e663558b29130989024763680
Feedback
Do you think this Vehicle Signal specification needs enhancement? Do you want to discuss with experts? Try the following ressources to get in touch with the VSS community:
Do you think this Vehicle Signal specification needs enhancement? Do you want to discuss with experts? Try the following ressources to get in touch with the VSS community:
$ databroker-cli
sdv.databroker.v1 > connect
[connect] OK
sdv.databroker.v1 > get Vehicle.Cabin.Seat.Row2.Pos1.Backrest.SideBolster.Support
[get] OK
Vehicle.Cabin.Seat.Row2.Pos1.Backrest.SideBolster.Support: ( NotAvailable )sdv.databroker.v1 > set Vehicle.Cabin.Seat.Row2.Pos1.Backrest.SideBolster.Support 0[set] OK
Digital Auto: Playground
playground.digital.auto provides an in-browser, rapid prototyping environment utilizing the COVESA APIs for connected vehicles.
The UUID for Vehicle.Cabin.Seat.Row2.Pos1.Backrest.SideBolster.Support is 87cedae0f6ba58a0940859642b89fdb0
Feedback
Do you think this Vehicle Signal specification needs enhancement? Do you want to discuss with experts? Try the following ressources to get in touch with the VSS community:
Do you think this Vehicle Signal specification needs enhancement? Do you want to discuss with experts? Try the following ressources to get in touch with the VSS community:
$ databroker-cli
sdv.databroker.v1 > connect
[connect] OK
sdv.databroker.v1 > get Vehicle.Cabin.Seat.Row2.Pos1.Headrest.Angle
[get] OK
Vehicle.Cabin.Seat.Row2.Pos1.Headrest.Angle: ( NotAvailable )sdv.databroker.v1 > set Vehicle.Cabin.Seat.Row2.Pos1.Headrest.Angle 0[set] OK
Digital Auto: Playground
playground.digital.auto provides an in-browser, rapid prototyping environment utilizing the COVESA APIs for connected vehicles.
The UUID for Vehicle.Cabin.Seat.Row2.Pos1.Headrest.Angle is 7a720646e0d657c5b10979f1c403eb4b
Feedback
Do you think this Vehicle Signal specification needs enhancement? Do you want to discuss with experts? Try the following ressources to get in touch with the VSS community:
$ databroker-cli
sdv.databroker.v1 > connect
[connect] OK
sdv.databroker.v1 > get Vehicle.Cabin.Seat.Row2.Pos1.Headrest.Height
[get] OK
Vehicle.Cabin.Seat.Row2.Pos1.Headrest.Height: ( NotAvailable )sdv.databroker.v1 > set Vehicle.Cabin.Seat.Row2.Pos1.Headrest.Height 0[set] OK
Digital Auto: Playground
playground.digital.auto provides an in-browser, rapid prototyping environment utilizing the COVESA APIs for connected vehicles.
The UUID for Vehicle.Cabin.Seat.Row2.Pos1.Headrest.Height is 12d45094d6c9545089e932a2462d5f68
Feedback
Do you think this Vehicle Signal specification needs enhancement? Do you want to discuss with experts? Try the following ressources to get in touch with the VSS community:
$ databroker-cli
sdv.databroker.v1 > connect
[connect] OK
sdv.databroker.v1 > get Vehicle.Cabin.Seat.Row2.Pos1.Heating
[get] OK
Vehicle.Cabin.Seat.Row2.Pos1.Heating: ( NotAvailable )sdv.databroker.v1 > set Vehicle.Cabin.Seat.Row2.Pos1.Heating 0[set] OK
Digital Auto: Playground
playground.digital.auto provides an in-browser, rapid prototyping environment utilizing the COVESA APIs for connected vehicles.
The UUID for Vehicle.Cabin.Seat.Row2.Pos1.Heating is 0f61ef421bcd5c8dbe6a5b477cb10a49
Feedback
Do you think this Vehicle Signal specification needs enhancement? Do you want to discuss with experts? Try the following ressources to get in touch with the VSS community:
$ databroker-cli
sdv.databroker.v1 > connect
[connect] OK
sdv.databroker.v1 > get Vehicle.Cabin.Seat.Row2.Pos1.Height
[get] OK
Vehicle.Cabin.Seat.Row2.Pos1.Height: ( NotAvailable )sdv.databroker.v1 > set Vehicle.Cabin.Seat.Row2.Pos1.Height 0[set] OK
Digital Auto: Playground
playground.digital.auto provides an in-browser, rapid prototyping environment utilizing the COVESA APIs for connected vehicles.
The UUID for Vehicle.Cabin.Seat.Row2.Pos1.Height is 6e6e7aadfd0d52d4ac877147d84540d0
Feedback
Do you think this Vehicle Signal specification needs enhancement? Do you want to discuss with experts? Try the following ressources to get in touch with the VSS community:
$ databroker-cli
sdv.databroker.v1 > connect
[connect] OK
sdv.databroker.v1 > get Vehicle.Cabin.Seat.Row2.Pos1.IsBelted
[get] OK
Vehicle.Cabin.Seat.Row2.Pos1.IsBelted: ( NotAvailable )sdv.databroker.v1 > set Vehicle.Cabin.Seat.Row2.Pos1.IsBelted false[set] OK
Digital Auto: Playground
playground.digital.auto provides an in-browser, rapid prototyping environment utilizing the COVESA APIs for connected vehicles.
The UUID for Vehicle.Cabin.Seat.Row2.Pos1.IsBelted is ad65078f81075a67babb66ecd2c902f7
Feedback
Do you think this Vehicle Signal specification needs enhancement? Do you want to discuss with experts? Try the following ressources to get in touch with the VSS community:
$ databroker-cli
sdv.databroker.v1 > connect
[connect] OK
sdv.databroker.v1 > get Vehicle.Cabin.Seat.Row2.Pos1.IsOccupied
[get] OK
Vehicle.Cabin.Seat.Row2.Pos1.IsOccupied: ( NotAvailable )sdv.databroker.v1 > set Vehicle.Cabin.Seat.Row2.Pos1.IsOccupied false[set] OK
Digital Auto: Playground
playground.digital.auto provides an in-browser, rapid prototyping environment utilizing the COVESA APIs for connected vehicles.
The UUID for Vehicle.Cabin.Seat.Row2.Pos1.IsOccupied is e8c5a3df63b15e8a83f0b16b6a77092f
Feedback
Do you think this Vehicle Signal specification needs enhancement? Do you want to discuss with experts? Try the following ressources to get in touch with the VSS community:
$ databroker-cli
sdv.databroker.v1 > connect
[connect] OK
sdv.databroker.v1 > get Vehicle.Cabin.Seat.Row2.Pos1.Massage
[get] OK
Vehicle.Cabin.Seat.Row2.Pos1.Massage: ( NotAvailable )sdv.databroker.v1 > set Vehicle.Cabin.Seat.Row2.Pos1.Massage 0[set] OK
Digital Auto: Playground
playground.digital.auto provides an in-browser, rapid prototyping environment utilizing the COVESA APIs for connected vehicles.
The UUID for Vehicle.Cabin.Seat.Row2.Pos1.Massage is 406607948a235d829c5da212594813b1
Feedback
Do you think this Vehicle Signal specification needs enhancement? Do you want to discuss with experts? Try the following ressources to get in touch with the VSS community:
Do you think this Vehicle Signal specification needs enhancement? Do you want to discuss with experts? Try the following ressources to get in touch with the VSS community:
Do you think this Vehicle Signal specification needs enhancement? Do you want to discuss with experts? Try the following ressources to get in touch with the VSS community:
$ databroker-cli
sdv.databroker.v1 > connect
[connect] OK
sdv.databroker.v1 > get Vehicle.Cabin.Seat.Row2.Pos1.Occupant.Identifier.Issuer
[get] OK
Vehicle.Cabin.Seat.Row2.Pos1.Occupant.Identifier.Issuer: ( NotAvailable )sdv.databroker.v1 > set Vehicle.Cabin.Seat.Row2.Pos1.Occupant.Identifier.Issuer Foo
[set] OK
Digital Auto: Playground
playground.digital.auto provides an in-browser, rapid prototyping environment utilizing the COVESA APIs for connected vehicles.
The UUID for Vehicle.Cabin.Seat.Row2.Pos1.Occupant.Identifier.Issuer is 188458a15b30577d8fb01d0f15641a6e
Feedback
Do you think this Vehicle Signal specification needs enhancement? Do you want to discuss with experts? Try the following ressources to get in touch with the VSS community:
$ databroker-cli
sdv.databroker.v1 > connect
[connect] OK
sdv.databroker.v1 > get Vehicle.Cabin.Seat.Row2.Pos1.Occupant.Identifier.Subject
[get] OK
Vehicle.Cabin.Seat.Row2.Pos1.Occupant.Identifier.Subject: ( NotAvailable )sdv.databroker.v1 > set Vehicle.Cabin.Seat.Row2.Pos1.Occupant.Identifier.Subject Foo
[set] OK
Digital Auto: Playground
playground.digital.auto provides an in-browser, rapid prototyping environment utilizing the COVESA APIs for connected vehicles.
The UUID for Vehicle.Cabin.Seat.Row2.Pos1.Occupant.Identifier.Subject is 159e7daad966588ca48997859b811b72
Feedback
Do you think this Vehicle Signal specification needs enhancement? Do you want to discuss with experts? Try the following ressources to get in touch with the VSS community:
$ databroker-cli
sdv.databroker.v1 > connect
[connect] OK
sdv.databroker.v1 > get Vehicle.Cabin.Seat.Row2.Pos1.Position
[get] OK
Vehicle.Cabin.Seat.Row2.Pos1.Position: ( NotAvailable )sdv.databroker.v1 > set Vehicle.Cabin.Seat.Row2.Pos1.Position 0[set] OK
Digital Auto: Playground
playground.digital.auto provides an in-browser, rapid prototyping environment utilizing the COVESA APIs for connected vehicles.
The UUID for Vehicle.Cabin.Seat.Row2.Pos1.Position is 3dd247aae2555a1ebaf76ae4017f23bb
Feedback
Do you think this Vehicle Signal specification needs enhancement? Do you want to discuss with experts? Try the following ressources to get in touch with the VSS community:
The following is a list of VSS supported built-in datatypes:
Name
Type
Min
Max
uint8
unsigned 8-bit integer
0
255
int8
signed 8-bit integer
-128
127
uint16
unsigned 16-bit integer
0
65535
int16
signed 16-bit integer
-32768
32767
uint32
unsigned 32-bit integer
0
4294967295
int32
signed 32-bit integer
-2147483648
2147483647
uint64
unsigned 64-bit integer
0
2^64 - 1
int64
signed 64-bit integer
-2^63
2^63 - 1
boolean
boolean value
0/false
1/true
float
floating point number
-3.4e -38
3.4e 38
double
double precision floating point number
-1.7e -300
1.7e 300
string
character string
n/a
n/a
Min, max and default values defined in a Vehicle Signal Specification must be in the supported range of the data type.
5.1.8.7.1.3.11 - Seating
Full qualified VSS Path:
Vehicle.Cabin.Seat.Row2.Pos1.Seating
Description:
Describes signals related to the seat bottom of the seat.
Comment:
Seating is here considered as the part of the seat that supports the thighs. Additional cushions (if any) for support of lower legs is not covered by this branch.
Navigation
flowchart LR
Vehicle-->Cabin
Cabin-->Seat
Seat-->Row2
Row2-->Pos1
Pos1-->Seating
Digital Auto: Playground
playground.digital.auto provides an in-browser, rapid prototyping environment utilizing the COVESA APIs for connected vehicles.
Do you think this Vehicle Signal specification needs enhancement? Do you want to discuss with experts? Try the following ressources to get in touch with the VSS community:
$ databroker-cli
sdv.databroker.v1 > connect
[connect] OK
sdv.databroker.v1 > get Vehicle.Cabin.Seat.Row2.Pos1.Seating.Length
[get] OK
Vehicle.Cabin.Seat.Row2.Pos1.Seating.Length: ( NotAvailable )sdv.databroker.v1 > set Vehicle.Cabin.Seat.Row2.Pos1.Seating.Length 0[set] OK
Digital Auto: Playground
playground.digital.auto provides an in-browser, rapid prototyping environment utilizing the COVESA APIs for connected vehicles.
The UUID for Vehicle.Cabin.Seat.Row2.Pos1.Seating.Length is 9eabbf5a69cd51c88de9e70eb9545750
Feedback
Do you think this Vehicle Signal specification needs enhancement? Do you want to discuss with experts? Try the following ressources to get in touch with the VSS community:
Do you think this Vehicle Signal specification needs enhancement? Do you want to discuss with experts? Try the following ressources to get in touch with the VSS community:
Do you think this Vehicle Signal specification needs enhancement? Do you want to discuss with experts? Try the following ressources to get in touch with the VSS community:
$ databroker-cli
sdv.databroker.v1 > connect
[connect] OK
sdv.databroker.v1 > get Vehicle.Cabin.Seat.Row2.Pos1.Switch.Backrest.IsReclineBackwardEngaged
[get] OK
Vehicle.Cabin.Seat.Row2.Pos1.Switch.Backrest.IsReclineBackwardEngaged: ( NotAvailable )sdv.databroker.v1 > set Vehicle.Cabin.Seat.Row2.Pos1.Switch.Backrest.IsReclineBackwardEngaged false[set] OK
Digital Auto: Playground
playground.digital.auto provides an in-browser, rapid prototyping environment utilizing the COVESA APIs for connected vehicles.
The UUID for Vehicle.Cabin.Seat.Row2.Pos1.Switch.Backrest.IsReclineBackwardEngaged is 0b5415702e0b5461afacea857c05a6fe
Feedback
Do you think this Vehicle Signal specification needs enhancement? Do you want to discuss with experts? Try the following ressources to get in touch with the VSS community:
$ databroker-cli
sdv.databroker.v1 > connect
[connect] OK
sdv.databroker.v1 > get Vehicle.Cabin.Seat.Row2.Pos1.Switch.Backrest.IsReclineForwardEngaged
[get] OK
Vehicle.Cabin.Seat.Row2.Pos1.Switch.Backrest.IsReclineForwardEngaged: ( NotAvailable )sdv.databroker.v1 > set Vehicle.Cabin.Seat.Row2.Pos1.Switch.Backrest.IsReclineForwardEngaged false[set] OK
Digital Auto: Playground
playground.digital.auto provides an in-browser, rapid prototyping environment utilizing the COVESA APIs for connected vehicles.
The UUID for Vehicle.Cabin.Seat.Row2.Pos1.Switch.Backrest.IsReclineForwardEngaged is 1e1bbfda10e25d228e01a632277d57c3
Feedback
Do you think this Vehicle Signal specification needs enhancement? Do you want to discuss with experts? Try the following ressources to get in touch with the VSS community:
Do you think this Vehicle Signal specification needs enhancement? Do you want to discuss with experts? Try the following ressources to get in touch with the VSS community:
$ databroker-cli
sdv.databroker.v1 > connect
[connect] OK
sdv.databroker.v1 > get Vehicle.Cabin.Seat.Row2.Pos1.Switch.Backrest.Lumbar.IsDownEngaged
[get] OK
Vehicle.Cabin.Seat.Row2.Pos1.Switch.Backrest.Lumbar.IsDownEngaged: ( NotAvailable )sdv.databroker.v1 > set Vehicle.Cabin.Seat.Row2.Pos1.Switch.Backrest.Lumbar.IsDownEngaged false[set] OK
Digital Auto: Playground
playground.digital.auto provides an in-browser, rapid prototyping environment utilizing the COVESA APIs for connected vehicles.
The UUID for Vehicle.Cabin.Seat.Row2.Pos1.Switch.Backrest.Lumbar.IsDownEngaged is 09337347e2f557fe8649342548c7fe3c
Feedback
Do you think this Vehicle Signal specification needs enhancement? Do you want to discuss with experts? Try the following ressources to get in touch with the VSS community:
$ databroker-cli
sdv.databroker.v1 > connect
[connect] OK
sdv.databroker.v1 > get Vehicle.Cabin.Seat.Row2.Pos1.Switch.Backrest.Lumbar.IsLessSupportEngaged
[get] OK
Vehicle.Cabin.Seat.Row2.Pos1.Switch.Backrest.Lumbar.IsLessSupportEngaged: ( NotAvailable )sdv.databroker.v1 > set Vehicle.Cabin.Seat.Row2.Pos1.Switch.Backrest.Lumbar.IsLessSupportEngaged false[set] OK
Digital Auto: Playground
playground.digital.auto provides an in-browser, rapid prototyping environment utilizing the COVESA APIs for connected vehicles.
The UUID for Vehicle.Cabin.Seat.Row2.Pos1.Switch.Backrest.Lumbar.IsLessSupportEngaged is 12fe41df5ab8545e8a3e7b2411585243
Feedback
Do you think this Vehicle Signal specification needs enhancement? Do you want to discuss with experts? Try the following ressources to get in touch with the VSS community:
$ databroker-cli
sdv.databroker.v1 > connect
[connect] OK
sdv.databroker.v1 > get Vehicle.Cabin.Seat.Row2.Pos1.Switch.Backrest.Lumbar.IsMoreSupportEngaged
[get] OK
Vehicle.Cabin.Seat.Row2.Pos1.Switch.Backrest.Lumbar.IsMoreSupportEngaged: ( NotAvailable )sdv.databroker.v1 > set Vehicle.Cabin.Seat.Row2.Pos1.Switch.Backrest.Lumbar.IsMoreSupportEngaged false[set] OK
Digital Auto: Playground
playground.digital.auto provides an in-browser, rapid prototyping environment utilizing the COVESA APIs for connected vehicles.
The UUID for Vehicle.Cabin.Seat.Row2.Pos1.Switch.Backrest.Lumbar.IsMoreSupportEngaged is 73e6514d130e5bfb85d4cfb7c45d8138
Feedback
Do you think this Vehicle Signal specification needs enhancement? Do you want to discuss with experts? Try the following ressources to get in touch with the VSS community:
$ databroker-cli
sdv.databroker.v1 > connect
[connect] OK
sdv.databroker.v1 > get Vehicle.Cabin.Seat.Row2.Pos1.Switch.Backrest.Lumbar.IsUpEngaged
[get] OK
Vehicle.Cabin.Seat.Row2.Pos1.Switch.Backrest.Lumbar.IsUpEngaged: ( NotAvailable )sdv.databroker.v1 > set Vehicle.Cabin.Seat.Row2.Pos1.Switch.Backrest.Lumbar.IsUpEngaged false[set] OK
Digital Auto: Playground
playground.digital.auto provides an in-browser, rapid prototyping environment utilizing the COVESA APIs for connected vehicles.
The UUID for Vehicle.Cabin.Seat.Row2.Pos1.Switch.Backrest.Lumbar.IsUpEngaged is 47f8690805455b8c927f2834942b2ded
Feedback
Do you think this Vehicle Signal specification needs enhancement? Do you want to discuss with experts? Try the following ressources to get in touch with the VSS community:
Do you think this Vehicle Signal specification needs enhancement? Do you want to discuss with experts? Try the following ressources to get in touch with the VSS community:
$ databroker-cli
sdv.databroker.v1 > connect
[connect] OK
sdv.databroker.v1 > get Vehicle.Cabin.Seat.Row2.Pos1.Switch.Backrest.SideBolster.IsLessSupportEngaged
[get] OK
Vehicle.Cabin.Seat.Row2.Pos1.Switch.Backrest.SideBolster.IsLessSupportEngaged: ( NotAvailable )sdv.databroker.v1 > set Vehicle.Cabin.Seat.Row2.Pos1.Switch.Backrest.SideBolster.IsLessSupportEngaged false[set] OK
Digital Auto: Playground
playground.digital.auto provides an in-browser, rapid prototyping environment utilizing the COVESA APIs for connected vehicles.
The UUID for Vehicle.Cabin.Seat.Row2.Pos1.Switch.Backrest.SideBolster.IsLessSupportEngaged is f5e3fae9d90954ad9a240b72fa0a5cb4
Feedback
Do you think this Vehicle Signal specification needs enhancement? Do you want to discuss with experts? Try the following ressources to get in touch with the VSS community:
$ databroker-cli
sdv.databroker.v1 > connect
[connect] OK
sdv.databroker.v1 > get Vehicle.Cabin.Seat.Row2.Pos1.Switch.Backrest.SideBolster.IsMoreSupportEngaged
[get] OK
Vehicle.Cabin.Seat.Row2.Pos1.Switch.Backrest.SideBolster.IsMoreSupportEngaged: ( NotAvailable )sdv.databroker.v1 > set Vehicle.Cabin.Seat.Row2.Pos1.Switch.Backrest.SideBolster.IsMoreSupportEngaged false[set] OK
Digital Auto: Playground
playground.digital.auto provides an in-browser, rapid prototyping environment utilizing the COVESA APIs for connected vehicles.
The UUID for Vehicle.Cabin.Seat.Row2.Pos1.Switch.Backrest.SideBolster.IsMoreSupportEngaged is a7dc6c8941805c47b837334abfa7abee
Feedback
Do you think this Vehicle Signal specification needs enhancement? Do you want to discuss with experts? Try the following ressources to get in touch with the VSS community:
Do you think this Vehicle Signal specification needs enhancement? Do you want to discuss with experts? Try the following ressources to get in touch with the VSS community:
$ databroker-cli
sdv.databroker.v1 > connect
[connect] OK
sdv.databroker.v1 > get Vehicle.Cabin.Seat.Row2.Pos1.Switch.Headrest.IsBackwardEngaged
[get] OK
Vehicle.Cabin.Seat.Row2.Pos1.Switch.Headrest.IsBackwardEngaged: ( NotAvailable )sdv.databroker.v1 > set Vehicle.Cabin.Seat.Row2.Pos1.Switch.Headrest.IsBackwardEngaged false[set] OK
Digital Auto: Playground
playground.digital.auto provides an in-browser, rapid prototyping environment utilizing the COVESA APIs for connected vehicles.
The UUID for Vehicle.Cabin.Seat.Row2.Pos1.Switch.Headrest.IsBackwardEngaged is 9ed038b597665225a0f2dfd262cf59b5
Feedback
Do you think this Vehicle Signal specification needs enhancement? Do you want to discuss with experts? Try the following ressources to get in touch with the VSS community:
$ databroker-cli
sdv.databroker.v1 > connect
[connect] OK
sdv.databroker.v1 > get Vehicle.Cabin.Seat.Row2.Pos1.Switch.Headrest.IsDownEngaged
[get] OK
Vehicle.Cabin.Seat.Row2.Pos1.Switch.Headrest.IsDownEngaged: ( NotAvailable )sdv.databroker.v1 > set Vehicle.Cabin.Seat.Row2.Pos1.Switch.Headrest.IsDownEngaged false[set] OK
Digital Auto: Playground
playground.digital.auto provides an in-browser, rapid prototyping environment utilizing the COVESA APIs for connected vehicles.
The UUID for Vehicle.Cabin.Seat.Row2.Pos1.Switch.Headrest.IsDownEngaged is 4d3d29ccfcde55f9bdf40eeeb7ecf5dc
Feedback
Do you think this Vehicle Signal specification needs enhancement? Do you want to discuss with experts? Try the following ressources to get in touch with the VSS community:
$ databroker-cli
sdv.databroker.v1 > connect
[connect] OK
sdv.databroker.v1 > get Vehicle.Cabin.Seat.Row2.Pos1.Switch.Headrest.IsForwardEngaged
[get] OK
Vehicle.Cabin.Seat.Row2.Pos1.Switch.Headrest.IsForwardEngaged: ( NotAvailable )sdv.databroker.v1 > set Vehicle.Cabin.Seat.Row2.Pos1.Switch.Headrest.IsForwardEngaged false[set] OK
Digital Auto: Playground
playground.digital.auto provides an in-browser, rapid prototyping environment utilizing the COVESA APIs for connected vehicles.
The UUID for Vehicle.Cabin.Seat.Row2.Pos1.Switch.Headrest.IsForwardEngaged is ae9cdee6019a567ebac3e85a909fe7ca
Feedback
Do you think this Vehicle Signal specification needs enhancement? Do you want to discuss with experts? Try the following ressources to get in touch with the VSS community:
$ databroker-cli
sdv.databroker.v1 > connect
[connect] OK
sdv.databroker.v1 > get Vehicle.Cabin.Seat.Row2.Pos1.Switch.Headrest.IsUpEngaged
[get] OK
Vehicle.Cabin.Seat.Row2.Pos1.Switch.Headrest.IsUpEngaged: ( NotAvailable )sdv.databroker.v1 > set Vehicle.Cabin.Seat.Row2.Pos1.Switch.Headrest.IsUpEngaged false[set] OK
Digital Auto: Playground
playground.digital.auto provides an in-browser, rapid prototyping environment utilizing the COVESA APIs for connected vehicles.
The UUID for Vehicle.Cabin.Seat.Row2.Pos1.Switch.Headrest.IsUpEngaged is f929508b3527553a959952bcd227f70e
Feedback
Do you think this Vehicle Signal specification needs enhancement? Do you want to discuss with experts? Try the following ressources to get in touch with the VSS community:
$ databroker-cli
sdv.databroker.v1 > connect
[connect] OK
sdv.databroker.v1 > get Vehicle.Cabin.Seat.Row2.Pos1.Switch.IsDownEngaged
[get] OK
Vehicle.Cabin.Seat.Row2.Pos1.Switch.IsDownEngaged: ( NotAvailable )sdv.databroker.v1 > set Vehicle.Cabin.Seat.Row2.Pos1.Switch.IsDownEngaged false[set] OK
Digital Auto: Playground
playground.digital.auto provides an in-browser, rapid prototyping environment utilizing the COVESA APIs for connected vehicles.
The UUID for Vehicle.Cabin.Seat.Row2.Pos1.Switch.IsDownEngaged is fd41789d95035c2fa1e855d22eab80fa
Feedback
Do you think this Vehicle Signal specification needs enhancement? Do you want to discuss with experts? Try the following ressources to get in touch with the VSS community:
$ databroker-cli
sdv.databroker.v1 > connect
[connect] OK
sdv.databroker.v1 > get Vehicle.Cabin.Seat.Row2.Pos1.Switch.IsTiltBackwardEngaged
[get] OK
Vehicle.Cabin.Seat.Row2.Pos1.Switch.IsTiltBackwardEngaged: ( NotAvailable )sdv.databroker.v1 > set Vehicle.Cabin.Seat.Row2.Pos1.Switch.IsTiltBackwardEngaged false[set] OK
Digital Auto: Playground
playground.digital.auto provides an in-browser, rapid prototyping environment utilizing the COVESA APIs for connected vehicles.
The UUID for Vehicle.Cabin.Seat.Row2.Pos1.Switch.IsTiltBackwardEngaged is 22726fefa40d5805b46b2c87e43782ed
Feedback
Do you think this Vehicle Signal specification needs enhancement? Do you want to discuss with experts? Try the following ressources to get in touch with the VSS community:
$ databroker-cli
sdv.databroker.v1 > connect
[connect] OK
sdv.databroker.v1 > get Vehicle.Cabin.Seat.Row2.Pos1.Switch.IsTiltForwardEngaged
[get] OK
Vehicle.Cabin.Seat.Row2.Pos1.Switch.IsTiltForwardEngaged: ( NotAvailable )sdv.databroker.v1 > set Vehicle.Cabin.Seat.Row2.Pos1.Switch.IsTiltForwardEngaged false[set] OK
Digital Auto: Playground
playground.digital.auto provides an in-browser, rapid prototyping environment utilizing the COVESA APIs for connected vehicles.
The UUID for Vehicle.Cabin.Seat.Row2.Pos1.Switch.IsTiltForwardEngaged is f557b6a2712f5307b56577d93b9e746f
Feedback
Do you think this Vehicle Signal specification needs enhancement? Do you want to discuss with experts? Try the following ressources to get in touch with the VSS community:
$ databroker-cli
sdv.databroker.v1 > connect
[connect] OK
sdv.databroker.v1 > get Vehicle.Cabin.Seat.Row2.Pos1.Switch.IsUpEngaged
[get] OK
Vehicle.Cabin.Seat.Row2.Pos1.Switch.IsUpEngaged: ( NotAvailable )sdv.databroker.v1 > set Vehicle.Cabin.Seat.Row2.Pos1.Switch.IsUpEngaged false[set] OK
Digital Auto: Playground
playground.digital.auto provides an in-browser, rapid prototyping environment utilizing the COVESA APIs for connected vehicles.
The UUID for Vehicle.Cabin.Seat.Row2.Pos1.Switch.IsUpEngaged is 3dacf86cf185576f8a3916a315c69b1d
Feedback
Do you think this Vehicle Signal specification needs enhancement? Do you want to discuss with experts? Try the following ressources to get in touch with the VSS community:
Do you think this Vehicle Signal specification needs enhancement? Do you want to discuss with experts? Try the following ressources to get in touch with the VSS community:
$ databroker-cli
sdv.databroker.v1 > connect
[connect] OK
sdv.databroker.v1 > get Vehicle.Cabin.Seat.Row2.Pos1.Switch.Massage.IsDecreaseEngaged
[get] OK
Vehicle.Cabin.Seat.Row2.Pos1.Switch.Massage.IsDecreaseEngaged: ( NotAvailable )sdv.databroker.v1 > set Vehicle.Cabin.Seat.Row2.Pos1.Switch.Massage.IsDecreaseEngaged false[set] OK
Digital Auto: Playground
playground.digital.auto provides an in-browser, rapid prototyping environment utilizing the COVESA APIs for connected vehicles.
The UUID for Vehicle.Cabin.Seat.Row2.Pos1.Switch.Massage.IsDecreaseEngaged is d1f9e86a98be5f2ca81ac11d05356bb6
Feedback
Do you think this Vehicle Signal specification needs enhancement? Do you want to discuss with experts? Try the following ressources to get in touch with the VSS community:
$ databroker-cli
sdv.databroker.v1 > connect
[connect] OK
sdv.databroker.v1 > get Vehicle.Cabin.Seat.Row2.Pos1.Switch.Massage.IsIncreaseEngaged
[get] OK
Vehicle.Cabin.Seat.Row2.Pos1.Switch.Massage.IsIncreaseEngaged: ( NotAvailable )sdv.databroker.v1 > set Vehicle.Cabin.Seat.Row2.Pos1.Switch.Massage.IsIncreaseEngaged false[set] OK
Digital Auto: Playground
playground.digital.auto provides an in-browser, rapid prototyping environment utilizing the COVESA APIs for connected vehicles.
The UUID for Vehicle.Cabin.Seat.Row2.Pos1.Switch.Massage.IsIncreaseEngaged is 7b656c6aa62c5156aab2d437a03bd074
Feedback
Do you think this Vehicle Signal specification needs enhancement? Do you want to discuss with experts? Try the following ressources to get in touch with the VSS community:
Do you think this Vehicle Signal specification needs enhancement? Do you want to discuss with experts? Try the following ressources to get in touch with the VSS community:
$ databroker-cli
sdv.databroker.v1 > connect
[connect] OK
sdv.databroker.v1 > get Vehicle.Cabin.Seat.Row2.Pos1.Switch.Seating.IsBackwardEngaged
[get] OK
Vehicle.Cabin.Seat.Row2.Pos1.Switch.Seating.IsBackwardEngaged: ( NotAvailable )sdv.databroker.v1 > set Vehicle.Cabin.Seat.Row2.Pos1.Switch.Seating.IsBackwardEngaged false[set] OK
Digital Auto: Playground
playground.digital.auto provides an in-browser, rapid prototyping environment utilizing the COVESA APIs for connected vehicles.
The UUID for Vehicle.Cabin.Seat.Row2.Pos1.Switch.Seating.IsBackwardEngaged is c02ddbb0e2c1536081dae3cb23baf4b1
Feedback
Do you think this Vehicle Signal specification needs enhancement? Do you want to discuss with experts? Try the following ressources to get in touch with the VSS community:
$ databroker-cli
sdv.databroker.v1 > connect
[connect] OK
sdv.databroker.v1 > get Vehicle.Cabin.Seat.Row2.Pos1.Switch.Seating.IsForwardEngaged
[get] OK
Vehicle.Cabin.Seat.Row2.Pos1.Switch.Seating.IsForwardEngaged: ( NotAvailable )sdv.databroker.v1 > set Vehicle.Cabin.Seat.Row2.Pos1.Switch.Seating.IsForwardEngaged false[set] OK
Digital Auto: Playground
playground.digital.auto provides an in-browser, rapid prototyping environment utilizing the COVESA APIs for connected vehicles.
The UUID for Vehicle.Cabin.Seat.Row2.Pos1.Switch.Seating.IsForwardEngaged is f0ef5926752f573ea02dacb2a242c8a1
Feedback
Do you think this Vehicle Signal specification needs enhancement? Do you want to discuss with experts? Try the following ressources to get in touch with the VSS community:
$ databroker-cli
sdv.databroker.v1 > connect
[connect] OK
sdv.databroker.v1 > get Vehicle.Cabin.Seat.Row2.Pos1.Switch.IsBackwardEngaged
[get] OK
Vehicle.Cabin.Seat.Row2.Pos1.Switch.IsBackwardEngaged: ( NotAvailable )sdv.databroker.v1 > set Vehicle.Cabin.Seat.Row2.Pos1.Switch.IsBackwardEngaged false[set] OK
Digital Auto: Playground
playground.digital.auto provides an in-browser, rapid prototyping environment utilizing the COVESA APIs for connected vehicles.
The UUID for Vehicle.Cabin.Seat.Row2.Pos1.Switch.IsBackwardEngaged is 57d1ff9eaf4e5a7cbe683c13eed6e691
Feedback
Do you think this Vehicle Signal specification needs enhancement? Do you want to discuss with experts? Try the following ressources to get in touch with the VSS community:
$ databroker-cli
sdv.databroker.v1 > connect
[connect] OK
sdv.databroker.v1 > get Vehicle.Cabin.Seat.Row2.Pos1.Switch.IsCoolerEngaged
[get] OK
Vehicle.Cabin.Seat.Row2.Pos1.Switch.IsCoolerEngaged: ( NotAvailable )sdv.databroker.v1 > set Vehicle.Cabin.Seat.Row2.Pos1.Switch.IsCoolerEngaged false[set] OK
Digital Auto: Playground
playground.digital.auto provides an in-browser, rapid prototyping environment utilizing the COVESA APIs for connected vehicles.
The UUID for Vehicle.Cabin.Seat.Row2.Pos1.Switch.IsCoolerEngaged is ac1a8efdbafb561bb11af807d48e8378
Feedback
Do you think this Vehicle Signal specification needs enhancement? Do you want to discuss with experts? Try the following ressources to get in touch with the VSS community:
$ databroker-cli
sdv.databroker.v1 > connect
[connect] OK
sdv.databroker.v1 > get Vehicle.Cabin.Seat.Row2.Pos1.Switch.IsForwardEngaged
[get] OK
Vehicle.Cabin.Seat.Row2.Pos1.Switch.IsForwardEngaged: ( NotAvailable )sdv.databroker.v1 > set Vehicle.Cabin.Seat.Row2.Pos1.Switch.IsForwardEngaged false[set] OK
Digital Auto: Playground
playground.digital.auto provides an in-browser, rapid prototyping environment utilizing the COVESA APIs for connected vehicles.
The UUID for Vehicle.Cabin.Seat.Row2.Pos1.Switch.IsForwardEngaged is 33ed964275af591d85773bc23d70bd68
Feedback
Do you think this Vehicle Signal specification needs enhancement? Do you want to discuss with experts? Try the following ressources to get in touch with the VSS community:
$ databroker-cli
sdv.databroker.v1 > connect
[connect] OK
sdv.databroker.v1 > get Vehicle.Cabin.Seat.Row2.Pos1.Switch.IsWarmerEngaged
[get] OK
Vehicle.Cabin.Seat.Row2.Pos1.Switch.IsWarmerEngaged: ( NotAvailable )sdv.databroker.v1 > set Vehicle.Cabin.Seat.Row2.Pos1.Switch.IsWarmerEngaged false[set] OK
Digital Auto: Playground
playground.digital.auto provides an in-browser, rapid prototyping environment utilizing the COVESA APIs for connected vehicles.
The UUID for Vehicle.Cabin.Seat.Row2.Pos1.Switch.IsWarmerEngaged is 97a36b155294512f8c409a9bc82635bc
Feedback
Do you think this Vehicle Signal specification needs enhancement? Do you want to discuss with experts? Try the following ressources to get in touch with the VSS community:
The following is a list of VSS supported built-in datatypes:
Name
Type
Min
Max
uint8
unsigned 8-bit integer
0
255
int8
signed 8-bit integer
-128
127
uint16
unsigned 16-bit integer
0
65535
int16
signed 16-bit integer
-32768
32767
uint32
unsigned 32-bit integer
0
4294967295
int32
signed 32-bit integer
-2147483648
2147483647
uint64
unsigned 64-bit integer
0
2^64 - 1
int64
signed 64-bit integer
-2^63
2^63 - 1
boolean
boolean value
0/false
1/true
float
floating point number
-3.4e -38
3.4e 38
double
double precision floating point number
-1.7e -300
1.7e 300
string
character string
n/a
n/a
Min, max and default values defined in a Vehicle Signal Specification must be in the supported range of the data type.
5.1.8.7.1.3.13 - Tilt
Full qualified VSS Path:
Vehicle.Cabin.Seat.Row2.Pos1.Tilt
Description:
Tilting of seat (seating and backrest) relative to vehicle x-axis. 0 = seat bottom is flat, seat bottom and vehicle x-axis are parallel. Positive degrees = seat tilted backwards, seat x-axis tilted upward, seat z-axis is tilted backward.
Comment:
In VSS it is assumed that tilting a seat affects both seating (seat bottom) and backrest, i.e. the angle between seating and backrest will not be affected when changing Tilt.
Navigation
flowchart LR
Vehicle-->Cabin
Cabin-->Seat
Seat-->Row2
Row2-->Pos1
Pos1-->Tilt
$ databroker-cli
sdv.databroker.v1 > connect
[connect] OK
sdv.databroker.v1 > get Vehicle.Cabin.Seat.Row2.Pos1.Tilt
[get] OK
Vehicle.Cabin.Seat.Row2.Pos1.Tilt: ( NotAvailable )sdv.databroker.v1 > set Vehicle.Cabin.Seat.Row2.Pos1.Tilt 0[set] OK
Digital Auto: Playground
playground.digital.auto provides an in-browser, rapid prototyping environment utilizing the COVESA APIs for connected vehicles.
The UUID for Vehicle.Cabin.Seat.Row2.Pos1.Tilt is c61e74d2ae795b4da2e35325f8734005
Feedback
Do you think this Vehicle Signal specification needs enhancement? Do you want to discuss with experts? Try the following ressources to get in touch with the VSS community:
Do you think this Vehicle Signal specification needs enhancement? Do you want to discuss with experts? Try the following ressources to get in touch with the VSS community:
Vehicle.Cabin.Seat.Row1.Pos3.Height (Seat position on vehicle z-axis. Position is relative within available movable range of the seating. 0 = Lowermost position supported.)
Vehicle.Cabin.Seat.Row1.Pos3.Position (Seat position on vehicle x-axis. Position is relative to the frontmost position supported by the seat. 0 = Frontmost position supported.)
Vehicle.Cabin.Seat.Row1.Pos3.Tilt (Tilting of seat (seating and backrest) relative to vehicle x-axis. 0 = seat bottom is flat, seat bottom and vehicle x-axis are parallel. Positive degrees = seat tilted backwards, seat x-axis tilted upward, seat z-axis is tilted backward.)
Feedback
Do you think this Vehicle Signal specification needs enhancement? Do you want to discuss with experts? Try the following ressources to get in touch with the VSS community:
Do you think this Vehicle Signal specification needs enhancement? Do you want to discuss with experts? Try the following ressources to get in touch with the VSS community:
Do you think this Vehicle Signal specification needs enhancement? Do you want to discuss with experts? Try the following ressources to get in touch with the VSS community:
$ databroker-cli
sdv.databroker.v1 > connect
[connect] OK
sdv.databroker.v1 > get Vehicle.Cabin.Seat.Row1.Pos3.Switch.Backrest.IsReclineBackwardEngaged
[get] OK
Vehicle.Cabin.Seat.Row1.Pos3.Switch.Backrest.IsReclineBackwardEngaged: ( NotAvailable )sdv.databroker.v1 > set Vehicle.Cabin.Seat.Row1.Pos3.Switch.Backrest.IsReclineBackwardEngaged false[set] OK
Digital Auto: Playground
playground.digital.auto provides an in-browser, rapid prototyping environment utilizing the COVESA APIs for connected vehicles.
The UUID for Vehicle.Cabin.Seat.Row1.Pos3.Switch.Backrest.IsReclineBackwardEngaged is 1861981891f959dc896e00f4e369c86d
Feedback
Do you think this Vehicle Signal specification needs enhancement? Do you want to discuss with experts? Try the following ressources to get in touch with the VSS community:
$ databroker-cli
sdv.databroker.v1 > connect
[connect] OK
sdv.databroker.v1 > get Vehicle.Cabin.Seat.Row1.Pos3.Switch.Backrest.IsReclineForwardEngaged
[get] OK
Vehicle.Cabin.Seat.Row1.Pos3.Switch.Backrest.IsReclineForwardEngaged: ( NotAvailable )sdv.databroker.v1 > set Vehicle.Cabin.Seat.Row1.Pos3.Switch.Backrest.IsReclineForwardEngaged false[set] OK
Digital Auto: Playground
playground.digital.auto provides an in-browser, rapid prototyping environment utilizing the COVESA APIs for connected vehicles.
The UUID for Vehicle.Cabin.Seat.Row1.Pos3.Switch.Backrest.IsReclineForwardEngaged is 2a8cc40fb0b3556da210b7dfce7c0c6d
Feedback
Do you think this Vehicle Signal specification needs enhancement? Do you want to discuss with experts? Try the following ressources to get in touch with the VSS community:
Do you think this Vehicle Signal specification needs enhancement? Do you want to discuss with experts? Try the following ressources to get in touch with the VSS community:
$ databroker-cli
sdv.databroker.v1 > connect
[connect] OK
sdv.databroker.v1 > get Vehicle.Cabin.Seat.Row1.Pos3.Switch.Backrest.Lumbar.IsDownEngaged
[get] OK
Vehicle.Cabin.Seat.Row1.Pos3.Switch.Backrest.Lumbar.IsDownEngaged: ( NotAvailable )sdv.databroker.v1 > set Vehicle.Cabin.Seat.Row1.Pos3.Switch.Backrest.Lumbar.IsDownEngaged false[set] OK
Digital Auto: Playground
playground.digital.auto provides an in-browser, rapid prototyping environment utilizing the COVESA APIs for connected vehicles.
The UUID for Vehicle.Cabin.Seat.Row1.Pos3.Switch.Backrest.Lumbar.IsDownEngaged is 9a3655967c5b5f058e01c0b3770ba0d3
Feedback
Do you think this Vehicle Signal specification needs enhancement? Do you want to discuss with experts? Try the following ressources to get in touch with the VSS community:
$ databroker-cli
sdv.databroker.v1 > connect
[connect] OK
sdv.databroker.v1 > get Vehicle.Cabin.Seat.Row1.Pos3.Switch.Backrest.Lumbar.IsLessSupportEngaged
[get] OK
Vehicle.Cabin.Seat.Row1.Pos3.Switch.Backrest.Lumbar.IsLessSupportEngaged: ( NotAvailable )sdv.databroker.v1 > set Vehicle.Cabin.Seat.Row1.Pos3.Switch.Backrest.Lumbar.IsLessSupportEngaged false[set] OK
Digital Auto: Playground
playground.digital.auto provides an in-browser, rapid prototyping environment utilizing the COVESA APIs for connected vehicles.
The UUID for Vehicle.Cabin.Seat.Row1.Pos3.Switch.Backrest.Lumbar.IsLessSupportEngaged is 0f0708693e605289af83c3a1ecfd3159
Feedback
Do you think this Vehicle Signal specification needs enhancement? Do you want to discuss with experts? Try the following ressources to get in touch with the VSS community:
$ databroker-cli
sdv.databroker.v1 > connect
[connect] OK
sdv.databroker.v1 > get Vehicle.Cabin.Seat.Row1.Pos3.Switch.Backrest.Lumbar.IsMoreSupportEngaged
[get] OK
Vehicle.Cabin.Seat.Row1.Pos3.Switch.Backrest.Lumbar.IsMoreSupportEngaged: ( NotAvailable )sdv.databroker.v1 > set Vehicle.Cabin.Seat.Row1.Pos3.Switch.Backrest.Lumbar.IsMoreSupportEngaged false[set] OK
Digital Auto: Playground
playground.digital.auto provides an in-browser, rapid prototyping environment utilizing the COVESA APIs for connected vehicles.
The UUID for Vehicle.Cabin.Seat.Row1.Pos3.Switch.Backrest.Lumbar.IsMoreSupportEngaged is 6d590f0db798515b8d8e6f0bf1abfd67
Feedback
Do you think this Vehicle Signal specification needs enhancement? Do you want to discuss with experts? Try the following ressources to get in touch with the VSS community:
$ databroker-cli
sdv.databroker.v1 > connect
[connect] OK
sdv.databroker.v1 > get Vehicle.Cabin.Seat.Row1.Pos3.Switch.Backrest.Lumbar.IsUpEngaged
[get] OK
Vehicle.Cabin.Seat.Row1.Pos3.Switch.Backrest.Lumbar.IsUpEngaged: ( NotAvailable )sdv.databroker.v1 > set Vehicle.Cabin.Seat.Row1.Pos3.Switch.Backrest.Lumbar.IsUpEngaged false[set] OK
Digital Auto: Playground
playground.digital.auto provides an in-browser, rapid prototyping environment utilizing the COVESA APIs for connected vehicles.
The UUID for Vehicle.Cabin.Seat.Row1.Pos3.Switch.Backrest.Lumbar.IsUpEngaged is 663dca40a7645e66adfa00d64223dbbe
Feedback
Do you think this Vehicle Signal specification needs enhancement? Do you want to discuss with experts? Try the following ressources to get in touch with the VSS community:
Do you think this Vehicle Signal specification needs enhancement? Do you want to discuss with experts? Try the following ressources to get in touch with the VSS community:
$ databroker-cli
sdv.databroker.v1 > connect
[connect] OK
sdv.databroker.v1 > get Vehicle.Cabin.Seat.Row1.Pos3.Switch.Backrest.SideBolster.IsLessSupportEngaged
[get] OK
Vehicle.Cabin.Seat.Row1.Pos3.Switch.Backrest.SideBolster.IsLessSupportEngaged: ( NotAvailable )sdv.databroker.v1 > set Vehicle.Cabin.Seat.Row1.Pos3.Switch.Backrest.SideBolster.IsLessSupportEngaged false[set] OK
Digital Auto: Playground
playground.digital.auto provides an in-browser, rapid prototyping environment utilizing the COVESA APIs for connected vehicles.
The UUID for Vehicle.Cabin.Seat.Row1.Pos3.Switch.Backrest.SideBolster.IsLessSupportEngaged is 53a56a868fb3593fb21378b2d4dbbc7c
Feedback
Do you think this Vehicle Signal specification needs enhancement? Do you want to discuss with experts? Try the following ressources to get in touch with the VSS community:
$ databroker-cli
sdv.databroker.v1 > connect
[connect] OK
sdv.databroker.v1 > get Vehicle.Cabin.Seat.Row1.Pos3.Switch.Backrest.SideBolster.IsMoreSupportEngaged
[get] OK
Vehicle.Cabin.Seat.Row1.Pos3.Switch.Backrest.SideBolster.IsMoreSupportEngaged: ( NotAvailable )sdv.databroker.v1 > set Vehicle.Cabin.Seat.Row1.Pos3.Switch.Backrest.SideBolster.IsMoreSupportEngaged false[set] OK
Digital Auto: Playground
playground.digital.auto provides an in-browser, rapid prototyping environment utilizing the COVESA APIs for connected vehicles.
The UUID for Vehicle.Cabin.Seat.Row1.Pos3.Switch.Backrest.SideBolster.IsMoreSupportEngaged is 05b0ef6b02e55bb2814bcd95d9b77bd9
Feedback
Do you think this Vehicle Signal specification needs enhancement? Do you want to discuss with experts? Try the following ressources to get in touch with the VSS community:
Do you think this Vehicle Signal specification needs enhancement? Do you want to discuss with experts? Try the following ressources to get in touch with the VSS community:
$ databroker-cli
sdv.databroker.v1 > connect
[connect] OK
sdv.databroker.v1 > get Vehicle.Cabin.Seat.Row1.Pos3.Switch.Headrest.IsBackwardEngaged
[get] OK
Vehicle.Cabin.Seat.Row1.Pos3.Switch.Headrest.IsBackwardEngaged: ( NotAvailable )sdv.databroker.v1 > set Vehicle.Cabin.Seat.Row1.Pos3.Switch.Headrest.IsBackwardEngaged false[set] OK
Digital Auto: Playground
playground.digital.auto provides an in-browser, rapid prototyping environment utilizing the COVESA APIs for connected vehicles.
The UUID for Vehicle.Cabin.Seat.Row1.Pos3.Switch.Headrest.IsBackwardEngaged is cc633d8a000a5da3b0efe50e520e21fa
Feedback
Do you think this Vehicle Signal specification needs enhancement? Do you want to discuss with experts? Try the following ressources to get in touch with the VSS community:
$ databroker-cli
sdv.databroker.v1 > connect
[connect] OK
sdv.databroker.v1 > get Vehicle.Cabin.Seat.Row1.Pos3.Switch.Headrest.IsDownEngaged
[get] OK
Vehicle.Cabin.Seat.Row1.Pos3.Switch.Headrest.IsDownEngaged: ( NotAvailable )sdv.databroker.v1 > set Vehicle.Cabin.Seat.Row1.Pos3.Switch.Headrest.IsDownEngaged false[set] OK
Digital Auto: Playground
playground.digital.auto provides an in-browser, rapid prototyping environment utilizing the COVESA APIs for connected vehicles.
The UUID for Vehicle.Cabin.Seat.Row1.Pos3.Switch.Headrest.IsDownEngaged is 4ed2d91060bf5e578746b4b2f5a3e671
Feedback
Do you think this Vehicle Signal specification needs enhancement? Do you want to discuss with experts? Try the following ressources to get in touch with the VSS community:
$ databroker-cli
sdv.databroker.v1 > connect
[connect] OK
sdv.databroker.v1 > get Vehicle.Cabin.Seat.Row1.Pos3.Switch.Headrest.IsForwardEngaged
[get] OK
Vehicle.Cabin.Seat.Row1.Pos3.Switch.Headrest.IsForwardEngaged: ( NotAvailable )sdv.databroker.v1 > set Vehicle.Cabin.Seat.Row1.Pos3.Switch.Headrest.IsForwardEngaged false[set] OK
Digital Auto: Playground
playground.digital.auto provides an in-browser, rapid prototyping environment utilizing the COVESA APIs for connected vehicles.
The UUID for Vehicle.Cabin.Seat.Row1.Pos3.Switch.Headrest.IsForwardEngaged is 6ad93c92d96a59838e4810f0425f1fb0
Feedback
Do you think this Vehicle Signal specification needs enhancement? Do you want to discuss with experts? Try the following ressources to get in touch with the VSS community:
$ databroker-cli
sdv.databroker.v1 > connect
[connect] OK
sdv.databroker.v1 > get Vehicle.Cabin.Seat.Row1.Pos3.Switch.Headrest.IsUpEngaged
[get] OK
Vehicle.Cabin.Seat.Row1.Pos3.Switch.Headrest.IsUpEngaged: ( NotAvailable )sdv.databroker.v1 > set Vehicle.Cabin.Seat.Row1.Pos3.Switch.Headrest.IsUpEngaged false[set] OK
Digital Auto: Playground
playground.digital.auto provides an in-browser, rapid prototyping environment utilizing the COVESA APIs for connected vehicles.
The UUID for Vehicle.Cabin.Seat.Row1.Pos3.Switch.Headrest.IsUpEngaged is 89b2444c58c457bd936ecef543e7cc96
Feedback
Do you think this Vehicle Signal specification needs enhancement? Do you want to discuss with experts? Try the following ressources to get in touch with the VSS community:
$ databroker-cli
sdv.databroker.v1 > connect
[connect] OK
sdv.databroker.v1 > get Vehicle.Cabin.Seat.Row1.Pos3.Switch.IsBackwardEngaged
[get] OK
Vehicle.Cabin.Seat.Row1.Pos3.Switch.IsBackwardEngaged: ( NotAvailable )sdv.databroker.v1 > set Vehicle.Cabin.Seat.Row1.Pos3.Switch.IsBackwardEngaged false[set] OK
Digital Auto: Playground
playground.digital.auto provides an in-browser, rapid prototyping environment utilizing the COVESA APIs for connected vehicles.
The UUID for Vehicle.Cabin.Seat.Row1.Pos3.Switch.IsBackwardEngaged is 52d8da88ec95586a93952ea3d59023ad
Feedback
Do you think this Vehicle Signal specification needs enhancement? Do you want to discuss with experts? Try the following ressources to get in touch with the VSS community:
$ databroker-cli
sdv.databroker.v1 > connect
[connect] OK
sdv.databroker.v1 > get Vehicle.Cabin.Seat.Row1.Pos3.Switch.IsCoolerEngaged
[get] OK
Vehicle.Cabin.Seat.Row1.Pos3.Switch.IsCoolerEngaged: ( NotAvailable )sdv.databroker.v1 > set Vehicle.Cabin.Seat.Row1.Pos3.Switch.IsCoolerEngaged false[set] OK
Digital Auto: Playground
playground.digital.auto provides an in-browser, rapid prototyping environment utilizing the COVESA APIs for connected vehicles.
The UUID for Vehicle.Cabin.Seat.Row1.Pos3.Switch.IsCoolerEngaged is f5ed89b2972e5461abb6966e30a906ff
Feedback
Do you think this Vehicle Signal specification needs enhancement? Do you want to discuss with experts? Try the following ressources to get in touch with the VSS community:
$ databroker-cli
sdv.databroker.v1 > connect
[connect] OK
sdv.databroker.v1 > get Vehicle.Cabin.Seat.Row1.Pos3.Switch.IsDownEngaged
[get] OK
Vehicle.Cabin.Seat.Row1.Pos3.Switch.IsDownEngaged: ( NotAvailable )sdv.databroker.v1 > set Vehicle.Cabin.Seat.Row1.Pos3.Switch.IsDownEngaged false[set] OK
Digital Auto: Playground
playground.digital.auto provides an in-browser, rapid prototyping environment utilizing the COVESA APIs for connected vehicles.
The UUID for Vehicle.Cabin.Seat.Row1.Pos3.Switch.IsDownEngaged is 66e1d88d56ba572db7b97a5e20cc724c
Feedback
Do you think this Vehicle Signal specification needs enhancement? Do you want to discuss with experts? Try the following ressources to get in touch with the VSS community:
$ databroker-cli
sdv.databroker.v1 > connect
[connect] OK
sdv.databroker.v1 > get Vehicle.Cabin.Seat.Row1.Pos3.Switch.IsForwardEngaged
[get] OK
Vehicle.Cabin.Seat.Row1.Pos3.Switch.IsForwardEngaged: ( NotAvailable )sdv.databroker.v1 > set Vehicle.Cabin.Seat.Row1.Pos3.Switch.IsForwardEngaged false[set] OK
Digital Auto: Playground
playground.digital.auto provides an in-browser, rapid prototyping environment utilizing the COVESA APIs for connected vehicles.
The UUID for Vehicle.Cabin.Seat.Row1.Pos3.Switch.IsForwardEngaged is a3661e29e11957ed9cc12bb385b896bf
Feedback
Do you think this Vehicle Signal specification needs enhancement? Do you want to discuss with experts? Try the following ressources to get in touch with the VSS community:
$ databroker-cli
sdv.databroker.v1 > connect
[connect] OK
sdv.databroker.v1 > get Vehicle.Cabin.Seat.Row1.Pos3.Switch.IsTiltBackwardEngaged
[get] OK
Vehicle.Cabin.Seat.Row1.Pos3.Switch.IsTiltBackwardEngaged: ( NotAvailable )sdv.databroker.v1 > set Vehicle.Cabin.Seat.Row1.Pos3.Switch.IsTiltBackwardEngaged false[set] OK
Digital Auto: Playground
playground.digital.auto provides an in-browser, rapid prototyping environment utilizing the COVESA APIs for connected vehicles.
The UUID for Vehicle.Cabin.Seat.Row1.Pos3.Switch.IsTiltBackwardEngaged is ed590c68f1085a3c9889fc571ace2176
Feedback
Do you think this Vehicle Signal specification needs enhancement? Do you want to discuss with experts? Try the following ressources to get in touch with the VSS community:
$ databroker-cli
sdv.databroker.v1 > connect
[connect] OK
sdv.databroker.v1 > get Vehicle.Cabin.Seat.Row1.Pos3.Switch.IsTiltForwardEngaged
[get] OK
Vehicle.Cabin.Seat.Row1.Pos3.Switch.IsTiltForwardEngaged: ( NotAvailable )sdv.databroker.v1 > set Vehicle.Cabin.Seat.Row1.Pos3.Switch.IsTiltForwardEngaged false[set] OK
Digital Auto: Playground
playground.digital.auto provides an in-browser, rapid prototyping environment utilizing the COVESA APIs for connected vehicles.
The UUID for Vehicle.Cabin.Seat.Row1.Pos3.Switch.IsTiltForwardEngaged is 8eeefcb4a08e5d9f8eae76e92826e56e
Feedback
Do you think this Vehicle Signal specification needs enhancement? Do you want to discuss with experts? Try the following ressources to get in touch with the VSS community:
$ databroker-cli
sdv.databroker.v1 > connect
[connect] OK
sdv.databroker.v1 > get Vehicle.Cabin.Seat.Row1.Pos3.Switch.IsUpEngaged
[get] OK
Vehicle.Cabin.Seat.Row1.Pos3.Switch.IsUpEngaged: ( NotAvailable )sdv.databroker.v1 > set Vehicle.Cabin.Seat.Row1.Pos3.Switch.IsUpEngaged false[set] OK
Digital Auto: Playground
playground.digital.auto provides an in-browser, rapid prototyping environment utilizing the COVESA APIs for connected vehicles.
The UUID for Vehicle.Cabin.Seat.Row1.Pos3.Switch.IsUpEngaged is 1240dc083504580b97ba1cfadb9da659
Feedback
Do you think this Vehicle Signal specification needs enhancement? Do you want to discuss with experts? Try the following ressources to get in touch with the VSS community:
$ databroker-cli
sdv.databroker.v1 > connect
[connect] OK
sdv.databroker.v1 > get Vehicle.Cabin.Seat.Row1.Pos3.Switch.IsWarmerEngaged
[get] OK
Vehicle.Cabin.Seat.Row1.Pos3.Switch.IsWarmerEngaged: ( NotAvailable )sdv.databroker.v1 > set Vehicle.Cabin.Seat.Row1.Pos3.Switch.IsWarmerEngaged false[set] OK
Digital Auto: Playground
playground.digital.auto provides an in-browser, rapid prototyping environment utilizing the COVESA APIs for connected vehicles.
The UUID for Vehicle.Cabin.Seat.Row1.Pos3.Switch.IsWarmerEngaged is 0d7eed9ccb24537fb7f97f0163a4fdd8
Feedback
Do you think this Vehicle Signal specification needs enhancement? Do you want to discuss with experts? Try the following ressources to get in touch with the VSS community:
Do you think this Vehicle Signal specification needs enhancement? Do you want to discuss with experts? Try the following ressources to get in touch with the VSS community:
$ databroker-cli
sdv.databroker.v1 > connect
[connect] OK
sdv.databroker.v1 > get Vehicle.Cabin.Seat.Row1.Pos3.Switch.Massage.IsDecreaseEngaged
[get] OK
Vehicle.Cabin.Seat.Row1.Pos3.Switch.Massage.IsDecreaseEngaged: ( NotAvailable )sdv.databroker.v1 > set Vehicle.Cabin.Seat.Row1.Pos3.Switch.Massage.IsDecreaseEngaged false[set] OK
Digital Auto: Playground
playground.digital.auto provides an in-browser, rapid prototyping environment utilizing the COVESA APIs for connected vehicles.
The UUID for Vehicle.Cabin.Seat.Row1.Pos3.Switch.Massage.IsDecreaseEngaged is 329dfaaab56f55a39ca9c132ee4bf533
Feedback
Do you think this Vehicle Signal specification needs enhancement? Do you want to discuss with experts? Try the following ressources to get in touch with the VSS community:
$ databroker-cli
sdv.databroker.v1 > connect
[connect] OK
sdv.databroker.v1 > get Vehicle.Cabin.Seat.Row1.Pos3.Switch.Massage.IsIncreaseEngaged
[get] OK
Vehicle.Cabin.Seat.Row1.Pos3.Switch.Massage.IsIncreaseEngaged: ( NotAvailable )sdv.databroker.v1 > set Vehicle.Cabin.Seat.Row1.Pos3.Switch.Massage.IsIncreaseEngaged false[set] OK
Digital Auto: Playground
playground.digital.auto provides an in-browser, rapid prototyping environment utilizing the COVESA APIs for connected vehicles.
The UUID for Vehicle.Cabin.Seat.Row1.Pos3.Switch.Massage.IsIncreaseEngaged is 6d09e331ceb55a2691f120a6f1205cbb
Feedback
Do you think this Vehicle Signal specification needs enhancement? Do you want to discuss with experts? Try the following ressources to get in touch with the VSS community:
Do you think this Vehicle Signal specification needs enhancement? Do you want to discuss with experts? Try the following ressources to get in touch with the VSS community:
$ databroker-cli
sdv.databroker.v1 > connect
[connect] OK
sdv.databroker.v1 > get Vehicle.Cabin.Seat.Row1.Pos3.Switch.Seating.IsBackwardEngaged
[get] OK
Vehicle.Cabin.Seat.Row1.Pos3.Switch.Seating.IsBackwardEngaged: ( NotAvailable )sdv.databroker.v1 > set Vehicle.Cabin.Seat.Row1.Pos3.Switch.Seating.IsBackwardEngaged false[set] OK
Digital Auto: Playground
playground.digital.auto provides an in-browser, rapid prototyping environment utilizing the COVESA APIs for connected vehicles.
The UUID for Vehicle.Cabin.Seat.Row1.Pos3.Switch.Seating.IsBackwardEngaged is b9829f44a76857e0bc9deeb036ecd311
Feedback
Do you think this Vehicle Signal specification needs enhancement? Do you want to discuss with experts? Try the following ressources to get in touch with the VSS community:
$ databroker-cli
sdv.databroker.v1 > connect
[connect] OK
sdv.databroker.v1 > get Vehicle.Cabin.Seat.Row1.Pos3.Switch.Seating.IsForwardEngaged
[get] OK
Vehicle.Cabin.Seat.Row1.Pos3.Switch.Seating.IsForwardEngaged: ( NotAvailable )sdv.databroker.v1 > set Vehicle.Cabin.Seat.Row1.Pos3.Switch.Seating.IsForwardEngaged false[set] OK
Digital Auto: Playground
playground.digital.auto provides an in-browser, rapid prototyping environment utilizing the COVESA APIs for connected vehicles.
The UUID for Vehicle.Cabin.Seat.Row1.Pos3.Switch.Seating.IsForwardEngaged is c8ab873dd8fb51dd9493fb00f33e01d6
Feedback
Do you think this Vehicle Signal specification needs enhancement? Do you want to discuss with experts? Try the following ressources to get in touch with the VSS community:
Do you think this Vehicle Signal specification needs enhancement? Do you want to discuss with experts? Try the following ressources to get in touch with the VSS community:
$ databroker-cli
sdv.databroker.v1 > connect
[connect] OK
sdv.databroker.v1 > get Vehicle.Cabin.Seat.Row1.Pos3.Airbag.IsDeployed
[get] OK
Vehicle.Cabin.Seat.Row1.Pos3.Airbag.IsDeployed: ( NotAvailable )sdv.databroker.v1 > set Vehicle.Cabin.Seat.Row1.Pos3.Airbag.IsDeployed false[set] OK
Digital Auto: Playground
playground.digital.auto provides an in-browser, rapid prototyping environment utilizing the COVESA APIs for connected vehicles.
The UUID for Vehicle.Cabin.Seat.Row1.Pos3.Airbag.IsDeployed is c4e9b66d938d5e188ac577094daaf37e
Feedback
Do you think this Vehicle Signal specification needs enhancement? Do you want to discuss with experts? Try the following ressources to get in touch with the VSS community:
Do you think this Vehicle Signal specification needs enhancement? Do you want to discuss with experts? Try the following ressources to get in touch with the VSS community:
Do you think this Vehicle Signal specification needs enhancement? Do you want to discuss with experts? Try the following ressources to get in touch with the VSS community:
$ databroker-cli
sdv.databroker.v1 > connect
[connect] OK
sdv.databroker.v1 > get Vehicle.Cabin.Seat.Row1.Pos3.Backrest.Lumbar.Height
[get] OK
Vehicle.Cabin.Seat.Row1.Pos3.Backrest.Lumbar.Height: ( NotAvailable )sdv.databroker.v1 > set Vehicle.Cabin.Seat.Row1.Pos3.Backrest.Lumbar.Height 0[set] OK
Digital Auto: Playground
playground.digital.auto provides an in-browser, rapid prototyping environment utilizing the COVESA APIs for connected vehicles.
The UUID for Vehicle.Cabin.Seat.Row1.Pos3.Backrest.Lumbar.Height is 4a529381905750be9c09a1bfec05eabd
Feedback
Do you think this Vehicle Signal specification needs enhancement? Do you want to discuss with experts? Try the following ressources to get in touch with the VSS community:
$ databroker-cli
sdv.databroker.v1 > connect
[connect] OK
sdv.databroker.v1 > get Vehicle.Cabin.Seat.Row1.Pos3.Backrest.Lumbar.Support
[get] OK
Vehicle.Cabin.Seat.Row1.Pos3.Backrest.Lumbar.Support: ( NotAvailable )sdv.databroker.v1 > set Vehicle.Cabin.Seat.Row1.Pos3.Backrest.Lumbar.Support 0[set] OK
Digital Auto: Playground
playground.digital.auto provides an in-browser, rapid prototyping environment utilizing the COVESA APIs for connected vehicles.
The UUID for Vehicle.Cabin.Seat.Row1.Pos3.Backrest.Lumbar.Support is 127744c26ebe5c729d69a95bfe96b00e
Feedback
Do you think this Vehicle Signal specification needs enhancement? Do you want to discuss with experts? Try the following ressources to get in touch with the VSS community:
The following is a list of VSS supported built-in datatypes:
Name
Type
Min
Max
uint8
unsigned 8-bit integer
0
255
int8
signed 8-bit integer
-128
127
uint16
unsigned 16-bit integer
0
65535
int16
signed 16-bit integer
-32768
32767
uint32
unsigned 32-bit integer
0
4294967295
int32
signed 32-bit integer
-2147483648
2147483647
uint64
unsigned 64-bit integer
0
2^64 - 1
int64
signed 64-bit integer
-2^63
2^63 - 1
boolean
boolean value
0/false
1/true
float
floating point number
-3.4e -38
3.4e 38
double
double precision floating point number
-1.7e -300
1.7e 300
string
character string
n/a
n/a
Min, max and default values defined in a Vehicle Signal Specification must be in the supported range of the data type.
5.1.8.7.2.1.3.2 - Recline
Full qualified VSS Path:
Vehicle.Cabin.Seat.Row1.Pos3.Backrest.Recline
Description:
Backrest recline compared to seat z-axis (seat vertical axis). 0 degrees = Upright/Vertical backrest. Negative degrees for forward recline. Positive degrees for backward recline.
Comment:
Seat z-axis depends on seat tilt. This means that movement of backrest due to seat tilting will not affect Backrest.Recline as long as the angle between Seating and Backrest are constant. Absolute recline relative to vehicle z-axis can be calculated as Tilt + Backrest.Recline.
Navigation
flowchart LR
Vehicle-->Cabin
Cabin-->Seat
Seat-->Row1
Row1-->Pos3
Pos3-->Backrest
Backrest-->Recline
$ databroker-cli
sdv.databroker.v1 > connect
[connect] OK
sdv.databroker.v1 > get Vehicle.Cabin.Seat.Row1.Pos3.Backrest.Recline
[get] OK
Vehicle.Cabin.Seat.Row1.Pos3.Backrest.Recline: ( NotAvailable )sdv.databroker.v1 > set Vehicle.Cabin.Seat.Row1.Pos3.Backrest.Recline 0[set] OK
Digital Auto: Playground
playground.digital.auto provides an in-browser, rapid prototyping environment utilizing the COVESA APIs for connected vehicles.
The UUID for Vehicle.Cabin.Seat.Row1.Pos3.Backrest.Recline is dc901384498f5de6b93b2a5b3850fb87
Feedback
Do you think this Vehicle Signal specification needs enhancement? Do you want to discuss with experts? Try the following ressources to get in touch with the VSS community:
Do you think this Vehicle Signal specification needs enhancement? Do you want to discuss with experts? Try the following ressources to get in touch with the VSS community:
$ databroker-cli
sdv.databroker.v1 > connect
[connect] OK
sdv.databroker.v1 > get Vehicle.Cabin.Seat.Row1.Pos3.Backrest.SideBolster.Support
[get] OK
Vehicle.Cabin.Seat.Row1.Pos3.Backrest.SideBolster.Support: ( NotAvailable )sdv.databroker.v1 > set Vehicle.Cabin.Seat.Row1.Pos3.Backrest.SideBolster.Support 0[set] OK
Digital Auto: Playground
playground.digital.auto provides an in-browser, rapid prototyping environment utilizing the COVESA APIs for connected vehicles.
The UUID for Vehicle.Cabin.Seat.Row1.Pos3.Backrest.SideBolster.Support is dba595a898b75345bf1d013a45261681
Feedback
Do you think this Vehicle Signal specification needs enhancement? Do you want to discuss with experts? Try the following ressources to get in touch with the VSS community:
Do you think this Vehicle Signal specification needs enhancement? Do you want to discuss with experts? Try the following ressources to get in touch with the VSS community:
$ databroker-cli
sdv.databroker.v1 > connect
[connect] OK
sdv.databroker.v1 > get Vehicle.Cabin.Seat.Row1.Pos3.Headrest.Angle
[get] OK
Vehicle.Cabin.Seat.Row1.Pos3.Headrest.Angle: ( NotAvailable )sdv.databroker.v1 > set Vehicle.Cabin.Seat.Row1.Pos3.Headrest.Angle 0[set] OK
Digital Auto: Playground
playground.digital.auto provides an in-browser, rapid prototyping environment utilizing the COVESA APIs for connected vehicles.
The UUID for Vehicle.Cabin.Seat.Row1.Pos3.Headrest.Angle is b4d77cf7a7f55768b3910435e79027f2
Feedback
Do you think this Vehicle Signal specification needs enhancement? Do you want to discuss with experts? Try the following ressources to get in touch with the VSS community:
$ databroker-cli
sdv.databroker.v1 > connect
[connect] OK
sdv.databroker.v1 > get Vehicle.Cabin.Seat.Row1.Pos3.Headrest.Height
[get] OK
Vehicle.Cabin.Seat.Row1.Pos3.Headrest.Height: ( NotAvailable )sdv.databroker.v1 > set Vehicle.Cabin.Seat.Row1.Pos3.Headrest.Height 0[set] OK
Digital Auto: Playground
playground.digital.auto provides an in-browser, rapid prototyping environment utilizing the COVESA APIs for connected vehicles.
The UUID for Vehicle.Cabin.Seat.Row1.Pos3.Headrest.Height is 420eaf9bc7ac5560a26ad018afe27e1b
Feedback
Do you think this Vehicle Signal specification needs enhancement? Do you want to discuss with experts? Try the following ressources to get in touch with the VSS community:
$ databroker-cli
sdv.databroker.v1 > connect
[connect] OK
sdv.databroker.v1 > get Vehicle.Cabin.Seat.Row1.Pos3.Heating
[get] OK
Vehicle.Cabin.Seat.Row1.Pos3.Heating: ( NotAvailable )sdv.databroker.v1 > set Vehicle.Cabin.Seat.Row1.Pos3.Heating 0[set] OK
Digital Auto: Playground
playground.digital.auto provides an in-browser, rapid prototyping environment utilizing the COVESA APIs for connected vehicles.
The UUID for Vehicle.Cabin.Seat.Row1.Pos3.Heating is 4af67468dd7a55a58195d9b61997d077
Feedback
Do you think this Vehicle Signal specification needs enhancement? Do you want to discuss with experts? Try the following ressources to get in touch with the VSS community:
$ databroker-cli
sdv.databroker.v1 > connect
[connect] OK
sdv.databroker.v1 > get Vehicle.Cabin.Seat.Row1.Pos3.Height
[get] OK
Vehicle.Cabin.Seat.Row1.Pos3.Height: ( NotAvailable )sdv.databroker.v1 > set Vehicle.Cabin.Seat.Row1.Pos3.Height 0[set] OK
Digital Auto: Playground
playground.digital.auto provides an in-browser, rapid prototyping environment utilizing the COVESA APIs for connected vehicles.
The UUID for Vehicle.Cabin.Seat.Row1.Pos3.Height is d19199de59a153f782b8d61788c510a7
Feedback
Do you think this Vehicle Signal specification needs enhancement? Do you want to discuss with experts? Try the following ressources to get in touch with the VSS community:
$ databroker-cli
sdv.databroker.v1 > connect
[connect] OK
sdv.databroker.v1 > get Vehicle.Cabin.Seat.Row1.Pos3.IsBelted
[get] OK
Vehicle.Cabin.Seat.Row1.Pos3.IsBelted: ( NotAvailable )sdv.databroker.v1 > set Vehicle.Cabin.Seat.Row1.Pos3.IsBelted false[set] OK
Digital Auto: Playground
playground.digital.auto provides an in-browser, rapid prototyping environment utilizing the COVESA APIs for connected vehicles.
The UUID for Vehicle.Cabin.Seat.Row1.Pos3.IsBelted is 975fe66f9fa05d8ca7fb9d334641bb97
Feedback
Do you think this Vehicle Signal specification needs enhancement? Do you want to discuss with experts? Try the following ressources to get in touch with the VSS community:
$ databroker-cli
sdv.databroker.v1 > connect
[connect] OK
sdv.databroker.v1 > get Vehicle.Cabin.Seat.Row1.Pos3.IsOccupied
[get] OK
Vehicle.Cabin.Seat.Row1.Pos3.IsOccupied: ( NotAvailable )sdv.databroker.v1 > set Vehicle.Cabin.Seat.Row1.Pos3.IsOccupied false[set] OK
Digital Auto: Playground
playground.digital.auto provides an in-browser, rapid prototyping environment utilizing the COVESA APIs for connected vehicles.
The UUID for Vehicle.Cabin.Seat.Row1.Pos3.IsOccupied is 1540906a83bd5f70af4859910aafd890
Feedback
Do you think this Vehicle Signal specification needs enhancement? Do you want to discuss with experts? Try the following ressources to get in touch with the VSS community:
$ databroker-cli
sdv.databroker.v1 > connect
[connect] OK
sdv.databroker.v1 > get Vehicle.Cabin.Seat.Row1.Pos3.Massage
[get] OK
Vehicle.Cabin.Seat.Row1.Pos3.Massage: ( NotAvailable )sdv.databroker.v1 > set Vehicle.Cabin.Seat.Row1.Pos3.Massage 0[set] OK
Digital Auto: Playground
playground.digital.auto provides an in-browser, rapid prototyping environment utilizing the COVESA APIs for connected vehicles.
The UUID for Vehicle.Cabin.Seat.Row1.Pos3.Massage is d63d68381ec65f50a8dd6dfbc0bd751d
Feedback
Do you think this Vehicle Signal specification needs enhancement? Do you want to discuss with experts? Try the following ressources to get in touch with the VSS community:
Do you think this Vehicle Signal specification needs enhancement? Do you want to discuss with experts? Try the following ressources to get in touch with the VSS community:
Do you think this Vehicle Signal specification needs enhancement? Do you want to discuss with experts? Try the following ressources to get in touch with the VSS community:
$ databroker-cli
sdv.databroker.v1 > connect
[connect] OK
sdv.databroker.v1 > get Vehicle.Cabin.Seat.Row1.Pos3.Occupant.Identifier.Issuer
[get] OK
Vehicle.Cabin.Seat.Row1.Pos3.Occupant.Identifier.Issuer: ( NotAvailable )sdv.databroker.v1 > set Vehicle.Cabin.Seat.Row1.Pos3.Occupant.Identifier.Issuer Foo
[set] OK
Digital Auto: Playground
playground.digital.auto provides an in-browser, rapid prototyping environment utilizing the COVESA APIs for connected vehicles.
The UUID for Vehicle.Cabin.Seat.Row1.Pos3.Occupant.Identifier.Issuer is 0d29fa2a1b97563c8e1ba31b8571f328
Feedback
Do you think this Vehicle Signal specification needs enhancement? Do you want to discuss with experts? Try the following ressources to get in touch with the VSS community:
$ databroker-cli
sdv.databroker.v1 > connect
[connect] OK
sdv.databroker.v1 > get Vehicle.Cabin.Seat.Row1.Pos3.Occupant.Identifier.Subject
[get] OK
Vehicle.Cabin.Seat.Row1.Pos3.Occupant.Identifier.Subject: ( NotAvailable )sdv.databroker.v1 > set Vehicle.Cabin.Seat.Row1.Pos3.Occupant.Identifier.Subject Foo
[set] OK
Digital Auto: Playground
playground.digital.auto provides an in-browser, rapid prototyping environment utilizing the COVESA APIs for connected vehicles.
The UUID for Vehicle.Cabin.Seat.Row1.Pos3.Occupant.Identifier.Subject is a7306a24de2155f2a1de070bc8f1bd60
Feedback
Do you think this Vehicle Signal specification needs enhancement? Do you want to discuss with experts? Try the following ressources to get in touch with the VSS community:
$ databroker-cli
sdv.databroker.v1 > connect
[connect] OK
sdv.databroker.v1 > get Vehicle.Cabin.Seat.Row1.Pos3.Position
[get] OK
Vehicle.Cabin.Seat.Row1.Pos3.Position: ( NotAvailable )sdv.databroker.v1 > set Vehicle.Cabin.Seat.Row1.Pos3.Position 0[set] OK
Digital Auto: Playground
playground.digital.auto provides an in-browser, rapid prototyping environment utilizing the COVESA APIs for connected vehicles.
The UUID for Vehicle.Cabin.Seat.Row1.Pos3.Position is 2a2ba0e42dcc563cba80cc491b66c45f
Feedback
Do you think this Vehicle Signal specification needs enhancement? Do you want to discuss with experts? Try the following ressources to get in touch with the VSS community:
The following is a list of VSS supported built-in datatypes:
Name
Type
Min
Max
uint8
unsigned 8-bit integer
0
255
int8
signed 8-bit integer
-128
127
uint16
unsigned 16-bit integer
0
65535
int16
signed 16-bit integer
-32768
32767
uint32
unsigned 32-bit integer
0
4294967295
int32
signed 32-bit integer
-2147483648
2147483647
uint64
unsigned 64-bit integer
0
2^64 - 1
int64
signed 64-bit integer
-2^63
2^63 - 1
boolean
boolean value
0/false
1/true
float
floating point number
-3.4e -38
3.4e 38
double
double precision floating point number
-1.7e -300
1.7e 300
string
character string
n/a
n/a
Min, max and default values defined in a Vehicle Signal Specification must be in the supported range of the data type.
5.1.8.7.2.1.12 - Seating
Full qualified VSS Path:
Vehicle.Cabin.Seat.Row1.Pos3.Seating
Description:
Describes signals related to the seat bottom of the seat.
Comment:
Seating is here considered as the part of the seat that supports the thighs. Additional cushions (if any) for support of lower legs is not covered by this branch.
Navigation
flowchart LR
Vehicle-->Cabin
Cabin-->Seat
Seat-->Row1
Row1-->Pos3
Pos3-->Seating
Digital Auto: Playground
playground.digital.auto provides an in-browser, rapid prototyping environment utilizing the COVESA APIs for connected vehicles.
Do you think this Vehicle Signal specification needs enhancement? Do you want to discuss with experts? Try the following ressources to get in touch with the VSS community:
$ databroker-cli
sdv.databroker.v1 > connect
[connect] OK
sdv.databroker.v1 > get Vehicle.Cabin.Seat.Row1.Pos3.Seating.Length
[get] OK
Vehicle.Cabin.Seat.Row1.Pos3.Seating.Length: ( NotAvailable )sdv.databroker.v1 > set Vehicle.Cabin.Seat.Row1.Pos3.Seating.Length 0[set] OK
Digital Auto: Playground
playground.digital.auto provides an in-browser, rapid prototyping environment utilizing the COVESA APIs for connected vehicles.
The UUID for Vehicle.Cabin.Seat.Row1.Pos3.Seating.Length is c44b283345dd5a428bd099ed1153d4a4
Feedback
Do you think this Vehicle Signal specification needs enhancement? Do you want to discuss with experts? Try the following ressources to get in touch with the VSS community:
The following is a list of VSS supported built-in datatypes:
Name
Type
Min
Max
uint8
unsigned 8-bit integer
0
255
int8
signed 8-bit integer
-128
127
uint16
unsigned 16-bit integer
0
65535
int16
signed 16-bit integer
-32768
32767
uint32
unsigned 32-bit integer
0
4294967295
int32
signed 32-bit integer
-2147483648
2147483647
uint64
unsigned 64-bit integer
0
2^64 - 1
int64
signed 64-bit integer
-2^63
2^63 - 1
boolean
boolean value
0/false
1/true
float
floating point number
-3.4e -38
3.4e 38
double
double precision floating point number
-1.7e -300
1.7e 300
string
character string
n/a
n/a
Min, max and default values defined in a Vehicle Signal Specification must be in the supported range of the data type.
5.1.8.7.2.1.13 - Tilt
Full qualified VSS Path:
Vehicle.Cabin.Seat.Row1.Pos3.Tilt
Description:
Tilting of seat (seating and backrest) relative to vehicle x-axis. 0 = seat bottom is flat, seat bottom and vehicle x-axis are parallel. Positive degrees = seat tilted backwards, seat x-axis tilted upward, seat z-axis is tilted backward.
Comment:
In VSS it is assumed that tilting a seat affects both seating (seat bottom) and backrest, i.e. the angle between seating and backrest will not be affected when changing Tilt.
Navigation
flowchart LR
Vehicle-->Cabin
Cabin-->Seat
Seat-->Row1
Row1-->Pos3
Pos3-->Tilt
$ databroker-cli
sdv.databroker.v1 > connect
[connect] OK
sdv.databroker.v1 > get Vehicle.Cabin.Seat.Row1.Pos3.Tilt
[get] OK
Vehicle.Cabin.Seat.Row1.Pos3.Tilt: ( NotAvailable )sdv.databroker.v1 > set Vehicle.Cabin.Seat.Row1.Pos3.Tilt 0[set] OK
Digital Auto: Playground
playground.digital.auto provides an in-browser, rapid prototyping environment utilizing the COVESA APIs for connected vehicles.
The UUID for Vehicle.Cabin.Seat.Row1.Pos3.Tilt is 9fb74b71b3ce54f4af6e5e472f159949
Feedback
Do you think this Vehicle Signal specification needs enhancement? Do you want to discuss with experts? Try the following ressources to get in touch with the VSS community:
Vehicle.Cabin.Seat.Row1.Pos2.Height (Seat position on vehicle z-axis. Position is relative within available movable range of the seating. 0 = Lowermost position supported.)
Vehicle.Cabin.Seat.Row1.Pos2.Position (Seat position on vehicle x-axis. Position is relative to the frontmost position supported by the seat. 0 = Frontmost position supported.)
Vehicle.Cabin.Seat.Row1.Pos2.Tilt (Tilting of seat (seating and backrest) relative to vehicle x-axis. 0 = seat bottom is flat, seat bottom and vehicle x-axis are parallel. Positive degrees = seat tilted backwards, seat x-axis tilted upward, seat z-axis is tilted backward.)
Feedback
Do you think this Vehicle Signal specification needs enhancement? Do you want to discuss with experts? Try the following ressources to get in touch with the VSS community:
Do you think this Vehicle Signal specification needs enhancement? Do you want to discuss with experts? Try the following ressources to get in touch with the VSS community:
$ databroker-cli
sdv.databroker.v1 > connect
[connect] OK
sdv.databroker.v1 > get Vehicle.Cabin.Seat.Row1.Pos2.Airbag.IsDeployed
[get] OK
Vehicle.Cabin.Seat.Row1.Pos2.Airbag.IsDeployed: ( NotAvailable )sdv.databroker.v1 > set Vehicle.Cabin.Seat.Row1.Pos2.Airbag.IsDeployed false[set] OK
Digital Auto: Playground
playground.digital.auto provides an in-browser, rapid prototyping environment utilizing the COVESA APIs for connected vehicles.
The UUID for Vehicle.Cabin.Seat.Row1.Pos2.Airbag.IsDeployed is d65c423837db53ebbfd462ead6c92687
Feedback
Do you think this Vehicle Signal specification needs enhancement? Do you want to discuss with experts? Try the following ressources to get in touch with the VSS community:
Do you think this Vehicle Signal specification needs enhancement? Do you want to discuss with experts? Try the following ressources to get in touch with the VSS community:
$ databroker-cli
sdv.databroker.v1 > connect
[connect] OK
sdv.databroker.v1 > get Vehicle.Cabin.Seat.Row1.Pos2.Headrest.Angle
[get] OK
Vehicle.Cabin.Seat.Row1.Pos2.Headrest.Angle: ( NotAvailable )sdv.databroker.v1 > set Vehicle.Cabin.Seat.Row1.Pos2.Headrest.Angle 0[set] OK
Digital Auto: Playground
playground.digital.auto provides an in-browser, rapid prototyping environment utilizing the COVESA APIs for connected vehicles.
The UUID for Vehicle.Cabin.Seat.Row1.Pos2.Headrest.Angle is 73491bcc68d850849cd6cbb7c2d4fdb1
Feedback
Do you think this Vehicle Signal specification needs enhancement? Do you want to discuss with experts? Try the following ressources to get in touch with the VSS community:
$ databroker-cli
sdv.databroker.v1 > connect
[connect] OK
sdv.databroker.v1 > get Vehicle.Cabin.Seat.Row1.Pos2.Headrest.Height
[get] OK
Vehicle.Cabin.Seat.Row1.Pos2.Headrest.Height: ( NotAvailable )sdv.databroker.v1 > set Vehicle.Cabin.Seat.Row1.Pos2.Headrest.Height 0[set] OK
Digital Auto: Playground
playground.digital.auto provides an in-browser, rapid prototyping environment utilizing the COVESA APIs for connected vehicles.
The UUID for Vehicle.Cabin.Seat.Row1.Pos2.Headrest.Height is 2d8573879aaa5b28bcdf425c82bc6aa2
Feedback
Do you think this Vehicle Signal specification needs enhancement? Do you want to discuss with experts? Try the following ressources to get in touch with the VSS community:
The following is a list of VSS supported built-in datatypes:
Name
Type
Min
Max
uint8
unsigned 8-bit integer
0
255
int8
signed 8-bit integer
-128
127
uint16
unsigned 16-bit integer
0
65535
int16
signed 16-bit integer
-32768
32767
uint32
unsigned 32-bit integer
0
4294967295
int32
signed 32-bit integer
-2147483648
2147483647
uint64
unsigned 64-bit integer
0
2^64 - 1
int64
signed 64-bit integer
-2^63
2^63 - 1
boolean
boolean value
0/false
1/true
float
floating point number
-3.4e -38
3.4e 38
double
double precision floating point number
-1.7e -300
1.7e 300
string
character string
n/a
n/a
Min, max and default values defined in a Vehicle Signal Specification must be in the supported range of the data type.
5.1.8.7.2.2.3 - Seating
Full qualified VSS Path:
Vehicle.Cabin.Seat.Row1.Pos2.Seating
Description:
Describes signals related to the seat bottom of the seat.
Comment:
Seating is here considered as the part of the seat that supports the thighs. Additional cushions (if any) for support of lower legs is not covered by this branch.
Navigation
flowchart LR
Vehicle-->Cabin
Cabin-->Seat
Seat-->Row1
Row1-->Pos2
Pos2-->Seating
Digital Auto: Playground
playground.digital.auto provides an in-browser, rapid prototyping environment utilizing the COVESA APIs for connected vehicles.
Do you think this Vehicle Signal specification needs enhancement? Do you want to discuss with experts? Try the following ressources to get in touch with the VSS community:
$ databroker-cli
sdv.databroker.v1 > connect
[connect] OK
sdv.databroker.v1 > get Vehicle.Cabin.Seat.Row1.Pos2.Seating.Length
[get] OK
Vehicle.Cabin.Seat.Row1.Pos2.Seating.Length: ( NotAvailable )sdv.databroker.v1 > set Vehicle.Cabin.Seat.Row1.Pos2.Seating.Length 0[set] OK
Digital Auto: Playground
playground.digital.auto provides an in-browser, rapid prototyping environment utilizing the COVESA APIs for connected vehicles.
The UUID for Vehicle.Cabin.Seat.Row1.Pos2.Seating.Length is cef5936e042158fd9259018d9895b860
Feedback
Do you think this Vehicle Signal specification needs enhancement? Do you want to discuss with experts? Try the following ressources to get in touch with the VSS community:
Do you think this Vehicle Signal specification needs enhancement? Do you want to discuss with experts? Try the following ressources to get in touch with the VSS community:
Do you think this Vehicle Signal specification needs enhancement? Do you want to discuss with experts? Try the following ressources to get in touch with the VSS community:
$ databroker-cli
sdv.databroker.v1 > connect
[connect] OK
sdv.databroker.v1 > get Vehicle.Cabin.Seat.Row1.Pos2.Switch.Massage.IsDecreaseEngaged
[get] OK
Vehicle.Cabin.Seat.Row1.Pos2.Switch.Massage.IsDecreaseEngaged: ( NotAvailable )sdv.databroker.v1 > set Vehicle.Cabin.Seat.Row1.Pos2.Switch.Massage.IsDecreaseEngaged false[set] OK
Digital Auto: Playground
playground.digital.auto provides an in-browser, rapid prototyping environment utilizing the COVESA APIs for connected vehicles.
The UUID for Vehicle.Cabin.Seat.Row1.Pos2.Switch.Massage.IsDecreaseEngaged is b655bf7a99015d638a6d7177aa6d89e9
Feedback
Do you think this Vehicle Signal specification needs enhancement? Do you want to discuss with experts? Try the following ressources to get in touch with the VSS community:
$ databroker-cli
sdv.databroker.v1 > connect
[connect] OK
sdv.databroker.v1 > get Vehicle.Cabin.Seat.Row1.Pos2.Switch.Massage.IsIncreaseEngaged
[get] OK
Vehicle.Cabin.Seat.Row1.Pos2.Switch.Massage.IsIncreaseEngaged: ( NotAvailable )sdv.databroker.v1 > set Vehicle.Cabin.Seat.Row1.Pos2.Switch.Massage.IsIncreaseEngaged false[set] OK
Digital Auto: Playground
playground.digital.auto provides an in-browser, rapid prototyping environment utilizing the COVESA APIs for connected vehicles.
The UUID for Vehicle.Cabin.Seat.Row1.Pos2.Switch.Massage.IsIncreaseEngaged is 8d81938f575756199e1c604f6a51677e
Feedback
Do you think this Vehicle Signal specification needs enhancement? Do you want to discuss with experts? Try the following ressources to get in touch with the VSS community:
Do you think this Vehicle Signal specification needs enhancement? Do you want to discuss with experts? Try the following ressources to get in touch with the VSS community:
$ databroker-cli
sdv.databroker.v1 > connect
[connect] OK
sdv.databroker.v1 > get Vehicle.Cabin.Seat.Row1.Pos2.Switch.Backrest.IsReclineBackwardEngaged
[get] OK
Vehicle.Cabin.Seat.Row1.Pos2.Switch.Backrest.IsReclineBackwardEngaged: ( NotAvailable )sdv.databroker.v1 > set Vehicle.Cabin.Seat.Row1.Pos2.Switch.Backrest.IsReclineBackwardEngaged false[set] OK
Digital Auto: Playground
playground.digital.auto provides an in-browser, rapid prototyping environment utilizing the COVESA APIs for connected vehicles.
The UUID for Vehicle.Cabin.Seat.Row1.Pos2.Switch.Backrest.IsReclineBackwardEngaged is 524f91af31e150b8aca5de230369be7f
Feedback
Do you think this Vehicle Signal specification needs enhancement? Do you want to discuss with experts? Try the following ressources to get in touch with the VSS community:
$ databroker-cli
sdv.databroker.v1 > connect
[connect] OK
sdv.databroker.v1 > get Vehicle.Cabin.Seat.Row1.Pos2.Switch.Backrest.IsReclineForwardEngaged
[get] OK
Vehicle.Cabin.Seat.Row1.Pos2.Switch.Backrest.IsReclineForwardEngaged: ( NotAvailable )sdv.databroker.v1 > set Vehicle.Cabin.Seat.Row1.Pos2.Switch.Backrest.IsReclineForwardEngaged false[set] OK
Digital Auto: Playground
playground.digital.auto provides an in-browser, rapid prototyping environment utilizing the COVESA APIs for connected vehicles.
The UUID for Vehicle.Cabin.Seat.Row1.Pos2.Switch.Backrest.IsReclineForwardEngaged is e5bd5743807c5b899098d22e6cc3a4bc
Feedback
Do you think this Vehicle Signal specification needs enhancement? Do you want to discuss with experts? Try the following ressources to get in touch with the VSS community:
Do you think this Vehicle Signal specification needs enhancement? Do you want to discuss with experts? Try the following ressources to get in touch with the VSS community:
$ databroker-cli
sdv.databroker.v1 > connect
[connect] OK
sdv.databroker.v1 > get Vehicle.Cabin.Seat.Row1.Pos2.Switch.Backrest.Lumbar.IsDownEngaged
[get] OK
Vehicle.Cabin.Seat.Row1.Pos2.Switch.Backrest.Lumbar.IsDownEngaged: ( NotAvailable )sdv.databroker.v1 > set Vehicle.Cabin.Seat.Row1.Pos2.Switch.Backrest.Lumbar.IsDownEngaged false[set] OK
Digital Auto: Playground
playground.digital.auto provides an in-browser, rapid prototyping environment utilizing the COVESA APIs for connected vehicles.
The UUID for Vehicle.Cabin.Seat.Row1.Pos2.Switch.Backrest.Lumbar.IsDownEngaged is 3491b91384f95975851e64636514f52f
Feedback
Do you think this Vehicle Signal specification needs enhancement? Do you want to discuss with experts? Try the following ressources to get in touch with the VSS community:
$ databroker-cli
sdv.databroker.v1 > connect
[connect] OK
sdv.databroker.v1 > get Vehicle.Cabin.Seat.Row1.Pos2.Switch.Backrest.Lumbar.IsLessSupportEngaged
[get] OK
Vehicle.Cabin.Seat.Row1.Pos2.Switch.Backrest.Lumbar.IsLessSupportEngaged: ( NotAvailable )sdv.databroker.v1 > set Vehicle.Cabin.Seat.Row1.Pos2.Switch.Backrest.Lumbar.IsLessSupportEngaged false[set] OK
Digital Auto: Playground
playground.digital.auto provides an in-browser, rapid prototyping environment utilizing the COVESA APIs for connected vehicles.
The UUID for Vehicle.Cabin.Seat.Row1.Pos2.Switch.Backrest.Lumbar.IsLessSupportEngaged is af092a25f40a5003b7354f5f580b0e11
Feedback
Do you think this Vehicle Signal specification needs enhancement? Do you want to discuss with experts? Try the following ressources to get in touch with the VSS community:
$ databroker-cli
sdv.databroker.v1 > connect
[connect] OK
sdv.databroker.v1 > get Vehicle.Cabin.Seat.Row1.Pos2.Switch.Backrest.Lumbar.IsMoreSupportEngaged
[get] OK
Vehicle.Cabin.Seat.Row1.Pos2.Switch.Backrest.Lumbar.IsMoreSupportEngaged: ( NotAvailable )sdv.databroker.v1 > set Vehicle.Cabin.Seat.Row1.Pos2.Switch.Backrest.Lumbar.IsMoreSupportEngaged false[set] OK
Digital Auto: Playground
playground.digital.auto provides an in-browser, rapid prototyping environment utilizing the COVESA APIs for connected vehicles.
The UUID for Vehicle.Cabin.Seat.Row1.Pos2.Switch.Backrest.Lumbar.IsMoreSupportEngaged is 1ae05b08ed295d4f8305abc26088cca2
Feedback
Do you think this Vehicle Signal specification needs enhancement? Do you want to discuss with experts? Try the following ressources to get in touch with the VSS community:
$ databroker-cli
sdv.databroker.v1 > connect
[connect] OK
sdv.databroker.v1 > get Vehicle.Cabin.Seat.Row1.Pos2.Switch.Backrest.Lumbar.IsUpEngaged
[get] OK
Vehicle.Cabin.Seat.Row1.Pos2.Switch.Backrest.Lumbar.IsUpEngaged: ( NotAvailable )sdv.databroker.v1 > set Vehicle.Cabin.Seat.Row1.Pos2.Switch.Backrest.Lumbar.IsUpEngaged false[set] OK
Digital Auto: Playground
playground.digital.auto provides an in-browser, rapid prototyping environment utilizing the COVESA APIs for connected vehicles.
The UUID for Vehicle.Cabin.Seat.Row1.Pos2.Switch.Backrest.Lumbar.IsUpEngaged is da6a3f596a5c5db2b5984356087278d4
Feedback
Do you think this Vehicle Signal specification needs enhancement? Do you want to discuss with experts? Try the following ressources to get in touch with the VSS community:
Do you think this Vehicle Signal specification needs enhancement? Do you want to discuss with experts? Try the following ressources to get in touch with the VSS community:
$ databroker-cli
sdv.databroker.v1 > connect
[connect] OK
sdv.databroker.v1 > get Vehicle.Cabin.Seat.Row1.Pos2.Switch.Backrest.SideBolster.IsLessSupportEngaged
[get] OK
Vehicle.Cabin.Seat.Row1.Pos2.Switch.Backrest.SideBolster.IsLessSupportEngaged: ( NotAvailable )sdv.databroker.v1 > set Vehicle.Cabin.Seat.Row1.Pos2.Switch.Backrest.SideBolster.IsLessSupportEngaged false[set] OK
Digital Auto: Playground
playground.digital.auto provides an in-browser, rapid prototyping environment utilizing the COVESA APIs for connected vehicles.
The UUID for Vehicle.Cabin.Seat.Row1.Pos2.Switch.Backrest.SideBolster.IsLessSupportEngaged is 5e6fa87ef4fd563d97299bc2d88300d1
Feedback
Do you think this Vehicle Signal specification needs enhancement? Do you want to discuss with experts? Try the following ressources to get in touch with the VSS community:
$ databroker-cli
sdv.databroker.v1 > connect
[connect] OK
sdv.databroker.v1 > get Vehicle.Cabin.Seat.Row1.Pos2.Switch.Backrest.SideBolster.IsMoreSupportEngaged
[get] OK
Vehicle.Cabin.Seat.Row1.Pos2.Switch.Backrest.SideBolster.IsMoreSupportEngaged: ( NotAvailable )sdv.databroker.v1 > set Vehicle.Cabin.Seat.Row1.Pos2.Switch.Backrest.SideBolster.IsMoreSupportEngaged false[set] OK
Digital Auto: Playground
playground.digital.auto provides an in-browser, rapid prototyping environment utilizing the COVESA APIs for connected vehicles.
The UUID for Vehicle.Cabin.Seat.Row1.Pos2.Switch.Backrest.SideBolster.IsMoreSupportEngaged is 33b758ca51f15403a398ef3072dcaae2
Feedback
Do you think this Vehicle Signal specification needs enhancement? Do you want to discuss with experts? Try the following ressources to get in touch with the VSS community:
Do you think this Vehicle Signal specification needs enhancement? Do you want to discuss with experts? Try the following ressources to get in touch with the VSS community:
$ databroker-cli
sdv.databroker.v1 > connect
[connect] OK
sdv.databroker.v1 > get Vehicle.Cabin.Seat.Row1.Pos2.Switch.Headrest.IsBackwardEngaged
[get] OK
Vehicle.Cabin.Seat.Row1.Pos2.Switch.Headrest.IsBackwardEngaged: ( NotAvailable )sdv.databroker.v1 > set Vehicle.Cabin.Seat.Row1.Pos2.Switch.Headrest.IsBackwardEngaged false[set] OK
Digital Auto: Playground
playground.digital.auto provides an in-browser, rapid prototyping environment utilizing the COVESA APIs for connected vehicles.
The UUID for Vehicle.Cabin.Seat.Row1.Pos2.Switch.Headrest.IsBackwardEngaged is 556de341eb5052489018ae6ff95310e2
Feedback
Do you think this Vehicle Signal specification needs enhancement? Do you want to discuss with experts? Try the following ressources to get in touch with the VSS community:
$ databroker-cli
sdv.databroker.v1 > connect
[connect] OK
sdv.databroker.v1 > get Vehicle.Cabin.Seat.Row1.Pos2.Switch.Headrest.IsDownEngaged
[get] OK
Vehicle.Cabin.Seat.Row1.Pos2.Switch.Headrest.IsDownEngaged: ( NotAvailable )sdv.databroker.v1 > set Vehicle.Cabin.Seat.Row1.Pos2.Switch.Headrest.IsDownEngaged false[set] OK
Digital Auto: Playground
playground.digital.auto provides an in-browser, rapid prototyping environment utilizing the COVESA APIs for connected vehicles.
The UUID for Vehicle.Cabin.Seat.Row1.Pos2.Switch.Headrest.IsDownEngaged is 2245feeb2eeb54e3b9303bc2dc232de6
Feedback
Do you think this Vehicle Signal specification needs enhancement? Do you want to discuss with experts? Try the following ressources to get in touch with the VSS community:
$ databroker-cli
sdv.databroker.v1 > connect
[connect] OK
sdv.databroker.v1 > get Vehicle.Cabin.Seat.Row1.Pos2.Switch.Headrest.IsForwardEngaged
[get] OK
Vehicle.Cabin.Seat.Row1.Pos2.Switch.Headrest.IsForwardEngaged: ( NotAvailable )sdv.databroker.v1 > set Vehicle.Cabin.Seat.Row1.Pos2.Switch.Headrest.IsForwardEngaged false[set] OK
Digital Auto: Playground
playground.digital.auto provides an in-browser, rapid prototyping environment utilizing the COVESA APIs for connected vehicles.
The UUID for Vehicle.Cabin.Seat.Row1.Pos2.Switch.Headrest.IsForwardEngaged is 39e5e43777ab5af9ba972a6da265a4f1
Feedback
Do you think this Vehicle Signal specification needs enhancement? Do you want to discuss with experts? Try the following ressources to get in touch with the VSS community:
$ databroker-cli
sdv.databroker.v1 > connect
[connect] OK
sdv.databroker.v1 > get Vehicle.Cabin.Seat.Row1.Pos2.Switch.Headrest.IsUpEngaged
[get] OK
Vehicle.Cabin.Seat.Row1.Pos2.Switch.Headrest.IsUpEngaged: ( NotAvailable )sdv.databroker.v1 > set Vehicle.Cabin.Seat.Row1.Pos2.Switch.Headrest.IsUpEngaged false[set] OK
Digital Auto: Playground
playground.digital.auto provides an in-browser, rapid prototyping environment utilizing the COVESA APIs for connected vehicles.
The UUID for Vehicle.Cabin.Seat.Row1.Pos2.Switch.Headrest.IsUpEngaged is f182830bd5955b85b8e755895d578b03
Feedback
Do you think this Vehicle Signal specification needs enhancement? Do you want to discuss with experts? Try the following ressources to get in touch with the VSS community:
$ databroker-cli
sdv.databroker.v1 > connect
[connect] OK
sdv.databroker.v1 > get Vehicle.Cabin.Seat.Row1.Pos2.Switch.IsBackwardEngaged
[get] OK
Vehicle.Cabin.Seat.Row1.Pos2.Switch.IsBackwardEngaged: ( NotAvailable )sdv.databroker.v1 > set Vehicle.Cabin.Seat.Row1.Pos2.Switch.IsBackwardEngaged false[set] OK
Digital Auto: Playground
playground.digital.auto provides an in-browser, rapid prototyping environment utilizing the COVESA APIs for connected vehicles.
The UUID for Vehicle.Cabin.Seat.Row1.Pos2.Switch.IsBackwardEngaged is 861eca7954cb554e9fb8a21568126e10
Feedback
Do you think this Vehicle Signal specification needs enhancement? Do you want to discuss with experts? Try the following ressources to get in touch with the VSS community:
$ databroker-cli
sdv.databroker.v1 > connect
[connect] OK
sdv.databroker.v1 > get Vehicle.Cabin.Seat.Row1.Pos2.Switch.IsCoolerEngaged
[get] OK
Vehicle.Cabin.Seat.Row1.Pos2.Switch.IsCoolerEngaged: ( NotAvailable )sdv.databroker.v1 > set Vehicle.Cabin.Seat.Row1.Pos2.Switch.IsCoolerEngaged false[set] OK
Digital Auto: Playground
playground.digital.auto provides an in-browser, rapid prototyping environment utilizing the COVESA APIs for connected vehicles.
The UUID for Vehicle.Cabin.Seat.Row1.Pos2.Switch.IsCoolerEngaged is d3e2606f6cdc57759850f19e1ce8c4f2
Feedback
Do you think this Vehicle Signal specification needs enhancement? Do you want to discuss with experts? Try the following ressources to get in touch with the VSS community:
$ databroker-cli
sdv.databroker.v1 > connect
[connect] OK
sdv.databroker.v1 > get Vehicle.Cabin.Seat.Row1.Pos2.Switch.IsDownEngaged
[get] OK
Vehicle.Cabin.Seat.Row1.Pos2.Switch.IsDownEngaged: ( NotAvailable )sdv.databroker.v1 > set Vehicle.Cabin.Seat.Row1.Pos2.Switch.IsDownEngaged false[set] OK
Digital Auto: Playground
playground.digital.auto provides an in-browser, rapid prototyping environment utilizing the COVESA APIs for connected vehicles.
The UUID for Vehicle.Cabin.Seat.Row1.Pos2.Switch.IsDownEngaged is 7da73beabcbc5f338bc68e9b5e3daf06
Feedback
Do you think this Vehicle Signal specification needs enhancement? Do you want to discuss with experts? Try the following ressources to get in touch with the VSS community:
$ databroker-cli
sdv.databroker.v1 > connect
[connect] OK
sdv.databroker.v1 > get Vehicle.Cabin.Seat.Row1.Pos2.Switch.IsForwardEngaged
[get] OK
Vehicle.Cabin.Seat.Row1.Pos2.Switch.IsForwardEngaged: ( NotAvailable )sdv.databroker.v1 > set Vehicle.Cabin.Seat.Row1.Pos2.Switch.IsForwardEngaged false[set] OK
Digital Auto: Playground
playground.digital.auto provides an in-browser, rapid prototyping environment utilizing the COVESA APIs for connected vehicles.
The UUID for Vehicle.Cabin.Seat.Row1.Pos2.Switch.IsForwardEngaged is 28ff94d05f795705928644e5a0101e8b
Feedback
Do you think this Vehicle Signal specification needs enhancement? Do you want to discuss with experts? Try the following ressources to get in touch with the VSS community:
$ databroker-cli
sdv.databroker.v1 > connect
[connect] OK
sdv.databroker.v1 > get Vehicle.Cabin.Seat.Row1.Pos2.Switch.IsTiltBackwardEngaged
[get] OK
Vehicle.Cabin.Seat.Row1.Pos2.Switch.IsTiltBackwardEngaged: ( NotAvailable )sdv.databroker.v1 > set Vehicle.Cabin.Seat.Row1.Pos2.Switch.IsTiltBackwardEngaged false[set] OK
Digital Auto: Playground
playground.digital.auto provides an in-browser, rapid prototyping environment utilizing the COVESA APIs for connected vehicles.
The UUID for Vehicle.Cabin.Seat.Row1.Pos2.Switch.IsTiltBackwardEngaged is 0482452fd1a3501d96e06ee7c5dba6dd
Feedback
Do you think this Vehicle Signal specification needs enhancement? Do you want to discuss with experts? Try the following ressources to get in touch with the VSS community:
$ databroker-cli
sdv.databroker.v1 > connect
[connect] OK
sdv.databroker.v1 > get Vehicle.Cabin.Seat.Row1.Pos2.Switch.IsTiltForwardEngaged
[get] OK
Vehicle.Cabin.Seat.Row1.Pos2.Switch.IsTiltForwardEngaged: ( NotAvailable )sdv.databroker.v1 > set Vehicle.Cabin.Seat.Row1.Pos2.Switch.IsTiltForwardEngaged false[set] OK
Digital Auto: Playground
playground.digital.auto provides an in-browser, rapid prototyping environment utilizing the COVESA APIs for connected vehicles.
The UUID for Vehicle.Cabin.Seat.Row1.Pos2.Switch.IsTiltForwardEngaged is d0433b6d2d965fecb9384ac5205de397
Feedback
Do you think this Vehicle Signal specification needs enhancement? Do you want to discuss with experts? Try the following ressources to get in touch with the VSS community:
$ databroker-cli
sdv.databroker.v1 > connect
[connect] OK
sdv.databroker.v1 > get Vehicle.Cabin.Seat.Row1.Pos2.Switch.IsUpEngaged
[get] OK
Vehicle.Cabin.Seat.Row1.Pos2.Switch.IsUpEngaged: ( NotAvailable )sdv.databroker.v1 > set Vehicle.Cabin.Seat.Row1.Pos2.Switch.IsUpEngaged false[set] OK
Digital Auto: Playground
playground.digital.auto provides an in-browser, rapid prototyping environment utilizing the COVESA APIs for connected vehicles.
The UUID for Vehicle.Cabin.Seat.Row1.Pos2.Switch.IsUpEngaged is 3906c493560e5c5686c69f0d2aa65e91
Feedback
Do you think this Vehicle Signal specification needs enhancement? Do you want to discuss with experts? Try the following ressources to get in touch with the VSS community:
$ databroker-cli
sdv.databroker.v1 > connect
[connect] OK
sdv.databroker.v1 > get Vehicle.Cabin.Seat.Row1.Pos2.Switch.IsWarmerEngaged
[get] OK
Vehicle.Cabin.Seat.Row1.Pos2.Switch.IsWarmerEngaged: ( NotAvailable )sdv.databroker.v1 > set Vehicle.Cabin.Seat.Row1.Pos2.Switch.IsWarmerEngaged false[set] OK
Digital Auto: Playground
playground.digital.auto provides an in-browser, rapid prototyping environment utilizing the COVESA APIs for connected vehicles.
The UUID for Vehicle.Cabin.Seat.Row1.Pos2.Switch.IsWarmerEngaged is 61eb1ede01d45ff2a6a4eec903741a08
Feedback
Do you think this Vehicle Signal specification needs enhancement? Do you want to discuss with experts? Try the following ressources to get in touch with the VSS community:
Do you think this Vehicle Signal specification needs enhancement? Do you want to discuss with experts? Try the following ressources to get in touch with the VSS community:
$ databroker-cli
sdv.databroker.v1 > connect
[connect] OK
sdv.databroker.v1 > get Vehicle.Cabin.Seat.Row1.Pos2.Switch.Seating.IsBackwardEngaged
[get] OK
Vehicle.Cabin.Seat.Row1.Pos2.Switch.Seating.IsBackwardEngaged: ( NotAvailable )sdv.databroker.v1 > set Vehicle.Cabin.Seat.Row1.Pos2.Switch.Seating.IsBackwardEngaged false[set] OK
Digital Auto: Playground
playground.digital.auto provides an in-browser, rapid prototyping environment utilizing the COVESA APIs for connected vehicles.
The UUID for Vehicle.Cabin.Seat.Row1.Pos2.Switch.Seating.IsBackwardEngaged is e6d761d8e77651dab939076cdc8bd529
Feedback
Do you think this Vehicle Signal specification needs enhancement? Do you want to discuss with experts? Try the following ressources to get in touch with the VSS community:
$ databroker-cli
sdv.databroker.v1 > connect
[connect] OK
sdv.databroker.v1 > get Vehicle.Cabin.Seat.Row1.Pos2.Switch.Seating.IsForwardEngaged
[get] OK
Vehicle.Cabin.Seat.Row1.Pos2.Switch.Seating.IsForwardEngaged: ( NotAvailable )sdv.databroker.v1 > set Vehicle.Cabin.Seat.Row1.Pos2.Switch.Seating.IsForwardEngaged false[set] OK
Digital Auto: Playground
playground.digital.auto provides an in-browser, rapid prototyping environment utilizing the COVESA APIs for connected vehicles.
The UUID for Vehicle.Cabin.Seat.Row1.Pos2.Switch.Seating.IsForwardEngaged is 4081bab44a1d5da1b70a5dc158f2ae39
Feedback
Do you think this Vehicle Signal specification needs enhancement? Do you want to discuss with experts? Try the following ressources to get in touch with the VSS community:
Do you think this Vehicle Signal specification needs enhancement? Do you want to discuss with experts? Try the following ressources to get in touch with the VSS community:
Do you think this Vehicle Signal specification needs enhancement? Do you want to discuss with experts? Try the following ressources to get in touch with the VSS community:
$ databroker-cli
sdv.databroker.v1 > connect
[connect] OK
sdv.databroker.v1 > get Vehicle.Cabin.Seat.Row1.Pos2.Backrest.SideBolster.Support
[get] OK
Vehicle.Cabin.Seat.Row1.Pos2.Backrest.SideBolster.Support: ( NotAvailable )sdv.databroker.v1 > set Vehicle.Cabin.Seat.Row1.Pos2.Backrest.SideBolster.Support 0[set] OK
Digital Auto: Playground
playground.digital.auto provides an in-browser, rapid prototyping environment utilizing the COVESA APIs for connected vehicles.
The UUID for Vehicle.Cabin.Seat.Row1.Pos2.Backrest.SideBolster.Support is 63d6501d545350d7bd98d377bf43c45d
Feedback
Do you think this Vehicle Signal specification needs enhancement? Do you want to discuss with experts? Try the following ressources to get in touch with the VSS community:
Do you think this Vehicle Signal specification needs enhancement? Do you want to discuss with experts? Try the following ressources to get in touch with the VSS community:
$ databroker-cli
sdv.databroker.v1 > connect
[connect] OK
sdv.databroker.v1 > get Vehicle.Cabin.Seat.Row1.Pos2.Backrest.Lumbar.Height
[get] OK
Vehicle.Cabin.Seat.Row1.Pos2.Backrest.Lumbar.Height: ( NotAvailable )sdv.databroker.v1 > set Vehicle.Cabin.Seat.Row1.Pos2.Backrest.Lumbar.Height 0[set] OK
Digital Auto: Playground
playground.digital.auto provides an in-browser, rapid prototyping environment utilizing the COVESA APIs for connected vehicles.
The UUID for Vehicle.Cabin.Seat.Row1.Pos2.Backrest.Lumbar.Height is 3c282a3edb5c504e83f32ba674c3d0fc
Feedback
Do you think this Vehicle Signal specification needs enhancement? Do you want to discuss with experts? Try the following ressources to get in touch with the VSS community:
$ databroker-cli
sdv.databroker.v1 > connect
[connect] OK
sdv.databroker.v1 > get Vehicle.Cabin.Seat.Row1.Pos2.Backrest.Lumbar.Support
[get] OK
Vehicle.Cabin.Seat.Row1.Pos2.Backrest.Lumbar.Support: ( NotAvailable )sdv.databroker.v1 > set Vehicle.Cabin.Seat.Row1.Pos2.Backrest.Lumbar.Support 0[set] OK
Digital Auto: Playground
playground.digital.auto provides an in-browser, rapid prototyping environment utilizing the COVESA APIs for connected vehicles.
The UUID for Vehicle.Cabin.Seat.Row1.Pos2.Backrest.Lumbar.Support is 049baabba96d52a5b1936acc45cb6e2c
Feedback
Do you think this Vehicle Signal specification needs enhancement? Do you want to discuss with experts? Try the following ressources to get in touch with the VSS community:
The following is a list of VSS supported built-in datatypes:
Name
Type
Min
Max
uint8
unsigned 8-bit integer
0
255
int8
signed 8-bit integer
-128
127
uint16
unsigned 16-bit integer
0
65535
int16
signed 16-bit integer
-32768
32767
uint32
unsigned 32-bit integer
0
4294967295
int32
signed 32-bit integer
-2147483648
2147483647
uint64
unsigned 64-bit integer
0
2^64 - 1
int64
signed 64-bit integer
-2^63
2^63 - 1
boolean
boolean value
0/false
1/true
float
floating point number
-3.4e -38
3.4e 38
double
double precision floating point number
-1.7e -300
1.7e 300
string
character string
n/a
n/a
Min, max and default values defined in a Vehicle Signal Specification must be in the supported range of the data type.
5.1.8.7.2.2.5.3 - Recline
Full qualified VSS Path:
Vehicle.Cabin.Seat.Row1.Pos2.Backrest.Recline
Description:
Backrest recline compared to seat z-axis (seat vertical axis). 0 degrees = Upright/Vertical backrest. Negative degrees for forward recline. Positive degrees for backward recline.
Comment:
Seat z-axis depends on seat tilt. This means that movement of backrest due to seat tilting will not affect Backrest.Recline as long as the angle between Seating and Backrest are constant. Absolute recline relative to vehicle z-axis can be calculated as Tilt + Backrest.Recline.
Navigation
flowchart LR
Vehicle-->Cabin
Cabin-->Seat
Seat-->Row1
Row1-->Pos2
Pos2-->Backrest
Backrest-->Recline
$ databroker-cli
sdv.databroker.v1 > connect
[connect] OK
sdv.databroker.v1 > get Vehicle.Cabin.Seat.Row1.Pos2.Backrest.Recline
[get] OK
Vehicle.Cabin.Seat.Row1.Pos2.Backrest.Recline: ( NotAvailable )sdv.databroker.v1 > set Vehicle.Cabin.Seat.Row1.Pos2.Backrest.Recline 0[set] OK
Digital Auto: Playground
playground.digital.auto provides an in-browser, rapid prototyping environment utilizing the COVESA APIs for connected vehicles.
The UUID for Vehicle.Cabin.Seat.Row1.Pos2.Backrest.Recline is a30da9db6ae45d4d80fbd81952d94479
Feedback
Do you think this Vehicle Signal specification needs enhancement? Do you want to discuss with experts? Try the following ressources to get in touch with the VSS community:
$ databroker-cli
sdv.databroker.v1 > connect
[connect] OK
sdv.databroker.v1 > get Vehicle.Cabin.Seat.Row1.Pos2.Heating
[get] OK
Vehicle.Cabin.Seat.Row1.Pos2.Heating: ( NotAvailable )sdv.databroker.v1 > set Vehicle.Cabin.Seat.Row1.Pos2.Heating 0[set] OK
Digital Auto: Playground
playground.digital.auto provides an in-browser, rapid prototyping environment utilizing the COVESA APIs for connected vehicles.
The UUID for Vehicle.Cabin.Seat.Row1.Pos2.Heating is eae672cc71dc5046bf1bdef59b8cd980
Feedback
Do you think this Vehicle Signal specification needs enhancement? Do you want to discuss with experts? Try the following ressources to get in touch with the VSS community:
$ databroker-cli
sdv.databroker.v1 > connect
[connect] OK
sdv.databroker.v1 > get Vehicle.Cabin.Seat.Row1.Pos2.Height
[get] OK
Vehicle.Cabin.Seat.Row1.Pos2.Height: ( NotAvailable )sdv.databroker.v1 > set Vehicle.Cabin.Seat.Row1.Pos2.Height 0[set] OK
Digital Auto: Playground
playground.digital.auto provides an in-browser, rapid prototyping environment utilizing the COVESA APIs for connected vehicles.
The UUID for Vehicle.Cabin.Seat.Row1.Pos2.Height is fc3b3498a15c5417aadbbce4f758a6d5
Feedback
Do you think this Vehicle Signal specification needs enhancement? Do you want to discuss with experts? Try the following ressources to get in touch with the VSS community:
$ databroker-cli
sdv.databroker.v1 > connect
[connect] OK
sdv.databroker.v1 > get Vehicle.Cabin.Seat.Row1.Pos2.IsBelted
[get] OK
Vehicle.Cabin.Seat.Row1.Pos2.IsBelted: ( NotAvailable )sdv.databroker.v1 > set Vehicle.Cabin.Seat.Row1.Pos2.IsBelted false[set] OK
Digital Auto: Playground
playground.digital.auto provides an in-browser, rapid prototyping environment utilizing the COVESA APIs for connected vehicles.
The UUID for Vehicle.Cabin.Seat.Row1.Pos2.IsBelted is ee2919e0ffdd5a939a1b86b570c14112
Feedback
Do you think this Vehicle Signal specification needs enhancement? Do you want to discuss with experts? Try the following ressources to get in touch with the VSS community:
$ databroker-cli
sdv.databroker.v1 > connect
[connect] OK
sdv.databroker.v1 > get Vehicle.Cabin.Seat.Row1.Pos2.IsOccupied
[get] OK
Vehicle.Cabin.Seat.Row1.Pos2.IsOccupied: ( NotAvailable )sdv.databroker.v1 > set Vehicle.Cabin.Seat.Row1.Pos2.IsOccupied false[set] OK
Digital Auto: Playground
playground.digital.auto provides an in-browser, rapid prototyping environment utilizing the COVESA APIs for connected vehicles.
The UUID for Vehicle.Cabin.Seat.Row1.Pos2.IsOccupied is 4d0cdff266e45dd2a8a878b572d34b7e
Feedback
Do you think this Vehicle Signal specification needs enhancement? Do you want to discuss with experts? Try the following ressources to get in touch with the VSS community:
$ databroker-cli
sdv.databroker.v1 > connect
[connect] OK
sdv.databroker.v1 > get Vehicle.Cabin.Seat.Row1.Pos2.Massage
[get] OK
Vehicle.Cabin.Seat.Row1.Pos2.Massage: ( NotAvailable )sdv.databroker.v1 > set Vehicle.Cabin.Seat.Row1.Pos2.Massage 0[set] OK
Digital Auto: Playground
playground.digital.auto provides an in-browser, rapid prototyping environment utilizing the COVESA APIs for connected vehicles.
The UUID for Vehicle.Cabin.Seat.Row1.Pos2.Massage is c1935863d503574fb5d20b703974399c
Feedback
Do you think this Vehicle Signal specification needs enhancement? Do you want to discuss with experts? Try the following ressources to get in touch with the VSS community:
Do you think this Vehicle Signal specification needs enhancement? Do you want to discuss with experts? Try the following ressources to get in touch with the VSS community:
Do you think this Vehicle Signal specification needs enhancement? Do you want to discuss with experts? Try the following ressources to get in touch with the VSS community:
$ databroker-cli
sdv.databroker.v1 > connect
[connect] OK
sdv.databroker.v1 > get Vehicle.Cabin.Seat.Row1.Pos2.Occupant.Identifier.Issuer
[get] OK
Vehicle.Cabin.Seat.Row1.Pos2.Occupant.Identifier.Issuer: ( NotAvailable )sdv.databroker.v1 > set Vehicle.Cabin.Seat.Row1.Pos2.Occupant.Identifier.Issuer Foo
[set] OK
Digital Auto: Playground
playground.digital.auto provides an in-browser, rapid prototyping environment utilizing the COVESA APIs for connected vehicles.
The UUID for Vehicle.Cabin.Seat.Row1.Pos2.Occupant.Identifier.Issuer is f88bffa4714d57f8b61b1034c57190ff
Feedback
Do you think this Vehicle Signal specification needs enhancement? Do you want to discuss with experts? Try the following ressources to get in touch with the VSS community:
$ databroker-cli
sdv.databroker.v1 > connect
[connect] OK
sdv.databroker.v1 > get Vehicle.Cabin.Seat.Row1.Pos2.Occupant.Identifier.Subject
[get] OK
Vehicle.Cabin.Seat.Row1.Pos2.Occupant.Identifier.Subject: ( NotAvailable )sdv.databroker.v1 > set Vehicle.Cabin.Seat.Row1.Pos2.Occupant.Identifier.Subject Foo
[set] OK
Digital Auto: Playground
playground.digital.auto provides an in-browser, rapid prototyping environment utilizing the COVESA APIs for connected vehicles.
The UUID for Vehicle.Cabin.Seat.Row1.Pos2.Occupant.Identifier.Subject is f8f67096b9e35197a3e199e9171c4872
Feedback
Do you think this Vehicle Signal specification needs enhancement? Do you want to discuss with experts? Try the following ressources to get in touch with the VSS community:
$ databroker-cli
sdv.databroker.v1 > connect
[connect] OK
sdv.databroker.v1 > get Vehicle.Cabin.Seat.Row1.Pos2.Position
[get] OK
Vehicle.Cabin.Seat.Row1.Pos2.Position: ( NotAvailable )sdv.databroker.v1 > set Vehicle.Cabin.Seat.Row1.Pos2.Position 0[set] OK
Digital Auto: Playground
playground.digital.auto provides an in-browser, rapid prototyping environment utilizing the COVESA APIs for connected vehicles.
The UUID for Vehicle.Cabin.Seat.Row1.Pos2.Position is f14a3e9eaaf35012a8be3782b6a53f55
Feedback
Do you think this Vehicle Signal specification needs enhancement? Do you want to discuss with experts? Try the following ressources to get in touch with the VSS community:
The following is a list of VSS supported built-in datatypes:
Name
Type
Min
Max
uint8
unsigned 8-bit integer
0
255
int8
signed 8-bit integer
-128
127
uint16
unsigned 16-bit integer
0
65535
int16
signed 16-bit integer
-32768
32767
uint32
unsigned 32-bit integer
0
4294967295
int32
signed 32-bit integer
-2147483648
2147483647
uint64
unsigned 64-bit integer
0
2^64 - 1
int64
signed 64-bit integer
-2^63
2^63 - 1
boolean
boolean value
0/false
1/true
float
floating point number
-3.4e -38
3.4e 38
double
double precision floating point number
-1.7e -300
1.7e 300
string
character string
n/a
n/a
Min, max and default values defined in a Vehicle Signal Specification must be in the supported range of the data type.
5.1.8.7.2.2.13 - Tilt
Full qualified VSS Path:
Vehicle.Cabin.Seat.Row1.Pos2.Tilt
Description:
Tilting of seat (seating and backrest) relative to vehicle x-axis. 0 = seat bottom is flat, seat bottom and vehicle x-axis are parallel. Positive degrees = seat tilted backwards, seat x-axis tilted upward, seat z-axis is tilted backward.
Comment:
In VSS it is assumed that tilting a seat affects both seating (seat bottom) and backrest, i.e. the angle between seating and backrest will not be affected when changing Tilt.
Navigation
flowchart LR
Vehicle-->Cabin
Cabin-->Seat
Seat-->Row1
Row1-->Pos2
Pos2-->Tilt
$ databroker-cli
sdv.databroker.v1 > connect
[connect] OK
sdv.databroker.v1 > get Vehicle.Cabin.Seat.Row1.Pos2.Tilt
[get] OK
Vehicle.Cabin.Seat.Row1.Pos2.Tilt: ( NotAvailable )sdv.databroker.v1 > set Vehicle.Cabin.Seat.Row1.Pos2.Tilt 0[set] OK
Digital Auto: Playground
playground.digital.auto provides an in-browser, rapid prototyping environment utilizing the COVESA APIs for connected vehicles.
The UUID for Vehicle.Cabin.Seat.Row1.Pos2.Tilt is 6156f12b768e56929c7d325c4bbe1d78
Feedback
Do you think this Vehicle Signal specification needs enhancement? Do you want to discuss with experts? Try the following ressources to get in touch with the VSS community:
Vehicle.Cabin.Seat.Row1.Pos1.Height (Seat position on vehicle z-axis. Position is relative within available movable range of the seating. 0 = Lowermost position supported.)
Vehicle.Cabin.Seat.Row1.Pos1.Position (Seat position on vehicle x-axis. Position is relative to the frontmost position supported by the seat. 0 = Frontmost position supported.)
Vehicle.Cabin.Seat.Row1.Pos1.Tilt (Tilting of seat (seating and backrest) relative to vehicle x-axis. 0 = seat bottom is flat, seat bottom and vehicle x-axis are parallel. Positive degrees = seat tilted backwards, seat x-axis tilted upward, seat z-axis is tilted backward.)
Feedback
Do you think this Vehicle Signal specification needs enhancement? Do you want to discuss with experts? Try the following ressources to get in touch with the VSS community:
Do you think this Vehicle Signal specification needs enhancement? Do you want to discuss with experts? Try the following ressources to get in touch with the VSS community:
$ databroker-cli
sdv.databroker.v1 > connect
[connect] OK
sdv.databroker.v1 > get Vehicle.Cabin.Seat.Row1.Pos1.Airbag.IsDeployed
[get] OK
Vehicle.Cabin.Seat.Row1.Pos1.Airbag.IsDeployed: ( NotAvailable )sdv.databroker.v1 > set Vehicle.Cabin.Seat.Row1.Pos1.Airbag.IsDeployed false[set] OK
Digital Auto: Playground
playground.digital.auto provides an in-browser, rapid prototyping environment utilizing the COVESA APIs for connected vehicles.
The UUID for Vehicle.Cabin.Seat.Row1.Pos1.Airbag.IsDeployed is 49cc2754a4385ef8bdd8ba4e81ae91f6
Feedback
Do you think this Vehicle Signal specification needs enhancement? Do you want to discuss with experts? Try the following ressources to get in touch with the VSS community:
Do you think this Vehicle Signal specification needs enhancement? Do you want to discuss with experts? Try the following ressources to get in touch with the VSS community:
Do you think this Vehicle Signal specification needs enhancement? Do you want to discuss with experts? Try the following ressources to get in touch with the VSS community:
$ databroker-cli
sdv.databroker.v1 > connect
[connect] OK
sdv.databroker.v1 > get Vehicle.Cabin.Seat.Row1.Pos1.Backrest.Lumbar.Height
[get] OK
Vehicle.Cabin.Seat.Row1.Pos1.Backrest.Lumbar.Height: ( NotAvailable )sdv.databroker.v1 > set Vehicle.Cabin.Seat.Row1.Pos1.Backrest.Lumbar.Height 0[set] OK
Digital Auto: Playground
playground.digital.auto provides an in-browser, rapid prototyping environment utilizing the COVESA APIs for connected vehicles.
The UUID for Vehicle.Cabin.Seat.Row1.Pos1.Backrest.Lumbar.Height is 2093f65ca1085a8fab20837e00218461
Feedback
Do you think this Vehicle Signal specification needs enhancement? Do you want to discuss with experts? Try the following ressources to get in touch with the VSS community:
$ databroker-cli
sdv.databroker.v1 > connect
[connect] OK
sdv.databroker.v1 > get Vehicle.Cabin.Seat.Row1.Pos1.Backrest.Lumbar.Support
[get] OK
Vehicle.Cabin.Seat.Row1.Pos1.Backrest.Lumbar.Support: ( NotAvailable )sdv.databroker.v1 > set Vehicle.Cabin.Seat.Row1.Pos1.Backrest.Lumbar.Support 0[set] OK
Digital Auto: Playground
playground.digital.auto provides an in-browser, rapid prototyping environment utilizing the COVESA APIs for connected vehicles.
The UUID for Vehicle.Cabin.Seat.Row1.Pos1.Backrest.Lumbar.Support is c072a2f72b9554b2b45d81a352bc48ad
Feedback
Do you think this Vehicle Signal specification needs enhancement? Do you want to discuss with experts? Try the following ressources to get in touch with the VSS community:
The following is a list of VSS supported built-in datatypes:
Name
Type
Min
Max
uint8
unsigned 8-bit integer
0
255
int8
signed 8-bit integer
-128
127
uint16
unsigned 16-bit integer
0
65535
int16
signed 16-bit integer
-32768
32767
uint32
unsigned 32-bit integer
0
4294967295
int32
signed 32-bit integer
-2147483648
2147483647
uint64
unsigned 64-bit integer
0
2^64 - 1
int64
signed 64-bit integer
-2^63
2^63 - 1
boolean
boolean value
0/false
1/true
float
floating point number
-3.4e -38
3.4e 38
double
double precision floating point number
-1.7e -300
1.7e 300
string
character string
n/a
n/a
Min, max and default values defined in a Vehicle Signal Specification must be in the supported range of the data type.
5.1.8.7.2.3.2.2 - Recline
Full qualified VSS Path:
Vehicle.Cabin.Seat.Row1.Pos1.Backrest.Recline
Description:
Backrest recline compared to seat z-axis (seat vertical axis). 0 degrees = Upright/Vertical backrest. Negative degrees for forward recline. Positive degrees for backward recline.
Comment:
Seat z-axis depends on seat tilt. This means that movement of backrest due to seat tilting will not affect Backrest.Recline as long as the angle between Seating and Backrest are constant. Absolute recline relative to vehicle z-axis can be calculated as Tilt + Backrest.Recline.
Navigation
flowchart LR
Vehicle-->Cabin
Cabin-->Seat
Seat-->Row1
Row1-->Pos1
Pos1-->Backrest
Backrest-->Recline
$ databroker-cli
sdv.databroker.v1 > connect
[connect] OK
sdv.databroker.v1 > get Vehicle.Cabin.Seat.Row1.Pos1.Backrest.Recline
[get] OK
Vehicle.Cabin.Seat.Row1.Pos1.Backrest.Recline: ( NotAvailable )sdv.databroker.v1 > set Vehicle.Cabin.Seat.Row1.Pos1.Backrest.Recline 0[set] OK
Digital Auto: Playground
playground.digital.auto provides an in-browser, rapid prototyping environment utilizing the COVESA APIs for connected vehicles.
The UUID for Vehicle.Cabin.Seat.Row1.Pos1.Backrest.Recline is b1d538f0eb1658639e64f024e1a42831
Feedback
Do you think this Vehicle Signal specification needs enhancement? Do you want to discuss with experts? Try the following ressources to get in touch with the VSS community:
Do you think this Vehicle Signal specification needs enhancement? Do you want to discuss with experts? Try the following ressources to get in touch with the VSS community:
$ databroker-cli
sdv.databroker.v1 > connect
[connect] OK
sdv.databroker.v1 > get Vehicle.Cabin.Seat.Row1.Pos1.Backrest.SideBolster.Support
[get] OK
Vehicle.Cabin.Seat.Row1.Pos1.Backrest.SideBolster.Support: ( NotAvailable )sdv.databroker.v1 > set Vehicle.Cabin.Seat.Row1.Pos1.Backrest.SideBolster.Support 0[set] OK
Digital Auto: Playground
playground.digital.auto provides an in-browser, rapid prototyping environment utilizing the COVESA APIs for connected vehicles.
The UUID for Vehicle.Cabin.Seat.Row1.Pos1.Backrest.SideBolster.Support is b9a59ddb83995d6381d38ebdd19fb4b9
Feedback
Do you think this Vehicle Signal specification needs enhancement? Do you want to discuss with experts? Try the following ressources to get in touch with the VSS community:
Do you think this Vehicle Signal specification needs enhancement? Do you want to discuss with experts? Try the following ressources to get in touch with the VSS community:
$ databroker-cli
sdv.databroker.v1 > connect
[connect] OK
sdv.databroker.v1 > get Vehicle.Cabin.Seat.Row1.Pos1.Headrest.Angle
[get] OK
Vehicle.Cabin.Seat.Row1.Pos1.Headrest.Angle: ( NotAvailable )sdv.databroker.v1 > set Vehicle.Cabin.Seat.Row1.Pos1.Headrest.Angle 0[set] OK
Digital Auto: Playground
playground.digital.auto provides an in-browser, rapid prototyping environment utilizing the COVESA APIs for connected vehicles.
The UUID for Vehicle.Cabin.Seat.Row1.Pos1.Headrest.Angle is a438c09436955cdd859b08848642464e
Feedback
Do you think this Vehicle Signal specification needs enhancement? Do you want to discuss with experts? Try the following ressources to get in touch with the VSS community:
$ databroker-cli
sdv.databroker.v1 > connect
[connect] OK
sdv.databroker.v1 > get Vehicle.Cabin.Seat.Row1.Pos1.Headrest.Height
[get] OK
Vehicle.Cabin.Seat.Row1.Pos1.Headrest.Height: ( NotAvailable )sdv.databroker.v1 > set Vehicle.Cabin.Seat.Row1.Pos1.Headrest.Height 0[set] OK
Digital Auto: Playground
playground.digital.auto provides an in-browser, rapid prototyping environment utilizing the COVESA APIs for connected vehicles.
The UUID for Vehicle.Cabin.Seat.Row1.Pos1.Headrest.Height is 04fbc8b58fb1507ca46e133f502212a8
Feedback
Do you think this Vehicle Signal specification needs enhancement? Do you want to discuss with experts? Try the following ressources to get in touch with the VSS community:
$ databroker-cli
sdv.databroker.v1 > connect
[connect] OK
sdv.databroker.v1 > get Vehicle.Cabin.Seat.Row1.Pos1.Heating
[get] OK
Vehicle.Cabin.Seat.Row1.Pos1.Heating: ( NotAvailable )sdv.databroker.v1 > set Vehicle.Cabin.Seat.Row1.Pos1.Heating 0[set] OK
Digital Auto: Playground
playground.digital.auto provides an in-browser, rapid prototyping environment utilizing the COVESA APIs for connected vehicles.
The UUID for Vehicle.Cabin.Seat.Row1.Pos1.Heating is 6055f646e52c58959fe7c89e7e5e77df
Feedback
Do you think this Vehicle Signal specification needs enhancement? Do you want to discuss with experts? Try the following ressources to get in touch with the VSS community:
$ databroker-cli
sdv.databroker.v1 > connect
[connect] OK
sdv.databroker.v1 > get Vehicle.Cabin.Seat.Row1.Pos1.Height
[get] OK
Vehicle.Cabin.Seat.Row1.Pos1.Height: ( NotAvailable )sdv.databroker.v1 > set Vehicle.Cabin.Seat.Row1.Pos1.Height 0[set] OK
Digital Auto: Playground
playground.digital.auto provides an in-browser, rapid prototyping environment utilizing the COVESA APIs for connected vehicles.
The UUID for Vehicle.Cabin.Seat.Row1.Pos1.Height is a28e02777f0652c09282c639b2ab0a63
Feedback
Do you think this Vehicle Signal specification needs enhancement? Do you want to discuss with experts? Try the following ressources to get in touch with the VSS community:
$ databroker-cli
sdv.databroker.v1 > connect
[connect] OK
sdv.databroker.v1 > get Vehicle.Cabin.Seat.Row1.Pos1.IsBelted
[get] OK
Vehicle.Cabin.Seat.Row1.Pos1.IsBelted: ( NotAvailable )sdv.databroker.v1 > set Vehicle.Cabin.Seat.Row1.Pos1.IsBelted false[set] OK
Digital Auto: Playground
playground.digital.auto provides an in-browser, rapid prototyping environment utilizing the COVESA APIs for connected vehicles.
The UUID for Vehicle.Cabin.Seat.Row1.Pos1.IsBelted is 6bd16a2258d152919db77e9592ac837a
Feedback
Do you think this Vehicle Signal specification needs enhancement? Do you want to discuss with experts? Try the following ressources to get in touch with the VSS community:
$ databroker-cli
sdv.databroker.v1 > connect
[connect] OK
sdv.databroker.v1 > get Vehicle.Cabin.Seat.Row1.Pos1.Massage
[get] OK
Vehicle.Cabin.Seat.Row1.Pos1.Massage: ( NotAvailable )sdv.databroker.v1 > set Vehicle.Cabin.Seat.Row1.Pos1.Massage 0[set] OK
Digital Auto: Playground
playground.digital.auto provides an in-browser, rapid prototyping environment utilizing the COVESA APIs for connected vehicles.
The UUID for Vehicle.Cabin.Seat.Row1.Pos1.Massage is 0e668142a0855c31845050e3535ff1b3
Feedback
Do you think this Vehicle Signal specification needs enhancement? Do you want to discuss with experts? Try the following ressources to get in touch with the VSS community:
$ databroker-cli
sdv.databroker.v1 > connect
[connect] OK
sdv.databroker.v1 > get Vehicle.Cabin.Seat.Row1.Pos1.Position
[get] OK
Vehicle.Cabin.Seat.Row1.Pos1.Position: ( NotAvailable )sdv.databroker.v1 > set Vehicle.Cabin.Seat.Row1.Pos1.Position 0[set] OK
Digital Auto: Playground
playground.digital.auto provides an in-browser, rapid prototyping environment utilizing the COVESA APIs for connected vehicles.
The UUID for Vehicle.Cabin.Seat.Row1.Pos1.Position is 78283eb5efee58f8bce8b5fa3760df54
Feedback
Do you think this Vehicle Signal specification needs enhancement? Do you want to discuss with experts? Try the following ressources to get in touch with the VSS community:
The following is a list of VSS supported built-in datatypes:
Name
Type
Min
Max
uint8
unsigned 8-bit integer
0
255
int8
signed 8-bit integer
-128
127
uint16
unsigned 16-bit integer
0
65535
int16
signed 16-bit integer
-32768
32767
uint32
unsigned 32-bit integer
0
4294967295
int32
signed 32-bit integer
-2147483648
2147483647
uint64
unsigned 64-bit integer
0
2^64 - 1
int64
signed 64-bit integer
-2^63
2^63 - 1
boolean
boolean value
0/false
1/true
float
floating point number
-3.4e -38
3.4e 38
double
double precision floating point number
-1.7e -300
1.7e 300
string
character string
n/a
n/a
Min, max and default values defined in a Vehicle Signal Specification must be in the supported range of the data type.
5.1.8.7.2.3.9 - Seating
Full qualified VSS Path:
Vehicle.Cabin.Seat.Row1.Pos1.Seating
Description:
Describes signals related to the seat bottom of the seat.
Comment:
Seating is here considered as the part of the seat that supports the thighs. Additional cushions (if any) for support of lower legs is not covered by this branch.
Navigation
flowchart LR
Vehicle-->Cabin
Cabin-->Seat
Seat-->Row1
Row1-->Pos1
Pos1-->Seating
Digital Auto: Playground
playground.digital.auto provides an in-browser, rapid prototyping environment utilizing the COVESA APIs for connected vehicles.
Do you think this Vehicle Signal specification needs enhancement? Do you want to discuss with experts? Try the following ressources to get in touch with the VSS community:
$ databroker-cli
sdv.databroker.v1 > connect
[connect] OK
sdv.databroker.v1 > get Vehicle.Cabin.Seat.Row1.Pos1.Seating.Length
[get] OK
Vehicle.Cabin.Seat.Row1.Pos1.Seating.Length: ( NotAvailable )sdv.databroker.v1 > set Vehicle.Cabin.Seat.Row1.Pos1.Seating.Length 0[set] OK
Digital Auto: Playground
playground.digital.auto provides an in-browser, rapid prototyping environment utilizing the COVESA APIs for connected vehicles.
The UUID for Vehicle.Cabin.Seat.Row1.Pos1.Seating.Length is 365425c0104757ae9d14c29c0cc61f78
Feedback
Do you think this Vehicle Signal specification needs enhancement? Do you want to discuss with experts? Try the following ressources to get in touch with the VSS community:
Do you think this Vehicle Signal specification needs enhancement? Do you want to discuss with experts? Try the following ressources to get in touch with the VSS community:
Do you think this Vehicle Signal specification needs enhancement? Do you want to discuss with experts? Try the following ressources to get in touch with the VSS community:
$ databroker-cli
sdv.databroker.v1 > connect
[connect] OK
sdv.databroker.v1 > get Vehicle.Cabin.Seat.Row1.Pos1.Switch.Headrest.IsBackwardEngaged
[get] OK
Vehicle.Cabin.Seat.Row1.Pos1.Switch.Headrest.IsBackwardEngaged: ( NotAvailable )sdv.databroker.v1 > set Vehicle.Cabin.Seat.Row1.Pos1.Switch.Headrest.IsBackwardEngaged false[set] OK
Digital Auto: Playground
playground.digital.auto provides an in-browser, rapid prototyping environment utilizing the COVESA APIs for connected vehicles.
The UUID for Vehicle.Cabin.Seat.Row1.Pos1.Switch.Headrest.IsBackwardEngaged is 6ec4a46af3db57cc9d4c45923996923c
Feedback
Do you think this Vehicle Signal specification needs enhancement? Do you want to discuss with experts? Try the following ressources to get in touch with the VSS community:
$ databroker-cli
sdv.databroker.v1 > connect
[connect] OK
sdv.databroker.v1 > get Vehicle.Cabin.Seat.Row1.Pos1.Switch.Headrest.IsDownEngaged
[get] OK
Vehicle.Cabin.Seat.Row1.Pos1.Switch.Headrest.IsDownEngaged: ( NotAvailable )sdv.databroker.v1 > set Vehicle.Cabin.Seat.Row1.Pos1.Switch.Headrest.IsDownEngaged false[set] OK
Digital Auto: Playground
playground.digital.auto provides an in-browser, rapid prototyping environment utilizing the COVESA APIs for connected vehicles.
The UUID for Vehicle.Cabin.Seat.Row1.Pos1.Switch.Headrest.IsDownEngaged is 0d844cc3591453b48177a3ed45880e21
Feedback
Do you think this Vehicle Signal specification needs enhancement? Do you want to discuss with experts? Try the following ressources to get in touch with the VSS community:
$ databroker-cli
sdv.databroker.v1 > connect
[connect] OK
sdv.databroker.v1 > get Vehicle.Cabin.Seat.Row1.Pos1.Switch.Headrest.IsForwardEngaged
[get] OK
Vehicle.Cabin.Seat.Row1.Pos1.Switch.Headrest.IsForwardEngaged: ( NotAvailable )sdv.databroker.v1 > set Vehicle.Cabin.Seat.Row1.Pos1.Switch.Headrest.IsForwardEngaged false[set] OK
Digital Auto: Playground
playground.digital.auto provides an in-browser, rapid prototyping environment utilizing the COVESA APIs for connected vehicles.
The UUID for Vehicle.Cabin.Seat.Row1.Pos1.Switch.Headrest.IsForwardEngaged is ca96e4f18b1753faab74e2d4c452d8df
Feedback
Do you think this Vehicle Signal specification needs enhancement? Do you want to discuss with experts? Try the following ressources to get in touch with the VSS community:
$ databroker-cli
sdv.databroker.v1 > connect
[connect] OK
sdv.databroker.v1 > get Vehicle.Cabin.Seat.Row1.Pos1.Switch.Headrest.IsUpEngaged
[get] OK
Vehicle.Cabin.Seat.Row1.Pos1.Switch.Headrest.IsUpEngaged: ( NotAvailable )sdv.databroker.v1 > set Vehicle.Cabin.Seat.Row1.Pos1.Switch.Headrest.IsUpEngaged false[set] OK
Digital Auto: Playground
playground.digital.auto provides an in-browser, rapid prototyping environment utilizing the COVESA APIs for connected vehicles.
The UUID for Vehicle.Cabin.Seat.Row1.Pos1.Switch.Headrest.IsUpEngaged is a603834c5eae54a78222d20515bd64df
Feedback
Do you think this Vehicle Signal specification needs enhancement? Do you want to discuss with experts? Try the following ressources to get in touch with the VSS community:
Do you think this Vehicle Signal specification needs enhancement? Do you want to discuss with experts? Try the following ressources to get in touch with the VSS community:
$ databroker-cli
sdv.databroker.v1 > connect
[connect] OK
sdv.databroker.v1 > get Vehicle.Cabin.Seat.Row1.Pos1.Switch.Massage.IsDecreaseEngaged
[get] OK
Vehicle.Cabin.Seat.Row1.Pos1.Switch.Massage.IsDecreaseEngaged: ( NotAvailable )sdv.databroker.v1 > set Vehicle.Cabin.Seat.Row1.Pos1.Switch.Massage.IsDecreaseEngaged false[set] OK
Digital Auto: Playground
playground.digital.auto provides an in-browser, rapid prototyping environment utilizing the COVESA APIs for connected vehicles.
The UUID for Vehicle.Cabin.Seat.Row1.Pos1.Switch.Massage.IsDecreaseEngaged is c6209e1fd41e5efbbe3b70910068533b
Feedback
Do you think this Vehicle Signal specification needs enhancement? Do you want to discuss with experts? Try the following ressources to get in touch with the VSS community:
$ databroker-cli
sdv.databroker.v1 > connect
[connect] OK
sdv.databroker.v1 > get Vehicle.Cabin.Seat.Row1.Pos1.Switch.Massage.IsIncreaseEngaged
[get] OK
Vehicle.Cabin.Seat.Row1.Pos1.Switch.Massage.IsIncreaseEngaged: ( NotAvailable )sdv.databroker.v1 > set Vehicle.Cabin.Seat.Row1.Pos1.Switch.Massage.IsIncreaseEngaged false[set] OK
Digital Auto: Playground
playground.digital.auto provides an in-browser, rapid prototyping environment utilizing the COVESA APIs for connected vehicles.
The UUID for Vehicle.Cabin.Seat.Row1.Pos1.Switch.Massage.IsIncreaseEngaged is 3500d7caafe458e19dac56fcff1ada61
Feedback
Do you think this Vehicle Signal specification needs enhancement? Do you want to discuss with experts? Try the following ressources to get in touch with the VSS community:
Do you think this Vehicle Signal specification needs enhancement? Do you want to discuss with experts? Try the following ressources to get in touch with the VSS community:
$ databroker-cli
sdv.databroker.v1 > connect
[connect] OK
sdv.databroker.v1 > get Vehicle.Cabin.Seat.Row1.Pos1.Switch.Seating.IsBackwardEngaged
[get] OK
Vehicle.Cabin.Seat.Row1.Pos1.Switch.Seating.IsBackwardEngaged: ( NotAvailable )sdv.databroker.v1 > set Vehicle.Cabin.Seat.Row1.Pos1.Switch.Seating.IsBackwardEngaged false[set] OK
Digital Auto: Playground
playground.digital.auto provides an in-browser, rapid prototyping environment utilizing the COVESA APIs for connected vehicles.
The UUID for Vehicle.Cabin.Seat.Row1.Pos1.Switch.Seating.IsBackwardEngaged is b623d9fd81d658c7a4872550065a26f0
Feedback
Do you think this Vehicle Signal specification needs enhancement? Do you want to discuss with experts? Try the following ressources to get in touch with the VSS community:
$ databroker-cli
sdv.databroker.v1 > connect
[connect] OK
sdv.databroker.v1 > get Vehicle.Cabin.Seat.Row1.Pos1.Switch.Seating.IsForwardEngaged
[get] OK
Vehicle.Cabin.Seat.Row1.Pos1.Switch.Seating.IsForwardEngaged: ( NotAvailable )sdv.databroker.v1 > set Vehicle.Cabin.Seat.Row1.Pos1.Switch.Seating.IsForwardEngaged false[set] OK
Digital Auto: Playground
playground.digital.auto provides an in-browser, rapid prototyping environment utilizing the COVESA APIs for connected vehicles.
The UUID for Vehicle.Cabin.Seat.Row1.Pos1.Switch.Seating.IsForwardEngaged is 8ef4c44f8e42567f89c1ff54dd337e91
Feedback
Do you think this Vehicle Signal specification needs enhancement? Do you want to discuss with experts? Try the following ressources to get in touch with the VSS community:
Do you think this Vehicle Signal specification needs enhancement? Do you want to discuss with experts? Try the following ressources to get in touch with the VSS community:
Do you think this Vehicle Signal specification needs enhancement? Do you want to discuss with experts? Try the following ressources to get in touch with the VSS community:
$ databroker-cli
sdv.databroker.v1 > connect
[connect] OK
sdv.databroker.v1 > get Vehicle.Cabin.Seat.Row1.Pos1.Switch.Backrest.SideBolster.IsLessSupportEngaged
[get] OK
Vehicle.Cabin.Seat.Row1.Pos1.Switch.Backrest.SideBolster.IsLessSupportEngaged: ( NotAvailable )sdv.databroker.v1 > set Vehicle.Cabin.Seat.Row1.Pos1.Switch.Backrest.SideBolster.IsLessSupportEngaged false[set] OK
Digital Auto: Playground
playground.digital.auto provides an in-browser, rapid prototyping environment utilizing the COVESA APIs for connected vehicles.
The UUID for Vehicle.Cabin.Seat.Row1.Pos1.Switch.Backrest.SideBolster.IsLessSupportEngaged is cc76940524925bf3883918b8ee30d702
Feedback
Do you think this Vehicle Signal specification needs enhancement? Do you want to discuss with experts? Try the following ressources to get in touch with the VSS community:
$ databroker-cli
sdv.databroker.v1 > connect
[connect] OK
sdv.databroker.v1 > get Vehicle.Cabin.Seat.Row1.Pos1.Switch.Backrest.SideBolster.IsMoreSupportEngaged
[get] OK
Vehicle.Cabin.Seat.Row1.Pos1.Switch.Backrest.SideBolster.IsMoreSupportEngaged: ( NotAvailable )sdv.databroker.v1 > set Vehicle.Cabin.Seat.Row1.Pos1.Switch.Backrest.SideBolster.IsMoreSupportEngaged false[set] OK
Digital Auto: Playground
playground.digital.auto provides an in-browser, rapid prototyping environment utilizing the COVESA APIs for connected vehicles.
The UUID for Vehicle.Cabin.Seat.Row1.Pos1.Switch.Backrest.SideBolster.IsMoreSupportEngaged is 515bd1ca932a5747b8f8523aa5e26466
Feedback
Do you think this Vehicle Signal specification needs enhancement? Do you want to discuss with experts? Try the following ressources to get in touch with the VSS community:
$ databroker-cli
sdv.databroker.v1 > connect
[connect] OK
sdv.databroker.v1 > get Vehicle.Cabin.Seat.Row1.Pos1.Switch.Backrest.IsReclineBackwardEngaged
[get] OK
Vehicle.Cabin.Seat.Row1.Pos1.Switch.Backrest.IsReclineBackwardEngaged: ( NotAvailable )sdv.databroker.v1 > set Vehicle.Cabin.Seat.Row1.Pos1.Switch.Backrest.IsReclineBackwardEngaged false[set] OK
Digital Auto: Playground
playground.digital.auto provides an in-browser, rapid prototyping environment utilizing the COVESA APIs for connected vehicles.
The UUID for Vehicle.Cabin.Seat.Row1.Pos1.Switch.Backrest.IsReclineBackwardEngaged is d21af34f33955fdf8a35b2909f1db5ae
Feedback
Do you think this Vehicle Signal specification needs enhancement? Do you want to discuss with experts? Try the following ressources to get in touch with the VSS community:
$ databroker-cli
sdv.databroker.v1 > connect
[connect] OK
sdv.databroker.v1 > get Vehicle.Cabin.Seat.Row1.Pos1.Switch.Backrest.IsReclineForwardEngaged
[get] OK
Vehicle.Cabin.Seat.Row1.Pos1.Switch.Backrest.IsReclineForwardEngaged: ( NotAvailable )sdv.databroker.v1 > set Vehicle.Cabin.Seat.Row1.Pos1.Switch.Backrest.IsReclineForwardEngaged false[set] OK
Digital Auto: Playground
playground.digital.auto provides an in-browser, rapid prototyping environment utilizing the COVESA APIs for connected vehicles.
The UUID for Vehicle.Cabin.Seat.Row1.Pos1.Switch.Backrest.IsReclineForwardEngaged is fd1e56d716d2594b84e1c46b00ab47a5
Feedback
Do you think this Vehicle Signal specification needs enhancement? Do you want to discuss with experts? Try the following ressources to get in touch with the VSS community:
Do you think this Vehicle Signal specification needs enhancement? Do you want to discuss with experts? Try the following ressources to get in touch with the VSS community:
$ databroker-cli
sdv.databroker.v1 > connect
[connect] OK
sdv.databroker.v1 > get Vehicle.Cabin.Seat.Row1.Pos1.Switch.Backrest.Lumbar.IsDownEngaged
[get] OK
Vehicle.Cabin.Seat.Row1.Pos1.Switch.Backrest.Lumbar.IsDownEngaged: ( NotAvailable )sdv.databroker.v1 > set Vehicle.Cabin.Seat.Row1.Pos1.Switch.Backrest.Lumbar.IsDownEngaged false[set] OK
Digital Auto: Playground
playground.digital.auto provides an in-browser, rapid prototyping environment utilizing the COVESA APIs for connected vehicles.
The UUID for Vehicle.Cabin.Seat.Row1.Pos1.Switch.Backrest.Lumbar.IsDownEngaged is 01644b70287d5d1ba9a2f0c9770dadb8
Feedback
Do you think this Vehicle Signal specification needs enhancement? Do you want to discuss with experts? Try the following ressources to get in touch with the VSS community:
$ databroker-cli
sdv.databroker.v1 > connect
[connect] OK
sdv.databroker.v1 > get Vehicle.Cabin.Seat.Row1.Pos1.Switch.Backrest.Lumbar.IsLessSupportEngaged
[get] OK
Vehicle.Cabin.Seat.Row1.Pos1.Switch.Backrest.Lumbar.IsLessSupportEngaged: ( NotAvailable )sdv.databroker.v1 > set Vehicle.Cabin.Seat.Row1.Pos1.Switch.Backrest.Lumbar.IsLessSupportEngaged false[set] OK
Digital Auto: Playground
playground.digital.auto provides an in-browser, rapid prototyping environment utilizing the COVESA APIs for connected vehicles.
The UUID for Vehicle.Cabin.Seat.Row1.Pos1.Switch.Backrest.Lumbar.IsLessSupportEngaged is 757b1f58b4c558429b1d3f11f1a89e6f
Feedback
Do you think this Vehicle Signal specification needs enhancement? Do you want to discuss with experts? Try the following ressources to get in touch with the VSS community:
$ databroker-cli
sdv.databroker.v1 > connect
[connect] OK
sdv.databroker.v1 > get Vehicle.Cabin.Seat.Row1.Pos1.Switch.Backrest.Lumbar.IsMoreSupportEngaged
[get] OK
Vehicle.Cabin.Seat.Row1.Pos1.Switch.Backrest.Lumbar.IsMoreSupportEngaged: ( NotAvailable )sdv.databroker.v1 > set Vehicle.Cabin.Seat.Row1.Pos1.Switch.Backrest.Lumbar.IsMoreSupportEngaged false[set] OK
Digital Auto: Playground
playground.digital.auto provides an in-browser, rapid prototyping environment utilizing the COVESA APIs for connected vehicles.
The UUID for Vehicle.Cabin.Seat.Row1.Pos1.Switch.Backrest.Lumbar.IsMoreSupportEngaged is 3542721cf4cc5d8c86e9f8e4a3f36736
Feedback
Do you think this Vehicle Signal specification needs enhancement? Do you want to discuss with experts? Try the following ressources to get in touch with the VSS community:
$ databroker-cli
sdv.databroker.v1 > connect
[connect] OK
sdv.databroker.v1 > get Vehicle.Cabin.Seat.Row1.Pos1.Switch.Backrest.Lumbar.IsUpEngaged
[get] OK
Vehicle.Cabin.Seat.Row1.Pos1.Switch.Backrest.Lumbar.IsUpEngaged: ( NotAvailable )sdv.databroker.v1 > set Vehicle.Cabin.Seat.Row1.Pos1.Switch.Backrest.Lumbar.IsUpEngaged false[set] OK
Digital Auto: Playground
playground.digital.auto provides an in-browser, rapid prototyping environment utilizing the COVESA APIs for connected vehicles.
The UUID for Vehicle.Cabin.Seat.Row1.Pos1.Switch.Backrest.Lumbar.IsUpEngaged is ceceff9c973453d3bec25db6a56be86c
Feedback
Do you think this Vehicle Signal specification needs enhancement? Do you want to discuss with experts? Try the following ressources to get in touch with the VSS community:
$ databroker-cli
sdv.databroker.v1 > connect
[connect] OK
sdv.databroker.v1 > get Vehicle.Cabin.Seat.Row1.Pos1.Switch.IsBackwardEngaged
[get] OK
Vehicle.Cabin.Seat.Row1.Pos1.Switch.IsBackwardEngaged: ( NotAvailable )sdv.databroker.v1 > set Vehicle.Cabin.Seat.Row1.Pos1.Switch.IsBackwardEngaged false[set] OK
Digital Auto: Playground
playground.digital.auto provides an in-browser, rapid prototyping environment utilizing the COVESA APIs for connected vehicles.
The UUID for Vehicle.Cabin.Seat.Row1.Pos1.Switch.IsBackwardEngaged is 6a28f8e404f05a5b9339b3a40b8c0275
Feedback
Do you think this Vehicle Signal specification needs enhancement? Do you want to discuss with experts? Try the following ressources to get in touch with the VSS community:
$ databroker-cli
sdv.databroker.v1 > connect
[connect] OK
sdv.databroker.v1 > get Vehicle.Cabin.Seat.Row1.Pos1.Switch.IsCoolerEngaged
[get] OK
Vehicle.Cabin.Seat.Row1.Pos1.Switch.IsCoolerEngaged: ( NotAvailable )sdv.databroker.v1 > set Vehicle.Cabin.Seat.Row1.Pos1.Switch.IsCoolerEngaged false[set] OK
Digital Auto: Playground
playground.digital.auto provides an in-browser, rapid prototyping environment utilizing the COVESA APIs for connected vehicles.
The UUID for Vehicle.Cabin.Seat.Row1.Pos1.Switch.IsCoolerEngaged is abab10f2fc1753fc9276f4571d24b3ac
Feedback
Do you think this Vehicle Signal specification needs enhancement? Do you want to discuss with experts? Try the following ressources to get in touch with the VSS community:
$ databroker-cli
sdv.databroker.v1 > connect
[connect] OK
sdv.databroker.v1 > get Vehicle.Cabin.Seat.Row1.Pos1.Switch.IsDownEngaged
[get] OK
Vehicle.Cabin.Seat.Row1.Pos1.Switch.IsDownEngaged: ( NotAvailable )sdv.databroker.v1 > set Vehicle.Cabin.Seat.Row1.Pos1.Switch.IsDownEngaged false[set] OK
Digital Auto: Playground
playground.digital.auto provides an in-browser, rapid prototyping environment utilizing the COVESA APIs for connected vehicles.
The UUID for Vehicle.Cabin.Seat.Row1.Pos1.Switch.IsDownEngaged is 2f758e9b09dc518693db398d31551eeb
Feedback
Do you think this Vehicle Signal specification needs enhancement? Do you want to discuss with experts? Try the following ressources to get in touch with the VSS community:
$ databroker-cli
sdv.databroker.v1 > connect
[connect] OK
sdv.databroker.v1 > get Vehicle.Cabin.Seat.Row1.Pos1.Switch.IsForwardEngaged
[get] OK
Vehicle.Cabin.Seat.Row1.Pos1.Switch.IsForwardEngaged: ( NotAvailable )sdv.databroker.v1 > set Vehicle.Cabin.Seat.Row1.Pos1.Switch.IsForwardEngaged false[set] OK
Digital Auto: Playground
playground.digital.auto provides an in-browser, rapid prototyping environment utilizing the COVESA APIs for connected vehicles.
The UUID for Vehicle.Cabin.Seat.Row1.Pos1.Switch.IsForwardEngaged is 849766f5f3885f9ba0c4cd817290b6a1
Feedback
Do you think this Vehicle Signal specification needs enhancement? Do you want to discuss with experts? Try the following ressources to get in touch with the VSS community:
$ databroker-cli
sdv.databroker.v1 > connect
[connect] OK
sdv.databroker.v1 > get Vehicle.Cabin.Seat.Row1.Pos1.Switch.IsTiltBackwardEngaged
[get] OK
Vehicle.Cabin.Seat.Row1.Pos1.Switch.IsTiltBackwardEngaged: ( NotAvailable )sdv.databroker.v1 > set Vehicle.Cabin.Seat.Row1.Pos1.Switch.IsTiltBackwardEngaged false[set] OK
Digital Auto: Playground
playground.digital.auto provides an in-browser, rapid prototyping environment utilizing the COVESA APIs for connected vehicles.
The UUID for Vehicle.Cabin.Seat.Row1.Pos1.Switch.IsTiltBackwardEngaged is 810dfaf2b68950e7b695efbfdd80f58a
Feedback
Do you think this Vehicle Signal specification needs enhancement? Do you want to discuss with experts? Try the following ressources to get in touch with the VSS community:
$ databroker-cli
sdv.databroker.v1 > connect
[connect] OK
sdv.databroker.v1 > get Vehicle.Cabin.Seat.Row1.Pos1.Switch.IsTiltForwardEngaged
[get] OK
Vehicle.Cabin.Seat.Row1.Pos1.Switch.IsTiltForwardEngaged: ( NotAvailable )sdv.databroker.v1 > set Vehicle.Cabin.Seat.Row1.Pos1.Switch.IsTiltForwardEngaged false[set] OK
Digital Auto: Playground
playground.digital.auto provides an in-browser, rapid prototyping environment utilizing the COVESA APIs for connected vehicles.
The UUID for Vehicle.Cabin.Seat.Row1.Pos1.Switch.IsTiltForwardEngaged is ee55f014fe5c59c8a3808f64b0c51f9e
Feedback
Do you think this Vehicle Signal specification needs enhancement? Do you want to discuss with experts? Try the following ressources to get in touch with the VSS community:
$ databroker-cli
sdv.databroker.v1 > connect
[connect] OK
sdv.databroker.v1 > get Vehicle.Cabin.Seat.Row1.Pos1.Switch.IsUpEngaged
[get] OK
Vehicle.Cabin.Seat.Row1.Pos1.Switch.IsUpEngaged: ( NotAvailable )sdv.databroker.v1 > set Vehicle.Cabin.Seat.Row1.Pos1.Switch.IsUpEngaged false[set] OK
Digital Auto: Playground
playground.digital.auto provides an in-browser, rapid prototyping environment utilizing the COVESA APIs for connected vehicles.
The UUID for Vehicle.Cabin.Seat.Row1.Pos1.Switch.IsUpEngaged is efb6bf4955d45232b8443c3428ec91c2
Feedback
Do you think this Vehicle Signal specification needs enhancement? Do you want to discuss with experts? Try the following ressources to get in touch with the VSS community:
$ databroker-cli
sdv.databroker.v1 > connect
[connect] OK
sdv.databroker.v1 > get Vehicle.Cabin.Seat.Row1.Pos1.Switch.IsWarmerEngaged
[get] OK
Vehicle.Cabin.Seat.Row1.Pos1.Switch.IsWarmerEngaged: ( NotAvailable )sdv.databroker.v1 > set Vehicle.Cabin.Seat.Row1.Pos1.Switch.IsWarmerEngaged false[set] OK
Digital Auto: Playground
playground.digital.auto provides an in-browser, rapid prototyping environment utilizing the COVESA APIs for connected vehicles.
The UUID for Vehicle.Cabin.Seat.Row1.Pos1.Switch.IsWarmerEngaged is f60421d441985b5bb8f68fabae1e937a
Feedback
Do you think this Vehicle Signal specification needs enhancement? Do you want to discuss with experts? Try the following ressources to get in touch with the VSS community:
The following is a list of VSS supported built-in datatypes:
Name
Type
Min
Max
uint8
unsigned 8-bit integer
0
255
int8
signed 8-bit integer
-128
127
uint16
unsigned 16-bit integer
0
65535
int16
signed 16-bit integer
-32768
32767
uint32
unsigned 32-bit integer
0
4294967295
int32
signed 32-bit integer
-2147483648
2147483647
uint64
unsigned 64-bit integer
0
2^64 - 1
int64
signed 64-bit integer
-2^63
2^63 - 1
boolean
boolean value
0/false
1/true
float
floating point number
-3.4e -38
3.4e 38
double
double precision floating point number
-1.7e -300
1.7e 300
string
character string
n/a
n/a
Min, max and default values defined in a Vehicle Signal Specification must be in the supported range of the data type.
5.1.8.7.2.3.11 - Tilt
Full qualified VSS Path:
Vehicle.Cabin.Seat.Row1.Pos1.Tilt
Description:
Tilting of seat (seating and backrest) relative to vehicle x-axis. 0 = seat bottom is flat, seat bottom and vehicle x-axis are parallel. Positive degrees = seat tilted backwards, seat x-axis tilted upward, seat z-axis is tilted backward.
Comment:
In VSS it is assumed that tilting a seat affects both seating (seat bottom) and backrest, i.e. the angle between seating and backrest will not be affected when changing Tilt.
Navigation
flowchart LR
Vehicle-->Cabin
Cabin-->Seat
Seat-->Row1
Row1-->Pos1
Pos1-->Tilt
$ databroker-cli
sdv.databroker.v1 > connect
[connect] OK
sdv.databroker.v1 > get Vehicle.Cabin.Seat.Row1.Pos1.Tilt
[get] OK
Vehicle.Cabin.Seat.Row1.Pos1.Tilt: ( NotAvailable )sdv.databroker.v1 > set Vehicle.Cabin.Seat.Row1.Pos1.Tilt 0[set] OK
Digital Auto: Playground
playground.digital.auto provides an in-browser, rapid prototyping environment utilizing the COVESA APIs for connected vehicles.
The UUID for Vehicle.Cabin.Seat.Row1.Pos1.Tilt is 20630968a82f53bc89aed9797e0b9c59
Feedback
Do you think this Vehicle Signal specification needs enhancement? Do you want to discuss with experts? Try the following ressources to get in touch with the VSS community:
$ databroker-cli
sdv.databroker.v1 > connect
[connect] OK
sdv.databroker.v1 > get Vehicle.Cabin.Seat.Row1.Pos1.IsOccupied
[get] OK
Vehicle.Cabin.Seat.Row1.Pos1.IsOccupied: ( NotAvailable )sdv.databroker.v1 > set Vehicle.Cabin.Seat.Row1.Pos1.IsOccupied false[set] OK
Digital Auto: Playground
playground.digital.auto provides an in-browser, rapid prototyping environment utilizing the COVESA APIs for connected vehicles.
The UUID for Vehicle.Cabin.Seat.Row1.Pos1.IsOccupied is 4e85e2b0ec45582f90f2a17b3636ccc0
Feedback
Do you think this Vehicle Signal specification needs enhancement? Do you want to discuss with experts? Try the following ressources to get in touch with the VSS community:
Do you think this Vehicle Signal specification needs enhancement? Do you want to discuss with experts? Try the following ressources to get in touch with the VSS community:
Do you think this Vehicle Signal specification needs enhancement? Do you want to discuss with experts? Try the following ressources to get in touch with the VSS community:
$ databroker-cli
sdv.databroker.v1 > connect
[connect] OK
sdv.databroker.v1 > get Vehicle.Cabin.Seat.Row1.Pos1.Occupant.Identifier.Issuer
[get] OK
Vehicle.Cabin.Seat.Row1.Pos1.Occupant.Identifier.Issuer: ( NotAvailable )sdv.databroker.v1 > set Vehicle.Cabin.Seat.Row1.Pos1.Occupant.Identifier.Issuer Foo
[set] OK
Digital Auto: Playground
playground.digital.auto provides an in-browser, rapid prototyping environment utilizing the COVESA APIs for connected vehicles.
The UUID for Vehicle.Cabin.Seat.Row1.Pos1.Occupant.Identifier.Issuer is c631b08751b851ec9b12ade8332ba5e6
Feedback
Do you think this Vehicle Signal specification needs enhancement? Do you want to discuss with experts? Try the following ressources to get in touch with the VSS community:
$ databroker-cli
sdv.databroker.v1 > connect
[connect] OK
sdv.databroker.v1 > get Vehicle.Cabin.Seat.Row1.Pos1.Occupant.Identifier.Subject
[get] OK
Vehicle.Cabin.Seat.Row1.Pos1.Occupant.Identifier.Subject: ( NotAvailable )sdv.databroker.v1 > set Vehicle.Cabin.Seat.Row1.Pos1.Occupant.Identifier.Subject Foo
[set] OK
Digital Auto: Playground
playground.digital.auto provides an in-browser, rapid prototyping environment utilizing the COVESA APIs for connected vehicles.
The UUID for Vehicle.Cabin.Seat.Row1.Pos1.Occupant.Identifier.Subject is 8df99b3fedff5a219eacf254fb299ffb
Feedback
Do you think this Vehicle Signal specification needs enhancement? Do you want to discuss with experts? Try the following ressources to get in touch with the VSS community:
Do you think this Vehicle Signal specification needs enhancement? Do you want to discuss with experts? Try the following ressources to get in touch with the VSS community:
Do you think this Vehicle Signal specification needs enhancement? Do you want to discuss with experts? Try the following ressources to get in touch with the VSS community:
Do you think this Vehicle Signal specification needs enhancement? Do you want to discuss with experts? Try the following ressources to get in touch with the VSS community:
$ databroker-cli
sdv.databroker.v1 > connect
[connect] OK
sdv.databroker.v1 > get Vehicle.Cabin.Door.Row2.Right.IsChildLockActive
[get] OK
Vehicle.Cabin.Door.Row2.Right.IsChildLockActive: ( NotAvailable )sdv.databroker.v1 > set Vehicle.Cabin.Door.Row2.Right.IsChildLockActive false[set] OK
Digital Auto: Playground
playground.digital.auto provides an in-browser, rapid prototyping environment utilizing the COVESA APIs for connected vehicles.
The UUID for Vehicle.Cabin.Door.Row2.Right.IsChildLockActive is c3747fdce0835d9abf8030917f3a6d3c
Feedback
Do you think this Vehicle Signal specification needs enhancement? Do you want to discuss with experts? Try the following ressources to get in touch with the VSS community:
$ databroker-cli
sdv.databroker.v1 > connect
[connect] OK
sdv.databroker.v1 > get Vehicle.Cabin.Door.Row2.Right.IsLocked
[get] OK
Vehicle.Cabin.Door.Row2.Right.IsLocked: ( NotAvailable )sdv.databroker.v1 > set Vehicle.Cabin.Door.Row2.Right.IsLocked false[set] OK
Digital Auto: Playground
playground.digital.auto provides an in-browser, rapid prototyping environment utilizing the COVESA APIs for connected vehicles.
The UUID for Vehicle.Cabin.Door.Row2.Right.IsLocked is 51e82637cc1a5c6994e1928402a29419
Feedback
Do you think this Vehicle Signal specification needs enhancement? Do you want to discuss with experts? Try the following ressources to get in touch with the VSS community:
$ databroker-cli
sdv.databroker.v1 > connect
[connect] OK
sdv.databroker.v1 > get Vehicle.Cabin.Door.Row2.Right.IsOpen
[get] OK
Vehicle.Cabin.Door.Row2.Right.IsOpen: ( NotAvailable )sdv.databroker.v1 > set Vehicle.Cabin.Door.Row2.Right.IsOpen false[set] OK
Digital Auto: Playground
playground.digital.auto provides an in-browser, rapid prototyping environment utilizing the COVESA APIs for connected vehicles.
The UUID for Vehicle.Cabin.Door.Row2.Right.IsOpen is 06f3b61e354f5db7b5b0e7f551fac582
Feedback
Do you think this Vehicle Signal specification needs enhancement? Do you want to discuss with experts? Try the following ressources to get in touch with the VSS community:
Do you think this Vehicle Signal specification needs enhancement? Do you want to discuss with experts? Try the following ressources to get in touch with the VSS community:
$ databroker-cli
sdv.databroker.v1 > connect
[connect] OK
sdv.databroker.v1 > get Vehicle.Cabin.Door.Row2.Right.Shade.Position
[get] OK
Vehicle.Cabin.Door.Row2.Right.Shade.Position: ( NotAvailable )sdv.databroker.v1 > set Vehicle.Cabin.Door.Row2.Right.Shade.Position 0[set] OK
Digital Auto: Playground
playground.digital.auto provides an in-browser, rapid prototyping environment utilizing the COVESA APIs for connected vehicles.
The UUID for Vehicle.Cabin.Door.Row2.Right.Shade.Position is fa705739512a54e9a103ff356be14df7
Feedback
Do you think this Vehicle Signal specification needs enhancement? Do you want to discuss with experts? Try the following ressources to get in touch with the VSS community:
$ databroker-cli
sdv.databroker.v1 > connect
[connect] OK
sdv.databroker.v1 > get Vehicle.Cabin.Door.Row2.Right.Shade.Switch
[get] OK
Vehicle.Cabin.Door.Row2.Right.Shade.Switch: ( NotAvailable )sdv.databroker.v1 > set Vehicle.Cabin.Door.Row2.Right.Shade.Switch Foo
[set] OK
Digital Auto: Playground
playground.digital.auto provides an in-browser, rapid prototyping environment utilizing the COVESA APIs for connected vehicles.
The UUID for Vehicle.Cabin.Door.Row2.Right.Shade.Switch is 5b94a0c4e30a575c93942f0566be8be7
Feedback
Do you think this Vehicle Signal specification needs enhancement? Do you want to discuss with experts? Try the following ressources to get in touch with the VSS community:
Do you think this Vehicle Signal specification needs enhancement? Do you want to discuss with experts? Try the following ressources to get in touch with the VSS community:
$ databroker-cli
sdv.databroker.v1 > connect
[connect] OK
sdv.databroker.v1 > get Vehicle.Cabin.Door.Row2.Right.Window.IsChildLockEngaged
[get] OK
Vehicle.Cabin.Door.Row2.Right.Window.IsChildLockEngaged: ( NotAvailable )sdv.databroker.v1 > set Vehicle.Cabin.Door.Row2.Right.Window.IsChildLockEngaged false[set] OK
Digital Auto: Playground
playground.digital.auto provides an in-browser, rapid prototyping environment utilizing the COVESA APIs for connected vehicles.
The UUID for Vehicle.Cabin.Door.Row2.Right.Window.IsChildLockEngaged is 6f018766950a5b5284ac1e8824fdacb0
Feedback
Do you think this Vehicle Signal specification needs enhancement? Do you want to discuss with experts? Try the following ressources to get in touch with the VSS community:
$ databroker-cli
sdv.databroker.v1 > connect
[connect] OK
sdv.databroker.v1 > get Vehicle.Cabin.Door.Row2.Right.Window.IsOpen
[get] OK
Vehicle.Cabin.Door.Row2.Right.Window.IsOpen: ( NotAvailable )sdv.databroker.v1 > set Vehicle.Cabin.Door.Row2.Right.Window.IsOpen false[set] OK
Digital Auto: Playground
playground.digital.auto provides an in-browser, rapid prototyping environment utilizing the COVESA APIs for connected vehicles.
The UUID for Vehicle.Cabin.Door.Row2.Right.Window.IsOpen is 793b5c94b89f5e11bc71cc8a6de8ec34
Feedback
Do you think this Vehicle Signal specification needs enhancement? Do you want to discuss with experts? Try the following ressources to get in touch with the VSS community:
$ databroker-cli
sdv.databroker.v1 > connect
[connect] OK
sdv.databroker.v1 > get Vehicle.Cabin.Door.Row2.Right.Window.Position
[get] OK
Vehicle.Cabin.Door.Row2.Right.Window.Position: ( NotAvailable )sdv.databroker.v1 > set Vehicle.Cabin.Door.Row2.Right.Window.Position 0[set] OK
Digital Auto: Playground
playground.digital.auto provides an in-browser, rapid prototyping environment utilizing the COVESA APIs for connected vehicles.
The UUID for Vehicle.Cabin.Door.Row2.Right.Window.Position is f6323b78eecc58e5a9bc5d66f2548ce3
Feedback
Do you think this Vehicle Signal specification needs enhancement? Do you want to discuss with experts? Try the following ressources to get in touch with the VSS community:
$ databroker-cli
sdv.databroker.v1 > connect
[connect] OK
sdv.databroker.v1 > get Vehicle.Cabin.Door.Row2.Right.Window.Switch
[get] OK
Vehicle.Cabin.Door.Row2.Right.Window.Switch: ( NotAvailable )sdv.databroker.v1 > set Vehicle.Cabin.Door.Row2.Right.Window.Switch Foo
[set] OK
Digital Auto: Playground
playground.digital.auto provides an in-browser, rapid prototyping environment utilizing the COVESA APIs for connected vehicles.
The UUID for Vehicle.Cabin.Door.Row2.Right.Window.Switch is 364c0a712fa854b4b1b332eae1be179b
Feedback
Do you think this Vehicle Signal specification needs enhancement? Do you want to discuss with experts? Try the following ressources to get in touch with the VSS community:
Do you think this Vehicle Signal specification needs enhancement? Do you want to discuss with experts? Try the following ressources to get in touch with the VSS community:
$ databroker-cli
sdv.databroker.v1 > connect
[connect] OK
sdv.databroker.v1 > get Vehicle.Cabin.Door.Row2.Left.IsChildLockActive
[get] OK
Vehicle.Cabin.Door.Row2.Left.IsChildLockActive: ( NotAvailable )sdv.databroker.v1 > set Vehicle.Cabin.Door.Row2.Left.IsChildLockActive false[set] OK
Digital Auto: Playground
playground.digital.auto provides an in-browser, rapid prototyping environment utilizing the COVESA APIs for connected vehicles.
The UUID for Vehicle.Cabin.Door.Row2.Left.IsChildLockActive is 1c08760700ca5814a62bac4e64628f8e
Feedback
Do you think this Vehicle Signal specification needs enhancement? Do you want to discuss with experts? Try the following ressources to get in touch with the VSS community:
Do you think this Vehicle Signal specification needs enhancement? Do you want to discuss with experts? Try the following ressources to get in touch with the VSS community:
$ databroker-cli
sdv.databroker.v1 > connect
[connect] OK
sdv.databroker.v1 > get Vehicle.Cabin.Door.Row2.Left.Shade.Position
[get] OK
Vehicle.Cabin.Door.Row2.Left.Shade.Position: ( NotAvailable )sdv.databroker.v1 > set Vehicle.Cabin.Door.Row2.Left.Shade.Position 0[set] OK
Digital Auto: Playground
playground.digital.auto provides an in-browser, rapid prototyping environment utilizing the COVESA APIs for connected vehicles.
The UUID for Vehicle.Cabin.Door.Row2.Left.Shade.Position is 33d7bdce5c915c3ea9633851f4f79cfb
Feedback
Do you think this Vehicle Signal specification needs enhancement? Do you want to discuss with experts? Try the following ressources to get in touch with the VSS community:
$ databroker-cli
sdv.databroker.v1 > connect
[connect] OK
sdv.databroker.v1 > get Vehicle.Cabin.Door.Row2.Left.Shade.Switch
[get] OK
Vehicle.Cabin.Door.Row2.Left.Shade.Switch: ( NotAvailable )sdv.databroker.v1 > set Vehicle.Cabin.Door.Row2.Left.Shade.Switch Foo
[set] OK
Digital Auto: Playground
playground.digital.auto provides an in-browser, rapid prototyping environment utilizing the COVESA APIs for connected vehicles.
The UUID for Vehicle.Cabin.Door.Row2.Left.Shade.Switch is 41f6f14bbb595dcf8e51d1696e877114
Feedback
Do you think this Vehicle Signal specification needs enhancement? Do you want to discuss with experts? Try the following ressources to get in touch with the VSS community:
$ databroker-cli
sdv.databroker.v1 > connect
[connect] OK
sdv.databroker.v1 > get Vehicle.Cabin.Door.Row2.Left.IsLocked
[get] OK
Vehicle.Cabin.Door.Row2.Left.IsLocked: ( NotAvailable )sdv.databroker.v1 > set Vehicle.Cabin.Door.Row2.Left.IsLocked false[set] OK
Digital Auto: Playground
playground.digital.auto provides an in-browser, rapid prototyping environment utilizing the COVESA APIs for connected vehicles.
The UUID for Vehicle.Cabin.Door.Row2.Left.IsLocked is 5fb9d9707cd85925ab6658d90f044b45
Feedback
Do you think this Vehicle Signal specification needs enhancement? Do you want to discuss with experts? Try the following ressources to get in touch with the VSS community:
$ databroker-cli
sdv.databroker.v1 > connect
[connect] OK
sdv.databroker.v1 > get Vehicle.Cabin.Door.Row2.Left.IsOpen
[get] OK
Vehicle.Cabin.Door.Row2.Left.IsOpen: ( NotAvailable )sdv.databroker.v1 > set Vehicle.Cabin.Door.Row2.Left.IsOpen false[set] OK
Digital Auto: Playground
playground.digital.auto provides an in-browser, rapid prototyping environment utilizing the COVESA APIs for connected vehicles.
The UUID for Vehicle.Cabin.Door.Row2.Left.IsOpen is 0143c6028c355f29ae5b3ee2d31869a8
Feedback
Do you think this Vehicle Signal specification needs enhancement? Do you want to discuss with experts? Try the following ressources to get in touch with the VSS community:
Do you think this Vehicle Signal specification needs enhancement? Do you want to discuss with experts? Try the following ressources to get in touch with the VSS community:
$ databroker-cli
sdv.databroker.v1 > connect
[connect] OK
sdv.databroker.v1 > get Vehicle.Cabin.Door.Row2.Left.Window.IsChildLockEngaged
[get] OK
Vehicle.Cabin.Door.Row2.Left.Window.IsChildLockEngaged: ( NotAvailable )sdv.databroker.v1 > set Vehicle.Cabin.Door.Row2.Left.Window.IsChildLockEngaged false[set] OK
Digital Auto: Playground
playground.digital.auto provides an in-browser, rapid prototyping environment utilizing the COVESA APIs for connected vehicles.
The UUID for Vehicle.Cabin.Door.Row2.Left.Window.IsChildLockEngaged is f41454131c6d502da452e1b1436e20c1
Feedback
Do you think this Vehicle Signal specification needs enhancement? Do you want to discuss with experts? Try the following ressources to get in touch with the VSS community:
$ databroker-cli
sdv.databroker.v1 > connect
[connect] OK
sdv.databroker.v1 > get Vehicle.Cabin.Door.Row2.Left.Window.Switch
[get] OK
Vehicle.Cabin.Door.Row2.Left.Window.Switch: ( NotAvailable )sdv.databroker.v1 > set Vehicle.Cabin.Door.Row2.Left.Window.Switch Foo
[set] OK
Digital Auto: Playground
playground.digital.auto provides an in-browser, rapid prototyping environment utilizing the COVESA APIs for connected vehicles.
The UUID for Vehicle.Cabin.Door.Row2.Left.Window.Switch is 1a5d1c57f46e576a8a94853e2a44d3f8
Feedback
Do you think this Vehicle Signal specification needs enhancement? Do you want to discuss with experts? Try the following ressources to get in touch with the VSS community:
$ databroker-cli
sdv.databroker.v1 > connect
[connect] OK
sdv.databroker.v1 > get Vehicle.Cabin.Door.Row2.Left.Window.IsOpen
[get] OK
Vehicle.Cabin.Door.Row2.Left.Window.IsOpen: ( NotAvailable )sdv.databroker.v1 > set Vehicle.Cabin.Door.Row2.Left.Window.IsOpen false[set] OK
Digital Auto: Playground
playground.digital.auto provides an in-browser, rapid prototyping environment utilizing the COVESA APIs for connected vehicles.
The UUID for Vehicle.Cabin.Door.Row2.Left.Window.IsOpen is 6abd32926e7a5b6b9767033063baaf4c
Feedback
Do you think this Vehicle Signal specification needs enhancement? Do you want to discuss with experts? Try the following ressources to get in touch with the VSS community:
$ databroker-cli
sdv.databroker.v1 > connect
[connect] OK
sdv.databroker.v1 > get Vehicle.Cabin.Door.Row2.Left.Window.Position
[get] OK
Vehicle.Cabin.Door.Row2.Left.Window.Position: ( NotAvailable )sdv.databroker.v1 > set Vehicle.Cabin.Door.Row2.Left.Window.Position 0[set] OK
Digital Auto: Playground
playground.digital.auto provides an in-browser, rapid prototyping environment utilizing the COVESA APIs for connected vehicles.
The UUID for Vehicle.Cabin.Door.Row2.Left.Window.Position is 6eeda05cd5d357958a0b0649b1b406f8
Feedback
Do you think this Vehicle Signal specification needs enhancement? Do you want to discuss with experts? Try the following ressources to get in touch with the VSS community:
Do you think this Vehicle Signal specification needs enhancement? Do you want to discuss with experts? Try the following ressources to get in touch with the VSS community:
Do you think this Vehicle Signal specification needs enhancement? Do you want to discuss with experts? Try the following ressources to get in touch with the VSS community:
$ databroker-cli
sdv.databroker.v1 > connect
[connect] OK
sdv.databroker.v1 > get Vehicle.Cabin.Door.Row1.Left.IsChildLockActive
[get] OK
Vehicle.Cabin.Door.Row1.Left.IsChildLockActive: ( NotAvailable )sdv.databroker.v1 > set Vehicle.Cabin.Door.Row1.Left.IsChildLockActive false[set] OK
Digital Auto: Playground
playground.digital.auto provides an in-browser, rapid prototyping environment utilizing the COVESA APIs for connected vehicles.
The UUID for Vehicle.Cabin.Door.Row1.Left.IsChildLockActive is 194a1dd29e245ff8a19dee7e022bad02
Feedback
Do you think this Vehicle Signal specification needs enhancement? Do you want to discuss with experts? Try the following ressources to get in touch with the VSS community:
$ databroker-cli
sdv.databroker.v1 > connect
[connect] OK
sdv.databroker.v1 > get Vehicle.Cabin.Door.Row1.Left.IsLocked
[get] OK
Vehicle.Cabin.Door.Row1.Left.IsLocked: ( NotAvailable )sdv.databroker.v1 > set Vehicle.Cabin.Door.Row1.Left.IsLocked false[set] OK
Digital Auto: Playground
playground.digital.auto provides an in-browser, rapid prototyping environment utilizing the COVESA APIs for connected vehicles.
The UUID for Vehicle.Cabin.Door.Row1.Left.IsLocked is 859b44ab75de5d67a8beedff883a72d0
Feedback
Do you think this Vehicle Signal specification needs enhancement? Do you want to discuss with experts? Try the following ressources to get in touch with the VSS community:
$ databroker-cli
sdv.databroker.v1 > connect
[connect] OK
sdv.databroker.v1 > get Vehicle.Cabin.Door.Row1.Left.IsOpen
[get] OK
Vehicle.Cabin.Door.Row1.Left.IsOpen: ( NotAvailable )sdv.databroker.v1 > set Vehicle.Cabin.Door.Row1.Left.IsOpen false[set] OK
Digital Auto: Playground
playground.digital.auto provides an in-browser, rapid prototyping environment utilizing the COVESA APIs for connected vehicles.
The UUID for Vehicle.Cabin.Door.Row1.Left.IsOpen is a5560fa546985678be670c13a0467545
Feedback
Do you think this Vehicle Signal specification needs enhancement? Do you want to discuss with experts? Try the following ressources to get in touch with the VSS community:
Do you think this Vehicle Signal specification needs enhancement? Do you want to discuss with experts? Try the following ressources to get in touch with the VSS community:
$ databroker-cli
sdv.databroker.v1 > connect
[connect] OK
sdv.databroker.v1 > get Vehicle.Cabin.Door.Row1.Left.Shade.Position
[get] OK
Vehicle.Cabin.Door.Row1.Left.Shade.Position: ( NotAvailable )sdv.databroker.v1 > set Vehicle.Cabin.Door.Row1.Left.Shade.Position 0[set] OK
Digital Auto: Playground
playground.digital.auto provides an in-browser, rapid prototyping environment utilizing the COVESA APIs for connected vehicles.
The UUID for Vehicle.Cabin.Door.Row1.Left.Shade.Position is a4c73477293156999f74416245d4f858
Feedback
Do you think this Vehicle Signal specification needs enhancement? Do you want to discuss with experts? Try the following ressources to get in touch with the VSS community:
$ databroker-cli
sdv.databroker.v1 > connect
[connect] OK
sdv.databroker.v1 > get Vehicle.Cabin.Door.Row1.Left.Shade.Switch
[get] OK
Vehicle.Cabin.Door.Row1.Left.Shade.Switch: ( NotAvailable )sdv.databroker.v1 > set Vehicle.Cabin.Door.Row1.Left.Shade.Switch Foo
[set] OK
Digital Auto: Playground
playground.digital.auto provides an in-browser, rapid prototyping environment utilizing the COVESA APIs for connected vehicles.
The UUID for Vehicle.Cabin.Door.Row1.Left.Shade.Switch is 15c012ed31a054ecb2b9b2b1cf57e825
Feedback
Do you think this Vehicle Signal specification needs enhancement? Do you want to discuss with experts? Try the following ressources to get in touch with the VSS community:
Do you think this Vehicle Signal specification needs enhancement? Do you want to discuss with experts? Try the following ressources to get in touch with the VSS community:
$ databroker-cli
sdv.databroker.v1 > connect
[connect] OK
sdv.databroker.v1 > get Vehicle.Cabin.Door.Row1.Left.Window.IsChildLockEngaged
[get] OK
Vehicle.Cabin.Door.Row1.Left.Window.IsChildLockEngaged: ( NotAvailable )sdv.databroker.v1 > set Vehicle.Cabin.Door.Row1.Left.Window.IsChildLockEngaged false[set] OK
Digital Auto: Playground
playground.digital.auto provides an in-browser, rapid prototyping environment utilizing the COVESA APIs for connected vehicles.
The UUID for Vehicle.Cabin.Door.Row1.Left.Window.IsChildLockEngaged is 618fe1eb106857faaf83f24236ed1819
Feedback
Do you think this Vehicle Signal specification needs enhancement? Do you want to discuss with experts? Try the following ressources to get in touch with the VSS community:
$ databroker-cli
sdv.databroker.v1 > connect
[connect] OK
sdv.databroker.v1 > get Vehicle.Cabin.Door.Row1.Left.Window.IsOpen
[get] OK
Vehicle.Cabin.Door.Row1.Left.Window.IsOpen: ( NotAvailable )sdv.databroker.v1 > set Vehicle.Cabin.Door.Row1.Left.Window.IsOpen false[set] OK
Digital Auto: Playground
playground.digital.auto provides an in-browser, rapid prototyping environment utilizing the COVESA APIs for connected vehicles.
The UUID for Vehicle.Cabin.Door.Row1.Left.Window.IsOpen is e7a98f3520825732922e41eb5b88ac49
Feedback
Do you think this Vehicle Signal specification needs enhancement? Do you want to discuss with experts? Try the following ressources to get in touch with the VSS community:
$ databroker-cli
sdv.databroker.v1 > connect
[connect] OK
sdv.databroker.v1 > get Vehicle.Cabin.Door.Row1.Left.Window.Position
[get] OK
Vehicle.Cabin.Door.Row1.Left.Window.Position: ( NotAvailable )sdv.databroker.v1 > set Vehicle.Cabin.Door.Row1.Left.Window.Position 0[set] OK
Digital Auto: Playground
playground.digital.auto provides an in-browser, rapid prototyping environment utilizing the COVESA APIs for connected vehicles.
The UUID for Vehicle.Cabin.Door.Row1.Left.Window.Position is 63137367f94856acbb900a0dcdc7e495
Feedback
Do you think this Vehicle Signal specification needs enhancement? Do you want to discuss with experts? Try the following ressources to get in touch with the VSS community:
$ databroker-cli
sdv.databroker.v1 > connect
[connect] OK
sdv.databroker.v1 > get Vehicle.Cabin.Door.Row1.Left.Window.Switch
[get] OK
Vehicle.Cabin.Door.Row1.Left.Window.Switch: ( NotAvailable )sdv.databroker.v1 > set Vehicle.Cabin.Door.Row1.Left.Window.Switch Foo
[set] OK
Digital Auto: Playground
playground.digital.auto provides an in-browser, rapid prototyping environment utilizing the COVESA APIs for connected vehicles.
The UUID for Vehicle.Cabin.Door.Row1.Left.Window.Switch is e276bf971dae507f99b463f7fe574969
Feedback
Do you think this Vehicle Signal specification needs enhancement? Do you want to discuss with experts? Try the following ressources to get in touch with the VSS community:
Do you think this Vehicle Signal specification needs enhancement? Do you want to discuss with experts? Try the following ressources to get in touch with the VSS community:
$ databroker-cli
sdv.databroker.v1 > connect
[connect] OK
sdv.databroker.v1 > get Vehicle.Cabin.Door.Row1.Right.IsChildLockActive
[get] OK
Vehicle.Cabin.Door.Row1.Right.IsChildLockActive: ( NotAvailable )sdv.databroker.v1 > set Vehicle.Cabin.Door.Row1.Right.IsChildLockActive false[set] OK
Digital Auto: Playground
playground.digital.auto provides an in-browser, rapid prototyping environment utilizing the COVESA APIs for connected vehicles.
The UUID for Vehicle.Cabin.Door.Row1.Right.IsChildLockActive is 2eedf9e01c225ff39ee62a7c11395d6c
Feedback
Do you think this Vehicle Signal specification needs enhancement? Do you want to discuss with experts? Try the following ressources to get in touch with the VSS community:
$ databroker-cli
sdv.databroker.v1 > connect
[connect] OK
sdv.databroker.v1 > get Vehicle.Cabin.Door.Row1.Right.IsLocked
[get] OK
Vehicle.Cabin.Door.Row1.Right.IsLocked: ( NotAvailable )sdv.databroker.v1 > set Vehicle.Cabin.Door.Row1.Right.IsLocked false[set] OK
Digital Auto: Playground
playground.digital.auto provides an in-browser, rapid prototyping environment utilizing the COVESA APIs for connected vehicles.
The UUID for Vehicle.Cabin.Door.Row1.Right.IsLocked is 7e5cf60543505205922b714cee2a3246
Feedback
Do you think this Vehicle Signal specification needs enhancement? Do you want to discuss with experts? Try the following ressources to get in touch with the VSS community:
$ databroker-cli
sdv.databroker.v1 > connect
[connect] OK
sdv.databroker.v1 > get Vehicle.Cabin.Door.Row1.Right.IsOpen
[get] OK
Vehicle.Cabin.Door.Row1.Right.IsOpen: ( NotAvailable )sdv.databroker.v1 > set Vehicle.Cabin.Door.Row1.Right.IsOpen false[set] OK
Digital Auto: Playground
playground.digital.auto provides an in-browser, rapid prototyping environment utilizing the COVESA APIs for connected vehicles.
The UUID for Vehicle.Cabin.Door.Row1.Right.IsOpen is 055c01ebe86f507b97d15cfba82482a9
Feedback
Do you think this Vehicle Signal specification needs enhancement? Do you want to discuss with experts? Try the following ressources to get in touch with the VSS community:
Do you think this Vehicle Signal specification needs enhancement? Do you want to discuss with experts? Try the following ressources to get in touch with the VSS community:
$ databroker-cli
sdv.databroker.v1 > connect
[connect] OK
sdv.databroker.v1 > get Vehicle.Cabin.Door.Row1.Right.Shade.Position
[get] OK
Vehicle.Cabin.Door.Row1.Right.Shade.Position: ( NotAvailable )sdv.databroker.v1 > set Vehicle.Cabin.Door.Row1.Right.Shade.Position 0[set] OK
Digital Auto: Playground
playground.digital.auto provides an in-browser, rapid prototyping environment utilizing the COVESA APIs for connected vehicles.
The UUID for Vehicle.Cabin.Door.Row1.Right.Shade.Position is 22944f205eb45c6f804e481b8dd783c5
Feedback
Do you think this Vehicle Signal specification needs enhancement? Do you want to discuss with experts? Try the following ressources to get in touch with the VSS community:
$ databroker-cli
sdv.databroker.v1 > connect
[connect] OK
sdv.databroker.v1 > get Vehicle.Cabin.Door.Row1.Right.Shade.Switch
[get] OK
Vehicle.Cabin.Door.Row1.Right.Shade.Switch: ( NotAvailable )sdv.databroker.v1 > set Vehicle.Cabin.Door.Row1.Right.Shade.Switch Foo
[set] OK
Digital Auto: Playground
playground.digital.auto provides an in-browser, rapid prototyping environment utilizing the COVESA APIs for connected vehicles.
The UUID for Vehicle.Cabin.Door.Row1.Right.Shade.Switch is 763aea099a515fc998fde10d936b0b38
Feedback
Do you think this Vehicle Signal specification needs enhancement? Do you want to discuss with experts? Try the following ressources to get in touch with the VSS community:
Do you think this Vehicle Signal specification needs enhancement? Do you want to discuss with experts? Try the following ressources to get in touch with the VSS community:
$ databroker-cli
sdv.databroker.v1 > connect
[connect] OK
sdv.databroker.v1 > get Vehicle.Cabin.Door.Row1.Right.Window.IsChildLockEngaged
[get] OK
Vehicle.Cabin.Door.Row1.Right.Window.IsChildLockEngaged: ( NotAvailable )sdv.databroker.v1 > set Vehicle.Cabin.Door.Row1.Right.Window.IsChildLockEngaged false[set] OK
Digital Auto: Playground
playground.digital.auto provides an in-browser, rapid prototyping environment utilizing the COVESA APIs for connected vehicles.
The UUID for Vehicle.Cabin.Door.Row1.Right.Window.IsChildLockEngaged is 6a65a16ba60c5c41b550a7b5f8b313dd
Feedback
Do you think this Vehicle Signal specification needs enhancement? Do you want to discuss with experts? Try the following ressources to get in touch with the VSS community:
$ databroker-cli
sdv.databroker.v1 > connect
[connect] OK
sdv.databroker.v1 > get Vehicle.Cabin.Door.Row1.Right.Window.IsOpen
[get] OK
Vehicle.Cabin.Door.Row1.Right.Window.IsOpen: ( NotAvailable )sdv.databroker.v1 > set Vehicle.Cabin.Door.Row1.Right.Window.IsOpen false[set] OK
Digital Auto: Playground
playground.digital.auto provides an in-browser, rapid prototyping environment utilizing the COVESA APIs for connected vehicles.
The UUID for Vehicle.Cabin.Door.Row1.Right.Window.IsOpen is 90d0fdeaef075b78abab0b710c760393
Feedback
Do you think this Vehicle Signal specification needs enhancement? Do you want to discuss with experts? Try the following ressources to get in touch with the VSS community:
$ databroker-cli
sdv.databroker.v1 > connect
[connect] OK
sdv.databroker.v1 > get Vehicle.Cabin.Door.Row1.Right.Window.Position
[get] OK
Vehicle.Cabin.Door.Row1.Right.Window.Position: ( NotAvailable )sdv.databroker.v1 > set Vehicle.Cabin.Door.Row1.Right.Window.Position 0[set] OK
Digital Auto: Playground
playground.digital.auto provides an in-browser, rapid prototyping environment utilizing the COVESA APIs for connected vehicles.
The UUID for Vehicle.Cabin.Door.Row1.Right.Window.Position is e7ef528471eb585a937664abab9fbc68
Feedback
Do you think this Vehicle Signal specification needs enhancement? Do you want to discuss with experts? Try the following ressources to get in touch with the VSS community:
$ databroker-cli
sdv.databroker.v1 > connect
[connect] OK
sdv.databroker.v1 > get Vehicle.Cabin.Door.Row1.Right.Window.Switch
[get] OK
Vehicle.Cabin.Door.Row1.Right.Window.Switch: ( NotAvailable )sdv.databroker.v1 > set Vehicle.Cabin.Door.Row1.Right.Window.Switch Foo
[set] OK
Digital Auto: Playground
playground.digital.auto provides an in-browser, rapid prototyping environment utilizing the COVESA APIs for connected vehicles.
The UUID for Vehicle.Cabin.Door.Row1.Right.Window.Switch is fcb9ede77f065479a10740324c0efdc6
Feedback
Do you think this Vehicle Signal specification needs enhancement? Do you want to discuss with experts? Try the following ressources to get in touch with the VSS community:
Do you think this Vehicle Signal specification needs enhancement? Do you want to discuss with experts? Try the following ressources to get in touch with the VSS community:
$ databroker-cli
sdv.databroker.v1 > connect
[connect] OK
sdv.databroker.v1 > get Vehicle.Cabin.Lights.AmbientLight
[get] OK
Vehicle.Cabin.Lights.AmbientLight: ( NotAvailable )sdv.databroker.v1 > set Vehicle.Cabin.Lights.AmbientLight 0[set] OK
Digital Auto: Playground
playground.digital.auto provides an in-browser, rapid prototyping environment utilizing the COVESA APIs for connected vehicles.
The UUID for Vehicle.Cabin.Lights.AmbientLight is cf7bf6bc25c2564383e72ef840e4b47d
Feedback
Do you think this Vehicle Signal specification needs enhancement? Do you want to discuss with experts? Try the following ressources to get in touch with the VSS community:
$ databroker-cli
sdv.databroker.v1 > connect
[connect] OK
sdv.databroker.v1 > get Vehicle.Cabin.Lights.IsDomeOn
[get] OK
Vehicle.Cabin.Lights.IsDomeOn: ( NotAvailable )sdv.databroker.v1 > set Vehicle.Cabin.Lights.IsDomeOn false[set] OK
Digital Auto: Playground
playground.digital.auto provides an in-browser, rapid prototyping environment utilizing the COVESA APIs for connected vehicles.
The UUID for Vehicle.Cabin.Lights.IsDomeOn is cc100f4cd2ff5e0593a557a74ebf5d9a
Feedback
Do you think this Vehicle Signal specification needs enhancement? Do you want to discuss with experts? Try the following ressources to get in touch with the VSS community:
$ databroker-cli
sdv.databroker.v1 > connect
[connect] OK
sdv.databroker.v1 > get Vehicle.Cabin.Lights.IsGloveBoxOn
[get] OK
Vehicle.Cabin.Lights.IsGloveBoxOn: ( NotAvailable )sdv.databroker.v1 > set Vehicle.Cabin.Lights.IsGloveBoxOn false[set] OK
Digital Auto: Playground
playground.digital.auto provides an in-browser, rapid prototyping environment utilizing the COVESA APIs for connected vehicles.
The UUID for Vehicle.Cabin.Lights.IsGloveBoxOn is f7281175fbc85b4a937b2606e4300f9a
Feedback
Do you think this Vehicle Signal specification needs enhancement? Do you want to discuss with experts? Try the following ressources to get in touch with the VSS community:
$ databroker-cli
sdv.databroker.v1 > connect
[connect] OK
sdv.databroker.v1 > get Vehicle.Cabin.Lights.IsTrunkOn
[get] OK
Vehicle.Cabin.Lights.IsTrunkOn: ( NotAvailable )sdv.databroker.v1 > set Vehicle.Cabin.Lights.IsTrunkOn false[set] OK
Digital Auto: Playground
playground.digital.auto provides an in-browser, rapid prototyping environment utilizing the COVESA APIs for connected vehicles.
The UUID for Vehicle.Cabin.Lights.IsTrunkOn is 3697df4cddc751df847fac74bd32390f
Feedback
Do you think this Vehicle Signal specification needs enhancement? Do you want to discuss with experts? Try the following ressources to get in touch with the VSS community:
$ databroker-cli
sdv.databroker.v1 > connect
[connect] OK
sdv.databroker.v1 > get Vehicle.Cabin.Lights.LightIntensity
[get] OK
Vehicle.Cabin.Lights.LightIntensity: ( NotAvailable )sdv.databroker.v1 > set Vehicle.Cabin.Lights.LightIntensity 0[set] OK
Digital Auto: Playground
playground.digital.auto provides an in-browser, rapid prototyping environment utilizing the COVESA APIs for connected vehicles.
The UUID for Vehicle.Cabin.Lights.LightIntensity is a66eba0bae225a56babf3f9ceb65fc76
Feedback
Do you think this Vehicle Signal specification needs enhancement? Do you want to discuss with experts? Try the following ressources to get in touch with the VSS community:
Do you think this Vehicle Signal specification needs enhancement? Do you want to discuss with experts? Try the following ressources to get in touch with the VSS community:
Do you think this Vehicle Signal specification needs enhancement? Do you want to discuss with experts? Try the following ressources to get in touch with the VSS community:
$ databroker-cli
sdv.databroker.v1 > connect
[connect] OK
sdv.databroker.v1 > get Vehicle.Cabin.Lights.Spotlight.Row1.IsLeftOn
[get] OK
Vehicle.Cabin.Lights.Spotlight.Row1.IsLeftOn: ( NotAvailable )sdv.databroker.v1 > set Vehicle.Cabin.Lights.Spotlight.Row1.IsLeftOn false[set] OK
Digital Auto: Playground
playground.digital.auto provides an in-browser, rapid prototyping environment utilizing the COVESA APIs for connected vehicles.
The UUID for Vehicle.Cabin.Lights.Spotlight.Row1.IsLeftOn is c6a9c6b14d725113a087ce7e58a9c90b
Feedback
Do you think this Vehicle Signal specification needs enhancement? Do you want to discuss with experts? Try the following ressources to get in touch with the VSS community:
$ databroker-cli
sdv.databroker.v1 > connect
[connect] OK
sdv.databroker.v1 > get Vehicle.Cabin.Lights.Spotlight.Row1.IsRightOn
[get] OK
Vehicle.Cabin.Lights.Spotlight.Row1.IsRightOn: ( NotAvailable )sdv.databroker.v1 > set Vehicle.Cabin.Lights.Spotlight.Row1.IsRightOn false[set] OK
Digital Auto: Playground
playground.digital.auto provides an in-browser, rapid prototyping environment utilizing the COVESA APIs for connected vehicles.
The UUID for Vehicle.Cabin.Lights.Spotlight.Row1.IsRightOn is 7c08ddd9067f5905855cec9f30546fc9
Feedback
Do you think this Vehicle Signal specification needs enhancement? Do you want to discuss with experts? Try the following ressources to get in touch with the VSS community:
$ databroker-cli
sdv.databroker.v1 > connect
[connect] OK
sdv.databroker.v1 > get Vehicle.Cabin.Lights.Spotlight.Row1.IsSharedOn
[get] OK
Vehicle.Cabin.Lights.Spotlight.Row1.IsSharedOn: ( NotAvailable )sdv.databroker.v1 > set Vehicle.Cabin.Lights.Spotlight.Row1.IsSharedOn false[set] OK
Digital Auto: Playground
playground.digital.auto provides an in-browser, rapid prototyping environment utilizing the COVESA APIs for connected vehicles.
The UUID for Vehicle.Cabin.Lights.Spotlight.Row1.IsSharedOn is 99614d03c27f50a6a32b99b68814e6d7
Feedback
Do you think this Vehicle Signal specification needs enhancement? Do you want to discuss with experts? Try the following ressources to get in touch with the VSS community:
Do you think this Vehicle Signal specification needs enhancement? Do you want to discuss with experts? Try the following ressources to get in touch with the VSS community:
$ databroker-cli
sdv.databroker.v1 > connect
[connect] OK
sdv.databroker.v1 > get Vehicle.Cabin.Lights.Spotlight.Row2.IsLeftOn
[get] OK
Vehicle.Cabin.Lights.Spotlight.Row2.IsLeftOn: ( NotAvailable )sdv.databroker.v1 > set Vehicle.Cabin.Lights.Spotlight.Row2.IsLeftOn false[set] OK
Digital Auto: Playground
playground.digital.auto provides an in-browser, rapid prototyping environment utilizing the COVESA APIs for connected vehicles.
The UUID for Vehicle.Cabin.Lights.Spotlight.Row2.IsLeftOn is 15534d254ce851509a8dfae763a9d709
Feedback
Do you think this Vehicle Signal specification needs enhancement? Do you want to discuss with experts? Try the following ressources to get in touch with the VSS community:
$ databroker-cli
sdv.databroker.v1 > connect
[connect] OK
sdv.databroker.v1 > get Vehicle.Cabin.Lights.Spotlight.Row2.IsRightOn
[get] OK
Vehicle.Cabin.Lights.Spotlight.Row2.IsRightOn: ( NotAvailable )sdv.databroker.v1 > set Vehicle.Cabin.Lights.Spotlight.Row2.IsRightOn false[set] OK
Digital Auto: Playground
playground.digital.auto provides an in-browser, rapid prototyping environment utilizing the COVESA APIs for connected vehicles.
The UUID for Vehicle.Cabin.Lights.Spotlight.Row2.IsRightOn is 06e866363b5c589db5b446eca0b68c8b
Feedback
Do you think this Vehicle Signal specification needs enhancement? Do you want to discuss with experts? Try the following ressources to get in touch with the VSS community:
$ databroker-cli
sdv.databroker.v1 > connect
[connect] OK
sdv.databroker.v1 > get Vehicle.Cabin.Lights.Spotlight.Row2.IsSharedOn
[get] OK
Vehicle.Cabin.Lights.Spotlight.Row2.IsSharedOn: ( NotAvailable )sdv.databroker.v1 > set Vehicle.Cabin.Lights.Spotlight.Row2.IsSharedOn false[set] OK
Digital Auto: Playground
playground.digital.auto provides an in-browser, rapid prototyping environment utilizing the COVESA APIs for connected vehicles.
The UUID for Vehicle.Cabin.Lights.Spotlight.Row2.IsSharedOn is 087dd02860965a61a5cba8c66f8dbd36
Feedback
Do you think this Vehicle Signal specification needs enhancement? Do you want to discuss with experts? Try the following ressources to get in touch with the VSS community:
Do you think this Vehicle Signal specification needs enhancement? Do you want to discuss with experts? Try the following ressources to get in touch with the VSS community:
$ databroker-cli
sdv.databroker.v1 > connect
[connect] OK
sdv.databroker.v1 > get Vehicle.Cabin.Lights.Spotlight.Row3.IsLeftOn
[get] OK
Vehicle.Cabin.Lights.Spotlight.Row3.IsLeftOn: ( NotAvailable )sdv.databroker.v1 > set Vehicle.Cabin.Lights.Spotlight.Row3.IsLeftOn false[set] OK
Digital Auto: Playground
playground.digital.auto provides an in-browser, rapid prototyping environment utilizing the COVESA APIs for connected vehicles.
The UUID for Vehicle.Cabin.Lights.Spotlight.Row3.IsLeftOn is f32530172b1a535cba376e660a3a630a
Feedback
Do you think this Vehicle Signal specification needs enhancement? Do you want to discuss with experts? Try the following ressources to get in touch with the VSS community:
$ databroker-cli
sdv.databroker.v1 > connect
[connect] OK
sdv.databroker.v1 > get Vehicle.Cabin.Lights.Spotlight.Row3.IsRightOn
[get] OK
Vehicle.Cabin.Lights.Spotlight.Row3.IsRightOn: ( NotAvailable )sdv.databroker.v1 > set Vehicle.Cabin.Lights.Spotlight.Row3.IsRightOn false[set] OK
Digital Auto: Playground
playground.digital.auto provides an in-browser, rapid prototyping environment utilizing the COVESA APIs for connected vehicles.
The UUID for Vehicle.Cabin.Lights.Spotlight.Row3.IsRightOn is 20424c00cf1d5e49b4287efe186cd263
Feedback
Do you think this Vehicle Signal specification needs enhancement? Do you want to discuss with experts? Try the following ressources to get in touch with the VSS community:
$ databroker-cli
sdv.databroker.v1 > connect
[connect] OK
sdv.databroker.v1 > get Vehicle.Cabin.Lights.Spotlight.Row3.IsSharedOn
[get] OK
Vehicle.Cabin.Lights.Spotlight.Row3.IsSharedOn: ( NotAvailable )sdv.databroker.v1 > set Vehicle.Cabin.Lights.Spotlight.Row3.IsSharedOn false[set] OK
Digital Auto: Playground
playground.digital.auto provides an in-browser, rapid prototyping environment utilizing the COVESA APIs for connected vehicles.
The UUID for Vehicle.Cabin.Lights.Spotlight.Row3.IsSharedOn is 87f00a029ec854d39702ef86e030c00c
Feedback
Do you think this Vehicle Signal specification needs enhancement? Do you want to discuss with experts? Try the following ressources to get in touch with the VSS community:
Do you think this Vehicle Signal specification needs enhancement? Do you want to discuss with experts? Try the following ressources to get in touch with the VSS community:
$ databroker-cli
sdv.databroker.v1 > connect
[connect] OK
sdv.databroker.v1 > get Vehicle.Cabin.Lights.Spotlight.Row4.IsLeftOn
[get] OK
Vehicle.Cabin.Lights.Spotlight.Row4.IsLeftOn: ( NotAvailable )sdv.databroker.v1 > set Vehicle.Cabin.Lights.Spotlight.Row4.IsLeftOn false[set] OK
Digital Auto: Playground
playground.digital.auto provides an in-browser, rapid prototyping environment utilizing the COVESA APIs for connected vehicles.
The UUID for Vehicle.Cabin.Lights.Spotlight.Row4.IsLeftOn is 643c07780d2453e98b5091a39516f7ec
Feedback
Do you think this Vehicle Signal specification needs enhancement? Do you want to discuss with experts? Try the following ressources to get in touch with the VSS community:
$ databroker-cli
sdv.databroker.v1 > connect
[connect] OK
sdv.databroker.v1 > get Vehicle.Cabin.Lights.Spotlight.Row4.IsRightOn
[get] OK
Vehicle.Cabin.Lights.Spotlight.Row4.IsRightOn: ( NotAvailable )sdv.databroker.v1 > set Vehicle.Cabin.Lights.Spotlight.Row4.IsRightOn false[set] OK
Digital Auto: Playground
playground.digital.auto provides an in-browser, rapid prototyping environment utilizing the COVESA APIs for connected vehicles.
The UUID for Vehicle.Cabin.Lights.Spotlight.Row4.IsRightOn is f012d37429aa53d1bf8648d686a804ef
Feedback
Do you think this Vehicle Signal specification needs enhancement? Do you want to discuss with experts? Try the following ressources to get in touch with the VSS community:
$ databroker-cli
sdv.databroker.v1 > connect
[connect] OK
sdv.databroker.v1 > get Vehicle.Cabin.Lights.Spotlight.Row4.IsSharedOn
[get] OK
Vehicle.Cabin.Lights.Spotlight.Row4.IsSharedOn: ( NotAvailable )sdv.databroker.v1 > set Vehicle.Cabin.Lights.Spotlight.Row4.IsSharedOn false[set] OK
Digital Auto: Playground
playground.digital.auto provides an in-browser, rapid prototyping environment utilizing the COVESA APIs for connected vehicles.
The UUID for Vehicle.Cabin.Lights.Spotlight.Row4.IsSharedOn is 8f8de6d5b18f5cc69c9ecd556ce6b6ed
Feedback
Do you think this Vehicle Signal specification needs enhancement? Do you want to discuss with experts? Try the following ressources to get in touch with the VSS community:
Do you think this Vehicle Signal specification needs enhancement? Do you want to discuss with experts? Try the following ressources to get in touch with the VSS community:
$ databroker-cli
sdv.databroker.v1 > connect
[connect] OK
sdv.databroker.v1 > get Vehicle.Cabin.RearviewMirror.DimmingLevel
[get] OK
Vehicle.Cabin.RearviewMirror.DimmingLevel: ( NotAvailable )sdv.databroker.v1 > set Vehicle.Cabin.RearviewMirror.DimmingLevel 0[set] OK
Digital Auto: Playground
playground.digital.auto provides an in-browser, rapid prototyping environment utilizing the COVESA APIs for connected vehicles.
The UUID for Vehicle.Cabin.RearviewMirror.DimmingLevel is 4e2bcbaa6dc1586d8282324b475e5dee
Feedback
Do you think this Vehicle Signal specification needs enhancement? Do you want to discuss with experts? Try the following ressources to get in touch with the VSS community:
Do you think this Vehicle Signal specification needs enhancement? Do you want to discuss with experts? Try the following ressources to get in touch with the VSS community:
$ databroker-cli
sdv.databroker.v1 > connect
[connect] OK
sdv.databroker.v1 > get Vehicle.Cabin.Sunroof.Position
[get] OK
Vehicle.Cabin.Sunroof.Position: ( NotAvailable )sdv.databroker.v1 > set Vehicle.Cabin.Sunroof.Position 0[set] OK
Digital Auto: Playground
playground.digital.auto provides an in-browser, rapid prototyping environment utilizing the COVESA APIs for connected vehicles.
The UUID for Vehicle.Cabin.Sunroof.Position is ab598697f1c852eda4df9ed62a956d17
Feedback
Do you think this Vehicle Signal specification needs enhancement? Do you want to discuss with experts? Try the following ressources to get in touch with the VSS community:
Do you think this Vehicle Signal specification needs enhancement? Do you want to discuss with experts? Try the following ressources to get in touch with the VSS community:
$ databroker-cli
sdv.databroker.v1 > connect
[connect] OK
sdv.databroker.v1 > get Vehicle.Cabin.Sunroof.Shade.Position
[get] OK
Vehicle.Cabin.Sunroof.Shade.Position: ( NotAvailable )sdv.databroker.v1 > set Vehicle.Cabin.Sunroof.Shade.Position 0[set] OK
Digital Auto: Playground
playground.digital.auto provides an in-browser, rapid prototyping environment utilizing the COVESA APIs for connected vehicles.
The UUID for Vehicle.Cabin.Sunroof.Shade.Position is 5f78c2a631b75abc88744f9bad277f5a
Feedback
Do you think this Vehicle Signal specification needs enhancement? Do you want to discuss with experts? Try the following ressources to get in touch with the VSS community:
$ databroker-cli
sdv.databroker.v1 > connect
[connect] OK
sdv.databroker.v1 > get Vehicle.Cabin.Sunroof.Shade.Switch
[get] OK
Vehicle.Cabin.Sunroof.Shade.Switch: ( NotAvailable )sdv.databroker.v1 > set Vehicle.Cabin.Sunroof.Shade.Switch Foo
[set] OK
Digital Auto: Playground
playground.digital.auto provides an in-browser, rapid prototyping environment utilizing the COVESA APIs for connected vehicles.
The UUID for Vehicle.Cabin.Sunroof.Shade.Switch is 3836077128c65381b01e74a1a8be1c40
Feedback
Do you think this Vehicle Signal specification needs enhancement? Do you want to discuss with experts? Try the following ressources to get in touch with the VSS community:
$ databroker-cli
sdv.databroker.v1 > connect
[connect] OK
sdv.databroker.v1 > get Vehicle.Cabin.Sunroof.Switch
[get] OK
Vehicle.Cabin.Sunroof.Switch: ( NotAvailable )sdv.databroker.v1 > set Vehicle.Cabin.Sunroof.Switch Foo
[set] OK
Digital Auto: Playground
playground.digital.auto provides an in-browser, rapid prototyping environment utilizing the COVESA APIs for connected vehicles.
The UUID for Vehicle.Cabin.Sunroof.Switch is 88c39afd45a25ea2b474ff581e1fb138
Feedback
Do you think this Vehicle Signal specification needs enhancement? Do you want to discuss with experts? Try the following ressources to get in touch with the VSS community:
Vehicle.Cabin.Infotainment.PowerOptimizeLevel (Power optimization level for this branch/subsystem. A higher number indicates more aggressive power optimization. Level 0 indicates that all functionality is enabled, no power optimization enabled. Level 10 indicates most aggressive power optimization mode, only essential functionality enabled.)
Do you think this Vehicle Signal specification needs enhancement? Do you want to discuss with experts? Try the following ressources to get in touch with the VSS community:
Do you think this Vehicle Signal specification needs enhancement? Do you want to discuss with experts? Try the following ressources to get in touch with the VSS community:
$ databroker-cli
sdv.databroker.v1 > connect
[connect] OK
sdv.databroker.v1 > get Vehicle.Cabin.Infotainment.HMI.Brightness
[get] OK
Vehicle.Cabin.Infotainment.HMI.Brightness: ( NotAvailable )sdv.databroker.v1 > set Vehicle.Cabin.Infotainment.HMI.Brightness 0[set] OK
Digital Auto: Playground
playground.digital.auto provides an in-browser, rapid prototyping environment utilizing the COVESA APIs for connected vehicles.
The UUID for Vehicle.Cabin.Infotainment.HMI.Brightness is 44147980dabd56b883ae4d2491383a17
Feedback
Do you think this Vehicle Signal specification needs enhancement? Do you want to discuss with experts? Try the following ressources to get in touch with the VSS community:
$ databroker-cli
sdv.databroker.v1 > connect
[connect] OK
sdv.databroker.v1 > get Vehicle.Cabin.Infotainment.HMI.CurrentLanguage
[get] OK
Vehicle.Cabin.Infotainment.HMI.CurrentLanguage: ( NotAvailable )sdv.databroker.v1 > set Vehicle.Cabin.Infotainment.HMI.CurrentLanguage Foo
[set] OK
Digital Auto: Playground
playground.digital.auto provides an in-browser, rapid prototyping environment utilizing the COVESA APIs for connected vehicles.
The UUID for Vehicle.Cabin.Infotainment.HMI.CurrentLanguage is dc29ee5b7f7154b4ab05a9771fe930b3
Feedback
Do you think this Vehicle Signal specification needs enhancement? Do you want to discuss with experts? Try the following ressources to get in touch with the VSS community:
$ databroker-cli
sdv.databroker.v1 > connect
[connect] OK
sdv.databroker.v1 > get Vehicle.Cabin.Infotainment.HMI.DateFormat
[get] OK
Vehicle.Cabin.Infotainment.HMI.DateFormat: ( NotAvailable )sdv.databroker.v1 > set Vehicle.Cabin.Infotainment.HMI.DateFormat Foo
[set] OK
Digital Auto: Playground
playground.digital.auto provides an in-browser, rapid prototyping environment utilizing the COVESA APIs for connected vehicles.
The UUID for Vehicle.Cabin.Infotainment.HMI.DateFormat is 0f03c3955fe953e9893a1f52e964919e
Feedback
Do you think this Vehicle Signal specification needs enhancement? Do you want to discuss with experts? Try the following ressources to get in touch with the VSS community:
$ databroker-cli
sdv.databroker.v1 > connect
[connect] OK
sdv.databroker.v1 > get Vehicle.Cabin.Infotainment.HMI.DayNightMode
[get] OK
Vehicle.Cabin.Infotainment.HMI.DayNightMode: ( NotAvailable )sdv.databroker.v1 > set Vehicle.Cabin.Infotainment.HMI.DayNightMode Foo
[set] OK
Digital Auto: Playground
playground.digital.auto provides an in-browser, rapid prototyping environment utilizing the COVESA APIs for connected vehicles.
The UUID for Vehicle.Cabin.Infotainment.HMI.DayNightMode is a892039ba136588fa26b2670f839c0cc
Feedback
Do you think this Vehicle Signal specification needs enhancement? Do you want to discuss with experts? Try the following ressources to get in touch with the VSS community:
$ databroker-cli
sdv.databroker.v1 > connect
[connect] OK
sdv.databroker.v1 > get Vehicle.Cabin.Infotainment.HMI.DistanceUnit
[get] OK
Vehicle.Cabin.Infotainment.HMI.DistanceUnit: ( NotAvailable )sdv.databroker.v1 > set Vehicle.Cabin.Infotainment.HMI.DistanceUnit Foo
[set] OK
Digital Auto: Playground
playground.digital.auto provides an in-browser, rapid prototyping environment utilizing the COVESA APIs for connected vehicles.
The UUID for Vehicle.Cabin.Infotainment.HMI.DistanceUnit is 4b40e8bdb1a053ee9ee35338d8804e7b
Feedback
Do you think this Vehicle Signal specification needs enhancement? Do you want to discuss with experts? Try the following ressources to get in touch with the VSS community:
$ databroker-cli
sdv.databroker.v1 > connect
[connect] OK
sdv.databroker.v1 > get Vehicle.Cabin.Infotainment.HMI.EVEconomyUnits
[get] OK
Vehicle.Cabin.Infotainment.HMI.EVEconomyUnits: ( NotAvailable )sdv.databroker.v1 > set Vehicle.Cabin.Infotainment.HMI.EVEconomyUnits Foo
[set] OK
Digital Auto: Playground
playground.digital.auto provides an in-browser, rapid prototyping environment utilizing the COVESA APIs for connected vehicles.
The UUID for Vehicle.Cabin.Infotainment.HMI.EVEconomyUnits is 914846f6804757ba81ca6bcfac8d2c48
Feedback
Do you think this Vehicle Signal specification needs enhancement? Do you want to discuss with experts? Try the following ressources to get in touch with the VSS community:
$ databroker-cli
sdv.databroker.v1 > connect
[connect] OK
sdv.databroker.v1 > get Vehicle.Cabin.Infotainment.HMI.FuelEconomyUnits
[get] OK
Vehicle.Cabin.Infotainment.HMI.FuelEconomyUnits: ( NotAvailable )sdv.databroker.v1 > set Vehicle.Cabin.Infotainment.HMI.FuelEconomyUnits Foo
[set] OK
Digital Auto: Playground
playground.digital.auto provides an in-browser, rapid prototyping environment utilizing the COVESA APIs for connected vehicles.
The UUID for Vehicle.Cabin.Infotainment.HMI.FuelEconomyUnits is 0e6a43ce1aa45243b753545ffa1f0f8c
Feedback
Do you think this Vehicle Signal specification needs enhancement? Do you want to discuss with experts? Try the following ressources to get in touch with the VSS community:
$ databroker-cli
sdv.databroker.v1 > connect
[connect] OK
sdv.databroker.v1 > get Vehicle.Cabin.Infotainment.HMI.FuelVolumeUnit
[get] OK
Vehicle.Cabin.Infotainment.HMI.FuelVolumeUnit: ( NotAvailable )sdv.databroker.v1 > set Vehicle.Cabin.Infotainment.HMI.FuelVolumeUnit Foo
[set] OK
Digital Auto: Playground
playground.digital.auto provides an in-browser, rapid prototyping environment utilizing the COVESA APIs for connected vehicles.
The UUID for Vehicle.Cabin.Infotainment.HMI.FuelVolumeUnit is aef80d0bd01d593082e41abf072dab9b
Feedback
Do you think this Vehicle Signal specification needs enhancement? Do you want to discuss with experts? Try the following ressources to get in touch with the VSS community:
$ databroker-cli
sdv.databroker.v1 > connect
[connect] OK
sdv.databroker.v1 > get Vehicle.Cabin.Infotainment.HMI.TemperatureUnit
[get] OK
Vehicle.Cabin.Infotainment.HMI.TemperatureUnit: ( NotAvailable )sdv.databroker.v1 > set Vehicle.Cabin.Infotainment.HMI.TemperatureUnit Foo
[set] OK
Digital Auto: Playground
playground.digital.auto provides an in-browser, rapid prototyping environment utilizing the COVESA APIs for connected vehicles.
The UUID for Vehicle.Cabin.Infotainment.HMI.TemperatureUnit is a7d1533490bb52b6b4f650280e72543d
Feedback
Do you think this Vehicle Signal specification needs enhancement? Do you want to discuss with experts? Try the following ressources to get in touch with the VSS community:
$ databroker-cli
sdv.databroker.v1 > connect
[connect] OK
sdv.databroker.v1 > get Vehicle.Cabin.Infotainment.HMI.TimeFormat
[get] OK
Vehicle.Cabin.Infotainment.HMI.TimeFormat: ( NotAvailable )sdv.databroker.v1 > set Vehicle.Cabin.Infotainment.HMI.TimeFormat Foo
[set] OK
Digital Auto: Playground
playground.digital.auto provides an in-browser, rapid prototyping environment utilizing the COVESA APIs for connected vehicles.
The UUID for Vehicle.Cabin.Infotainment.HMI.TimeFormat is 73083b87a4e25c02aee672ea32e40005
Feedback
Do you think this Vehicle Signal specification needs enhancement? Do you want to discuss with experts? Try the following ressources to get in touch with the VSS community:
$ databroker-cli
sdv.databroker.v1 > connect
[connect] OK
sdv.databroker.v1 > get Vehicle.Cabin.Infotainment.HMI.TirePressureUnit
[get] OK
Vehicle.Cabin.Infotainment.HMI.TirePressureUnit: ( NotAvailable )sdv.databroker.v1 > set Vehicle.Cabin.Infotainment.HMI.TirePressureUnit Foo
[set] OK
Digital Auto: Playground
playground.digital.auto provides an in-browser, rapid prototyping environment utilizing the COVESA APIs for connected vehicles.
The UUID for Vehicle.Cabin.Infotainment.HMI.TirePressureUnit is e5ffaf58cc10523fa0858deafb61a8ce
Feedback
Do you think this Vehicle Signal specification needs enhancement? Do you want to discuss with experts? Try the following ressources to get in touch with the VSS community:
Do you think this Vehicle Signal specification needs enhancement? Do you want to discuss with experts? Try the following ressources to get in touch with the VSS community:
Do you think this Vehicle Signal specification needs enhancement? Do you want to discuss with experts? Try the following ressources to get in touch with the VSS community:
$ databroker-cli
sdv.databroker.v1 > connect
[connect] OK
sdv.databroker.v1 > get Vehicle.Cabin.Infotainment.Navigation.DestinationSet.Latitude
[get] OK
Vehicle.Cabin.Infotainment.Navigation.DestinationSet.Latitude: ( NotAvailable )sdv.databroker.v1 > set Vehicle.Cabin.Infotainment.Navigation.DestinationSet.Latitude 0[set] OK
Digital Auto: Playground
playground.digital.auto provides an in-browser, rapid prototyping environment utilizing the COVESA APIs for connected vehicles.
The UUID for Vehicle.Cabin.Infotainment.Navigation.DestinationSet.Latitude is 3e33f3252934565d86de5409c761262b
Feedback
Do you think this Vehicle Signal specification needs enhancement? Do you want to discuss with experts? Try the following ressources to get in touch with the VSS community:
$ databroker-cli
sdv.databroker.v1 > connect
[connect] OK
sdv.databroker.v1 > get Vehicle.Cabin.Infotainment.Navigation.DestinationSet.Longitude
[get] OK
Vehicle.Cabin.Infotainment.Navigation.DestinationSet.Longitude: ( NotAvailable )sdv.databroker.v1 > set Vehicle.Cabin.Infotainment.Navigation.DestinationSet.Longitude 0[set] OK
Digital Auto: Playground
playground.digital.auto provides an in-browser, rapid prototyping environment utilizing the COVESA APIs for connected vehicles.
The UUID for Vehicle.Cabin.Infotainment.Navigation.DestinationSet.Longitude is e9bd511146ca51639c8d42c0702e22ee
Feedback
Do you think this Vehicle Signal specification needs enhancement? Do you want to discuss with experts? Try the following ressources to get in touch with the VSS community:
$ databroker-cli
sdv.databroker.v1 > connect
[connect] OK
sdv.databroker.v1 > get Vehicle.Cabin.Infotainment.Navigation.Mute
[get] OK
Vehicle.Cabin.Infotainment.Navigation.Mute: ( NotAvailable )sdv.databroker.v1 > set Vehicle.Cabin.Infotainment.Navigation.Mute Foo
[set] OK
Digital Auto: Playground
playground.digital.auto provides an in-browser, rapid prototyping environment utilizing the COVESA APIs for connected vehicles.
The UUID for Vehicle.Cabin.Infotainment.Navigation.Mute is d7ab68ec65aa5bafa95f042a60c91639
Feedback
Do you think this Vehicle Signal specification needs enhancement? Do you want to discuss with experts? Try the following ressources to get in touch with the VSS community:
$ databroker-cli
sdv.databroker.v1 > connect
[connect] OK
sdv.databroker.v1 > get Vehicle.Cabin.Infotainment.Navigation.Volume
[get] OK
Vehicle.Cabin.Infotainment.Navigation.Volume: ( NotAvailable )sdv.databroker.v1 > set Vehicle.Cabin.Infotainment.Navigation.Volume 0[set] OK
Digital Auto: Playground
playground.digital.auto provides an in-browser, rapid prototyping environment utilizing the COVESA APIs for connected vehicles.
The UUID for Vehicle.Cabin.Infotainment.Navigation.Volume is 3609ff09d29d54d596068f978cbc0777
Feedback
Do you think this Vehicle Signal specification needs enhancement? Do you want to discuss with experts? Try the following ressources to get in touch with the VSS community:
The following is a list of VSS supported built-in datatypes:
Name
Type
Min
Max
uint8
unsigned 8-bit integer
0
255
int8
signed 8-bit integer
-128
127
uint16
unsigned 16-bit integer
0
65535
int16
signed 16-bit integer
-32768
32767
uint32
unsigned 32-bit integer
0
4294967295
int32
signed 32-bit integer
-2147483648
2147483647
uint64
unsigned 64-bit integer
0
2^64 - 1
int64
signed 64-bit integer
-2^63
2^63 - 1
boolean
boolean value
0/false
1/true
float
floating point number
-3.4e -38
3.4e 38
double
double precision floating point number
-1.7e -300
1.7e 300
string
character string
n/a
n/a
Min, max and default values defined in a Vehicle Signal Specification must be in the supported range of the data type.
5.1.8.12.3 - PowerOptimizeLevel
Full qualified VSS Path:
Vehicle.Cabin.Infotainment.PowerOptimizeLevel
Description:
Power optimization level for this branch/subsystem. A higher number indicates more aggressive power optimization. Level 0 indicates that all functionality is enabled, no power optimization enabled. Level 10 indicates most aggressive power optimization mode, only essential functionality enabled.
Navigation
flowchart LR
Vehicle-->Cabin
Cabin-->Infotainment
Infotainment-->PowerOptimizeLevel
$ databroker-cli
sdv.databroker.v1 > connect
[connect] OK
sdv.databroker.v1 > get Vehicle.Cabin.Infotainment.PowerOptimizeLevel
[get] OK
Vehicle.Cabin.Infotainment.PowerOptimizeLevel: ( NotAvailable )sdv.databroker.v1 > set Vehicle.Cabin.Infotainment.PowerOptimizeLevel 0[set] OK
Digital Auto: Playground
playground.digital.auto provides an in-browser, rapid prototyping environment utilizing the COVESA APIs for connected vehicles.
The UUID for Vehicle.Cabin.Infotainment.PowerOptimizeLevel is 7be907e3d9fd5c46a516f7cd07f050a3
Feedback
Do you think this Vehicle Signal specification needs enhancement? Do you want to discuss with experts? Try the following ressources to get in touch with the VSS community:
Do you think this Vehicle Signal specification needs enhancement? Do you want to discuss with experts? Try the following ressources to get in touch with the VSS community:
$ databroker-cli
sdv.databroker.v1 > connect
[connect] OK
sdv.databroker.v1 > get Vehicle.Cabin.Infotainment.SmartphoneProjection.Active
[get] OK
Vehicle.Cabin.Infotainment.SmartphoneProjection.Active: ( NotAvailable )sdv.databroker.v1 > set Vehicle.Cabin.Infotainment.SmartphoneProjection.Active Foo
[set] OK
Digital Auto: Playground
playground.digital.auto provides an in-browser, rapid prototyping environment utilizing the COVESA APIs for connected vehicles.
The UUID for Vehicle.Cabin.Infotainment.SmartphoneProjection.Active is 7156b00b47a8513c8e86f50f7d152614
Feedback
Do you think this Vehicle Signal specification needs enhancement? Do you want to discuss with experts? Try the following ressources to get in touch with the VSS community:
$ databroker-cli
sdv.databroker.v1 > connect
[connect] OK
sdv.databroker.v1 > get Vehicle.Cabin.Infotainment.SmartphoneProjection.Source
[get] OK
Vehicle.Cabin.Infotainment.SmartphoneProjection.Source: ( NotAvailable )sdv.databroker.v1 > set Vehicle.Cabin.Infotainment.SmartphoneProjection.Source Foo
[set] OK
Digital Auto: Playground
playground.digital.auto provides an in-browser, rapid prototyping environment utilizing the COVESA APIs for connected vehicles.
The UUID for Vehicle.Cabin.Infotainment.SmartphoneProjection.Source is 1c2d1f379f5752ac802456a992b88156
Feedback
Do you think this Vehicle Signal specification needs enhancement? Do you want to discuss with experts? Try the following ressources to get in touch with the VSS community:
$ databroker-cli
sdv.databroker.v1 > connect
[connect] OK
sdv.databroker.v1 > get Vehicle.Cabin.Infotainment.SmartphoneProjection.SupportedMode
[get] OK
Vehicle.Cabin.Infotainment.SmartphoneProjection.SupportedMode: ( NotAvailable )sdv.databroker.v1 > set Vehicle.Cabin.Infotainment.SmartphoneProjection.SupportedMode 0[set] OK
Digital Auto: Playground
playground.digital.auto provides an in-browser, rapid prototyping environment utilizing the COVESA APIs for connected vehicles.
The UUID for Vehicle.Cabin.Infotainment.SmartphoneProjection.SupportedMode is 80fa132703655d989386bc6711afed49
Feedback
Do you think this Vehicle Signal specification needs enhancement? Do you want to discuss with experts? Try the following ressources to get in touch with the VSS community:
Do you think this Vehicle Signal specification needs enhancement? Do you want to discuss with experts? Try the following ressources to get in touch with the VSS community:
$ databroker-cli
sdv.databroker.v1 > connect
[connect] OK
sdv.databroker.v1 > get Vehicle.Cabin.Infotainment.Media.DeclinedURI
[get] OK
Vehicle.Cabin.Infotainment.Media.DeclinedURI: ( NotAvailable )sdv.databroker.v1 > set Vehicle.Cabin.Infotainment.Media.DeclinedURI Foo
[set] OK
Digital Auto: Playground
playground.digital.auto provides an in-browser, rapid prototyping environment utilizing the COVESA APIs for connected vehicles.
The UUID for Vehicle.Cabin.Infotainment.Media.DeclinedURI is 51b0d6227db55b92bc35eedd8277f4c4
Feedback
Do you think this Vehicle Signal specification needs enhancement? Do you want to discuss with experts? Try the following ressources to get in touch with the VSS community:
$ databroker-cli
sdv.databroker.v1 > connect
[connect] OK
sdv.databroker.v1 > get Vehicle.Cabin.Infotainment.Media.SelectedURI
[get] OK
Vehicle.Cabin.Infotainment.Media.SelectedURI: ( NotAvailable )sdv.databroker.v1 > set Vehicle.Cabin.Infotainment.Media.SelectedURI Foo
[set] OK
Digital Auto: Playground
playground.digital.auto provides an in-browser, rapid prototyping environment utilizing the COVESA APIs for connected vehicles.
The UUID for Vehicle.Cabin.Infotainment.Media.SelectedURI is 4820f7a961c25e91af12d3417a145d32
Feedback
Do you think this Vehicle Signal specification needs enhancement? Do you want to discuss with experts? Try the following ressources to get in touch with the VSS community:
$ databroker-cli
sdv.databroker.v1 > connect
[connect] OK
sdv.databroker.v1 > get Vehicle.Cabin.Infotainment.Media.Volume
[get] OK
Vehicle.Cabin.Infotainment.Media.Volume: ( NotAvailable )sdv.databroker.v1 > set Vehicle.Cabin.Infotainment.Media.Volume 0[set] OK
Digital Auto: Playground
playground.digital.auto provides an in-browser, rapid prototyping environment utilizing the COVESA APIs for connected vehicles.
The UUID for Vehicle.Cabin.Infotainment.Media.Volume is 8b344688816f5844ae5812bb136c8006
Feedback
Do you think this Vehicle Signal specification needs enhancement? Do you want to discuss with experts? Try the following ressources to get in touch with the VSS community:
$ databroker-cli
sdv.databroker.v1 > connect
[connect] OK
sdv.databroker.v1 > get Vehicle.Cabin.Infotainment.Media.Action
[get] OK
Vehicle.Cabin.Infotainment.Media.Action: ( NotAvailable )sdv.databroker.v1 > set Vehicle.Cabin.Infotainment.Media.Action Foo
[set] OK
Digital Auto: Playground
playground.digital.auto provides an in-browser, rapid prototyping environment utilizing the COVESA APIs for connected vehicles.
The UUID for Vehicle.Cabin.Infotainment.Media.Action is 0357aea525bf505981a14e4fc720094e
Feedback
Do you think this Vehicle Signal specification needs enhancement? Do you want to discuss with experts? Try the following ressources to get in touch with the VSS community:
Do you think this Vehicle Signal specification needs enhancement? Do you want to discuss with experts? Try the following ressources to get in touch with the VSS community:
The normal playback rate is multiplied by this value to obtain the current rate, so a value of 1.0 indicates normal speed. Values of lower than 1.0 make the media play slower than normal. Values of higher than 1.0 make the media play faster than normal.
Navigation
flowchart LR
Vehicle-->Cabin
Cabin-->Infotainment
Infotainment-->Media
Media-->Played
Played-->PlaybackRate
$ databroker-cli
sdv.databroker.v1 > connect
[connect] OK
sdv.databroker.v1 > get Vehicle.Cabin.Infotainment.Media.Played.PlaybackRate
[get] OK
Vehicle.Cabin.Infotainment.Media.Played.PlaybackRate: ( NotAvailable )sdv.databroker.v1 > set Vehicle.Cabin.Infotainment.Media.Played.PlaybackRate 0[set] OK
Digital Auto: Playground
playground.digital.auto provides an in-browser, rapid prototyping environment utilizing the COVESA APIs for connected vehicles.
The UUID for Vehicle.Cabin.Infotainment.Media.Played.PlaybackRate is f5e58f66f21f560fbd0124ab5b17460e
Feedback
Do you think this Vehicle Signal specification needs enhancement? Do you want to discuss with experts? Try the following ressources to get in touch with the VSS community:
$ databroker-cli
sdv.databroker.v1 > connect
[connect] OK
sdv.databroker.v1 > get Vehicle.Cabin.Infotainment.Media.Played.Album
[get] OK
Vehicle.Cabin.Infotainment.Media.Played.Album: ( NotAvailable )sdv.databroker.v1 > set Vehicle.Cabin.Infotainment.Media.Played.Album Foo
[set] OK
Digital Auto: Playground
playground.digital.auto provides an in-browser, rapid prototyping environment utilizing the COVESA APIs for connected vehicles.
The UUID for Vehicle.Cabin.Infotainment.Media.Played.Album is 1d80b1e2c1085def92b3548b5db2786e
Feedback
Do you think this Vehicle Signal specification needs enhancement? Do you want to discuss with experts? Try the following ressources to get in touch with the VSS community:
$ databroker-cli
sdv.databroker.v1 > connect
[connect] OK
sdv.databroker.v1 > get Vehicle.Cabin.Infotainment.Media.Played.Artist
[get] OK
Vehicle.Cabin.Infotainment.Media.Played.Artist: ( NotAvailable )sdv.databroker.v1 > set Vehicle.Cabin.Infotainment.Media.Played.Artist Foo
[set] OK
Digital Auto: Playground
playground.digital.auto provides an in-browser, rapid prototyping environment utilizing the COVESA APIs for connected vehicles.
The UUID for Vehicle.Cabin.Infotainment.Media.Played.Artist is 076af7ad8aff5110ab5a64d1f58ccdcb
Feedback
Do you think this Vehicle Signal specification needs enhancement? Do you want to discuss with experts? Try the following ressources to get in touch with the VSS community:
$ databroker-cli
sdv.databroker.v1 > connect
[connect] OK
sdv.databroker.v1 > get Vehicle.Cabin.Infotainment.Media.Played.Source
[get] OK
Vehicle.Cabin.Infotainment.Media.Played.Source: ( NotAvailable )sdv.databroker.v1 > set Vehicle.Cabin.Infotainment.Media.Played.Source Foo
[set] OK
Digital Auto: Playground
playground.digital.auto provides an in-browser, rapid prototyping environment utilizing the COVESA APIs for connected vehicles.
The UUID for Vehicle.Cabin.Infotainment.Media.Played.Source is 54fb88a7d7cf5e3aab63e8f52415c187
Feedback
Do you think this Vehicle Signal specification needs enhancement? Do you want to discuss with experts? Try the following ressources to get in touch with the VSS community:
$ databroker-cli
sdv.databroker.v1 > connect
[connect] OK
sdv.databroker.v1 > get Vehicle.Cabin.Infotainment.Media.Played.Track
[get] OK
Vehicle.Cabin.Infotainment.Media.Played.Track: ( NotAvailable )sdv.databroker.v1 > set Vehicle.Cabin.Infotainment.Media.Played.Track Foo
[set] OK
Digital Auto: Playground
playground.digital.auto provides an in-browser, rapid prototyping environment utilizing the COVESA APIs for connected vehicles.
The UUID for Vehicle.Cabin.Infotainment.Media.Played.Track is ee800d62a40351e6934649ca75927d69
Feedback
Do you think this Vehicle Signal specification needs enhancement? Do you want to discuss with experts? Try the following ressources to get in touch with the VSS community:
$ databroker-cli
sdv.databroker.v1 > connect
[connect] OK
sdv.databroker.v1 > get Vehicle.Cabin.Infotainment.Media.Played.URI
[get] OK
Vehicle.Cabin.Infotainment.Media.Played.URI: ( NotAvailable )sdv.databroker.v1 > set Vehicle.Cabin.Infotainment.Media.Played.URI Foo
[set] OK
Digital Auto: Playground
playground.digital.auto provides an in-browser, rapid prototyping environment utilizing the COVESA APIs for connected vehicles.
The UUID for Vehicle.Cabin.Infotainment.Media.Played.URI is 1ed22b9925c3502d8d1389c8e02d0f07
Feedback
Do you think this Vehicle Signal specification needs enhancement? Do you want to discuss with experts? Try the following ressources to get in touch with the VSS community:
Vehicle.Cabin.HVAC.PowerOptimizeLevel (Power optimization level for this branch/subsystem. A higher number indicates more aggressive power optimization. Level 0 indicates that all functionality is enabled, no power optimization enabled. Level 10 indicates most aggressive power optimization mode, only essential functionality enabled.)
Do you think this Vehicle Signal specification needs enhancement? Do you want to discuss with experts? Try the following ressources to get in touch with the VSS community:
$ databroker-cli
sdv.databroker.v1 > connect
[connect] OK
sdv.databroker.v1 > get Vehicle.Cabin.HVAC.AmbientAirTemperature
[get] OK
Vehicle.Cabin.HVAC.AmbientAirTemperature: ( NotAvailable )sdv.databroker.v1 > set Vehicle.Cabin.HVAC.AmbientAirTemperature 0[set] OK
Digital Auto: Playground
playground.digital.auto provides an in-browser, rapid prototyping environment utilizing the COVESA APIs for connected vehicles.
The UUID for Vehicle.Cabin.HVAC.AmbientAirTemperature is 611868a24bc25eb9a837208c235e9491
Feedback
Do you think this Vehicle Signal specification needs enhancement? Do you want to discuss with experts? Try the following ressources to get in touch with the VSS community:
$ databroker-cli
sdv.databroker.v1 > connect
[connect] OK
sdv.databroker.v1 > get Vehicle.Cabin.HVAC.IsAirConditioningActive
[get] OK
Vehicle.Cabin.HVAC.IsAirConditioningActive: ( NotAvailable )sdv.databroker.v1 > set Vehicle.Cabin.HVAC.IsAirConditioningActive false[set] OK
Digital Auto: Playground
playground.digital.auto provides an in-browser, rapid prototyping environment utilizing the COVESA APIs for connected vehicles.
The UUID for Vehicle.Cabin.HVAC.IsAirConditioningActive is dc4f79e4211c54a6b4eed0236aae84a6
Feedback
Do you think this Vehicle Signal specification needs enhancement? Do you want to discuss with experts? Try the following ressources to get in touch with the VSS community:
$ databroker-cli
sdv.databroker.v1 > connect
[connect] OK
sdv.databroker.v1 > get Vehicle.Cabin.HVAC.IsFrontDefrosterActive
[get] OK
Vehicle.Cabin.HVAC.IsFrontDefrosterActive: ( NotAvailable )sdv.databroker.v1 > set Vehicle.Cabin.HVAC.IsFrontDefrosterActive false[set] OK
Digital Auto: Playground
playground.digital.auto provides an in-browser, rapid prototyping environment utilizing the COVESA APIs for connected vehicles.
The UUID for Vehicle.Cabin.HVAC.IsFrontDefrosterActive is afa678c87182544bb6ab81fa6a770791
Feedback
Do you think this Vehicle Signal specification needs enhancement? Do you want to discuss with experts? Try the following ressources to get in touch with the VSS community:
$ databroker-cli
sdv.databroker.v1 > connect
[connect] OK
sdv.databroker.v1 > get Vehicle.Cabin.HVAC.IsRearDefrosterActive
[get] OK
Vehicle.Cabin.HVAC.IsRearDefrosterActive: ( NotAvailable )sdv.databroker.v1 > set Vehicle.Cabin.HVAC.IsRearDefrosterActive false[set] OK
Digital Auto: Playground
playground.digital.auto provides an in-browser, rapid prototyping environment utilizing the COVESA APIs for connected vehicles.
The UUID for Vehicle.Cabin.HVAC.IsRearDefrosterActive is d342a7939f2e5adeaeb5e68e3a314445
Feedback
Do you think this Vehicle Signal specification needs enhancement? Do you want to discuss with experts? Try the following ressources to get in touch with the VSS community:
$ databroker-cli
sdv.databroker.v1 > connect
[connect] OK
sdv.databroker.v1 > get Vehicle.Cabin.HVAC.IsRecirculationActive
[get] OK
Vehicle.Cabin.HVAC.IsRecirculationActive: ( NotAvailable )sdv.databroker.v1 > set Vehicle.Cabin.HVAC.IsRecirculationActive false[set] OK
Digital Auto: Playground
playground.digital.auto provides an in-browser, rapid prototyping environment utilizing the COVESA APIs for connected vehicles.
The UUID for Vehicle.Cabin.HVAC.IsRecirculationActive is 7b80c41c63b35c9299a410166cd33c81
Feedback
Do you think this Vehicle Signal specification needs enhancement? Do you want to discuss with experts? Try the following ressources to get in touch with the VSS community:
The following is a list of VSS supported built-in datatypes:
Name
Type
Min
Max
uint8
unsigned 8-bit integer
0
255
int8
signed 8-bit integer
-128
127
uint16
unsigned 16-bit integer
0
65535
int16
signed 16-bit integer
-32768
32767
uint32
unsigned 32-bit integer
0
4294967295
int32
signed 32-bit integer
-2147483648
2147483647
uint64
unsigned 64-bit integer
0
2^64 - 1
int64
signed 64-bit integer
-2^63
2^63 - 1
boolean
boolean value
0/false
1/true
float
floating point number
-3.4e -38
3.4e 38
double
double precision floating point number
-1.7e -300
1.7e 300
string
character string
n/a
n/a
Min, max and default values defined in a Vehicle Signal Specification must be in the supported range of the data type.
5.1.8.13.6 - PowerOptimizeLevel
Full qualified VSS Path:
Vehicle.Cabin.HVAC.PowerOptimizeLevel
Description:
Power optimization level for this branch/subsystem. A higher number indicates more aggressive power optimization. Level 0 indicates that all functionality is enabled, no power optimization enabled. Level 10 indicates most aggressive power optimization mode, only essential functionality enabled.
Navigation
flowchart LR
Vehicle-->Cabin
Cabin-->HVAC
HVAC-->PowerOptimizeLevel
$ databroker-cli
sdv.databroker.v1 > connect
[connect] OK
sdv.databroker.v1 > get Vehicle.Cabin.HVAC.PowerOptimizeLevel
[get] OK
Vehicle.Cabin.HVAC.PowerOptimizeLevel: ( NotAvailable )sdv.databroker.v1 > set Vehicle.Cabin.HVAC.PowerOptimizeLevel 0[set] OK
Digital Auto: Playground
playground.digital.auto provides an in-browser, rapid prototyping environment utilizing the COVESA APIs for connected vehicles.
The UUID for Vehicle.Cabin.HVAC.PowerOptimizeLevel is ee011a09ebc6519183177b05d7302ce8
Feedback
Do you think this Vehicle Signal specification needs enhancement? Do you want to discuss with experts? Try the following ressources to get in touch with the VSS community:
Do you think this Vehicle Signal specification needs enhancement? Do you want to discuss with experts? Try the following ressources to get in touch with the VSS community:
Do you think this Vehicle Signal specification needs enhancement? Do you want to discuss with experts? Try the following ressources to get in touch with the VSS community:
Do you think this Vehicle Signal specification needs enhancement? Do you want to discuss with experts? Try the following ressources to get in touch with the VSS community:
$ databroker-cli
sdv.databroker.v1 > connect
[connect] OK
sdv.databroker.v1 > get Vehicle.Cabin.HVAC.Station.Row4.Left.AirDistribution
[get] OK
Vehicle.Cabin.HVAC.Station.Row4.Left.AirDistribution: ( NotAvailable )sdv.databroker.v1 > set Vehicle.Cabin.HVAC.Station.Row4.Left.AirDistribution Foo
[set] OK
Digital Auto: Playground
playground.digital.auto provides an in-browser, rapid prototyping environment utilizing the COVESA APIs for connected vehicles.
The UUID for Vehicle.Cabin.HVAC.Station.Row4.Left.AirDistribution is ee591723296a580ea4ce9fc6ddbb5cf5
Feedback
Do you think this Vehicle Signal specification needs enhancement? Do you want to discuss with experts? Try the following ressources to get in touch with the VSS community:
$ databroker-cli
sdv.databroker.v1 > connect
[connect] OK
sdv.databroker.v1 > get Vehicle.Cabin.HVAC.Station.Row4.Left.FanSpeed
[get] OK
Vehicle.Cabin.HVAC.Station.Row4.Left.FanSpeed: ( NotAvailable )sdv.databroker.v1 > set Vehicle.Cabin.HVAC.Station.Row4.Left.FanSpeed 0[set] OK
Digital Auto: Playground
playground.digital.auto provides an in-browser, rapid prototyping environment utilizing the COVESA APIs for connected vehicles.
The UUID for Vehicle.Cabin.HVAC.Station.Row4.Left.FanSpeed is afd89e90044e5d5fa99e9c627742adb0
Feedback
Do you think this Vehicle Signal specification needs enhancement? Do you want to discuss with experts? Try the following ressources to get in touch with the VSS community:
$ databroker-cli
sdv.databroker.v1 > connect
[connect] OK
sdv.databroker.v1 > get Vehicle.Cabin.HVAC.Station.Row4.Left.Temperature
[get] OK
Vehicle.Cabin.HVAC.Station.Row4.Left.Temperature: ( NotAvailable )sdv.databroker.v1 > set Vehicle.Cabin.HVAC.Station.Row4.Left.Temperature 0[set] OK
Digital Auto: Playground
playground.digital.auto provides an in-browser, rapid prototyping environment utilizing the COVESA APIs for connected vehicles.
The UUID for Vehicle.Cabin.HVAC.Station.Row4.Left.Temperature is accc4bb43c775735843e87b545af08b2
Feedback
Do you think this Vehicle Signal specification needs enhancement? Do you want to discuss with experts? Try the following ressources to get in touch with the VSS community:
Do you think this Vehicle Signal specification needs enhancement? Do you want to discuss with experts? Try the following ressources to get in touch with the VSS community:
$ databroker-cli
sdv.databroker.v1 > connect
[connect] OK
sdv.databroker.v1 > get Vehicle.Cabin.HVAC.Station.Row4.Right.AirDistribution
[get] OK
Vehicle.Cabin.HVAC.Station.Row4.Right.AirDistribution: ( NotAvailable )sdv.databroker.v1 > set Vehicle.Cabin.HVAC.Station.Row4.Right.AirDistribution Foo
[set] OK
Digital Auto: Playground
playground.digital.auto provides an in-browser, rapid prototyping environment utilizing the COVESA APIs for connected vehicles.
The UUID for Vehicle.Cabin.HVAC.Station.Row4.Right.AirDistribution is 7d8b7cbfe68156d4a190a0a7525ee26c
Feedback
Do you think this Vehicle Signal specification needs enhancement? Do you want to discuss with experts? Try the following ressources to get in touch with the VSS community:
$ databroker-cli
sdv.databroker.v1 > connect
[connect] OK
sdv.databroker.v1 > get Vehicle.Cabin.HVAC.Station.Row4.Right.FanSpeed
[get] OK
Vehicle.Cabin.HVAC.Station.Row4.Right.FanSpeed: ( NotAvailable )sdv.databroker.v1 > set Vehicle.Cabin.HVAC.Station.Row4.Right.FanSpeed 0[set] OK
Digital Auto: Playground
playground.digital.auto provides an in-browser, rapid prototyping environment utilizing the COVESA APIs for connected vehicles.
The UUID for Vehicle.Cabin.HVAC.Station.Row4.Right.FanSpeed is b3cc73b02e5c5254b691373caacd7d21
Feedback
Do you think this Vehicle Signal specification needs enhancement? Do you want to discuss with experts? Try the following ressources to get in touch with the VSS community:
$ databroker-cli
sdv.databroker.v1 > connect
[connect] OK
sdv.databroker.v1 > get Vehicle.Cabin.HVAC.Station.Row4.Right.Temperature
[get] OK
Vehicle.Cabin.HVAC.Station.Row4.Right.Temperature: ( NotAvailable )sdv.databroker.v1 > set Vehicle.Cabin.HVAC.Station.Row4.Right.Temperature 0[set] OK
Digital Auto: Playground
playground.digital.auto provides an in-browser, rapid prototyping environment utilizing the COVESA APIs for connected vehicles.
The UUID for Vehicle.Cabin.HVAC.Station.Row4.Right.Temperature is 49c59496aa7356cf86c275a0eb93ba28
Feedback
Do you think this Vehicle Signal specification needs enhancement? Do you want to discuss with experts? Try the following ressources to get in touch with the VSS community:
Do you think this Vehicle Signal specification needs enhancement? Do you want to discuss with experts? Try the following ressources to get in touch with the VSS community:
Do you think this Vehicle Signal specification needs enhancement? Do you want to discuss with experts? Try the following ressources to get in touch with the VSS community:
$ databroker-cli
sdv.databroker.v1 > connect
[connect] OK
sdv.databroker.v1 > get Vehicle.Cabin.HVAC.Station.Row1.Left.AirDistribution
[get] OK
Vehicle.Cabin.HVAC.Station.Row1.Left.AirDistribution: ( NotAvailable )sdv.databroker.v1 > set Vehicle.Cabin.HVAC.Station.Row1.Left.AirDistribution Foo
[set] OK
Digital Auto: Playground
playground.digital.auto provides an in-browser, rapid prototyping environment utilizing the COVESA APIs for connected vehicles.
The UUID for Vehicle.Cabin.HVAC.Station.Row1.Left.AirDistribution is 33ca2e1ed1b1533b8e1309320074c07b
Feedback
Do you think this Vehicle Signal specification needs enhancement? Do you want to discuss with experts? Try the following ressources to get in touch with the VSS community:
$ databroker-cli
sdv.databroker.v1 > connect
[connect] OK
sdv.databroker.v1 > get Vehicle.Cabin.HVAC.Station.Row1.Left.FanSpeed
[get] OK
Vehicle.Cabin.HVAC.Station.Row1.Left.FanSpeed: ( NotAvailable )sdv.databroker.v1 > set Vehicle.Cabin.HVAC.Station.Row1.Left.FanSpeed 0[set] OK
Digital Auto: Playground
playground.digital.auto provides an in-browser, rapid prototyping environment utilizing the COVESA APIs for connected vehicles.
The UUID for Vehicle.Cabin.HVAC.Station.Row1.Left.FanSpeed is 483bcf787a715f10a1c936464fcb18a2
Feedback
Do you think this Vehicle Signal specification needs enhancement? Do you want to discuss with experts? Try the following ressources to get in touch with the VSS community:
$ databroker-cli
sdv.databroker.v1 > connect
[connect] OK
sdv.databroker.v1 > get Vehicle.Cabin.HVAC.Station.Row1.Left.Temperature
[get] OK
Vehicle.Cabin.HVAC.Station.Row1.Left.Temperature: ( NotAvailable )sdv.databroker.v1 > set Vehicle.Cabin.HVAC.Station.Row1.Left.Temperature 0[set] OK
Digital Auto: Playground
playground.digital.auto provides an in-browser, rapid prototyping environment utilizing the COVESA APIs for connected vehicles.
The UUID for Vehicle.Cabin.HVAC.Station.Row1.Left.Temperature is 347c13ff2a735d54a5f011d4573694cd
Feedback
Do you think this Vehicle Signal specification needs enhancement? Do you want to discuss with experts? Try the following ressources to get in touch with the VSS community:
Do you think this Vehicle Signal specification needs enhancement? Do you want to discuss with experts? Try the following ressources to get in touch with the VSS community:
$ databroker-cli
sdv.databroker.v1 > connect
[connect] OK
sdv.databroker.v1 > get Vehicle.Cabin.HVAC.Station.Row1.Right.AirDistribution
[get] OK
Vehicle.Cabin.HVAC.Station.Row1.Right.AirDistribution: ( NotAvailable )sdv.databroker.v1 > set Vehicle.Cabin.HVAC.Station.Row1.Right.AirDistribution Foo
[set] OK
Digital Auto: Playground
playground.digital.auto provides an in-browser, rapid prototyping environment utilizing the COVESA APIs for connected vehicles.
The UUID for Vehicle.Cabin.HVAC.Station.Row1.Right.AirDistribution is 00e25d807a755c4cb978a40ebfc0e8d0
Feedback
Do you think this Vehicle Signal specification needs enhancement? Do you want to discuss with experts? Try the following ressources to get in touch with the VSS community:
$ databroker-cli
sdv.databroker.v1 > connect
[connect] OK
sdv.databroker.v1 > get Vehicle.Cabin.HVAC.Station.Row1.Right.FanSpeed
[get] OK
Vehicle.Cabin.HVAC.Station.Row1.Right.FanSpeed: ( NotAvailable )sdv.databroker.v1 > set Vehicle.Cabin.HVAC.Station.Row1.Right.FanSpeed 0[set] OK
Digital Auto: Playground
playground.digital.auto provides an in-browser, rapid prototyping environment utilizing the COVESA APIs for connected vehicles.
The UUID for Vehicle.Cabin.HVAC.Station.Row1.Right.FanSpeed is 4b15871631c35ca583a1fc64524676ef
Feedback
Do you think this Vehicle Signal specification needs enhancement? Do you want to discuss with experts? Try the following ressources to get in touch with the VSS community:
$ databroker-cli
sdv.databroker.v1 > connect
[connect] OK
sdv.databroker.v1 > get Vehicle.Cabin.HVAC.Station.Row1.Right.Temperature
[get] OK
Vehicle.Cabin.HVAC.Station.Row1.Right.Temperature: ( NotAvailable )sdv.databroker.v1 > set Vehicle.Cabin.HVAC.Station.Row1.Right.Temperature 0[set] OK
Digital Auto: Playground
playground.digital.auto provides an in-browser, rapid prototyping environment utilizing the COVESA APIs for connected vehicles.
The UUID for Vehicle.Cabin.HVAC.Station.Row1.Right.Temperature is 592dc63c45145f739edbc5677196eb85
Feedback
Do you think this Vehicle Signal specification needs enhancement? Do you want to discuss with experts? Try the following ressources to get in touch with the VSS community:
Do you think this Vehicle Signal specification needs enhancement? Do you want to discuss with experts? Try the following ressources to get in touch with the VSS community:
Do you think this Vehicle Signal specification needs enhancement? Do you want to discuss with experts? Try the following ressources to get in touch with the VSS community:
$ databroker-cli
sdv.databroker.v1 > connect
[connect] OK
sdv.databroker.v1 > get Vehicle.Cabin.HVAC.Station.Row2.Left.AirDistribution
[get] OK
Vehicle.Cabin.HVAC.Station.Row2.Left.AirDistribution: ( NotAvailable )sdv.databroker.v1 > set Vehicle.Cabin.HVAC.Station.Row2.Left.AirDistribution Foo
[set] OK
Digital Auto: Playground
playground.digital.auto provides an in-browser, rapid prototyping environment utilizing the COVESA APIs for connected vehicles.
The UUID for Vehicle.Cabin.HVAC.Station.Row2.Left.AirDistribution is 3c22cd8ac56b59978927fc815ee79104
Feedback
Do you think this Vehicle Signal specification needs enhancement? Do you want to discuss with experts? Try the following ressources to get in touch with the VSS community:
$ databroker-cli
sdv.databroker.v1 > connect
[connect] OK
sdv.databroker.v1 > get Vehicle.Cabin.HVAC.Station.Row2.Left.FanSpeed
[get] OK
Vehicle.Cabin.HVAC.Station.Row2.Left.FanSpeed: ( NotAvailable )sdv.databroker.v1 > set Vehicle.Cabin.HVAC.Station.Row2.Left.FanSpeed 0[set] OK
Digital Auto: Playground
playground.digital.auto provides an in-browser, rapid prototyping environment utilizing the COVESA APIs for connected vehicles.
The UUID for Vehicle.Cabin.HVAC.Station.Row2.Left.FanSpeed is 3eb6e8979cb25efe9f33bc89c6b9e364
Feedback
Do you think this Vehicle Signal specification needs enhancement? Do you want to discuss with experts? Try the following ressources to get in touch with the VSS community:
$ databroker-cli
sdv.databroker.v1 > connect
[connect] OK
sdv.databroker.v1 > get Vehicle.Cabin.HVAC.Station.Row2.Left.Temperature
[get] OK
Vehicle.Cabin.HVAC.Station.Row2.Left.Temperature: ( NotAvailable )sdv.databroker.v1 > set Vehicle.Cabin.HVAC.Station.Row2.Left.Temperature 0[set] OK
Digital Auto: Playground
playground.digital.auto provides an in-browser, rapid prototyping environment utilizing the COVESA APIs for connected vehicles.
The UUID for Vehicle.Cabin.HVAC.Station.Row2.Left.Temperature is 7185fb43728f53f3960e1284b89a6f66
Feedback
Do you think this Vehicle Signal specification needs enhancement? Do you want to discuss with experts? Try the following ressources to get in touch with the VSS community:
Do you think this Vehicle Signal specification needs enhancement? Do you want to discuss with experts? Try the following ressources to get in touch with the VSS community:
$ databroker-cli
sdv.databroker.v1 > connect
[connect] OK
sdv.databroker.v1 > get Vehicle.Cabin.HVAC.Station.Row2.Right.AirDistribution
[get] OK
Vehicle.Cabin.HVAC.Station.Row2.Right.AirDistribution: ( NotAvailable )sdv.databroker.v1 > set Vehicle.Cabin.HVAC.Station.Row2.Right.AirDistribution Foo
[set] OK
Digital Auto: Playground
playground.digital.auto provides an in-browser, rapid prototyping environment utilizing the COVESA APIs for connected vehicles.
The UUID for Vehicle.Cabin.HVAC.Station.Row2.Right.AirDistribution is 10d42dd4337450e2af1c0dd2c9dcb3a7
Feedback
Do you think this Vehicle Signal specification needs enhancement? Do you want to discuss with experts? Try the following ressources to get in touch with the VSS community:
$ databroker-cli
sdv.databroker.v1 > connect
[connect] OK
sdv.databroker.v1 > get Vehicle.Cabin.HVAC.Station.Row2.Right.FanSpeed
[get] OK
Vehicle.Cabin.HVAC.Station.Row2.Right.FanSpeed: ( NotAvailable )sdv.databroker.v1 > set Vehicle.Cabin.HVAC.Station.Row2.Right.FanSpeed 0[set] OK
Digital Auto: Playground
playground.digital.auto provides an in-browser, rapid prototyping environment utilizing the COVESA APIs for connected vehicles.
The UUID for Vehicle.Cabin.HVAC.Station.Row2.Right.FanSpeed is b83d6d979cbc5507b1c43e988024c0af
Feedback
Do you think this Vehicle Signal specification needs enhancement? Do you want to discuss with experts? Try the following ressources to get in touch with the VSS community:
$ databroker-cli
sdv.databroker.v1 > connect
[connect] OK
sdv.databroker.v1 > get Vehicle.Cabin.HVAC.Station.Row2.Right.Temperature
[get] OK
Vehicle.Cabin.HVAC.Station.Row2.Right.Temperature: ( NotAvailable )sdv.databroker.v1 > set Vehicle.Cabin.HVAC.Station.Row2.Right.Temperature 0[set] OK
Digital Auto: Playground
playground.digital.auto provides an in-browser, rapid prototyping environment utilizing the COVESA APIs for connected vehicles.
The UUID for Vehicle.Cabin.HVAC.Station.Row2.Right.Temperature is c6822e4c0eae59cab832057bac327c67
Feedback
Do you think this Vehicle Signal specification needs enhancement? Do you want to discuss with experts? Try the following ressources to get in touch with the VSS community:
Do you think this Vehicle Signal specification needs enhancement? Do you want to discuss with experts? Try the following ressources to get in touch with the VSS community:
Do you think this Vehicle Signal specification needs enhancement? Do you want to discuss with experts? Try the following ressources to get in touch with the VSS community:
$ databroker-cli
sdv.databroker.v1 > connect
[connect] OK
sdv.databroker.v1 > get Vehicle.Cabin.HVAC.Station.Row3.Left.AirDistribution
[get] OK
Vehicle.Cabin.HVAC.Station.Row3.Left.AirDistribution: ( NotAvailable )sdv.databroker.v1 > set Vehicle.Cabin.HVAC.Station.Row3.Left.AirDistribution Foo
[set] OK
Digital Auto: Playground
playground.digital.auto provides an in-browser, rapid prototyping environment utilizing the COVESA APIs for connected vehicles.
The UUID for Vehicle.Cabin.HVAC.Station.Row3.Left.AirDistribution is f1e2dc36082b5980920c5fe3ee875659
Feedback
Do you think this Vehicle Signal specification needs enhancement? Do you want to discuss with experts? Try the following ressources to get in touch with the VSS community:
$ databroker-cli
sdv.databroker.v1 > connect
[connect] OK
sdv.databroker.v1 > get Vehicle.Cabin.HVAC.Station.Row3.Left.FanSpeed
[get] OK
Vehicle.Cabin.HVAC.Station.Row3.Left.FanSpeed: ( NotAvailable )sdv.databroker.v1 > set Vehicle.Cabin.HVAC.Station.Row3.Left.FanSpeed 0[set] OK
Digital Auto: Playground
playground.digital.auto provides an in-browser, rapid prototyping environment utilizing the COVESA APIs for connected vehicles.
The UUID for Vehicle.Cabin.HVAC.Station.Row3.Left.FanSpeed is 13170d23934e5a4ab97174ddee4dc180
Feedback
Do you think this Vehicle Signal specification needs enhancement? Do you want to discuss with experts? Try the following ressources to get in touch with the VSS community:
$ databroker-cli
sdv.databroker.v1 > connect
[connect] OK
sdv.databroker.v1 > get Vehicle.Cabin.HVAC.Station.Row3.Left.Temperature
[get] OK
Vehicle.Cabin.HVAC.Station.Row3.Left.Temperature: ( NotAvailable )sdv.databroker.v1 > set Vehicle.Cabin.HVAC.Station.Row3.Left.Temperature 0[set] OK
Digital Auto: Playground
playground.digital.auto provides an in-browser, rapid prototyping environment utilizing the COVESA APIs for connected vehicles.
The UUID for Vehicle.Cabin.HVAC.Station.Row3.Left.Temperature is b12b9565bd4e5c8e974ac0ff97223af4
Feedback
Do you think this Vehicle Signal specification needs enhancement? Do you want to discuss with experts? Try the following ressources to get in touch with the VSS community:
Do you think this Vehicle Signal specification needs enhancement? Do you want to discuss with experts? Try the following ressources to get in touch with the VSS community:
$ databroker-cli
sdv.databroker.v1 > connect
[connect] OK
sdv.databroker.v1 > get Vehicle.Cabin.HVAC.Station.Row3.Right.AirDistribution
[get] OK
Vehicle.Cabin.HVAC.Station.Row3.Right.AirDistribution: ( NotAvailable )sdv.databroker.v1 > set Vehicle.Cabin.HVAC.Station.Row3.Right.AirDistribution Foo
[set] OK
Digital Auto: Playground
playground.digital.auto provides an in-browser, rapid prototyping environment utilizing the COVESA APIs for connected vehicles.
The UUID for Vehicle.Cabin.HVAC.Station.Row3.Right.AirDistribution is 1b6c21042e3b5ac9ae351f807722795a
Feedback
Do you think this Vehicle Signal specification needs enhancement? Do you want to discuss with experts? Try the following ressources to get in touch with the VSS community:
$ databroker-cli
sdv.databroker.v1 > connect
[connect] OK
sdv.databroker.v1 > get Vehicle.Cabin.HVAC.Station.Row3.Right.FanSpeed
[get] OK
Vehicle.Cabin.HVAC.Station.Row3.Right.FanSpeed: ( NotAvailable )sdv.databroker.v1 > set Vehicle.Cabin.HVAC.Station.Row3.Right.FanSpeed 0[set] OK
Digital Auto: Playground
playground.digital.auto provides an in-browser, rapid prototyping environment utilizing the COVESA APIs for connected vehicles.
The UUID for Vehicle.Cabin.HVAC.Station.Row3.Right.FanSpeed is 9d5312c0ccc15f578b2c5e5512d34cb3
Feedback
Do you think this Vehicle Signal specification needs enhancement? Do you want to discuss with experts? Try the following ressources to get in touch with the VSS community:
$ databroker-cli
sdv.databroker.v1 > connect
[connect] OK
sdv.databroker.v1 > get Vehicle.Cabin.HVAC.Station.Row3.Right.Temperature
[get] OK
Vehicle.Cabin.HVAC.Station.Row3.Right.Temperature: ( NotAvailable )sdv.databroker.v1 > set Vehicle.Cabin.HVAC.Station.Row3.Right.Temperature 0[set] OK
Digital Auto: Playground
playground.digital.auto provides an in-browser, rapid prototyping environment utilizing the COVESA APIs for connected vehicles.
The UUID for Vehicle.Cabin.HVAC.Station.Row3.Right.Temperature is a76ea2c628df5099b0dca839aac84e63
Feedback
Do you think this Vehicle Signal specification needs enhancement? Do you want to discuss with experts? Try the following ressources to get in touch with the VSS community:
Do you think this Vehicle Signal specification needs enhancement? Do you want to discuss with experts? Try the following ressources to get in touch with the VSS community:
$ databroker-cli
sdv.databroker.v1 > connect
[connect] OK
sdv.databroker.v1 > get Vehicle.Cabin.RearShade.Position
[get] OK
Vehicle.Cabin.RearShade.Position: ( NotAvailable )sdv.databroker.v1 > set Vehicle.Cabin.RearShade.Position 0[set] OK
Digital Auto: Playground
playground.digital.auto provides an in-browser, rapid prototyping environment utilizing the COVESA APIs for connected vehicles.
The UUID for Vehicle.Cabin.RearShade.Position is 9e16fc53f2ec575dbf66c79f969949a9
Feedback
Do you think this Vehicle Signal specification needs enhancement? Do you want to discuss with experts? Try the following ressources to get in touch with the VSS community:
$ databroker-cli
sdv.databroker.v1 > connect
[connect] OK
sdv.databroker.v1 > get Vehicle.Cabin.RearShade.Switch
[get] OK
Vehicle.Cabin.RearShade.Switch: ( NotAvailable )sdv.databroker.v1 > set Vehicle.Cabin.RearShade.Switch Foo
[set] OK
Digital Auto: Playground
playground.digital.auto provides an in-browser, rapid prototyping environment utilizing the COVESA APIs for connected vehicles.
The UUID for Vehicle.Cabin.RearShade.Switch is da9f01e9baf35544842f1a7674c5172a
Feedback
Do you think this Vehicle Signal specification needs enhancement? Do you want to discuss with experts? Try the following ressources to get in touch with the VSS community:
Vehicle.Body.PowerOptimizeLevel (Power optimization level for this branch/subsystem. A higher number indicates more aggressive power optimization. Level 0 indicates that all functionality is enabled, no power optimization enabled. Level 10 indicates most aggressive power optimization mode, only essential functionality enabled.)
Do you think this Vehicle Signal specification needs enhancement? Do you want to discuss with experts? Try the following ressources to get in touch with the VSS community:
Power optimization level for this branch/subsystem. A higher number indicates more aggressive power optimization. Level 0 indicates that all functionality is enabled, no power optimization enabled. Level 10 indicates most aggressive power optimization mode, only essential functionality enabled.
Navigation
flowchart LR
Vehicle-->Body
Body-->PowerOptimizeLevel
$ databroker-cli
sdv.databroker.v1 > connect
[connect] OK
sdv.databroker.v1 > get Vehicle.Body.PowerOptimizeLevel
[get] OK
Vehicle.Body.PowerOptimizeLevel: ( NotAvailable )sdv.databroker.v1 > set Vehicle.Body.PowerOptimizeLevel 0[set] OK
Digital Auto: Playground
playground.digital.auto provides an in-browser, rapid prototyping environment utilizing the COVESA APIs for connected vehicles.
The UUID for Vehicle.Body.PowerOptimizeLevel is 2fe44a1c3bb155aca782b017efeb6175
Feedback
Do you think this Vehicle Signal specification needs enhancement? Do you want to discuss with experts? Try the following ressources to get in touch with the VSS community:
$ databroker-cli
sdv.databroker.v1 > connect
[connect] OK
sdv.databroker.v1 > get Vehicle.Body.RearMainSpoilerPosition
[get] OK
Vehicle.Body.RearMainSpoilerPosition: ( NotAvailable )sdv.databroker.v1 > set Vehicle.Body.RearMainSpoilerPosition 0[set] OK
Digital Auto: Playground
playground.digital.auto provides an in-browser, rapid prototyping environment utilizing the COVESA APIs for connected vehicles.
The UUID for Vehicle.Body.RearMainSpoilerPosition is 6209a82390585b869cc3d00d069eade2
Feedback
Do you think this Vehicle Signal specification needs enhancement? Do you want to discuss with experts? Try the following ressources to get in touch with the VSS community:
Do you think this Vehicle Signal specification needs enhancement? Do you want to discuss with experts? Try the following ressources to get in touch with the VSS community:
Vehicle.Body.Mirrors.Right.Pan (Mirror pan as a percent. 0 = Center Position. 100 = Fully Left Position. -100 = Fully Right Position.)
Vehicle.Body.Mirrors.Right.Tilt (Mirror tilt as a percent. 0 = Center Position. 100 = Fully Upward Position. -100 = Fully Downward Position.)
Feedback
Do you think this Vehicle Signal specification needs enhancement? Do you want to discuss with experts? Try the following ressources to get in touch with the VSS community:
$ databroker-cli
sdv.databroker.v1 > connect
[connect] OK
sdv.databroker.v1 > get Vehicle.Body.Mirrors.Right.IsHeatingOn
[get] OK
Vehicle.Body.Mirrors.Right.IsHeatingOn: ( NotAvailable )sdv.databroker.v1 > set Vehicle.Body.Mirrors.Right.IsHeatingOn false[set] OK
Digital Auto: Playground
playground.digital.auto provides an in-browser, rapid prototyping environment utilizing the COVESA APIs for connected vehicles.
The UUID for Vehicle.Body.Mirrors.Right.IsHeatingOn is 9a57455f48ea5fdbb7a998905dda318c
Feedback
Do you think this Vehicle Signal specification needs enhancement? Do you want to discuss with experts? Try the following ressources to get in touch with the VSS community:
$ databroker-cli
sdv.databroker.v1 > connect
[connect] OK
sdv.databroker.v1 > get Vehicle.Body.Mirrors.Right.Pan
[get] OK
Vehicle.Body.Mirrors.Right.Pan: ( NotAvailable )sdv.databroker.v1 > set Vehicle.Body.Mirrors.Right.Pan 0[set] OK
Digital Auto: Playground
playground.digital.auto provides an in-browser, rapid prototyping environment utilizing the COVESA APIs for connected vehicles.
The UUID for Vehicle.Body.Mirrors.Right.Pan is 26088f96804d5d7e811ba50bfb1113eb
Feedback
Do you think this Vehicle Signal specification needs enhancement? Do you want to discuss with experts? Try the following ressources to get in touch with the VSS community:
$ databroker-cli
sdv.databroker.v1 > connect
[connect] OK
sdv.databroker.v1 > get Vehicle.Body.Mirrors.Right.Tilt
[get] OK
Vehicle.Body.Mirrors.Right.Tilt: ( NotAvailable )sdv.databroker.v1 > set Vehicle.Body.Mirrors.Right.Tilt 0[set] OK
Digital Auto: Playground
playground.digital.auto provides an in-browser, rapid prototyping environment utilizing the COVESA APIs for connected vehicles.
The UUID for Vehicle.Body.Mirrors.Right.Tilt is 9a28a6ec824c57408881b916a1a0e32b
Feedback
Do you think this Vehicle Signal specification needs enhancement? Do you want to discuss with experts? Try the following ressources to get in touch with the VSS community:
Vehicle.Body.Mirrors.Left.Pan (Mirror pan as a percent. 0 = Center Position. 100 = Fully Left Position. -100 = Fully Right Position.)
Vehicle.Body.Mirrors.Left.Tilt (Mirror tilt as a percent. 0 = Center Position. 100 = Fully Upward Position. -100 = Fully Downward Position.)
Feedback
Do you think this Vehicle Signal specification needs enhancement? Do you want to discuss with experts? Try the following ressources to get in touch with the VSS community:
$ databroker-cli
sdv.databroker.v1 > connect
[connect] OK
sdv.databroker.v1 > get Vehicle.Body.Mirrors.Left.IsHeatingOn
[get] OK
Vehicle.Body.Mirrors.Left.IsHeatingOn: ( NotAvailable )sdv.databroker.v1 > set Vehicle.Body.Mirrors.Left.IsHeatingOn false[set] OK
Digital Auto: Playground
playground.digital.auto provides an in-browser, rapid prototyping environment utilizing the COVESA APIs for connected vehicles.
The UUID for Vehicle.Body.Mirrors.Left.IsHeatingOn is b8591c0592d8525e91e1a04495b6995d
Feedback
Do you think this Vehicle Signal specification needs enhancement? Do you want to discuss with experts? Try the following ressources to get in touch with the VSS community:
$ databroker-cli
sdv.databroker.v1 > connect
[connect] OK
sdv.databroker.v1 > get Vehicle.Body.Mirrors.Left.Pan
[get] OK
Vehicle.Body.Mirrors.Left.Pan: ( NotAvailable )sdv.databroker.v1 > set Vehicle.Body.Mirrors.Left.Pan 0[set] OK
Digital Auto: Playground
playground.digital.auto provides an in-browser, rapid prototyping environment utilizing the COVESA APIs for connected vehicles.
The UUID for Vehicle.Body.Mirrors.Left.Pan is 9dae4bc33a28531199fce500e0562f82
Feedback
Do you think this Vehicle Signal specification needs enhancement? Do you want to discuss with experts? Try the following ressources to get in touch with the VSS community:
$ databroker-cli
sdv.databroker.v1 > connect
[connect] OK
sdv.databroker.v1 > get Vehicle.Body.Mirrors.Left.Tilt
[get] OK
Vehicle.Body.Mirrors.Left.Tilt: ( NotAvailable )sdv.databroker.v1 > set Vehicle.Body.Mirrors.Left.Tilt 0[set] OK
Digital Auto: Playground
playground.digital.auto provides an in-browser, rapid prototyping environment utilizing the COVESA APIs for connected vehicles.
The UUID for Vehicle.Body.Mirrors.Left.Tilt is 698fee82cc115f3cba54825a298b46ab
Feedback
Do you think this Vehicle Signal specification needs enhancement? Do you want to discuss with experts? Try the following ressources to get in touch with the VSS community:
Do you think this Vehicle Signal specification needs enhancement? Do you want to discuss with experts? Try the following ressources to get in touch with the VSS community:
Do you think this Vehicle Signal specification needs enhancement? Do you want to discuss with experts? Try the following ressources to get in touch with the VSS community:
$ databroker-cli
sdv.databroker.v1 > connect
[connect] OK
sdv.databroker.v1 > get Vehicle.Body.Lights.Backup.IsDefect
[get] OK
Vehicle.Body.Lights.Backup.IsDefect: ( NotAvailable )sdv.databroker.v1 > set Vehicle.Body.Lights.Backup.IsDefect false[set] OK
Digital Auto: Playground
playground.digital.auto provides an in-browser, rapid prototyping environment utilizing the COVESA APIs for connected vehicles.
The UUID for Vehicle.Body.Lights.Backup.IsDefect is b907c4ac4ee459faa987c64a6da424c3
Feedback
Do you think this Vehicle Signal specification needs enhancement? Do you want to discuss with experts? Try the following ressources to get in touch with the VSS community:
$ databroker-cli
sdv.databroker.v1 > connect
[connect] OK
sdv.databroker.v1 > get Vehicle.Body.Lights.Backup.IsOn
[get] OK
Vehicle.Body.Lights.Backup.IsOn: ( NotAvailable )sdv.databroker.v1 > set Vehicle.Body.Lights.Backup.IsOn false[set] OK
Digital Auto: Playground
playground.digital.auto provides an in-browser, rapid prototyping environment utilizing the COVESA APIs for connected vehicles.
The UUID for Vehicle.Body.Lights.Backup.IsOn is ef23a3fa6106564195a66e21d8cf69b4
Feedback
Do you think this Vehicle Signal specification needs enhancement? Do you want to discuss with experts? Try the following ressources to get in touch with the VSS community:
The UUID for Vehicle.Body.Lights.Brake is 30eabe704102501cb299d03696fad92a
Children
This vehicle signal is a branch or structure and thus has sub-pages:
Vehicle.Body.Lights.Brake.IsActive (Indicates if break-light is active. INACTIVE means lights are off. ACTIVE means lights are on. ADAPTIVE means that break-light is indicating emergency-breaking.)
Do you think this Vehicle Signal specification needs enhancement? Do you want to discuss with experts? Try the following ressources to get in touch with the VSS community:
Indicates if break-light is active. INACTIVE means lights are off. ACTIVE means lights are on. ADAPTIVE means that break-light is indicating emergency-breaking.
Navigation
flowchart LR
Vehicle-->Body
Body-->Lights
Lights-->Brake
Brake-->IsActive
$ databroker-cli
sdv.databroker.v1 > connect
[connect] OK
sdv.databroker.v1 > get Vehicle.Body.Lights.Brake.IsActive
[get] OK
Vehicle.Body.Lights.Brake.IsActive: ( NotAvailable )sdv.databroker.v1 > set Vehicle.Body.Lights.Brake.IsActive Foo
[set] OK
Digital Auto: Playground
playground.digital.auto provides an in-browser, rapid prototyping environment utilizing the COVESA APIs for connected vehicles.
The UUID for Vehicle.Body.Lights.Brake.IsActive is 65eb84d61ea95313985054f626b85b59
Feedback
Do you think this Vehicle Signal specification needs enhancement? Do you want to discuss with experts? Try the following ressources to get in touch with the VSS community:
$ databroker-cli
sdv.databroker.v1 > connect
[connect] OK
sdv.databroker.v1 > get Vehicle.Body.Lights.Brake.IsDefect
[get] OK
Vehicle.Body.Lights.Brake.IsDefect: ( NotAvailable )sdv.databroker.v1 > set Vehicle.Body.Lights.Brake.IsDefect false[set] OK
Digital Auto: Playground
playground.digital.auto provides an in-browser, rapid prototyping environment utilizing the COVESA APIs for connected vehicles.
The UUID for Vehicle.Body.Lights.Brake.IsDefect is 1db542c5ba715e09b948527418966728
Feedback
Do you think this Vehicle Signal specification needs enhancement? Do you want to discuss with experts? Try the following ressources to get in touch with the VSS community:
Do you think this Vehicle Signal specification needs enhancement? Do you want to discuss with experts? Try the following ressources to get in touch with the VSS community:
Do you think this Vehicle Signal specification needs enhancement? Do you want to discuss with experts? Try the following ressources to get in touch with the VSS community:
$ databroker-cli
sdv.databroker.v1 > connect
[connect] OK
sdv.databroker.v1 > get Vehicle.Body.Lights.DirectionIndicator.Left.IsDefect
[get] OK
Vehicle.Body.Lights.DirectionIndicator.Left.IsDefect: ( NotAvailable )sdv.databroker.v1 > set Vehicle.Body.Lights.DirectionIndicator.Left.IsDefect false[set] OK
Digital Auto: Playground
playground.digital.auto provides an in-browser, rapid prototyping environment utilizing the COVESA APIs for connected vehicles.
The UUID for Vehicle.Body.Lights.DirectionIndicator.Left.IsDefect is 32a092936fb65165ba1dd8dfa38bf77d
Feedback
Do you think this Vehicle Signal specification needs enhancement? Do you want to discuss with experts? Try the following ressources to get in touch with the VSS community:
$ databroker-cli
sdv.databroker.v1 > connect
[connect] OK
sdv.databroker.v1 > get Vehicle.Body.Lights.DirectionIndicator.Left.IsSignaling
[get] OK
Vehicle.Body.Lights.DirectionIndicator.Left.IsSignaling: ( NotAvailable )sdv.databroker.v1 > set Vehicle.Body.Lights.DirectionIndicator.Left.IsSignaling false[set] OK
Digital Auto: Playground
playground.digital.auto provides an in-browser, rapid prototyping environment utilizing the COVESA APIs for connected vehicles.
The UUID for Vehicle.Body.Lights.DirectionIndicator.Left.IsSignaling is 33ac6ec5e4d9550aac6ae0ce97dae259
Feedback
Do you think this Vehicle Signal specification needs enhancement? Do you want to discuss with experts? Try the following ressources to get in touch with the VSS community:
Do you think this Vehicle Signal specification needs enhancement? Do you want to discuss with experts? Try the following ressources to get in touch with the VSS community:
$ databroker-cli
sdv.databroker.v1 > connect
[connect] OK
sdv.databroker.v1 > get Vehicle.Body.Lights.DirectionIndicator.Right.IsDefect
[get] OK
Vehicle.Body.Lights.DirectionIndicator.Right.IsDefect: ( NotAvailable )sdv.databroker.v1 > set Vehicle.Body.Lights.DirectionIndicator.Right.IsDefect false[set] OK
Digital Auto: Playground
playground.digital.auto provides an in-browser, rapid prototyping environment utilizing the COVESA APIs for connected vehicles.
The UUID for Vehicle.Body.Lights.DirectionIndicator.Right.IsDefect is db70c2d885725583a7ed95b215a8ec6c
Feedback
Do you think this Vehicle Signal specification needs enhancement? Do you want to discuss with experts? Try the following ressources to get in touch with the VSS community:
$ databroker-cli
sdv.databroker.v1 > connect
[connect] OK
sdv.databroker.v1 > get Vehicle.Body.Lights.DirectionIndicator.Right.IsSignaling
[get] OK
Vehicle.Body.Lights.DirectionIndicator.Right.IsSignaling: ( NotAvailable )sdv.databroker.v1 > set Vehicle.Body.Lights.DirectionIndicator.Right.IsSignaling false[set] OK
Digital Auto: Playground
playground.digital.auto provides an in-browser, rapid prototyping environment utilizing the COVESA APIs for connected vehicles.
The UUID for Vehicle.Body.Lights.DirectionIndicator.Right.IsSignaling is 9b0a1dab153f5dcda8df2116c3b6d487
Feedback
Do you think this Vehicle Signal specification needs enhancement? Do you want to discuss with experts? Try the following ressources to get in touch with the VSS community:
Do you think this Vehicle Signal specification needs enhancement? Do you want to discuss with experts? Try the following ressources to get in touch with the VSS community:
Do you think this Vehicle Signal specification needs enhancement? Do you want to discuss with experts? Try the following ressources to get in touch with the VSS community:
$ databroker-cli
sdv.databroker.v1 > connect
[connect] OK
sdv.databroker.v1 > get Vehicle.Body.Lights.Fog.Front.IsDefect
[get] OK
Vehicle.Body.Lights.Fog.Front.IsDefect: ( NotAvailable )sdv.databroker.v1 > set Vehicle.Body.Lights.Fog.Front.IsDefect false[set] OK
Digital Auto: Playground
playground.digital.auto provides an in-browser, rapid prototyping environment utilizing the COVESA APIs for connected vehicles.
The UUID for Vehicle.Body.Lights.Fog.Front.IsDefect is f9238f15d2615a22802ce9ec9f1d72e9
Feedback
Do you think this Vehicle Signal specification needs enhancement? Do you want to discuss with experts? Try the following ressources to get in touch with the VSS community:
$ databroker-cli
sdv.databroker.v1 > connect
[connect] OK
sdv.databroker.v1 > get Vehicle.Body.Lights.Fog.Front.IsOn
[get] OK
Vehicle.Body.Lights.Fog.Front.IsOn: ( NotAvailable )sdv.databroker.v1 > set Vehicle.Body.Lights.Fog.Front.IsOn false[set] OK
Digital Auto: Playground
playground.digital.auto provides an in-browser, rapid prototyping environment utilizing the COVESA APIs for connected vehicles.
The UUID for Vehicle.Body.Lights.Fog.Front.IsOn is 0ec10846d20a5d1b9b8a286303ecb844
Feedback
Do you think this Vehicle Signal specification needs enhancement? Do you want to discuss with experts? Try the following ressources to get in touch with the VSS community:
Do you think this Vehicle Signal specification needs enhancement? Do you want to discuss with experts? Try the following ressources to get in touch with the VSS community:
$ databroker-cli
sdv.databroker.v1 > connect
[connect] OK
sdv.databroker.v1 > get Vehicle.Body.Lights.Fog.Rear.IsDefect
[get] OK
Vehicle.Body.Lights.Fog.Rear.IsDefect: ( NotAvailable )sdv.databroker.v1 > set Vehicle.Body.Lights.Fog.Rear.IsDefect false[set] OK
Digital Auto: Playground
playground.digital.auto provides an in-browser, rapid prototyping environment utilizing the COVESA APIs for connected vehicles.
The UUID for Vehicle.Body.Lights.Fog.Rear.IsDefect is 1d44e594ffa35d73a6f620f479eeef4c
Feedback
Do you think this Vehicle Signal specification needs enhancement? Do you want to discuss with experts? Try the following ressources to get in touch with the VSS community:
$ databroker-cli
sdv.databroker.v1 > connect
[connect] OK
sdv.databroker.v1 > get Vehicle.Body.Lights.Fog.Rear.IsOn
[get] OK
Vehicle.Body.Lights.Fog.Rear.IsOn: ( NotAvailable )sdv.databroker.v1 > set Vehicle.Body.Lights.Fog.Rear.IsOn false[set] OK
Digital Auto: Playground
playground.digital.auto provides an in-browser, rapid prototyping environment utilizing the COVESA APIs for connected vehicles.
The UUID for Vehicle.Body.Lights.Fog.Rear.IsOn is 1fe08a2f687c5c2880adef26cc7de746
Feedback
Do you think this Vehicle Signal specification needs enhancement? Do you want to discuss with experts? Try the following ressources to get in touch with the VSS community:
Do you think this Vehicle Signal specification needs enhancement? Do you want to discuss with experts? Try the following ressources to get in touch with the VSS community:
$ databroker-cli
sdv.databroker.v1 > connect
[connect] OK
sdv.databroker.v1 > get Vehicle.Body.Lights.Hazard.IsDefect
[get] OK
Vehicle.Body.Lights.Hazard.IsDefect: ( NotAvailable )sdv.databroker.v1 > set Vehicle.Body.Lights.Hazard.IsDefect false[set] OK
Digital Auto: Playground
playground.digital.auto provides an in-browser, rapid prototyping environment utilizing the COVESA APIs for connected vehicles.
The UUID for Vehicle.Body.Lights.Hazard.IsDefect is 25cd3475beb6543a8538974b67544c43
Feedback
Do you think this Vehicle Signal specification needs enhancement? Do you want to discuss with experts? Try the following ressources to get in touch with the VSS community:
$ databroker-cli
sdv.databroker.v1 > connect
[connect] OK
sdv.databroker.v1 > get Vehicle.Body.Lights.Hazard.IsSignaling
[get] OK
Vehicle.Body.Lights.Hazard.IsSignaling: ( NotAvailable )sdv.databroker.v1 > set Vehicle.Body.Lights.Hazard.IsSignaling false[set] OK
Digital Auto: Playground
playground.digital.auto provides an in-browser, rapid prototyping environment utilizing the COVESA APIs for connected vehicles.
The UUID for Vehicle.Body.Lights.Hazard.IsSignaling is c53950205aa15dffa304390dcb761cc3
Feedback
Do you think this Vehicle Signal specification needs enhancement? Do you want to discuss with experts? Try the following ressources to get in touch with the VSS community:
Do you think this Vehicle Signal specification needs enhancement? Do you want to discuss with experts? Try the following ressources to get in touch with the VSS community:
$ databroker-cli
sdv.databroker.v1 > connect
[connect] OK
sdv.databroker.v1 > get Vehicle.Body.Lights.LicensePlate.IsDefect
[get] OK
Vehicle.Body.Lights.LicensePlate.IsDefect: ( NotAvailable )sdv.databroker.v1 > set Vehicle.Body.Lights.LicensePlate.IsDefect false[set] OK
Digital Auto: Playground
playground.digital.auto provides an in-browser, rapid prototyping environment utilizing the COVESA APIs for connected vehicles.
The UUID for Vehicle.Body.Lights.LicensePlate.IsDefect is 4de6594de7815cec97e5b851d70e239b
Feedback
Do you think this Vehicle Signal specification needs enhancement? Do you want to discuss with experts? Try the following ressources to get in touch with the VSS community:
$ databroker-cli
sdv.databroker.v1 > connect
[connect] OK
sdv.databroker.v1 > get Vehicle.Body.Lights.LicensePlate.IsOn
[get] OK
Vehicle.Body.Lights.LicensePlate.IsOn: ( NotAvailable )sdv.databroker.v1 > set Vehicle.Body.Lights.LicensePlate.IsOn false[set] OK
Digital Auto: Playground
playground.digital.auto provides an in-browser, rapid prototyping environment utilizing the COVESA APIs for connected vehicles.
The UUID for Vehicle.Body.Lights.LicensePlate.IsOn is afeace5d76ed53f989ae4251090ba069
Feedback
Do you think this Vehicle Signal specification needs enhancement? Do you want to discuss with experts? Try the following ressources to get in touch with the VSS community:
Do you think this Vehicle Signal specification needs enhancement? Do you want to discuss with experts? Try the following ressources to get in touch with the VSS community:
$ databroker-cli
sdv.databroker.v1 > connect
[connect] OK
sdv.databroker.v1 > get Vehicle.Body.Lights.Parking.IsDefect
[get] OK
Vehicle.Body.Lights.Parking.IsDefect: ( NotAvailable )sdv.databroker.v1 > set Vehicle.Body.Lights.Parking.IsDefect false[set] OK
Digital Auto: Playground
playground.digital.auto provides an in-browser, rapid prototyping environment utilizing the COVESA APIs for connected vehicles.
The UUID for Vehicle.Body.Lights.Parking.IsDefect is 56761305eae559c7931f6ff5fee0dfa8
Feedback
Do you think this Vehicle Signal specification needs enhancement? Do you want to discuss with experts? Try the following ressources to get in touch with the VSS community:
$ databroker-cli
sdv.databroker.v1 > connect
[connect] OK
sdv.databroker.v1 > get Vehicle.Body.Lights.Parking.IsOn
[get] OK
Vehicle.Body.Lights.Parking.IsOn: ( NotAvailable )sdv.databroker.v1 > set Vehicle.Body.Lights.Parking.IsOn false[set] OK
Digital Auto: Playground
playground.digital.auto provides an in-browser, rapid prototyping environment utilizing the COVESA APIs for connected vehicles.
The UUID for Vehicle.Body.Lights.Parking.IsOn is 6ba0825427335408ad7d0f148d6250ea
Feedback
Do you think this Vehicle Signal specification needs enhancement? Do you want to discuss with experts? Try the following ressources to get in touch with the VSS community:
Do you think this Vehicle Signal specification needs enhancement? Do you want to discuss with experts? Try the following ressources to get in touch with the VSS community:
$ databroker-cli
sdv.databroker.v1 > connect
[connect] OK
sdv.databroker.v1 > get Vehicle.Body.Lights.Running.IsDefect
[get] OK
Vehicle.Body.Lights.Running.IsDefect: ( NotAvailable )sdv.databroker.v1 > set Vehicle.Body.Lights.Running.IsDefect false[set] OK
Digital Auto: Playground
playground.digital.auto provides an in-browser, rapid prototyping environment utilizing the COVESA APIs for connected vehicles.
The UUID for Vehicle.Body.Lights.Running.IsDefect is 7cda127e6d45547681757e789c0b7a87
Feedback
Do you think this Vehicle Signal specification needs enhancement? Do you want to discuss with experts? Try the following ressources to get in touch with the VSS community:
$ databroker-cli
sdv.databroker.v1 > connect
[connect] OK
sdv.databroker.v1 > get Vehicle.Body.Lights.Running.IsOn
[get] OK
Vehicle.Body.Lights.Running.IsOn: ( NotAvailable )sdv.databroker.v1 > set Vehicle.Body.Lights.Running.IsOn false[set] OK
Digital Auto: Playground
playground.digital.auto provides an in-browser, rapid prototyping environment utilizing the COVESA APIs for connected vehicles.
The UUID for Vehicle.Body.Lights.Running.IsOn is 1c4e44f1e0275965b466ac674a5b8cac
Feedback
Do you think this Vehicle Signal specification needs enhancement? Do you want to discuss with experts? Try the following ressources to get in touch with the VSS community:
Do you think this Vehicle Signal specification needs enhancement? Do you want to discuss with experts? Try the following ressources to get in touch with the VSS community:
Do you think this Vehicle Signal specification needs enhancement? Do you want to discuss with experts? Try the following ressources to get in touch with the VSS community:
$ databroker-cli
sdv.databroker.v1 > connect
[connect] OK
sdv.databroker.v1 > get Vehicle.Body.Lights.Beam.High.IsDefect
[get] OK
Vehicle.Body.Lights.Beam.High.IsDefect: ( NotAvailable )sdv.databroker.v1 > set Vehicle.Body.Lights.Beam.High.IsDefect false[set] OK
Digital Auto: Playground
playground.digital.auto provides an in-browser, rapid prototyping environment utilizing the COVESA APIs for connected vehicles.
The UUID for Vehicle.Body.Lights.Beam.High.IsDefect is 83561d8c9a025cfdad6c4b325829fa00
Feedback
Do you think this Vehicle Signal specification needs enhancement? Do you want to discuss with experts? Try the following ressources to get in touch with the VSS community:
$ databroker-cli
sdv.databroker.v1 > connect
[connect] OK
sdv.databroker.v1 > get Vehicle.Body.Lights.Beam.High.IsOn
[get] OK
Vehicle.Body.Lights.Beam.High.IsOn: ( NotAvailable )sdv.databroker.v1 > set Vehicle.Body.Lights.Beam.High.IsOn false[set] OK
Digital Auto: Playground
playground.digital.auto provides an in-browser, rapid prototyping environment utilizing the COVESA APIs for connected vehicles.
The UUID for Vehicle.Body.Lights.Beam.High.IsOn is 24d1346519b05697b872c06556a09fb4
Feedback
Do you think this Vehicle Signal specification needs enhancement? Do you want to discuss with experts? Try the following ressources to get in touch with the VSS community:
Do you think this Vehicle Signal specification needs enhancement? Do you want to discuss with experts? Try the following ressources to get in touch with the VSS community:
$ databroker-cli
sdv.databroker.v1 > connect
[connect] OK
sdv.databroker.v1 > get Vehicle.Body.Lights.Beam.Low.IsDefect
[get] OK
Vehicle.Body.Lights.Beam.Low.IsDefect: ( NotAvailable )sdv.databroker.v1 > set Vehicle.Body.Lights.Beam.Low.IsDefect false[set] OK
Digital Auto: Playground
playground.digital.auto provides an in-browser, rapid prototyping environment utilizing the COVESA APIs for connected vehicles.
The UUID for Vehicle.Body.Lights.Beam.Low.IsDefect is 3a135f1267ea5b2a80aa9a17fc8072db
Feedback
Do you think this Vehicle Signal specification needs enhancement? Do you want to discuss with experts? Try the following ressources to get in touch with the VSS community:
$ databroker-cli
sdv.databroker.v1 > connect
[connect] OK
sdv.databroker.v1 > get Vehicle.Body.Lights.Beam.Low.IsOn
[get] OK
Vehicle.Body.Lights.Beam.Low.IsOn: ( NotAvailable )sdv.databroker.v1 > set Vehicle.Body.Lights.Beam.Low.IsOn false[set] OK
Digital Auto: Playground
playground.digital.auto provides an in-browser, rapid prototyping environment utilizing the COVESA APIs for connected vehicles.
The UUID for Vehicle.Body.Lights.Beam.Low.IsOn is 8b4d4855b0c95963a25dc564c9758610
Feedback
Do you think this Vehicle Signal specification needs enhancement? Do you want to discuss with experts? Try the following ressources to get in touch with the VSS community:
The following is a list of VSS supported built-in datatypes:
Name
Type
Min
Max
uint8
unsigned 8-bit integer
0
255
int8
signed 8-bit integer
-128
127
uint16
unsigned 16-bit integer
0
65535
int16
signed 16-bit integer
-32768
32767
uint32
unsigned 32-bit integer
0
4294967295
int32
signed 32-bit integer
-2147483648
2147483647
uint64
unsigned 64-bit integer
0
2^64 - 1
int64
signed 64-bit integer
-2^63
2^63 - 1
boolean
boolean value
0/false
1/true
float
floating point number
-3.4e -38
3.4e 38
double
double precision floating point number
-1.7e -300
1.7e 300
string
character string
n/a
n/a
Min, max and default values defined in a Vehicle Signal Specification must be in the supported range of the data type.
5.1.9.4.10 - IsHighBeamSwitchOn
Full qualified VSS Path:
Vehicle.Body.Lights.IsHighBeamSwitchOn
Description:
Status of the high beam switch. True = high beam enabled. False = high beam not enabled.
Comment:
This signal indicates the status of the switch and does not indicate if low or high beam actually are on. That typically depends on vehicle logic and other signals like Lights.LightSwitch and Vehicle.LowVoltageSystemState.
Navigation
flowchart LR
Vehicle-->Body
Body-->Lights
Lights-->IsHighBeamSwitchOn
$ databroker-cli
sdv.databroker.v1 > connect
[connect] OK
sdv.databroker.v1 > get Vehicle.Body.Lights.IsHighBeamSwitchOn
[get] OK
Vehicle.Body.Lights.IsHighBeamSwitchOn: ( NotAvailable )sdv.databroker.v1 > set Vehicle.Body.Lights.IsHighBeamSwitchOn false[set] OK
Digital Auto: Playground
playground.digital.auto provides an in-browser, rapid prototyping environment utilizing the COVESA APIs for connected vehicles.
The UUID for Vehicle.Body.Lights.IsHighBeamSwitchOn is ac7db3cd30f55650bc6939df504f1a79
Feedback
Do you think this Vehicle Signal specification needs enhancement? Do you want to discuss with experts? Try the following ressources to get in touch with the VSS community:
The following is a list of VSS supported built-in datatypes:
Name
Type
Min
Max
uint8
unsigned 8-bit integer
0
255
int8
signed 8-bit integer
-128
127
uint16
unsigned 16-bit integer
0
65535
int16
signed 16-bit integer
-32768
32767
uint32
unsigned 32-bit integer
0
4294967295
int32
signed 32-bit integer
-2147483648
2147483647
uint64
unsigned 64-bit integer
0
2^64 - 1
int64
signed 64-bit integer
-2^63
2^63 - 1
boolean
boolean value
0/false
1/true
float
floating point number
-3.4e -38
3.4e 38
double
double precision floating point number
-1.7e -300
1.7e 300
string
character string
n/a
n/a
Min, max and default values defined in a Vehicle Signal Specification must be in the supported range of the data type.
5.1.9.4.11 - LightSwitch
Full qualified VSS Path:
Vehicle.Body.Lights.LightSwitch
Description:
Status of the vehicle main light switch.
Comment:
A vehicle typically does not support all alternatives. Which lights that actually are lit may vary according to vehicle configuration and local legislation. OFF is typically indicated by 0. POSITION is typically indicated by ISO 7000 symbol 0456. DAYTIME_RUNNING_LIGHTS (DRL) can be indicated by ISO 7000 symbol 2611. AUTO indicates that vehicle automatically selects suitable lights. BEAM is typically indicated by ISO 7000 symbol 0083.
Navigation
flowchart LR
Vehicle-->Body
Body-->Lights
Lights-->LightSwitch
$ databroker-cli
sdv.databroker.v1 > connect
[connect] OK
sdv.databroker.v1 > get Vehicle.Body.Lights.LightSwitch
[get] OK
Vehicle.Body.Lights.LightSwitch: ( NotAvailable )sdv.databroker.v1 > set Vehicle.Body.Lights.LightSwitch Foo
[set] OK
Digital Auto: Playground
playground.digital.auto provides an in-browser, rapid prototyping environment utilizing the COVESA APIs for connected vehicles.
The UUID for Vehicle.Body.Lights.LightSwitch is 2feb14a3558256339442413783969f4f
Feedback
Do you think this Vehicle Signal specification needs enhancement? Do you want to discuss with experts? Try the following ressources to get in touch with the VSS community:
Do you think this Vehicle Signal specification needs enhancement? Do you want to discuss with experts? Try the following ressources to get in touch with the VSS community:
$ databroker-cli
sdv.databroker.v1 > connect
[connect] OK
sdv.databroker.v1 > get Vehicle.Body.Horn.IsActive
[get] OK
Vehicle.Body.Horn.IsActive: ( NotAvailable )sdv.databroker.v1 > set Vehicle.Body.Horn.IsActive false[set] OK
Digital Auto: Playground
playground.digital.auto provides an in-browser, rapid prototyping environment utilizing the COVESA APIs for connected vehicles.
The UUID for Vehicle.Body.Horn.IsActive is ba20deed9314525bb9d552a2b787fb20
Feedback
Do you think this Vehicle Signal specification needs enhancement? Do you want to discuss with experts? Try the following ressources to get in touch with the VSS community:
Do you think this Vehicle Signal specification needs enhancement? Do you want to discuss with experts? Try the following ressources to get in touch with the VSS community:
$ databroker-cli
sdv.databroker.v1 > connect
[connect] OK
sdv.databroker.v1 > get Vehicle.Body.Raindetection.Intensity
[get] OK
Vehicle.Body.Raindetection.Intensity: ( NotAvailable )sdv.databroker.v1 > set Vehicle.Body.Raindetection.Intensity 0[set] OK
Digital Auto: Playground
playground.digital.auto provides an in-browser, rapid prototyping environment utilizing the COVESA APIs for connected vehicles.
The UUID for Vehicle.Body.Raindetection.Intensity is 1ee0a2f22e8257d299425a4ff2652555
Feedback
Do you think this Vehicle Signal specification needs enhancement? Do you want to discuss with experts? Try the following ressources to get in touch with the VSS community:
Do you think this Vehicle Signal specification needs enhancement? Do you want to discuss with experts? Try the following ressources to get in touch with the VSS community:
Do you think this Vehicle Signal specification needs enhancement? Do you want to discuss with experts? Try the following ressources to get in touch with the VSS community:
$ databroker-cli
sdv.databroker.v1 > connect
[connect] OK
sdv.databroker.v1 > get Vehicle.Body.Windshield.Front.IsHeatingOn
[get] OK
Vehicle.Body.Windshield.Front.IsHeatingOn: ( NotAvailable )sdv.databroker.v1 > set Vehicle.Body.Windshield.Front.IsHeatingOn false[set] OK
Digital Auto: Playground
playground.digital.auto provides an in-browser, rapid prototyping environment utilizing the COVESA APIs for connected vehicles.
The UUID for Vehicle.Body.Windshield.Front.IsHeatingOn is 26e6a3b7e9bb58bebba29258faa6e300
Feedback
Do you think this Vehicle Signal specification needs enhancement? Do you want to discuss with experts? Try the following ressources to get in touch with the VSS community:
Do you think this Vehicle Signal specification needs enhancement? Do you want to discuss with experts? Try the following ressources to get in touch with the VSS community:
$ databroker-cli
sdv.databroker.v1 > connect
[connect] OK
sdv.databroker.v1 > get Vehicle.Body.Windshield.Front.WasherFluid.IsLevelLow
[get] OK
Vehicle.Body.Windshield.Front.WasherFluid.IsLevelLow: ( NotAvailable )sdv.databroker.v1 > set Vehicle.Body.Windshield.Front.WasherFluid.IsLevelLow false[set] OK
Digital Auto: Playground
playground.digital.auto provides an in-browser, rapid prototyping environment utilizing the COVESA APIs for connected vehicles.
The UUID for Vehicle.Body.Windshield.Front.WasherFluid.IsLevelLow is 8ca54695ad115f9bb6f56d7c450781a7
Feedback
Do you think this Vehicle Signal specification needs enhancement? Do you want to discuss with experts? Try the following ressources to get in touch with the VSS community:
$ databroker-cli
sdv.databroker.v1 > connect
[connect] OK
sdv.databroker.v1 > get Vehicle.Body.Windshield.Front.WasherFluid.Level
[get] OK
Vehicle.Body.Windshield.Front.WasherFluid.Level: ( NotAvailable )sdv.databroker.v1 > set Vehicle.Body.Windshield.Front.WasherFluid.Level 0[set] OK
Digital Auto: Playground
playground.digital.auto provides an in-browser, rapid prototyping environment utilizing the COVESA APIs for connected vehicles.
The UUID for Vehicle.Body.Windshield.Front.WasherFluid.Level is a36dfb91414f5792bd01d193dceff1f4
Feedback
Do you think this Vehicle Signal specification needs enhancement? Do you want to discuss with experts? Try the following ressources to get in touch with the VSS community:
The UUID for Vehicle.Body.Windshield.Front.Wiping is 2cffeccdc19a587cbe2264f426c6881a
Children
This vehicle signal is a branch or structure and thus has sub-pages:
Vehicle.Body.Windshield.Front.Wiping.Intensity (Relative intensity/sensitivity for interval and rain sensor mode as requested by user/driver. Has no significance if Windshield.Wiping.Mode is OFF/SLOW/MEDIUM/FAST 0 - wipers inactive. 1 - minimum intensity (lowest frequency/sensitivity, longest interval). 2/3/4/… - higher intensity (higher frequency/sensitivity, shorter interval). Maximum value supported is vehicle specific.)
Vehicle.Body.Windshield.Front.Wiping.Mode (Wiper mode requested by user/driver. INTERVAL indicates intermittent wiping, with fixed time interval between each wipe. RAIN_SENSOR indicates intermittent wiping based on rain intensity.)
Vehicle.Body.Windshield.Front.Wiping.WiperWear (Wiper wear as percent. 0 = No Wear. 100 = Worn. Replacement required. Method for calculating or estimating wiper wear is vehicle specific. For windshields with multiple wipers the wear reported shall correspond to the most worn wiper.)
Feedback
Do you think this Vehicle Signal specification needs enhancement? Do you want to discuss with experts? Try the following ressources to get in touch with the VSS community:
Relative intensity/sensitivity for interval and rain sensor mode as requested by user/driver. Has no significance if Windshield.Wiping.Mode is OFF/SLOW/MEDIUM/FAST 0 - wipers inactive. 1 - minimum intensity (lowest frequency/sensitivity, longest interval). 2/3/4/… - higher intensity (higher frequency/sensitivity, shorter interval). Maximum value supported is vehicle specific.
Navigation
flowchart LR
Vehicle-->Body
Body-->Windshield
Windshield-->Front
Front-->Wiping
Wiping-->Intensity
$ databroker-cli
sdv.databroker.v1 > connect
[connect] OK
sdv.databroker.v1 > get Vehicle.Body.Windshield.Front.Wiping.Intensity
[get] OK
Vehicle.Body.Windshield.Front.Wiping.Intensity: ( NotAvailable )sdv.databroker.v1 > set Vehicle.Body.Windshield.Front.Wiping.Intensity 0[set] OK
Digital Auto: Playground
playground.digital.auto provides an in-browser, rapid prototyping environment utilizing the COVESA APIs for connected vehicles.
The UUID for Vehicle.Body.Windshield.Front.Wiping.Intensity is 7cdd36d1cc8f5f9a9f079f663190b588
Feedback
Do you think this Vehicle Signal specification needs enhancement? Do you want to discuss with experts? Try the following ressources to get in touch with the VSS community:
$ databroker-cli
sdv.databroker.v1 > connect
[connect] OK
sdv.databroker.v1 > get Vehicle.Body.Windshield.Front.Wiping.IsWipersWorn
[get] OK
Vehicle.Body.Windshield.Front.Wiping.IsWipersWorn: ( NotAvailable )sdv.databroker.v1 > set Vehicle.Body.Windshield.Front.Wiping.IsWipersWorn false[set] OK
Digital Auto: Playground
playground.digital.auto provides an in-browser, rapid prototyping environment utilizing the COVESA APIs for connected vehicles.
The UUID for Vehicle.Body.Windshield.Front.Wiping.IsWipersWorn is b04ccc7daedb559c9bcdda6b00332be5
Feedback
Do you think this Vehicle Signal specification needs enhancement? Do you want to discuss with experts? Try the following ressources to get in touch with the VSS community:
The following is a list of VSS supported built-in datatypes:
Name
Type
Min
Max
uint8
unsigned 8-bit integer
0
255
int8
signed 8-bit integer
-128
127
uint16
unsigned 16-bit integer
0
65535
int16
signed 16-bit integer
-32768
32767
uint32
unsigned 32-bit integer
0
4294967295
int32
signed 32-bit integer
-2147483648
2147483647
uint64
unsigned 64-bit integer
0
2^64 - 1
int64
signed 64-bit integer
-2^63
2^63 - 1
boolean
boolean value
0/false
1/true
float
floating point number
-3.4e -38
3.4e 38
double
double precision floating point number
-1.7e -300
1.7e 300
string
character string
n/a
n/a
Min, max and default values defined in a Vehicle Signal Specification must be in the supported range of the data type.
5.1.9.7.1.3.3 - Mode
Full qualified VSS Path:
Vehicle.Body.Windshield.Front.Wiping.Mode
Description:
Wiper mode requested by user/driver. INTERVAL indicates intermittent wiping, with fixed time interval between each wipe. RAIN_SENSOR indicates intermittent wiping based on rain intensity.
Navigation
flowchart LR
Vehicle-->Body
Body-->Windshield
Windshield-->Front
Front-->Wiping
Wiping-->Mode
$ databroker-cli
sdv.databroker.v1 > connect
[connect] OK
sdv.databroker.v1 > get Vehicle.Body.Windshield.Front.Wiping.Mode
[get] OK
Vehicle.Body.Windshield.Front.Wiping.Mode: ( NotAvailable )sdv.databroker.v1 > set Vehicle.Body.Windshield.Front.Wiping.Mode Foo
[set] OK
Digital Auto: Playground
playground.digital.auto provides an in-browser, rapid prototyping environment utilizing the COVESA APIs for connected vehicles.
The UUID for Vehicle.Body.Windshield.Front.Wiping.Mode is 3ee6552c96e551c5b06b79ad30226767
Feedback
Do you think this Vehicle Signal specification needs enhancement? Do you want to discuss with experts? Try the following ressources to get in touch with the VSS community:
The following is a list of VSS supported built-in datatypes:
Name
Type
Min
Max
uint8
unsigned 8-bit integer
0
255
int8
signed 8-bit integer
-128
127
uint16
unsigned 16-bit integer
0
65535
int16
signed 16-bit integer
-32768
32767
uint32
unsigned 32-bit integer
0
4294967295
int32
signed 32-bit integer
-2147483648
2147483647
uint64
unsigned 64-bit integer
0
2^64 - 1
int64
signed 64-bit integer
-2^63
2^63 - 1
boolean
boolean value
0/false
1/true
float
floating point number
-3.4e -38
3.4e 38
double
double precision floating point number
-1.7e -300
1.7e 300
string
character string
n/a
n/a
Min, max and default values defined in a Vehicle Signal Specification must be in the supported range of the data type.
5.1.9.7.1.3.4 - System
Full qualified VSS Path:
Vehicle.Body.Windshield.Front.Wiping.System
Description:
Signals to control behavior of wipers in detail. By default VSS expects only one instance.
Comment:
These signals are typically not directly available to the user/driver of the vehicle. The overlay in overlays/extensions/dual_wiper_systems.vspec can be used to modify this branch to support two instances; Primary and Secondary.
Navigation
flowchart LR
Vehicle-->Body
Body-->Windshield
Windshield-->Front
Front-->Wiping
Wiping-->System
Digital Auto: Playground
playground.digital.auto provides an in-browser, rapid prototyping environment utilizing the COVESA APIs for connected vehicles.
The UUID for Vehicle.Body.Windshield.Front.Wiping.System is 9002ff76166950e0aa3b7c9df3b53468
Children
This vehicle signal is a branch or structure and thus has sub-pages:
Vehicle.Body.Windshield.Front.Wiping.System.ActualPosition (Actual position of main wiper blade for the wiper system relative to reference position. Location of reference position (0 degrees) and direction of positive/negative degrees is vehicle specific.)
Vehicle.Body.Windshield.Front.Wiping.System.Frequency (Wiping frequency/speed, measured in cycles per minute. The signal concerns the actual speed of the wiper blades when moving. Intervals/pauses are excluded, i.e. the value corresponds to the number of cycles that would be completed in 1 minute if wiping permanently over default range.)
Vehicle.Body.Windshield.Front.Wiping.System.IsEndingWipeCycle (Indicates if current wipe movement is completed or near completion. True = Movement is completed or near completion. Changes to RequestedPosition will be executed first after reaching previous RequestedPosition, if it has not already been reached. False = Movement is not near completion. Any change to RequestedPosition will be executed immediately. Change of direction may not be allowed.)
Vehicle.Body.Windshield.Front.Wiping.System.IsPositionReached (Indicates if a requested position has been reached. IsPositionReached refers to the previous position in case the TargetPosition is updated while IsEndingWipeCycle=True. True = Current or Previous TargetPosition reached. False = Position not (yet) reached, or wipers have moved away from the reached position.)
Vehicle.Body.Windshield.Front.Wiping.System.IsWiping (Indicates wiper movement. True if wiper blades are moving. Change of direction shall be considered as IsWiping if wipers will continue to move directly after the change of direction.)
Vehicle.Body.Windshield.Front.Wiping.System.Mode (Requested mode of wiper system. STOP_HOLD means that the wipers shall move to position given by TargetPosition and then hold the position. WIPE means that wipers shall move to the position given by TargetPosition and then hold the position if no new TargetPosition is requested. PLANT_MODE means that wiping is disabled. Exact behavior is vehicle specific. EMERGENCY_STOP means that wiping shall be immediately stopped without holding the position.)
Vehicle.Body.Windshield.Front.Wiping.System.TargetPosition (Requested position of main wiper blade for the wiper system relative to reference position. Location of reference position (0 degrees) and direction of positive/negative degrees is vehicle specific. System behavior when receiving TargetPosition depends on Mode and IsEndingWipeCycle. Supported values are vehicle specific and might be dynamically corrected. If IsEndingWipeCycle=True then wipers will complete current movement before actuating new TargetPosition. If IsEndingWipeCycle=False then wipers will directly change destination if the TargetPosition is changed.)
Feedback
Do you think this Vehicle Signal specification needs enhancement? Do you want to discuss with experts? Try the following ressources to get in touch with the VSS community:
Actual position of main wiper blade for the wiper system relative to reference position. Location of reference position (0 degrees) and direction of positive/negative degrees is vehicle specific.
Comment:
Default parking position might be used as reference position.
Navigation
flowchart LR
Vehicle-->Body
Body-->Windshield
Windshield-->Front
Front-->Wiping
Wiping-->System
System-->ActualPosition
$ databroker-cli
sdv.databroker.v1 > connect
[connect] OK
sdv.databroker.v1 > get Vehicle.Body.Windshield.Front.Wiping.System.ActualPosition
[get] OK
Vehicle.Body.Windshield.Front.Wiping.System.ActualPosition: ( NotAvailable )sdv.databroker.v1 > set Vehicle.Body.Windshield.Front.Wiping.System.ActualPosition 0[set] OK
Digital Auto: Playground
playground.digital.auto provides an in-browser, rapid prototyping environment utilizing the COVESA APIs for connected vehicles.
The UUID for Vehicle.Body.Windshield.Front.Wiping.System.ActualPosition is 026307b591465a8a99ffc0ebf262b393
Feedback
Do you think this Vehicle Signal specification needs enhancement? Do you want to discuss with experts? Try the following ressources to get in touch with the VSS community:
$ databroker-cli
sdv.databroker.v1 > connect
[connect] OK
sdv.databroker.v1 > get Vehicle.Body.Windshield.Front.Wiping.System.DriveCurrent
[get] OK
Vehicle.Body.Windshield.Front.Wiping.System.DriveCurrent: ( NotAvailable )sdv.databroker.v1 > set Vehicle.Body.Windshield.Front.Wiping.System.DriveCurrent 0[set] OK
Digital Auto: Playground
playground.digital.auto provides an in-browser, rapid prototyping environment utilizing the COVESA APIs for connected vehicles.
The UUID for Vehicle.Body.Windshield.Front.Wiping.System.DriveCurrent is 251e695821b758e7b7d459d5e2ab6ca4
Feedback
Do you think this Vehicle Signal specification needs enhancement? Do you want to discuss with experts? Try the following ressources to get in touch with the VSS community:
Wiping frequency/speed, measured in cycles per minute. The signal concerns the actual speed of the wiper blades when moving. Intervals/pauses are excluded, i.e. the value corresponds to the number of cycles that would be completed in 1 minute if wiping permanently over default range.
Comment:
Examples - 0 = Wipers stopped, 80 = Wipers doing 80 cycles per minute (in WIPE mode).
Navigation
flowchart LR
Vehicle-->Body
Body-->Windshield
Windshield-->Front
Front-->Wiping
Wiping-->System
System-->Frequency
$ databroker-cli
sdv.databroker.v1 > connect
[connect] OK
sdv.databroker.v1 > get Vehicle.Body.Windshield.Front.Wiping.System.Frequency
[get] OK
Vehicle.Body.Windshield.Front.Wiping.System.Frequency: ( NotAvailable )sdv.databroker.v1 > set Vehicle.Body.Windshield.Front.Wiping.System.Frequency 0[set] OK
Digital Auto: Playground
playground.digital.auto provides an in-browser, rapid prototyping environment utilizing the COVESA APIs for connected vehicles.
The UUID for Vehicle.Body.Windshield.Front.Wiping.System.Frequency is 7394c8b8d20d52638881161ec1b41fc0
Feedback
Do you think this Vehicle Signal specification needs enhancement? Do you want to discuss with experts? Try the following ressources to get in touch with the VSS community:
$ databroker-cli
sdv.databroker.v1 > connect
[connect] OK
sdv.databroker.v1 > get Vehicle.Body.Windshield.Front.Wiping.System.IsBlocked
[get] OK
Vehicle.Body.Windshield.Front.Wiping.System.IsBlocked: ( NotAvailable )sdv.databroker.v1 > set Vehicle.Body.Windshield.Front.Wiping.System.IsBlocked false[set] OK
Digital Auto: Playground
playground.digital.auto provides an in-browser, rapid prototyping environment utilizing the COVESA APIs for connected vehicles.
The UUID for Vehicle.Body.Windshield.Front.Wiping.System.IsBlocked is 4b526a2c781e56e386c82df226061f9e
Feedback
Do you think this Vehicle Signal specification needs enhancement? Do you want to discuss with experts? Try the following ressources to get in touch with the VSS community:
Indicates if current wipe movement is completed or near completion. True = Movement is completed or near completion. Changes to RequestedPosition will be executed first after reaching previous RequestedPosition, if it has not already been reached. False = Movement is not near completion. Any change to RequestedPosition will be executed immediately. Change of direction may not be allowed.
Comment:
In continuous wiping between A and B this sensor can be used a trigger to update TargetPosition.
Navigation
flowchart LR
Vehicle-->Body
Body-->Windshield
Windshield-->Front
Front-->Wiping
Wiping-->System
System-->IsEndingWipeCycle
$ databroker-cli
sdv.databroker.v1 > connect
[connect] OK
sdv.databroker.v1 > get Vehicle.Body.Windshield.Front.Wiping.System.IsEndingWipeCycle
[get] OK
Vehicle.Body.Windshield.Front.Wiping.System.IsEndingWipeCycle: ( NotAvailable )sdv.databroker.v1 > set Vehicle.Body.Windshield.Front.Wiping.System.IsEndingWipeCycle false[set] OK
Digital Auto: Playground
playground.digital.auto provides an in-browser, rapid prototyping environment utilizing the COVESA APIs for connected vehicles.
The UUID for Vehicle.Body.Windshield.Front.Wiping.System.IsEndingWipeCycle is 5000f7f0c39e5fed9a95413ae4166482
Feedback
Do you think this Vehicle Signal specification needs enhancement? Do you want to discuss with experts? Try the following ressources to get in touch with the VSS community:
$ databroker-cli
sdv.databroker.v1 > connect
[connect] OK
sdv.databroker.v1 > get Vehicle.Body.Windshield.Front.Wiping.System.IsOverheated
[get] OK
Vehicle.Body.Windshield.Front.Wiping.System.IsOverheated: ( NotAvailable )sdv.databroker.v1 > set Vehicle.Body.Windshield.Front.Wiping.System.IsOverheated false[set] OK
Digital Auto: Playground
playground.digital.auto provides an in-browser, rapid prototyping environment utilizing the COVESA APIs for connected vehicles.
The UUID for Vehicle.Body.Windshield.Front.Wiping.System.IsOverheated is e05d376ec2525ba2b61039d55f93760f
Feedback
Do you think this Vehicle Signal specification needs enhancement? Do you want to discuss with experts? Try the following ressources to get in touch with the VSS community:
Indicates if a requested position has been reached. IsPositionReached refers to the previous position in case the TargetPosition is updated while IsEndingWipeCycle=True. True = Current or Previous TargetPosition reached. False = Position not (yet) reached, or wipers have moved away from the reached position.
Navigation
flowchart LR
Vehicle-->Body
Body-->Windshield
Windshield-->Front
Front-->Wiping
Wiping-->System
System-->IsPositionReached
$ databroker-cli
sdv.databroker.v1 > connect
[connect] OK
sdv.databroker.v1 > get Vehicle.Body.Windshield.Front.Wiping.System.IsPositionReached
[get] OK
Vehicle.Body.Windshield.Front.Wiping.System.IsPositionReached: ( NotAvailable )sdv.databroker.v1 > set Vehicle.Body.Windshield.Front.Wiping.System.IsPositionReached false[set] OK
Digital Auto: Playground
playground.digital.auto provides an in-browser, rapid prototyping environment utilizing the COVESA APIs for connected vehicles.
The UUID for Vehicle.Body.Windshield.Front.Wiping.System.IsPositionReached is d42149fa8982593991aa5cd13a1cdee9
Feedback
Do you think this Vehicle Signal specification needs enhancement? Do you want to discuss with experts? Try the following ressources to get in touch with the VSS community:
$ databroker-cli
sdv.databroker.v1 > connect
[connect] OK
sdv.databroker.v1 > get Vehicle.Body.Windshield.Front.Wiping.System.IsWiperError
[get] OK
Vehicle.Body.Windshield.Front.Wiping.System.IsWiperError: ( NotAvailable )sdv.databroker.v1 > set Vehicle.Body.Windshield.Front.Wiping.System.IsWiperError false[set] OK
Digital Auto: Playground
playground.digital.auto provides an in-browser, rapid prototyping environment utilizing the COVESA APIs for connected vehicles.
The UUID for Vehicle.Body.Windshield.Front.Wiping.System.IsWiperError is 5276055d973f57998e1b8d6e536de735
Feedback
Do you think this Vehicle Signal specification needs enhancement? Do you want to discuss with experts? Try the following ressources to get in touch with the VSS community:
Indicates wiper movement. True if wiper blades are moving. Change of direction shall be considered as IsWiping if wipers will continue to move directly after the change of direction.
Navigation
flowchart LR
Vehicle-->Body
Body-->Windshield
Windshield-->Front
Front-->Wiping
Wiping-->System
System-->IsWiping
$ databroker-cli
sdv.databroker.v1 > connect
[connect] OK
sdv.databroker.v1 > get Vehicle.Body.Windshield.Front.Wiping.System.IsWiping
[get] OK
Vehicle.Body.Windshield.Front.Wiping.System.IsWiping: ( NotAvailable )sdv.databroker.v1 > set Vehicle.Body.Windshield.Front.Wiping.System.IsWiping false[set] OK
Digital Auto: Playground
playground.digital.auto provides an in-browser, rapid prototyping environment utilizing the COVESA APIs for connected vehicles.
The UUID for Vehicle.Body.Windshield.Front.Wiping.System.IsWiping is 2015a4610d7a5fbdbb63b260640838e6
Feedback
Do you think this Vehicle Signal specification needs enhancement? Do you want to discuss with experts? Try the following ressources to get in touch with the VSS community:
The following is a list of VSS supported built-in datatypes:
Name
Type
Min
Max
uint8
unsigned 8-bit integer
0
255
int8
signed 8-bit integer
-128
127
uint16
unsigned 16-bit integer
0
65535
int16
signed 16-bit integer
-32768
32767
uint32
unsigned 32-bit integer
0
4294967295
int32
signed 32-bit integer
-2147483648
2147483647
uint64
unsigned 64-bit integer
0
2^64 - 1
int64
signed 64-bit integer
-2^63
2^63 - 1
boolean
boolean value
0/false
1/true
float
floating point number
-3.4e -38
3.4e 38
double
double precision floating point number
-1.7e -300
1.7e 300
string
character string
n/a
n/a
Min, max and default values defined in a Vehicle Signal Specification must be in the supported range of the data type.
5.1.9.7.1.3.4.10 - Mode
Full qualified VSS Path:
Vehicle.Body.Windshield.Front.Wiping.System.Mode
Description:
Requested mode of wiper system. STOP_HOLD means that the wipers shall move to position given by TargetPosition and then hold the position. WIPE means that wipers shall move to the position given by TargetPosition and then hold the position if no new TargetPosition is requested. PLANT_MODE means that wiping is disabled. Exact behavior is vehicle specific. EMERGENCY_STOP means that wiping shall be immediately stopped without holding the position.
Navigation
flowchart LR
Vehicle-->Body
Body-->Windshield
Windshield-->Front
Front-->Wiping
Wiping-->System
System-->Mode
$ databroker-cli
sdv.databroker.v1 > connect
[connect] OK
sdv.databroker.v1 > get Vehicle.Body.Windshield.Front.Wiping.System.Mode
[get] OK
Vehicle.Body.Windshield.Front.Wiping.System.Mode: ( NotAvailable )sdv.databroker.v1 > set Vehicle.Body.Windshield.Front.Wiping.System.Mode Foo
[set] OK
Digital Auto: Playground
playground.digital.auto provides an in-browser, rapid prototyping environment utilizing the COVESA APIs for connected vehicles.
The UUID for Vehicle.Body.Windshield.Front.Wiping.System.Mode is d15518f5d1bc54a38718f43ef749dd34
Feedback
Do you think this Vehicle Signal specification needs enhancement? Do you want to discuss with experts? Try the following ressources to get in touch with the VSS community:
Requested position of main wiper blade for the wiper system relative to reference position. Location of reference position (0 degrees) and direction of positive/negative degrees is vehicle specific. System behavior when receiving TargetPosition depends on Mode and IsEndingWipeCycle. Supported values are vehicle specific and might be dynamically corrected. If IsEndingWipeCycle=True then wipers will complete current movement before actuating new TargetPosition. If IsEndingWipeCycle=False then wipers will directly change destination if the TargetPosition is changed.
Comment:
Default parking position might be used as reference position.
Navigation
flowchart LR
Vehicle-->Body
Body-->Windshield
Windshield-->Front
Front-->Wiping
Wiping-->System
System-->TargetPosition
$ databroker-cli
sdv.databroker.v1 > connect
[connect] OK
sdv.databroker.v1 > get Vehicle.Body.Windshield.Front.Wiping.System.TargetPosition
[get] OK
Vehicle.Body.Windshield.Front.Wiping.System.TargetPosition: ( NotAvailable )sdv.databroker.v1 > set Vehicle.Body.Windshield.Front.Wiping.System.TargetPosition 0[set] OK
Digital Auto: Playground
playground.digital.auto provides an in-browser, rapid prototyping environment utilizing the COVESA APIs for connected vehicles.
The UUID for Vehicle.Body.Windshield.Front.Wiping.System.TargetPosition is 7a4a3fdd2947596dbada6980c142f090
Feedback
Do you think this Vehicle Signal specification needs enhancement? Do you want to discuss with experts? Try the following ressources to get in touch with the VSS community:
The following is a list of VSS supported built-in datatypes:
Name
Type
Min
Max
uint8
unsigned 8-bit integer
0
255
int8
signed 8-bit integer
-128
127
uint16
unsigned 16-bit integer
0
65535
int16
signed 16-bit integer
-32768
32767
uint32
unsigned 32-bit integer
0
4294967295
int32
signed 32-bit integer
-2147483648
2147483647
uint64
unsigned 64-bit integer
0
2^64 - 1
int64
signed 64-bit integer
-2^63
2^63 - 1
boolean
boolean value
0/false
1/true
float
floating point number
-3.4e -38
3.4e 38
double
double precision floating point number
-1.7e -300
1.7e 300
string
character string
n/a
n/a
Min, max and default values defined in a Vehicle Signal Specification must be in the supported range of the data type.
5.1.9.7.1.3.5 - WiperWear
Full qualified VSS Path:
Vehicle.Body.Windshield.Front.Wiping.WiperWear
Description:
Wiper wear as percent. 0 = No Wear. 100 = Worn. Replacement required. Method for calculating or estimating wiper wear is vehicle specific. For windshields with multiple wipers the wear reported shall correspond to the most worn wiper.
Navigation
flowchart LR
Vehicle-->Body
Body-->Windshield
Windshield-->Front
Front-->Wiping
Wiping-->WiperWear
$ databroker-cli
sdv.databroker.v1 > connect
[connect] OK
sdv.databroker.v1 > get Vehicle.Body.Windshield.Front.Wiping.WiperWear
[get] OK
Vehicle.Body.Windshield.Front.Wiping.WiperWear: ( NotAvailable )sdv.databroker.v1 > set Vehicle.Body.Windshield.Front.Wiping.WiperWear 0[set] OK
Digital Auto: Playground
playground.digital.auto provides an in-browser, rapid prototyping environment utilizing the COVESA APIs for connected vehicles.
The UUID for Vehicle.Body.Windshield.Front.Wiping.WiperWear is 92c879c11bc65e6da30d582a3928caac
Feedback
Do you think this Vehicle Signal specification needs enhancement? Do you want to discuss with experts? Try the following ressources to get in touch with the VSS community:
Do you think this Vehicle Signal specification needs enhancement? Do you want to discuss with experts? Try the following ressources to get in touch with the VSS community:
$ databroker-cli
sdv.databroker.v1 > connect
[connect] OK
sdv.databroker.v1 > get Vehicle.Body.Windshield.Rear.IsHeatingOn
[get] OK
Vehicle.Body.Windshield.Rear.IsHeatingOn: ( NotAvailable )sdv.databroker.v1 > set Vehicle.Body.Windshield.Rear.IsHeatingOn false[set] OK
Digital Auto: Playground
playground.digital.auto provides an in-browser, rapid prototyping environment utilizing the COVESA APIs for connected vehicles.
The UUID for Vehicle.Body.Windshield.Rear.IsHeatingOn is 76d811b4c4c356f4898dd6383e28bc6f
Feedback
Do you think this Vehicle Signal specification needs enhancement? Do you want to discuss with experts? Try the following ressources to get in touch with the VSS community:
Do you think this Vehicle Signal specification needs enhancement? Do you want to discuss with experts? Try the following ressources to get in touch with the VSS community:
$ databroker-cli
sdv.databroker.v1 > connect
[connect] OK
sdv.databroker.v1 > get Vehicle.Body.Windshield.Rear.WasherFluid.IsLevelLow
[get] OK
Vehicle.Body.Windshield.Rear.WasherFluid.IsLevelLow: ( NotAvailable )sdv.databroker.v1 > set Vehicle.Body.Windshield.Rear.WasherFluid.IsLevelLow false[set] OK
Digital Auto: Playground
playground.digital.auto provides an in-browser, rapid prototyping environment utilizing the COVESA APIs for connected vehicles.
The UUID for Vehicle.Body.Windshield.Rear.WasherFluid.IsLevelLow is 8ca0356548ae54e8af3aeace49e5ed71
Feedback
Do you think this Vehicle Signal specification needs enhancement? Do you want to discuss with experts? Try the following ressources to get in touch with the VSS community:
$ databroker-cli
sdv.databroker.v1 > connect
[connect] OK
sdv.databroker.v1 > get Vehicle.Body.Windshield.Rear.WasherFluid.Level
[get] OK
Vehicle.Body.Windshield.Rear.WasherFluid.Level: ( NotAvailable )sdv.databroker.v1 > set Vehicle.Body.Windshield.Rear.WasherFluid.Level 0[set] OK
Digital Auto: Playground
playground.digital.auto provides an in-browser, rapid prototyping environment utilizing the COVESA APIs for connected vehicles.
The UUID for Vehicle.Body.Windshield.Rear.WasherFluid.Level is c167e5b265895c108da1b9582de2dd91
Feedback
Do you think this Vehicle Signal specification needs enhancement? Do you want to discuss with experts? Try the following ressources to get in touch with the VSS community:
The UUID for Vehicle.Body.Windshield.Rear.Wiping is f56e80a50fd75dbca48581aea4f012b7
Children
This vehicle signal is a branch or structure and thus has sub-pages:
Vehicle.Body.Windshield.Rear.Wiping.Intensity (Relative intensity/sensitivity for interval and rain sensor mode as requested by user/driver. Has no significance if Windshield.Wiping.Mode is OFF/SLOW/MEDIUM/FAST 0 - wipers inactive. 1 - minimum intensity (lowest frequency/sensitivity, longest interval). 2/3/4/… - higher intensity (higher frequency/sensitivity, shorter interval). Maximum value supported is vehicle specific.)
Vehicle.Body.Windshield.Rear.Wiping.Mode (Wiper mode requested by user/driver. INTERVAL indicates intermittent wiping, with fixed time interval between each wipe. RAIN_SENSOR indicates intermittent wiping based on rain intensity.)
Vehicle.Body.Windshield.Rear.Wiping.WiperWear (Wiper wear as percent. 0 = No Wear. 100 = Worn. Replacement required. Method for calculating or estimating wiper wear is vehicle specific. For windshields with multiple wipers the wear reported shall correspond to the most worn wiper.)
Feedback
Do you think this Vehicle Signal specification needs enhancement? Do you want to discuss with experts? Try the following ressources to get in touch with the VSS community:
Relative intensity/sensitivity for interval and rain sensor mode as requested by user/driver. Has no significance if Windshield.Wiping.Mode is OFF/SLOW/MEDIUM/FAST 0 - wipers inactive. 1 - minimum intensity (lowest frequency/sensitivity, longest interval). 2/3/4/… - higher intensity (higher frequency/sensitivity, shorter interval). Maximum value supported is vehicle specific.
Navigation
flowchart LR
Vehicle-->Body
Body-->Windshield
Windshield-->Rear
Rear-->Wiping
Wiping-->Intensity
$ databroker-cli
sdv.databroker.v1 > connect
[connect] OK
sdv.databroker.v1 > get Vehicle.Body.Windshield.Rear.Wiping.Intensity
[get] OK
Vehicle.Body.Windshield.Rear.Wiping.Intensity: ( NotAvailable )sdv.databroker.v1 > set Vehicle.Body.Windshield.Rear.Wiping.Intensity 0[set] OK
Digital Auto: Playground
playground.digital.auto provides an in-browser, rapid prototyping environment utilizing the COVESA APIs for connected vehicles.
The UUID for Vehicle.Body.Windshield.Rear.Wiping.Intensity is f18b13b9d96b51c492c031d3d86d22da
Feedback
Do you think this Vehicle Signal specification needs enhancement? Do you want to discuss with experts? Try the following ressources to get in touch with the VSS community:
$ databroker-cli
sdv.databroker.v1 > connect
[connect] OK
sdv.databroker.v1 > get Vehicle.Body.Windshield.Rear.Wiping.IsWipersWorn
[get] OK
Vehicle.Body.Windshield.Rear.Wiping.IsWipersWorn: ( NotAvailable )sdv.databroker.v1 > set Vehicle.Body.Windshield.Rear.Wiping.IsWipersWorn false[set] OK
Digital Auto: Playground
playground.digital.auto provides an in-browser, rapid prototyping environment utilizing the COVESA APIs for connected vehicles.
The UUID for Vehicle.Body.Windshield.Rear.Wiping.IsWipersWorn is 0e8d5f7cb6295b908be3a03e8792cca8
Feedback
Do you think this Vehicle Signal specification needs enhancement? Do you want to discuss with experts? Try the following ressources to get in touch with the VSS community:
The following is a list of VSS supported built-in datatypes:
Name
Type
Min
Max
uint8
unsigned 8-bit integer
0
255
int8
signed 8-bit integer
-128
127
uint16
unsigned 16-bit integer
0
65535
int16
signed 16-bit integer
-32768
32767
uint32
unsigned 32-bit integer
0
4294967295
int32
signed 32-bit integer
-2147483648
2147483647
uint64
unsigned 64-bit integer
0
2^64 - 1
int64
signed 64-bit integer
-2^63
2^63 - 1
boolean
boolean value
0/false
1/true
float
floating point number
-3.4e -38
3.4e 38
double
double precision floating point number
-1.7e -300
1.7e 300
string
character string
n/a
n/a
Min, max and default values defined in a Vehicle Signal Specification must be in the supported range of the data type.
5.1.9.7.2.3.3 - Mode
Full qualified VSS Path:
Vehicle.Body.Windshield.Rear.Wiping.Mode
Description:
Wiper mode requested by user/driver. INTERVAL indicates intermittent wiping, with fixed time interval between each wipe. RAIN_SENSOR indicates intermittent wiping based on rain intensity.
Navigation
flowchart LR
Vehicle-->Body
Body-->Windshield
Windshield-->Rear
Rear-->Wiping
Wiping-->Mode
$ databroker-cli
sdv.databroker.v1 > connect
[connect] OK
sdv.databroker.v1 > get Vehicle.Body.Windshield.Rear.Wiping.Mode
[get] OK
Vehicle.Body.Windshield.Rear.Wiping.Mode: ( NotAvailable )sdv.databroker.v1 > set Vehicle.Body.Windshield.Rear.Wiping.Mode Foo
[set] OK
Digital Auto: Playground
playground.digital.auto provides an in-browser, rapid prototyping environment utilizing the COVESA APIs for connected vehicles.
The UUID for Vehicle.Body.Windshield.Rear.Wiping.Mode is 8cc0b88ac8b45f5fa30bb7755ce22648
Feedback
Do you think this Vehicle Signal specification needs enhancement? Do you want to discuss with experts? Try the following ressources to get in touch with the VSS community:
The following is a list of VSS supported built-in datatypes:
Name
Type
Min
Max
uint8
unsigned 8-bit integer
0
255
int8
signed 8-bit integer
-128
127
uint16
unsigned 16-bit integer
0
65535
int16
signed 16-bit integer
-32768
32767
uint32
unsigned 32-bit integer
0
4294967295
int32
signed 32-bit integer
-2147483648
2147483647
uint64
unsigned 64-bit integer
0
2^64 - 1
int64
signed 64-bit integer
-2^63
2^63 - 1
boolean
boolean value
0/false
1/true
float
floating point number
-3.4e -38
3.4e 38
double
double precision floating point number
-1.7e -300
1.7e 300
string
character string
n/a
n/a
Min, max and default values defined in a Vehicle Signal Specification must be in the supported range of the data type.
5.1.9.7.2.3.4 - System
Full qualified VSS Path:
Vehicle.Body.Windshield.Rear.Wiping.System
Description:
Signals to control behavior of wipers in detail. By default VSS expects only one instance.
Comment:
These signals are typically not directly available to the user/driver of the vehicle. The overlay in overlays/extensions/dual_wiper_systems.vspec can be used to modify this branch to support two instances; Primary and Secondary.
Navigation
flowchart LR
Vehicle-->Body
Body-->Windshield
Windshield-->Rear
Rear-->Wiping
Wiping-->System
Digital Auto: Playground
playground.digital.auto provides an in-browser, rapid prototyping environment utilizing the COVESA APIs for connected vehicles.
The UUID for Vehicle.Body.Windshield.Rear.Wiping.System is a00826f6ecc25c3fae7ad164361bdb33
Children
This vehicle signal is a branch or structure and thus has sub-pages:
Vehicle.Body.Windshield.Rear.Wiping.System.ActualPosition (Actual position of main wiper blade for the wiper system relative to reference position. Location of reference position (0 degrees) and direction of positive/negative degrees is vehicle specific.)
Vehicle.Body.Windshield.Rear.Wiping.System.Frequency (Wiping frequency/speed, measured in cycles per minute. The signal concerns the actual speed of the wiper blades when moving. Intervals/pauses are excluded, i.e. the value corresponds to the number of cycles that would be completed in 1 minute if wiping permanently over default range.)
Vehicle.Body.Windshield.Rear.Wiping.System.IsEndingWipeCycle (Indicates if current wipe movement is completed or near completion. True = Movement is completed or near completion. Changes to RequestedPosition will be executed first after reaching previous RequestedPosition, if it has not already been reached. False = Movement is not near completion. Any change to RequestedPosition will be executed immediately. Change of direction may not be allowed.)
Vehicle.Body.Windshield.Rear.Wiping.System.IsPositionReached (Indicates if a requested position has been reached. IsPositionReached refers to the previous position in case the TargetPosition is updated while IsEndingWipeCycle=True. True = Current or Previous TargetPosition reached. False = Position not (yet) reached, or wipers have moved away from the reached position.)
Vehicle.Body.Windshield.Rear.Wiping.System.IsWiping (Indicates wiper movement. True if wiper blades are moving. Change of direction shall be considered as IsWiping if wipers will continue to move directly after the change of direction.)
Vehicle.Body.Windshield.Rear.Wiping.System.Mode (Requested mode of wiper system. STOP_HOLD means that the wipers shall move to position given by TargetPosition and then hold the position. WIPE means that wipers shall move to the position given by TargetPosition and then hold the position if no new TargetPosition is requested. PLANT_MODE means that wiping is disabled. Exact behavior is vehicle specific. EMERGENCY_STOP means that wiping shall be immediately stopped without holding the position.)
Vehicle.Body.Windshield.Rear.Wiping.System.TargetPosition (Requested position of main wiper blade for the wiper system relative to reference position. Location of reference position (0 degrees) and direction of positive/negative degrees is vehicle specific. System behavior when receiving TargetPosition depends on Mode and IsEndingWipeCycle. Supported values are vehicle specific and might be dynamically corrected. If IsEndingWipeCycle=True then wipers will complete current movement before actuating new TargetPosition. If IsEndingWipeCycle=False then wipers will directly change destination if the TargetPosition is changed.)
Feedback
Do you think this Vehicle Signal specification needs enhancement? Do you want to discuss with experts? Try the following ressources to get in touch with the VSS community:
Actual position of main wiper blade for the wiper system relative to reference position. Location of reference position (0 degrees) and direction of positive/negative degrees is vehicle specific.
Comment:
Default parking position might be used as reference position.
Navigation
flowchart LR
Vehicle-->Body
Body-->Windshield
Windshield-->Rear
Rear-->Wiping
Wiping-->System
System-->ActualPosition
$ databroker-cli
sdv.databroker.v1 > connect
[connect] OK
sdv.databroker.v1 > get Vehicle.Body.Windshield.Rear.Wiping.System.ActualPosition
[get] OK
Vehicle.Body.Windshield.Rear.Wiping.System.ActualPosition: ( NotAvailable )sdv.databroker.v1 > set Vehicle.Body.Windshield.Rear.Wiping.System.ActualPosition 0[set] OK
Digital Auto: Playground
playground.digital.auto provides an in-browser, rapid prototyping environment utilizing the COVESA APIs for connected vehicles.
The UUID for Vehicle.Body.Windshield.Rear.Wiping.System.ActualPosition is eddee2607a135582bbcf3d3afc845892
Feedback
Do you think this Vehicle Signal specification needs enhancement? Do you want to discuss with experts? Try the following ressources to get in touch with the VSS community:
$ databroker-cli
sdv.databroker.v1 > connect
[connect] OK
sdv.databroker.v1 > get Vehicle.Body.Windshield.Rear.Wiping.System.DriveCurrent
[get] OK
Vehicle.Body.Windshield.Rear.Wiping.System.DriveCurrent: ( NotAvailable )sdv.databroker.v1 > set Vehicle.Body.Windshield.Rear.Wiping.System.DriveCurrent 0[set] OK
Digital Auto: Playground
playground.digital.auto provides an in-browser, rapid prototyping environment utilizing the COVESA APIs for connected vehicles.
The UUID for Vehicle.Body.Windshield.Rear.Wiping.System.DriveCurrent is 7a254692329055dfb4089e2dcc1d4ef3
Feedback
Do you think this Vehicle Signal specification needs enhancement? Do you want to discuss with experts? Try the following ressources to get in touch with the VSS community:
Wiping frequency/speed, measured in cycles per minute. The signal concerns the actual speed of the wiper blades when moving. Intervals/pauses are excluded, i.e. the value corresponds to the number of cycles that would be completed in 1 minute if wiping permanently over default range.
Comment:
Examples - 0 = Wipers stopped, 80 = Wipers doing 80 cycles per minute (in WIPE mode).
Navigation
flowchart LR
Vehicle-->Body
Body-->Windshield
Windshield-->Rear
Rear-->Wiping
Wiping-->System
System-->Frequency
$ databroker-cli
sdv.databroker.v1 > connect
[connect] OK
sdv.databroker.v1 > get Vehicle.Body.Windshield.Rear.Wiping.System.Frequency
[get] OK
Vehicle.Body.Windshield.Rear.Wiping.System.Frequency: ( NotAvailable )sdv.databroker.v1 > set Vehicle.Body.Windshield.Rear.Wiping.System.Frequency 0[set] OK
Digital Auto: Playground
playground.digital.auto provides an in-browser, rapid prototyping environment utilizing the COVESA APIs for connected vehicles.
The UUID for Vehicle.Body.Windshield.Rear.Wiping.System.Frequency is 371171d971995c999585b028e19be461
Feedback
Do you think this Vehicle Signal specification needs enhancement? Do you want to discuss with experts? Try the following ressources to get in touch with the VSS community:
$ databroker-cli
sdv.databroker.v1 > connect
[connect] OK
sdv.databroker.v1 > get Vehicle.Body.Windshield.Rear.Wiping.System.IsBlocked
[get] OK
Vehicle.Body.Windshield.Rear.Wiping.System.IsBlocked: ( NotAvailable )sdv.databroker.v1 > set Vehicle.Body.Windshield.Rear.Wiping.System.IsBlocked false[set] OK
Digital Auto: Playground
playground.digital.auto provides an in-browser, rapid prototyping environment utilizing the COVESA APIs for connected vehicles.
The UUID for Vehicle.Body.Windshield.Rear.Wiping.System.IsBlocked is 046e818b4dd9595a8301503e9afe028b
Feedback
Do you think this Vehicle Signal specification needs enhancement? Do you want to discuss with experts? Try the following ressources to get in touch with the VSS community:
Indicates if current wipe movement is completed or near completion. True = Movement is completed or near completion. Changes to RequestedPosition will be executed first after reaching previous RequestedPosition, if it has not already been reached. False = Movement is not near completion. Any change to RequestedPosition will be executed immediately. Change of direction may not be allowed.
Comment:
In continuous wiping between A and B this sensor can be used a trigger to update TargetPosition.
Navigation
flowchart LR
Vehicle-->Body
Body-->Windshield
Windshield-->Rear
Rear-->Wiping
Wiping-->System
System-->IsEndingWipeCycle
$ databroker-cli
sdv.databroker.v1 > connect
[connect] OK
sdv.databroker.v1 > get Vehicle.Body.Windshield.Rear.Wiping.System.IsEndingWipeCycle
[get] OK
Vehicle.Body.Windshield.Rear.Wiping.System.IsEndingWipeCycle: ( NotAvailable )sdv.databroker.v1 > set Vehicle.Body.Windshield.Rear.Wiping.System.IsEndingWipeCycle false[set] OK
Digital Auto: Playground
playground.digital.auto provides an in-browser, rapid prototyping environment utilizing the COVESA APIs for connected vehicles.
The UUID for Vehicle.Body.Windshield.Rear.Wiping.System.IsEndingWipeCycle is c1357156d87c58f49d4c43c2a6e97c03
Feedback
Do you think this Vehicle Signal specification needs enhancement? Do you want to discuss with experts? Try the following ressources to get in touch with the VSS community:
$ databroker-cli
sdv.databroker.v1 > connect
[connect] OK
sdv.databroker.v1 > get Vehicle.Body.Windshield.Rear.Wiping.System.IsOverheated
[get] OK
Vehicle.Body.Windshield.Rear.Wiping.System.IsOverheated: ( NotAvailable )sdv.databroker.v1 > set Vehicle.Body.Windshield.Rear.Wiping.System.IsOverheated false[set] OK
Digital Auto: Playground
playground.digital.auto provides an in-browser, rapid prototyping environment utilizing the COVESA APIs for connected vehicles.
The UUID for Vehicle.Body.Windshield.Rear.Wiping.System.IsOverheated is d30bc6f33b995ef491c252980a559ee2
Feedback
Do you think this Vehicle Signal specification needs enhancement? Do you want to discuss with experts? Try the following ressources to get in touch with the VSS community:
Indicates if a requested position has been reached. IsPositionReached refers to the previous position in case the TargetPosition is updated while IsEndingWipeCycle=True. True = Current or Previous TargetPosition reached. False = Position not (yet) reached, or wipers have moved away from the reached position.
Navigation
flowchart LR
Vehicle-->Body
Body-->Windshield
Windshield-->Rear
Rear-->Wiping
Wiping-->System
System-->IsPositionReached
$ databroker-cli
sdv.databroker.v1 > connect
[connect] OK
sdv.databroker.v1 > get Vehicle.Body.Windshield.Rear.Wiping.System.IsPositionReached
[get] OK
Vehicle.Body.Windshield.Rear.Wiping.System.IsPositionReached: ( NotAvailable )sdv.databroker.v1 > set Vehicle.Body.Windshield.Rear.Wiping.System.IsPositionReached false[set] OK
Digital Auto: Playground
playground.digital.auto provides an in-browser, rapid prototyping environment utilizing the COVESA APIs for connected vehicles.
The UUID for Vehicle.Body.Windshield.Rear.Wiping.System.IsPositionReached is ad35e8d17cd95273b1091dcef2104ea1
Feedback
Do you think this Vehicle Signal specification needs enhancement? Do you want to discuss with experts? Try the following ressources to get in touch with the VSS community:
$ databroker-cli
sdv.databroker.v1 > connect
[connect] OK
sdv.databroker.v1 > get Vehicle.Body.Windshield.Rear.Wiping.System.IsWiperError
[get] OK
Vehicle.Body.Windshield.Rear.Wiping.System.IsWiperError: ( NotAvailable )sdv.databroker.v1 > set Vehicle.Body.Windshield.Rear.Wiping.System.IsWiperError false[set] OK
Digital Auto: Playground
playground.digital.auto provides an in-browser, rapid prototyping environment utilizing the COVESA APIs for connected vehicles.
The UUID for Vehicle.Body.Windshield.Rear.Wiping.System.IsWiperError is ac5983deacbe59d7ba1312d44bfd9cd4
Feedback
Do you think this Vehicle Signal specification needs enhancement? Do you want to discuss with experts? Try the following ressources to get in touch with the VSS community:
Indicates wiper movement. True if wiper blades are moving. Change of direction shall be considered as IsWiping if wipers will continue to move directly after the change of direction.
Navigation
flowchart LR
Vehicle-->Body
Body-->Windshield
Windshield-->Rear
Rear-->Wiping
Wiping-->System
System-->IsWiping
$ databroker-cli
sdv.databroker.v1 > connect
[connect] OK
sdv.databroker.v1 > get Vehicle.Body.Windshield.Rear.Wiping.System.IsWiping
[get] OK
Vehicle.Body.Windshield.Rear.Wiping.System.IsWiping: ( NotAvailable )sdv.databroker.v1 > set Vehicle.Body.Windshield.Rear.Wiping.System.IsWiping false[set] OK
Digital Auto: Playground
playground.digital.auto provides an in-browser, rapid prototyping environment utilizing the COVESA APIs for connected vehicles.
The UUID for Vehicle.Body.Windshield.Rear.Wiping.System.IsWiping is 4e001bf679e85c9aa7319bafc3a86e75
Feedback
Do you think this Vehicle Signal specification needs enhancement? Do you want to discuss with experts? Try the following ressources to get in touch with the VSS community:
The following is a list of VSS supported built-in datatypes:
Name
Type
Min
Max
uint8
unsigned 8-bit integer
0
255
int8
signed 8-bit integer
-128
127
uint16
unsigned 16-bit integer
0
65535
int16
signed 16-bit integer
-32768
32767
uint32
unsigned 32-bit integer
0
4294967295
int32
signed 32-bit integer
-2147483648
2147483647
uint64
unsigned 64-bit integer
0
2^64 - 1
int64
signed 64-bit integer
-2^63
2^63 - 1
boolean
boolean value
0/false
1/true
float
floating point number
-3.4e -38
3.4e 38
double
double precision floating point number
-1.7e -300
1.7e 300
string
character string
n/a
n/a
Min, max and default values defined in a Vehicle Signal Specification must be in the supported range of the data type.
5.1.9.7.2.3.4.10 - Mode
Full qualified VSS Path:
Vehicle.Body.Windshield.Rear.Wiping.System.Mode
Description:
Requested mode of wiper system. STOP_HOLD means that the wipers shall move to position given by TargetPosition and then hold the position. WIPE means that wipers shall move to the position given by TargetPosition and then hold the position if no new TargetPosition is requested. PLANT_MODE means that wiping is disabled. Exact behavior is vehicle specific. EMERGENCY_STOP means that wiping shall be immediately stopped without holding the position.
Navigation
flowchart LR
Vehicle-->Body
Body-->Windshield
Windshield-->Rear
Rear-->Wiping
Wiping-->System
System-->Mode
$ databroker-cli
sdv.databroker.v1 > connect
[connect] OK
sdv.databroker.v1 > get Vehicle.Body.Windshield.Rear.Wiping.System.Mode
[get] OK
Vehicle.Body.Windshield.Rear.Wiping.System.Mode: ( NotAvailable )sdv.databroker.v1 > set Vehicle.Body.Windshield.Rear.Wiping.System.Mode Foo
[set] OK
Digital Auto: Playground
playground.digital.auto provides an in-browser, rapid prototyping environment utilizing the COVESA APIs for connected vehicles.
The UUID for Vehicle.Body.Windshield.Rear.Wiping.System.Mode is f2f47522466d570baa7618fac5b0359c
Feedback
Do you think this Vehicle Signal specification needs enhancement? Do you want to discuss with experts? Try the following ressources to get in touch with the VSS community:
Requested position of main wiper blade for the wiper system relative to reference position. Location of reference position (0 degrees) and direction of positive/negative degrees is vehicle specific. System behavior when receiving TargetPosition depends on Mode and IsEndingWipeCycle. Supported values are vehicle specific and might be dynamically corrected. If IsEndingWipeCycle=True then wipers will complete current movement before actuating new TargetPosition. If IsEndingWipeCycle=False then wipers will directly change destination if the TargetPosition is changed.
Comment:
Default parking position might be used as reference position.
Navigation
flowchart LR
Vehicle-->Body
Body-->Windshield
Windshield-->Rear
Rear-->Wiping
Wiping-->System
System-->TargetPosition
$ databroker-cli
sdv.databroker.v1 > connect
[connect] OK
sdv.databroker.v1 > get Vehicle.Body.Windshield.Rear.Wiping.System.TargetPosition
[get] OK
Vehicle.Body.Windshield.Rear.Wiping.System.TargetPosition: ( NotAvailable )sdv.databroker.v1 > set Vehicle.Body.Windshield.Rear.Wiping.System.TargetPosition 0[set] OK
Digital Auto: Playground
playground.digital.auto provides an in-browser, rapid prototyping environment utilizing the COVESA APIs for connected vehicles.
The UUID for Vehicle.Body.Windshield.Rear.Wiping.System.TargetPosition is c39bef0760185555904a92a305392080
Feedback
Do you think this Vehicle Signal specification needs enhancement? Do you want to discuss with experts? Try the following ressources to get in touch with the VSS community:
The following is a list of VSS supported built-in datatypes:
Name
Type
Min
Max
uint8
unsigned 8-bit integer
0
255
int8
signed 8-bit integer
-128
127
uint16
unsigned 16-bit integer
0
65535
int16
signed 16-bit integer
-32768
32767
uint32
unsigned 32-bit integer
0
4294967295
int32
signed 32-bit integer
-2147483648
2147483647
uint64
unsigned 64-bit integer
0
2^64 - 1
int64
signed 64-bit integer
-2^63
2^63 - 1
boolean
boolean value
0/false
1/true
float
floating point number
-3.4e -38
3.4e 38
double
double precision floating point number
-1.7e -300
1.7e 300
string
character string
n/a
n/a
Min, max and default values defined in a Vehicle Signal Specification must be in the supported range of the data type.
5.1.9.7.2.3.5 - WiperWear
Full qualified VSS Path:
Vehicle.Body.Windshield.Rear.Wiping.WiperWear
Description:
Wiper wear as percent. 0 = No Wear. 100 = Worn. Replacement required. Method for calculating or estimating wiper wear is vehicle specific. For windshields with multiple wipers the wear reported shall correspond to the most worn wiper.
Navigation
flowchart LR
Vehicle-->Body
Body-->Windshield
Windshield-->Rear
Rear-->Wiping
Wiping-->WiperWear
$ databroker-cli
sdv.databroker.v1 > connect
[connect] OK
sdv.databroker.v1 > get Vehicle.Body.Windshield.Rear.Wiping.WiperWear
[get] OK
Vehicle.Body.Windshield.Rear.Wiping.WiperWear: ( NotAvailable )sdv.databroker.v1 > set Vehicle.Body.Windshield.Rear.Wiping.WiperWear 0[set] OK
Digital Auto: Playground
playground.digital.auto provides an in-browser, rapid prototyping environment utilizing the COVESA APIs for connected vehicles.
The UUID for Vehicle.Body.Windshield.Rear.Wiping.WiperWear is afd6a352230f5eeaa8ac5f1f188bfd33
Feedback
Do you think this Vehicle Signal specification needs enhancement? Do you want to discuss with experts? Try the following ressources to get in touch with the VSS community:
$ databroker-cli
sdv.databroker.v1 > connect
[connect] OK
sdv.databroker.v1 > get Vehicle.Body.BodyType
[get] OK
Vehicle.Body.BodyType: ( NotAvailable )sdv.databroker.v1 > set Vehicle.Body.BodyType Foo
[set] OK
Digital Auto: Playground
playground.digital.auto provides an in-browser, rapid prototyping environment utilizing the COVESA APIs for connected vehicles.
The UUID for Vehicle.Body.BodyType is 6253412513105deea63b1d424117fd88
Feedback
Do you think this Vehicle Signal specification needs enhancement? Do you want to discuss with experts? Try the following ressources to get in touch with the VSS community:
The following is a list of VSS supported built-in datatypes:
Name
Type
Min
Max
uint8
unsigned 8-bit integer
0
255
int8
signed 8-bit integer
-128
127
uint16
unsigned 16-bit integer
0
65535
int16
signed 16-bit integer
-32768
32767
uint32
unsigned 32-bit integer
0
4294967295
int32
signed 32-bit integer
-2147483648
2147483647
uint64
unsigned 64-bit integer
0
2^64 - 1
int64
signed 64-bit integer
-2^63
2^63 - 1
boolean
boolean value
0/false
1/true
float
floating point number
-3.4e -38
3.4e 38
double
double precision floating point number
-1.7e -300
1.7e 300
string
character string
n/a
n/a
Min, max and default values defined in a Vehicle Signal Specification must be in the supported range of the data type.
5.1.9.9 - Hood
Full qualified VSS Path:
Vehicle.Body.Hood
Description:
Hood status.
Comment:
The hood is the hinged cover over the engine compartment of a motor vehicles. Depending on vehicle, it can be either in the front or back of the vehicle. Luggage compartments are in VSS called trunks, even if they are located at the front of the vehicle.
Navigation
flowchart LR
Vehicle-->Body
Body-->Hood
Digital Auto: Playground
playground.digital.auto provides an in-browser, rapid prototyping environment utilizing the COVESA APIs for connected vehicles.
Do you think this Vehicle Signal specification needs enhancement? Do you want to discuss with experts? Try the following ressources to get in touch with the VSS community:
$ databroker-cli
sdv.databroker.v1 > connect
[connect] OK
sdv.databroker.v1 > get Vehicle.Body.Hood.IsOpen
[get] OK
Vehicle.Body.Hood.IsOpen: ( NotAvailable )sdv.databroker.v1 > set Vehicle.Body.Hood.IsOpen false[set] OK
Digital Auto: Playground
playground.digital.auto provides an in-browser, rapid prototyping environment utilizing the COVESA APIs for connected vehicles.
The UUID for Vehicle.Body.Hood.IsOpen is 890aa3359e1a579288af1cf8e6b5b71f
Feedback
Do you think this Vehicle Signal specification needs enhancement? Do you want to discuss with experts? Try the following ressources to get in touch with the VSS community:
$ databroker-cli
sdv.databroker.v1 > connect
[connect] OK
sdv.databroker.v1 > get Vehicle.Body.RefuelPosition
[get] OK
Vehicle.Body.RefuelPosition: ( NotAvailable )sdv.databroker.v1 > set Vehicle.Body.RefuelPosition Foo
[set] OK
Digital Auto: Playground
playground.digital.auto provides an in-browser, rapid prototyping environment utilizing the COVESA APIs for connected vehicles.
The UUID for Vehicle.Body.RefuelPosition is 53ef90a851fa57f0810d50238e852f02
Feedback
Do you think this Vehicle Signal specification needs enhancement? Do you want to discuss with experts? Try the following ressources to get in touch with the VSS community:
The following is a list of VSS supported built-in datatypes:
Name
Type
Min
Max
uint8
unsigned 8-bit integer
0
255
int8
signed 8-bit integer
-128
127
uint16
unsigned 16-bit integer
0
65535
int16
signed 16-bit integer
-32768
32767
uint32
unsigned 32-bit integer
0
4294967295
int32
signed 32-bit integer
-2147483648
2147483647
uint64
unsigned 64-bit integer
0
2^64 - 1
int64
signed 64-bit integer
-2^63
2^63 - 1
boolean
boolean value
0/false
1/true
float
floating point number
-3.4e -38
3.4e 38
double
double precision floating point number
-1.7e -300
1.7e 300
string
character string
n/a
n/a
Min, max and default values defined in a Vehicle Signal Specification must be in the supported range of the data type.
5.1.9.11 - Trunk
Full qualified VSS Path:
Vehicle.Body.Trunk
Description:
Trunk status.
Comment:
A trunk is a luggage compartment in a vehicle. Depending on vehicle, it can be either in the front or back of the vehicle. Some vehicles may have trunks both at the front and at the rear of the vehicle.
Navigation
flowchart LR
Vehicle-->Body
Body-->Trunk
Digital Auto: Playground
playground.digital.auto provides an in-browser, rapid prototyping environment utilizing the COVESA APIs for connected vehicles.
Do you think this Vehicle Signal specification needs enhancement? Do you want to discuss with experts? Try the following ressources to get in touch with the VSS community:
A trunk is a luggage compartment in a vehicle. Depending on vehicle, it can be either in the front or back of the vehicle. Some vehicles may have trunks both at the front and at the rear of the vehicle.
Navigation
flowchart LR
Vehicle-->Body
Body-->Trunk
Trunk-->Front
Digital Auto: Playground
playground.digital.auto provides an in-browser, rapid prototyping environment utilizing the COVESA APIs for connected vehicles.
Do you think this Vehicle Signal specification needs enhancement? Do you want to discuss with experts? Try the following ressources to get in touch with the VSS community:
$ databroker-cli
sdv.databroker.v1 > connect
[connect] OK
sdv.databroker.v1 > get Vehicle.Body.Trunk.Front.IsLocked
[get] OK
Vehicle.Body.Trunk.Front.IsLocked: ( NotAvailable )sdv.databroker.v1 > set Vehicle.Body.Trunk.Front.IsLocked false[set] OK
Digital Auto: Playground
playground.digital.auto provides an in-browser, rapid prototyping environment utilizing the COVESA APIs for connected vehicles.
The UUID for Vehicle.Body.Trunk.Front.IsLocked is e0eabc210f07505fa1b66b67729d681b
Feedback
Do you think this Vehicle Signal specification needs enhancement? Do you want to discuss with experts? Try the following ressources to get in touch with the VSS community:
$ databroker-cli
sdv.databroker.v1 > connect
[connect] OK
sdv.databroker.v1 > get Vehicle.Body.Trunk.Front.IsOpen
[get] OK
Vehicle.Body.Trunk.Front.IsOpen: ( NotAvailable )sdv.databroker.v1 > set Vehicle.Body.Trunk.Front.IsOpen false[set] OK
Digital Auto: Playground
playground.digital.auto provides an in-browser, rapid prototyping environment utilizing the COVESA APIs for connected vehicles.
The UUID for Vehicle.Body.Trunk.Front.IsOpen is 2047de0896a352fcaf02baa06819a023
Feedback
Do you think this Vehicle Signal specification needs enhancement? Do you want to discuss with experts? Try the following ressources to get in touch with the VSS community:
The following is a list of VSS supported built-in datatypes:
Name
Type
Min
Max
uint8
unsigned 8-bit integer
0
255
int8
signed 8-bit integer
-128
127
uint16
unsigned 16-bit integer
0
65535
int16
signed 16-bit integer
-32768
32767
uint32
unsigned 32-bit integer
0
4294967295
int32
signed 32-bit integer
-2147483648
2147483647
uint64
unsigned 64-bit integer
0
2^64 - 1
int64
signed 64-bit integer
-2^63
2^63 - 1
boolean
boolean value
0/false
1/true
float
floating point number
-3.4e -38
3.4e 38
double
double precision floating point number
-1.7e -300
1.7e 300
string
character string
n/a
n/a
Min, max and default values defined in a Vehicle Signal Specification must be in the supported range of the data type.
5.1.9.11.2 - Rear
Full qualified VSS Path:
Vehicle.Body.Trunk.Rear
Description:
Trunk status.
Comment:
A trunk is a luggage compartment in a vehicle. Depending on vehicle, it can be either in the front or back of the vehicle. Some vehicles may have trunks both at the front and at the rear of the vehicle.
Navigation
flowchart LR
Vehicle-->Body
Body-->Trunk
Trunk-->Rear
Digital Auto: Playground
playground.digital.auto provides an in-browser, rapid prototyping environment utilizing the COVESA APIs for connected vehicles.
Do you think this Vehicle Signal specification needs enhancement? Do you want to discuss with experts? Try the following ressources to get in touch with the VSS community:
$ databroker-cli
sdv.databroker.v1 > connect
[connect] OK
sdv.databroker.v1 > get Vehicle.Body.Trunk.Rear.IsLocked
[get] OK
Vehicle.Body.Trunk.Rear.IsLocked: ( NotAvailable )sdv.databroker.v1 > set Vehicle.Body.Trunk.Rear.IsLocked false[set] OK
Digital Auto: Playground
playground.digital.auto provides an in-browser, rapid prototyping environment utilizing the COVESA APIs for connected vehicles.
The UUID for Vehicle.Body.Trunk.Rear.IsLocked is 8f9b55b002ed59d3ac2ef0b014abf4aa
Feedback
Do you think this Vehicle Signal specification needs enhancement? Do you want to discuss with experts? Try the following ressources to get in touch with the VSS community:
$ databroker-cli
sdv.databroker.v1 > connect
[connect] OK
sdv.databroker.v1 > get Vehicle.Body.Trunk.Rear.IsOpen
[get] OK
Vehicle.Body.Trunk.Rear.IsOpen: ( NotAvailable )sdv.databroker.v1 > set Vehicle.Body.Trunk.Rear.IsOpen false[set] OK
Digital Auto: Playground
playground.digital.auto provides an in-browser, rapid prototyping environment utilizing the COVESA APIs for connected vehicles.
The UUID for Vehicle.Body.Trunk.Rear.IsOpen is 3d3249e59306594698367b839b12c938
Feedback
Do you think this Vehicle Signal specification needs enhancement? Do you want to discuss with experts? Try the following ressources to get in touch with the VSS community:
Do you think this Vehicle Signal specification needs enhancement? Do you want to discuss with experts? Try the following ressources to get in touch with the VSS community:
$ databroker-cli
sdv.databroker.v1 > connect
[connect] OK
sdv.databroker.v1 > get Vehicle.CurrentLocation.Altitude
[get] OK
Vehicle.CurrentLocation.Altitude: ( NotAvailable )sdv.databroker.v1 > set Vehicle.CurrentLocation.Altitude 0[set] OK
Digital Auto: Playground
playground.digital.auto provides an in-browser, rapid prototyping environment utilizing the COVESA APIs for connected vehicles.
The UUID for Vehicle.CurrentLocation.Altitude is d3ead98ab0b751c1a5b5dd5bc0e5e216
Feedback
Do you think this Vehicle Signal specification needs enhancement? Do you want to discuss with experts? Try the following ressources to get in touch with the VSS community:
Vehicle.CurrentLocation.GNSSReceiver.MountingPosition (Mounting position of GNSS receiver antenna relative to vehicle coordinate system. Axis definitions according to ISO 8855. Origin at center of (first) rear axle.)
Feedback
Do you think this Vehicle Signal specification needs enhancement? Do you want to discuss with experts? Try the following ressources to get in touch with the VSS community:
$ databroker-cli
sdv.databroker.v1 > connect
[connect] OK
sdv.databroker.v1 > get Vehicle.CurrentLocation.GNSSReceiver.FixType
[get] OK
Vehicle.CurrentLocation.GNSSReceiver.FixType: ( NotAvailable )sdv.databroker.v1 > set Vehicle.CurrentLocation.GNSSReceiver.FixType Foo
[set] OK
Digital Auto: Playground
playground.digital.auto provides an in-browser, rapid prototyping environment utilizing the COVESA APIs for connected vehicles.
The UUID for Vehicle.CurrentLocation.GNSSReceiver.FixType is 52853b33d4605608bd0ae50595c69309
Feedback
Do you think this Vehicle Signal specification needs enhancement? Do you want to discuss with experts? Try the following ressources to get in touch with the VSS community:
Mounting position of GNSS receiver antenna relative to vehicle coordinate system. Axis definitions according to ISO 8855. Origin at center of (first) rear axle.
Navigation
flowchart LR
Vehicle-->CurrentLocation
CurrentLocation-->GNSSReceiver
GNSSReceiver-->MountingPosition
Digital Auto: Playground
playground.digital.auto provides an in-browser, rapid prototyping environment utilizing the COVESA APIs for connected vehicles.
The UUID for Vehicle.CurrentLocation.GNSSReceiver.MountingPosition is 5c0887bce6fb5eb79402baaccb203e61
Children
This vehicle signal is a branch or structure and thus has sub-pages:
Vehicle.CurrentLocation.GNSSReceiver.MountingPosition.X (Mounting position of GNSS receiver antenna relative to vehicle coordinate system. Axis definitions according to ISO 8855. Origin at center of (first) rear axle. Positive values = forward of rear axle. Negative values = backward of rear axle.)
Vehicle.CurrentLocation.GNSSReceiver.MountingPosition.Y (Mounting position of GNSS receiver antenna relative to vehicle coordinate system. Axis definitions according to ISO 8855. Origin at center of (first) rear axle. Positive values = left of origin. Negative values = right of origin. Left/Right is as seen from driver perspective, i.e. by a person looking forward.)
Vehicle.CurrentLocation.GNSSReceiver.MountingPosition.Z (Mounting position of GNSS receiver on Z-axis. Axis definitions according to ISO 8855. Origin at center of (first) rear axle. Positive values = above center of rear axle. Negative values = below center of rear axle.)
Feedback
Do you think this Vehicle Signal specification needs enhancement? Do you want to discuss with experts? Try the following ressources to get in touch with the VSS community:
Mounting position of GNSS receiver antenna relative to vehicle coordinate system. Axis definitions according to ISO 8855. Origin at center of (first) rear axle. Positive values = left of origin. Negative values = right of origin. Left/Right is as seen from driver perspective, i.e. by a person looking forward.
Navigation
flowchart LR
Vehicle-->CurrentLocation
CurrentLocation-->GNSSReceiver
GNSSReceiver-->MountingPosition
MountingPosition-->Y
$ databroker-cli
sdv.databroker.v1 > connect
[connect] OK
sdv.databroker.v1 > get Vehicle.CurrentLocation.GNSSReceiver.MountingPosition.Y
[get] OK
Vehicle.CurrentLocation.GNSSReceiver.MountingPosition.Y: ( NotAvailable )sdv.databroker.v1 > set Vehicle.CurrentLocation.GNSSReceiver.MountingPosition.Y 0[set] OK
Digital Auto: Playground
playground.digital.auto provides an in-browser, rapid prototyping environment utilizing the COVESA APIs for connected vehicles.
The UUID for Vehicle.CurrentLocation.GNSSReceiver.MountingPosition.Y is 16745ae827c0527ea2c48c20f0c146f1
Feedback
Do you think this Vehicle Signal specification needs enhancement? Do you want to discuss with experts? Try the following ressources to get in touch with the VSS community:
Mounting position of GNSS receiver antenna relative to vehicle coordinate system. Axis definitions according to ISO 8855. Origin at center of (first) rear axle. Positive values = forward of rear axle. Negative values = backward of rear axle.
Navigation
flowchart LR
Vehicle-->CurrentLocation
CurrentLocation-->GNSSReceiver
GNSSReceiver-->MountingPosition
MountingPosition-->X
$ databroker-cli
sdv.databroker.v1 > connect
[connect] OK
sdv.databroker.v1 > get Vehicle.CurrentLocation.GNSSReceiver.MountingPosition.X
[get] OK
Vehicle.CurrentLocation.GNSSReceiver.MountingPosition.X: ( NotAvailable )sdv.databroker.v1 > set Vehicle.CurrentLocation.GNSSReceiver.MountingPosition.X 0[set] OK
Digital Auto: Playground
playground.digital.auto provides an in-browser, rapid prototyping environment utilizing the COVESA APIs for connected vehicles.
The UUID for Vehicle.CurrentLocation.GNSSReceiver.MountingPosition.X is f23d40f3556b5676a0d1e3def037197f
Feedback
Do you think this Vehicle Signal specification needs enhancement? Do you want to discuss with experts? Try the following ressources to get in touch with the VSS community:
Mounting position of GNSS receiver on Z-axis. Axis definitions according to ISO 8855. Origin at center of (first) rear axle. Positive values = above center of rear axle. Negative values = below center of rear axle.
Navigation
flowchart LR
Vehicle-->CurrentLocation
CurrentLocation-->GNSSReceiver
GNSSReceiver-->MountingPosition
MountingPosition-->Z
$ databroker-cli
sdv.databroker.v1 > connect
[connect] OK
sdv.databroker.v1 > get Vehicle.CurrentLocation.GNSSReceiver.MountingPosition.Z
[get] OK
Vehicle.CurrentLocation.GNSSReceiver.MountingPosition.Z: ( NotAvailable )sdv.databroker.v1 > set Vehicle.CurrentLocation.GNSSReceiver.MountingPosition.Z 0[set] OK
Digital Auto: Playground
playground.digital.auto provides an in-browser, rapid prototyping environment utilizing the COVESA APIs for connected vehicles.
The UUID for Vehicle.CurrentLocation.GNSSReceiver.MountingPosition.Z is a4d04e86518e5c5ab60e5e4face35756
Feedback
Do you think this Vehicle Signal specification needs enhancement? Do you want to discuss with experts? Try the following ressources to get in touch with the VSS community:
$ databroker-cli
sdv.databroker.v1 > connect
[connect] OK
sdv.databroker.v1 > get Vehicle.CurrentLocation.Heading
[get] OK
Vehicle.CurrentLocation.Heading: ( NotAvailable )sdv.databroker.v1 > set Vehicle.CurrentLocation.Heading 0[set] OK
Digital Auto: Playground
playground.digital.auto provides an in-browser, rapid prototyping environment utilizing the COVESA APIs for connected vehicles.
The UUID for Vehicle.CurrentLocation.Heading is 2a8f0afa2b315943aa001278875ce012
Feedback
Do you think this Vehicle Signal specification needs enhancement? Do you want to discuss with experts? Try the following ressources to get in touch with the VSS community:
$ databroker-cli
sdv.databroker.v1 > connect
[connect] OK
sdv.databroker.v1 > get Vehicle.CurrentLocation.HorizontalAccuracy
[get] OK
Vehicle.CurrentLocation.HorizontalAccuracy: ( NotAvailable )sdv.databroker.v1 > set Vehicle.CurrentLocation.HorizontalAccuracy 0[set] OK
Digital Auto: Playground
playground.digital.auto provides an in-browser, rapid prototyping environment utilizing the COVESA APIs for connected vehicles.
The UUID for Vehicle.CurrentLocation.HorizontalAccuracy is bf25ef243f0c5f839f7ef874f9c57fda
Feedback
Do you think this Vehicle Signal specification needs enhancement? Do you want to discuss with experts? Try the following ressources to get in touch with the VSS community:
$ databroker-cli
sdv.databroker.v1 > connect
[connect] OK
sdv.databroker.v1 > get Vehicle.CurrentLocation.Latitude
[get] OK
Vehicle.CurrentLocation.Latitude: ( NotAvailable )sdv.databroker.v1 > set Vehicle.CurrentLocation.Latitude 0[set] OK
Digital Auto: Playground
playground.digital.auto provides an in-browser, rapid prototyping environment utilizing the COVESA APIs for connected vehicles.
The UUID for Vehicle.CurrentLocation.Latitude is 08933c5a445055df80bea15fbfa07f1c
Feedback
Do you think this Vehicle Signal specification needs enhancement? Do you want to discuss with experts? Try the following ressources to get in touch with the VSS community:
$ databroker-cli
sdv.databroker.v1 > connect
[connect] OK
sdv.databroker.v1 > get Vehicle.CurrentLocation.Longitude
[get] OK
Vehicle.CurrentLocation.Longitude: ( NotAvailable )sdv.databroker.v1 > set Vehicle.CurrentLocation.Longitude 0[set] OK
Digital Auto: Playground
playground.digital.auto provides an in-browser, rapid prototyping environment utilizing the COVESA APIs for connected vehicles.
The UUID for Vehicle.CurrentLocation.Longitude is 5246f2ec5fea550cb1b36f110854cfbb
Feedback
Do you think this Vehicle Signal specification needs enhancement? Do you want to discuss with experts? Try the following ressources to get in touch with the VSS community:
$ databroker-cli
sdv.databroker.v1 > connect
[connect] OK
sdv.databroker.v1 > get Vehicle.CurrentLocation.Timestamp
[get] OK
Vehicle.CurrentLocation.Timestamp: ( NotAvailable )sdv.databroker.v1 > set Vehicle.CurrentLocation.Timestamp Foo
[set] OK
Digital Auto: Playground
playground.digital.auto provides an in-browser, rapid prototyping environment utilizing the COVESA APIs for connected vehicles.
The UUID for Vehicle.CurrentLocation.Timestamp is 094aeff73be05c08905690be0e82a438
Feedback
Do you think this Vehicle Signal specification needs enhancement? Do you want to discuss with experts? Try the following ressources to get in touch with the VSS community:
$ databroker-cli
sdv.databroker.v1 > connect
[connect] OK
sdv.databroker.v1 > get Vehicle.CurrentLocation.VerticalAccuracy
[get] OK
Vehicle.CurrentLocation.VerticalAccuracy: ( NotAvailable )sdv.databroker.v1 > set Vehicle.CurrentLocation.VerticalAccuracy 0[set] OK
Digital Auto: Playground
playground.digital.auto provides an in-browser, rapid prototyping environment utilizing the COVESA APIs for connected vehicles.
The UUID for Vehicle.CurrentLocation.VerticalAccuracy is 8f54055bce9e5e8e97fb6051582707ab
Feedback
Do you think this Vehicle Signal specification needs enhancement? Do you want to discuss with experts? Try the following ressources to get in touch with the VSS community:
The following is a list of VSS supported built-in datatypes:
Name
Type
Min
Max
uint8
unsigned 8-bit integer
0
255
int8
signed 8-bit integer
-128
127
uint16
unsigned 16-bit integer
0
65535
int16
signed 16-bit integer
-32768
32767
uint32
unsigned 32-bit integer
0
4294967295
int32
signed 32-bit integer
-2147483648
2147483647
uint64
unsigned 64-bit integer
0
2^64 - 1
int64
signed 64-bit integer
-2^63
2^63 - 1
boolean
boolean value
0/false
1/true
float
floating point number
-3.4e -38
3.4e 38
double
double precision floating point number
-1.7e -300
1.7e 300
string
character string
n/a
n/a
Min, max and default values defined in a Vehicle Signal Specification must be in the supported range of the data type.
5.1.11 - PowerOptimizeLevel
Full qualified VSS Path:
Vehicle.PowerOptimizeLevel
Description:
Power optimization level for this branch/subsystem. A higher number indicates more aggressive power optimization. Level 0 indicates that all functionality is enabled, no power optimization enabled. Level 10 indicates most aggressive power optimization mode, only essential functionality enabled.
$ databroker-cli
sdv.databroker.v1 > connect
[connect] OK
sdv.databroker.v1 > get Vehicle.PowerOptimizeLevel
[get] OK
Vehicle.PowerOptimizeLevel: ( NotAvailable )sdv.databroker.v1 > set Vehicle.PowerOptimizeLevel 0[set] OK
Digital Auto: Playground
playground.digital.auto provides an in-browser, rapid prototyping environment utilizing the COVESA APIs for connected vehicles.
The UUID for Vehicle.PowerOptimizeLevel is add77f60f7885e39a84baae200569077
Feedback
Do you think this Vehicle Signal specification needs enhancement? Do you want to discuss with experts? Try the following ressources to get in touch with the VSS community:
Vehicle.Powertrain.PowerOptimizeLevel (Power optimization level for this branch/subsystem. A higher number indicates more aggressive power optimization. Level 0 indicates that all functionality is enabled, no power optimization enabled. Level 10 indicates most aggressive power optimization mode, only essential functionality enabled.)
Vehicle.Powertrain.Range (Remaining range in meters using all energy sources available in the vehicle.)
Do you think this Vehicle Signal specification needs enhancement? Do you want to discuss with experts? Try the following ressources to get in touch with the VSS community:
Vehicle.Powertrain.FuelSystem.SupportedFuel (Detailed information on fuels supported by the vehicle. Identifiers originating from DIN EN 16942:2021-08, appendix B, with additional suffix for octane (RON) where relevant.)
Do you think this Vehicle Signal specification needs enhancement? Do you want to discuss with experts? Try the following ressources to get in touch with the VSS community:
$ databroker-cli
sdv.databroker.v1 > connect
[connect] OK
sdv.databroker.v1 > get Vehicle.Powertrain.FuelSystem.AverageConsumption
[get] OK
Vehicle.Powertrain.FuelSystem.AverageConsumption: ( NotAvailable )sdv.databroker.v1 > set Vehicle.Powertrain.FuelSystem.AverageConsumption 0[set] OK
Digital Auto: Playground
playground.digital.auto provides an in-browser, rapid prototyping environment utilizing the COVESA APIs for connected vehicles.
The UUID for Vehicle.Powertrain.FuelSystem.AverageConsumption is e2252108125a54dcab34e1bad0fe8bdc
Feedback
Do you think this Vehicle Signal specification needs enhancement? Do you want to discuss with experts? Try the following ressources to get in touch with the VSS community:
Fuel amount in liters consumed since start of current trip.
Comment:
A new trip is considered to start when engine gets enabled (e.g. LowVoltageSystemState in ON or START mode). A trip is considered to end when engine is no longer enabled. The signal may however keep the value of the last trip until a new trip is started.
Navigation
flowchart LR
Vehicle-->Powertrain
Powertrain-->FuelSystem
FuelSystem-->ConsumptionSinceStart
$ databroker-cli
sdv.databroker.v1 > connect
[connect] OK
sdv.databroker.v1 > get Vehicle.Powertrain.FuelSystem.ConsumptionSinceStart
[get] OK
Vehicle.Powertrain.FuelSystem.ConsumptionSinceStart: ( NotAvailable )sdv.databroker.v1 > set Vehicle.Powertrain.FuelSystem.ConsumptionSinceStart 0[set] OK
Digital Auto: Playground
playground.digital.auto provides an in-browser, rapid prototyping environment utilizing the COVESA APIs for connected vehicles.
The UUID for Vehicle.Powertrain.FuelSystem.ConsumptionSinceStart is adf0a40964ff556f92b10275ad918883
Feedback
Do you think this Vehicle Signal specification needs enhancement? Do you want to discuss with experts? Try the following ressources to get in touch with the VSS community:
$ databroker-cli
sdv.databroker.v1 > connect
[connect] OK
sdv.databroker.v1 > get Vehicle.Powertrain.FuelSystem.HybridType
[get] OK
Vehicle.Powertrain.FuelSystem.HybridType: ( NotAvailable )sdv.databroker.v1 > set Vehicle.Powertrain.FuelSystem.HybridType UNKNOWN
[set] OK
Digital Auto: Playground
playground.digital.auto provides an in-browser, rapid prototyping environment utilizing the COVESA APIs for connected vehicles.
The UUID for Vehicle.Powertrain.FuelSystem.HybridType is f0f72012f5e453c1935ff8c3a5aff696
Feedback
Do you think this Vehicle Signal specification needs enhancement? Do you want to discuss with experts? Try the following ressources to get in touch with the VSS community:
$ databroker-cli
sdv.databroker.v1 > connect
[connect] OK
sdv.databroker.v1 > get Vehicle.Powertrain.FuelSystem.InstantConsumption
[get] OK
Vehicle.Powertrain.FuelSystem.InstantConsumption: ( NotAvailable )sdv.databroker.v1 > set Vehicle.Powertrain.FuelSystem.InstantConsumption 0[set] OK
Digital Auto: Playground
playground.digital.auto provides an in-browser, rapid prototyping environment utilizing the COVESA APIs for connected vehicles.
The UUID for Vehicle.Powertrain.FuelSystem.InstantConsumption is cf65767ec8ad56ffadfdccd831e4b562
Feedback
Do you think this Vehicle Signal specification needs enhancement? Do you want to discuss with experts? Try the following ressources to get in touch with the VSS community:
$ databroker-cli
sdv.databroker.v1 > connect
[connect] OK
sdv.databroker.v1 > get Vehicle.Powertrain.FuelSystem.IsEngineStopStartEnabled
[get] OK
Vehicle.Powertrain.FuelSystem.IsEngineStopStartEnabled: ( NotAvailable )sdv.databroker.v1 > set Vehicle.Powertrain.FuelSystem.IsEngineStopStartEnabled false[set] OK
Digital Auto: Playground
playground.digital.auto provides an in-browser, rapid prototyping environment utilizing the COVESA APIs for connected vehicles.
The UUID for Vehicle.Powertrain.FuelSystem.IsEngineStopStartEnabled is 176eed5bb0da582a9ee56f1c70e12075
Feedback
Do you think this Vehicle Signal specification needs enhancement? Do you want to discuss with experts? Try the following ressources to get in touch with the VSS community:
$ databroker-cli
sdv.databroker.v1 > connect
[connect] OK
sdv.databroker.v1 > get Vehicle.Powertrain.FuelSystem.IsFuelLevelLow
[get] OK
Vehicle.Powertrain.FuelSystem.IsFuelLevelLow: ( NotAvailable )sdv.databroker.v1 > set Vehicle.Powertrain.FuelSystem.IsFuelLevelLow false[set] OK
Digital Auto: Playground
playground.digital.auto provides an in-browser, rapid prototyping environment utilizing the COVESA APIs for connected vehicles.
The UUID for Vehicle.Powertrain.FuelSystem.IsFuelLevelLow is 65f18ee3b04f5d4c8bb76083227dd9fe
Feedback
Do you think this Vehicle Signal specification needs enhancement? Do you want to discuss with experts? Try the following ressources to get in touch with the VSS community:
$ databroker-cli
sdv.databroker.v1 > connect
[connect] OK
sdv.databroker.v1 > get Vehicle.Powertrain.FuelSystem.Level
[get] OK
Vehicle.Powertrain.FuelSystem.Level: ( NotAvailable )sdv.databroker.v1 > set Vehicle.Powertrain.FuelSystem.Level 0[set] OK
Digital Auto: Playground
playground.digital.auto provides an in-browser, rapid prototyping environment utilizing the COVESA APIs for connected vehicles.
The UUID for Vehicle.Powertrain.FuelSystem.Level is 902bd295a662573088291e8b6a6b7943
Feedback
Do you think this Vehicle Signal specification needs enhancement? Do you want to discuss with experts? Try the following ressources to get in touch with the VSS community:
$ databroker-cli
sdv.databroker.v1 > connect
[connect] OK
sdv.databroker.v1 > get Vehicle.Powertrain.FuelSystem.Range
[get] OK
Vehicle.Powertrain.FuelSystem.Range: ( NotAvailable )sdv.databroker.v1 > set Vehicle.Powertrain.FuelSystem.Range 0[set] OK
Digital Auto: Playground
playground.digital.auto provides an in-browser, rapid prototyping environment utilizing the COVESA APIs for connected vehicles.
The UUID for Vehicle.Powertrain.FuelSystem.Range is c5a0dbe5e754553897f0aed0069af57a
Feedback
Do you think this Vehicle Signal specification needs enhancement? Do you want to discuss with experts? Try the following ressources to get in touch with the VSS community:
The following is a list of VSS supported built-in datatypes:
Name
Type
Min
Max
uint8
unsigned 8-bit integer
0
255
int8
signed 8-bit integer
-128
127
uint16
unsigned 16-bit integer
0
65535
int16
signed 16-bit integer
-32768
32767
uint32
unsigned 32-bit integer
0
4294967295
int32
signed 32-bit integer
-2147483648
2147483647
uint64
unsigned 64-bit integer
0
2^64 - 1
int64
signed 64-bit integer
-2^63
2^63 - 1
boolean
boolean value
0/false
1/true
float
floating point number
-3.4e -38
3.4e 38
double
double precision floating point number
-1.7e -300
1.7e 300
string
character string
n/a
n/a
Min, max and default values defined in a Vehicle Signal Specification must be in the supported range of the data type.
5.1.12.1.9 - SupportedFuel
Full qualified VSS Path:
Vehicle.Powertrain.FuelSystem.SupportedFuel
Description:
Detailed information on fuels supported by the vehicle. Identifiers originating from DIN EN 16942:2021-08, appendix B, with additional suffix for octane (RON) where relevant.
Comment:
RON 95 is sometimes referred to as Super, RON 98 as Super Plus.
Navigation
flowchart LR
Vehicle-->Powertrain
Powertrain-->FuelSystem
FuelSystem-->SupportedFuel
$ databroker-cli
sdv.databroker.v1 > connect
[connect] OK
sdv.databroker.v1 > get Vehicle.Powertrain.FuelSystem.SupportedFuel
[get] OK
Vehicle.Powertrain.FuelSystem.SupportedFuel: ( NotAvailable )sdv.databroker.v1 > set Vehicle.Powertrain.FuelSystem.SupportedFuel 0[set] OK
Digital Auto: Playground
playground.digital.auto provides an in-browser, rapid prototyping environment utilizing the COVESA APIs for connected vehicles.
The UUID for Vehicle.Powertrain.FuelSystem.SupportedFuel is 7fd3bf2ef0c650e69ff2037875ec59ee
Feedback
Do you think this Vehicle Signal specification needs enhancement? Do you want to discuss with experts? Try the following ressources to get in touch with the VSS community:
$ databroker-cli
sdv.databroker.v1 > connect
[connect] OK
sdv.databroker.v1 > get Vehicle.Powertrain.FuelSystem.SupportedFuelTypes
[get] OK
Vehicle.Powertrain.FuelSystem.SupportedFuelTypes: ( NotAvailable )sdv.databroker.v1 > set Vehicle.Powertrain.FuelSystem.SupportedFuelTypes 0[set] OK
Digital Auto: Playground
playground.digital.auto provides an in-browser, rapid prototyping environment utilizing the COVESA APIs for connected vehicles.
The UUID for Vehicle.Powertrain.FuelSystem.SupportedFuelTypes is 80edc3002aa25097aba6455fe459fa6c
Feedback
Do you think this Vehicle Signal specification needs enhancement? Do you want to discuss with experts? Try the following ressources to get in touch with the VSS community:
$ databroker-cli
sdv.databroker.v1 > connect
[connect] OK
sdv.databroker.v1 > get Vehicle.Powertrain.FuelSystem.TankCapacity
[get] OK
Vehicle.Powertrain.FuelSystem.TankCapacity: ( NotAvailable )sdv.databroker.v1 > set Vehicle.Powertrain.FuelSystem.TankCapacity 0[set] OK
Digital Auto: Playground
playground.digital.auto provides an in-browser, rapid prototyping environment utilizing the COVESA APIs for connected vehicles.
The UUID for Vehicle.Powertrain.FuelSystem.TankCapacity is 362643b866c55d5386fdbdf383464e90
Feedback
Do you think this Vehicle Signal specification needs enhancement? Do you want to discuss with experts? Try the following ressources to get in touch with the VSS community:
$ databroker-cli
sdv.databroker.v1 > connect
[connect] OK
sdv.databroker.v1 > get Vehicle.Powertrain.FuelSystem.TimeSinceStart
[get] OK
Vehicle.Powertrain.FuelSystem.TimeSinceStart: ( NotAvailable )sdv.databroker.v1 > set Vehicle.Powertrain.FuelSystem.TimeSinceStart 0[set] OK
Digital Auto: Playground
playground.digital.auto provides an in-browser, rapid prototyping environment utilizing the COVESA APIs for connected vehicles.
The UUID for Vehicle.Powertrain.FuelSystem.TimeSinceStart is 1a8dbc5107b3522fad852e63aa85aef9
Feedback
Do you think this Vehicle Signal specification needs enhancement? Do you want to discuss with experts? Try the following ressources to get in touch with the VSS community:
Vehicle.Powertrain.TractionBattery.CurrentCurrent (Current current flowing in/out of battery. Positive = Current flowing in to battery, e.g. during charging. Negative = Current flowing out of battery, e.g. during driving.)
Vehicle.Powertrain.TractionBattery.CurrentPower (Current electrical energy flowing in/out of battery. Positive = Energy flowing in to battery, e.g. during charging. Negative = Energy flowing out of battery, e.g. during driving.)
Vehicle.Powertrain.TractionBattery.DCDC (Properties related to DC/DC converter converting high voltage (from high voltage battery) to vehicle low voltage (supply voltage, typically 12 Volts).)
Do you think this Vehicle Signal specification needs enhancement? Do you want to discuss with experts? Try the following ressources to get in touch with the VSS community:
Do you think this Vehicle Signal specification needs enhancement? Do you want to discuss with experts? Try the following ressources to get in touch with the VSS community:
$ databroker-cli
sdv.databroker.v1 > connect
[connect] OK
sdv.databroker.v1 > get Vehicle.Powertrain.TractionBattery.DCDC.PowerLoss
[get] OK
Vehicle.Powertrain.TractionBattery.DCDC.PowerLoss: ( NotAvailable )sdv.databroker.v1 > set Vehicle.Powertrain.TractionBattery.DCDC.PowerLoss 0[set] OK
Digital Auto: Playground
playground.digital.auto provides an in-browser, rapid prototyping environment utilizing the COVESA APIs for connected vehicles.
The UUID for Vehicle.Powertrain.TractionBattery.DCDC.PowerLoss is f29e37087cdf57ca998188c7b945a77b
Feedback
Do you think this Vehicle Signal specification needs enhancement? Do you want to discuss with experts? Try the following ressources to get in touch with the VSS community:
$ databroker-cli
sdv.databroker.v1 > connect
[connect] OK
sdv.databroker.v1 > get Vehicle.Powertrain.TractionBattery.DCDC.Temperature
[get] OK
Vehicle.Powertrain.TractionBattery.DCDC.Temperature: ( NotAvailable )sdv.databroker.v1 > set Vehicle.Powertrain.TractionBattery.DCDC.Temperature 0[set] OK
Digital Auto: Playground
playground.digital.auto provides an in-browser, rapid prototyping environment utilizing the COVESA APIs for connected vehicles.
The UUID for Vehicle.Powertrain.TractionBattery.DCDC.Temperature is 4e587c3af2aa5fbb9205e42a64fc8d77
Feedback
Do you think this Vehicle Signal specification needs enhancement? Do you want to discuss with experts? Try the following ressources to get in touch with the VSS community:
Vehicle.Powertrain.TractionBattery.Charging.Mode (Control of the charge process. MANUAL means manually initiated (plug-in event, companion app, etc). TIMER means timer-based. GRID means grid-controlled (eg ISO 15118). PROFILE means controlled by profile download to vehicle.)
Do you think this Vehicle Signal specification needs enhancement? Do you want to discuss with experts? Try the following ressources to get in touch with the VSS community:
Do you think this Vehicle Signal specification needs enhancement? Do you want to discuss with experts? Try the following ressources to get in touch with the VSS community:
$ databroker-cli
sdv.databroker.v1 > connect
[connect] OK
sdv.databroker.v1 > get Vehicle.Powertrain.TractionBattery.Charging.ChargeCurrent.DC
[get] OK
Vehicle.Powertrain.TractionBattery.Charging.ChargeCurrent.DC: ( NotAvailable )sdv.databroker.v1 > set Vehicle.Powertrain.TractionBattery.Charging.ChargeCurrent.DC 0[set] OK
Digital Auto: Playground
playground.digital.auto provides an in-browser, rapid prototyping environment utilizing the COVESA APIs for connected vehicles.
The UUID for Vehicle.Powertrain.TractionBattery.Charging.ChargeCurrent.DC is 44204d7ae6fd5f8e954d0670a739bdf2
Feedback
Do you think this Vehicle Signal specification needs enhancement? Do you want to discuss with experts? Try the following ressources to get in touch with the VSS community:
$ databroker-cli
sdv.databroker.v1 > connect
[connect] OK
sdv.databroker.v1 > get Vehicle.Powertrain.TractionBattery.Charging.ChargeCurrent.Phase1
[get] OK
Vehicle.Powertrain.TractionBattery.Charging.ChargeCurrent.Phase1: ( NotAvailable )sdv.databroker.v1 > set Vehicle.Powertrain.TractionBattery.Charging.ChargeCurrent.Phase1 0[set] OK
Digital Auto: Playground
playground.digital.auto provides an in-browser, rapid prototyping environment utilizing the COVESA APIs for connected vehicles.
The UUID for Vehicle.Powertrain.TractionBattery.Charging.ChargeCurrent.Phase1 is 400dca50fcde52a6bb605d7e86f49776
Feedback
Do you think this Vehicle Signal specification needs enhancement? Do you want to discuss with experts? Try the following ressources to get in touch with the VSS community:
$ databroker-cli
sdv.databroker.v1 > connect
[connect] OK
sdv.databroker.v1 > get Vehicle.Powertrain.TractionBattery.Charging.ChargeCurrent.Phase2
[get] OK
Vehicle.Powertrain.TractionBattery.Charging.ChargeCurrent.Phase2: ( NotAvailable )sdv.databroker.v1 > set Vehicle.Powertrain.TractionBattery.Charging.ChargeCurrent.Phase2 0[set] OK
Digital Auto: Playground
playground.digital.auto provides an in-browser, rapid prototyping environment utilizing the COVESA APIs for connected vehicles.
The UUID for Vehicle.Powertrain.TractionBattery.Charging.ChargeCurrent.Phase2 is 32cb24d1c495503a9087d6f55997cf57
Feedback
Do you think this Vehicle Signal specification needs enhancement? Do you want to discuss with experts? Try the following ressources to get in touch with the VSS community:
$ databroker-cli
sdv.databroker.v1 > connect
[connect] OK
sdv.databroker.v1 > get Vehicle.Powertrain.TractionBattery.Charging.ChargeCurrent.Phase3
[get] OK
Vehicle.Powertrain.TractionBattery.Charging.ChargeCurrent.Phase3: ( NotAvailable )sdv.databroker.v1 > set Vehicle.Powertrain.TractionBattery.Charging.ChargeCurrent.Phase3 0[set] OK
Digital Auto: Playground
playground.digital.auto provides an in-browser, rapid prototyping environment utilizing the COVESA APIs for connected vehicles.
The UUID for Vehicle.Powertrain.TractionBattery.Charging.ChargeCurrent.Phase3 is 55fb7fb7ff4a5df9b6a3af435eac868e
Feedback
Do you think this Vehicle Signal specification needs enhancement? Do you want to discuss with experts? Try the following ressources to get in touch with the VSS community:
$ databroker-cli
sdv.databroker.v1 > connect
[connect] OK
sdv.databroker.v1 > get Vehicle.Powertrain.TractionBattery.Charging.ChargeLimit
[get] OK
Vehicle.Powertrain.TractionBattery.Charging.ChargeLimit: ( NotAvailable )sdv.databroker.v1 > set Vehicle.Powertrain.TractionBattery.Charging.ChargeLimit 0[set] OK
Digital Auto: Playground
playground.digital.auto provides an in-browser, rapid prototyping environment utilizing the COVESA APIs for connected vehicles.
The UUID for Vehicle.Powertrain.TractionBattery.Charging.ChargeLimit is 62360a4ed1095275a7052d65112aaef1
Feedback
Do you think this Vehicle Signal specification needs enhancement? Do you want to discuss with experts? Try the following ressources to get in touch with the VSS community:
Type of charge plug (charging inlet) available on the vehicle. IEC types refer to IEC 62196, GBT refers to GB/T 20234.
Comment:
A vehicle may have multiple charging inlets. IEC_TYPE_1_AC refers to Type 1 as defined in IEC 62196-2. Also known as Yazaki or J1772 connector. IEC_TYPE_2_AC refers to Type 2 as defined in IEC 62196-2. Also known as Mennekes connector. IEC_TYPE_3_AC refers to Type 3 as defined in IEC 62196-2. Also known as Scame connector. IEC_TYPE_4_DC refers to AA configuration as defined in IEC 62196-3. Also known as Type 4 or CHAdeMO connector. IEC_TYPE_1_CCS_DC refers to EE Configuration as defined in IEC 62196-3. Also known as CCS1 or Combo1 connector. IEC_TYPE_2_CCS_DC refers to FF Configuration as defined in IEC 62196-3. Also known as CCS2 or Combo2 connector. TESLA_ROADSTER, TESLA_HPWC (High Power Wall Connector) and TESLA_SUPERCHARGER refer to non-standardized charging inlets/methods used by Tesla. GBT_AC refers to connector specified in GB/T 20234.2. GBT_DC refers to connector specified in GB/T 20234.3. Also specified as BB Configuration in IEC 62196-3. OTHER shall be used if the vehicle has a charging connector, but not one of the connectors listed above. For additional information see https://en.wikipedia.org/wiki/IEC_62196.
Navigation
flowchart LR
Vehicle-->Powertrain
Powertrain-->TractionBattery
TractionBattery-->Charging
Charging-->ChargePlugType
$ databroker-cli
sdv.databroker.v1 > connect
[connect] OK
sdv.databroker.v1 > get Vehicle.Powertrain.TractionBattery.Charging.ChargePlugType
[get] OK
Vehicle.Powertrain.TractionBattery.Charging.ChargePlugType: ( NotAvailable )sdv.databroker.v1 > set Vehicle.Powertrain.TractionBattery.Charging.ChargePlugType 0[set] OK
Digital Auto: Playground
playground.digital.auto provides an in-browser, rapid prototyping environment utilizing the COVESA APIs for connected vehicles.
The UUID for Vehicle.Powertrain.TractionBattery.Charging.ChargePlugType is 4c56357a6f1d586395215a9beeb26d91
Feedback
Do you think this Vehicle Signal specification needs enhancement? Do you want to discuss with experts? Try the following ressources to get in touch with the VSS community:
$ databroker-cli
sdv.databroker.v1 > connect
[connect] OK
sdv.databroker.v1 > get Vehicle.Powertrain.TractionBattery.Charging.ChargePortFlap
[get] OK
Vehicle.Powertrain.TractionBattery.Charging.ChargePortFlap: ( NotAvailable )sdv.databroker.v1 > set Vehicle.Powertrain.TractionBattery.Charging.ChargePortFlap Foo
[set] OK
Digital Auto: Playground
playground.digital.auto provides an in-browser, rapid prototyping environment utilizing the COVESA APIs for connected vehicles.
The UUID for Vehicle.Powertrain.TractionBattery.Charging.ChargePortFlap is 71bdd2145bb55c3393df194bfc2e03e5
Feedback
Do you think this Vehicle Signal specification needs enhancement? Do you want to discuss with experts? Try the following ressources to get in touch with the VSS community:
$ databroker-cli
sdv.databroker.v1 > connect
[connect] OK
sdv.databroker.v1 > get Vehicle.Powertrain.TractionBattery.Charging.ChargeRate
[get] OK
Vehicle.Powertrain.TractionBattery.Charging.ChargeRate: ( NotAvailable )sdv.databroker.v1 > set Vehicle.Powertrain.TractionBattery.Charging.ChargeRate 0[set] OK
Digital Auto: Playground
playground.digital.auto provides an in-browser, rapid prototyping environment utilizing the COVESA APIs for connected vehicles.
The UUID for Vehicle.Powertrain.TractionBattery.Charging.ChargeRate is a287cea3fdaa533180c8e349343a7851
Feedback
Do you think this Vehicle Signal specification needs enhancement? Do you want to discuss with experts? Try the following ressources to get in touch with the VSS community:
Do you think this Vehicle Signal specification needs enhancement? Do you want to discuss with experts? Try the following ressources to get in touch with the VSS community:
$ databroker-cli
sdv.databroker.v1 > connect
[connect] OK
sdv.databroker.v1 > get Vehicle.Powertrain.TractionBattery.Charging.ChargeVoltage.DC
[get] OK
Vehicle.Powertrain.TractionBattery.Charging.ChargeVoltage.DC: ( NotAvailable )sdv.databroker.v1 > set Vehicle.Powertrain.TractionBattery.Charging.ChargeVoltage.DC 0[set] OK
Digital Auto: Playground
playground.digital.auto provides an in-browser, rapid prototyping environment utilizing the COVESA APIs for connected vehicles.
The UUID for Vehicle.Powertrain.TractionBattery.Charging.ChargeVoltage.DC is 701c21d1a4815b35ba061415789ec911
Feedback
Do you think this Vehicle Signal specification needs enhancement? Do you want to discuss with experts? Try the following ressources to get in touch with the VSS community:
$ databroker-cli
sdv.databroker.v1 > connect
[connect] OK
sdv.databroker.v1 > get Vehicle.Powertrain.TractionBattery.Charging.ChargeVoltage.Phase1
[get] OK
Vehicle.Powertrain.TractionBattery.Charging.ChargeVoltage.Phase1: ( NotAvailable )sdv.databroker.v1 > set Vehicle.Powertrain.TractionBattery.Charging.ChargeVoltage.Phase1 0[set] OK
Digital Auto: Playground
playground.digital.auto provides an in-browser, rapid prototyping environment utilizing the COVESA APIs for connected vehicles.
The UUID for Vehicle.Powertrain.TractionBattery.Charging.ChargeVoltage.Phase1 is 15991c8316585816815d6f4fb6b06776
Feedback
Do you think this Vehicle Signal specification needs enhancement? Do you want to discuss with experts? Try the following ressources to get in touch with the VSS community:
$ databroker-cli
sdv.databroker.v1 > connect
[connect] OK
sdv.databroker.v1 > get Vehicle.Powertrain.TractionBattery.Charging.ChargeVoltage.Phase2
[get] OK
Vehicle.Powertrain.TractionBattery.Charging.ChargeVoltage.Phase2: ( NotAvailable )sdv.databroker.v1 > set Vehicle.Powertrain.TractionBattery.Charging.ChargeVoltage.Phase2 0[set] OK
Digital Auto: Playground
playground.digital.auto provides an in-browser, rapid prototyping environment utilizing the COVESA APIs for connected vehicles.
The UUID for Vehicle.Powertrain.TractionBattery.Charging.ChargeVoltage.Phase2 is 6c0dcf98169d5a5190736a6dd81291a4
Feedback
Do you think this Vehicle Signal specification needs enhancement? Do you want to discuss with experts? Try the following ressources to get in touch with the VSS community:
$ databroker-cli
sdv.databroker.v1 > connect
[connect] OK
sdv.databroker.v1 > get Vehicle.Powertrain.TractionBattery.Charging.ChargeVoltage.Phase3
[get] OK
Vehicle.Powertrain.TractionBattery.Charging.ChargeVoltage.Phase3: ( NotAvailable )sdv.databroker.v1 > set Vehicle.Powertrain.TractionBattery.Charging.ChargeVoltage.Phase3 0[set] OK
Digital Auto: Playground
playground.digital.auto provides an in-browser, rapid prototyping environment utilizing the COVESA APIs for connected vehicles.
The UUID for Vehicle.Powertrain.TractionBattery.Charging.ChargeVoltage.Phase3 is 1ab06b48231e54e2ac27e543508c84f0
Feedback
Do you think this Vehicle Signal specification needs enhancement? Do you want to discuss with experts? Try the following ressources to get in touch with the VSS community:
$ databroker-cli
sdv.databroker.v1 > connect
[connect] OK
sdv.databroker.v1 > get Vehicle.Powertrain.TractionBattery.Charging.IsCharging
[get] OK
Vehicle.Powertrain.TractionBattery.Charging.IsCharging: ( NotAvailable )sdv.databroker.v1 > set Vehicle.Powertrain.TractionBattery.Charging.IsCharging false[set] OK
Digital Auto: Playground
playground.digital.auto provides an in-browser, rapid prototyping environment utilizing the COVESA APIs for connected vehicles.
The UUID for Vehicle.Powertrain.TractionBattery.Charging.IsCharging is d28244c9e3365899954bd3e38ef46bb9
Feedback
Do you think this Vehicle Signal specification needs enhancement? Do you want to discuss with experts? Try the following ressources to get in touch with the VSS community:
$ databroker-cli
sdv.databroker.v1 > connect
[connect] OK
sdv.databroker.v1 > get Vehicle.Powertrain.TractionBattery.Charging.IsChargingCableConnected
[get] OK
Vehicle.Powertrain.TractionBattery.Charging.IsChargingCableConnected: ( NotAvailable )sdv.databroker.v1 > set Vehicle.Powertrain.TractionBattery.Charging.IsChargingCableConnected false[set] OK
Digital Auto: Playground
playground.digital.auto provides an in-browser, rapid prototyping environment utilizing the COVESA APIs for connected vehicles.
The UUID for Vehicle.Powertrain.TractionBattery.Charging.IsChargingCableConnected is a1c8e2f662b95a54a9933a1b163fff84
Feedback
Do you think this Vehicle Signal specification needs enhancement? Do you want to discuss with experts? Try the following ressources to get in touch with the VSS community:
$ databroker-cli
sdv.databroker.v1 > connect
[connect] OK
sdv.databroker.v1 > get Vehicle.Powertrain.TractionBattery.Charging.IsChargingCableLocked
[get] OK
Vehicle.Powertrain.TractionBattery.Charging.IsChargingCableLocked: ( NotAvailable )sdv.databroker.v1 > set Vehicle.Powertrain.TractionBattery.Charging.IsChargingCableLocked false[set] OK
Digital Auto: Playground
playground.digital.auto provides an in-browser, rapid prototyping environment utilizing the COVESA APIs for connected vehicles.
The UUID for Vehicle.Powertrain.TractionBattery.Charging.IsChargingCableLocked is 7fa81693f3b8587f8d71e7b1619c8e21
Feedback
Do you think this Vehicle Signal specification needs enhancement? Do you want to discuss with experts? Try the following ressources to get in touch with the VSS community:
$ databroker-cli
sdv.databroker.v1 > connect
[connect] OK
sdv.databroker.v1 > get Vehicle.Powertrain.TractionBattery.Charging.IsDischarging
[get] OK
Vehicle.Powertrain.TractionBattery.Charging.IsDischarging: ( NotAvailable )sdv.databroker.v1 > set Vehicle.Powertrain.TractionBattery.Charging.IsDischarging false[set] OK
Digital Auto: Playground
playground.digital.auto provides an in-browser, rapid prototyping environment utilizing the COVESA APIs for connected vehicles.
The UUID for Vehicle.Powertrain.TractionBattery.Charging.IsDischarging is 534d884fb36652688535543b52419529
Feedback
Do you think this Vehicle Signal specification needs enhancement? Do you want to discuss with experts? Try the following ressources to get in touch with the VSS community:
Do you think this Vehicle Signal specification needs enhancement? Do you want to discuss with experts? Try the following ressources to get in touch with the VSS community:
$ databroker-cli
sdv.databroker.v1 > connect
[connect] OK
sdv.databroker.v1 > get Vehicle.Powertrain.TractionBattery.Charging.MaximumChargingCurrent.DC
[get] OK
Vehicle.Powertrain.TractionBattery.Charging.MaximumChargingCurrent.DC: ( NotAvailable )sdv.databroker.v1 > set Vehicle.Powertrain.TractionBattery.Charging.MaximumChargingCurrent.DC 0[set] OK
Digital Auto: Playground
playground.digital.auto provides an in-browser, rapid prototyping environment utilizing the COVESA APIs for connected vehicles.
The UUID for Vehicle.Powertrain.TractionBattery.Charging.MaximumChargingCurrent.DC is 5a70acfd3c8959898b43738151ab36e1
Feedback
Do you think this Vehicle Signal specification needs enhancement? Do you want to discuss with experts? Try the following ressources to get in touch with the VSS community:
$ databroker-cli
sdv.databroker.v1 > connect
[connect] OK
sdv.databroker.v1 > get Vehicle.Powertrain.TractionBattery.Charging.MaximumChargingCurrent.Phase1
[get] OK
Vehicle.Powertrain.TractionBattery.Charging.MaximumChargingCurrent.Phase1: ( NotAvailable )sdv.databroker.v1 > set Vehicle.Powertrain.TractionBattery.Charging.MaximumChargingCurrent.Phase1 0[set] OK
Digital Auto: Playground
playground.digital.auto provides an in-browser, rapid prototyping environment utilizing the COVESA APIs for connected vehicles.
The UUID for Vehicle.Powertrain.TractionBattery.Charging.MaximumChargingCurrent.Phase1 is e3c1034e89cc55968ff51b990906db43
Feedback
Do you think this Vehicle Signal specification needs enhancement? Do you want to discuss with experts? Try the following ressources to get in touch with the VSS community:
$ databroker-cli
sdv.databroker.v1 > connect
[connect] OK
sdv.databroker.v1 > get Vehicle.Powertrain.TractionBattery.Charging.MaximumChargingCurrent.Phase2
[get] OK
Vehicle.Powertrain.TractionBattery.Charging.MaximumChargingCurrent.Phase2: ( NotAvailable )sdv.databroker.v1 > set Vehicle.Powertrain.TractionBattery.Charging.MaximumChargingCurrent.Phase2 0[set] OK
Digital Auto: Playground
playground.digital.auto provides an in-browser, rapid prototyping environment utilizing the COVESA APIs for connected vehicles.
The UUID for Vehicle.Powertrain.TractionBattery.Charging.MaximumChargingCurrent.Phase2 is ab3514bc982e54f2b98698fb6c752368
Feedback
Do you think this Vehicle Signal specification needs enhancement? Do you want to discuss with experts? Try the following ressources to get in touch with the VSS community:
$ databroker-cli
sdv.databroker.v1 > connect
[connect] OK
sdv.databroker.v1 > get Vehicle.Powertrain.TractionBattery.Charging.MaximumChargingCurrent.Phase3
[get] OK
Vehicle.Powertrain.TractionBattery.Charging.MaximumChargingCurrent.Phase3: ( NotAvailable )sdv.databroker.v1 > set Vehicle.Powertrain.TractionBattery.Charging.MaximumChargingCurrent.Phase3 0[set] OK
Digital Auto: Playground
playground.digital.auto provides an in-browser, rapid prototyping environment utilizing the COVESA APIs for connected vehicles.
The UUID for Vehicle.Powertrain.TractionBattery.Charging.MaximumChargingCurrent.Phase3 is 47dd5e99c30d562e9e2e1c58007846b6
Feedback
Do you think this Vehicle Signal specification needs enhancement? Do you want to discuss with experts? Try the following ressources to get in touch with the VSS community:
The following is a list of VSS supported built-in datatypes:
Name
Type
Min
Max
uint8
unsigned 8-bit integer
0
255
int8
signed 8-bit integer
-128
127
uint16
unsigned 16-bit integer
0
65535
int16
signed 16-bit integer
-32768
32767
uint32
unsigned 32-bit integer
0
4294967295
int32
signed 32-bit integer
-2147483648
2147483647
uint64
unsigned 64-bit integer
0
2^64 - 1
int64
signed 64-bit integer
-2^63
2^63 - 1
boolean
boolean value
0/false
1/true
float
floating point number
-3.4e -38
3.4e 38
double
double precision floating point number
-1.7e -300
1.7e 300
string
character string
n/a
n/a
Min, max and default values defined in a Vehicle Signal Specification must be in the supported range of the data type.
5.1.12.2.2.12 - Mode
Full qualified VSS Path:
Vehicle.Powertrain.TractionBattery.Charging.Mode
Description:
Control of the charge process. MANUAL means manually initiated (plug-in event, companion app, etc). TIMER means timer-based. GRID means grid-controlled (eg ISO 15118). PROFILE means controlled by profile download to vehicle.
Comment:
The mechanism to provide a profile to the vehicle is currently not covered by VSS.
Navigation
flowchart LR
Vehicle-->Powertrain
Powertrain-->TractionBattery
TractionBattery-->Charging
Charging-->Mode
$ databroker-cli
sdv.databroker.v1 > connect
[connect] OK
sdv.databroker.v1 > get Vehicle.Powertrain.TractionBattery.Charging.Mode
[get] OK
Vehicle.Powertrain.TractionBattery.Charging.Mode: ( NotAvailable )sdv.databroker.v1 > set Vehicle.Powertrain.TractionBattery.Charging.Mode Foo
[set] OK
Digital Auto: Playground
playground.digital.auto provides an in-browser, rapid prototyping environment utilizing the COVESA APIs for connected vehicles.
The UUID for Vehicle.Powertrain.TractionBattery.Charging.Mode is 1e4be3280b265873945531f6f6d0ec6b
Feedback
Do you think this Vehicle Signal specification needs enhancement? Do you want to discuss with experts? Try the following ressources to get in touch with the VSS community:
$ databroker-cli
sdv.databroker.v1 > connect
[connect] OK
sdv.databroker.v1 > get Vehicle.Powertrain.TractionBattery.Charging.PowerLoss
[get] OK
Vehicle.Powertrain.TractionBattery.Charging.PowerLoss: ( NotAvailable )sdv.databroker.v1 > set Vehicle.Powertrain.TractionBattery.Charging.PowerLoss 0[set] OK
Digital Auto: Playground
playground.digital.auto provides an in-browser, rapid prototyping environment utilizing the COVESA APIs for connected vehicles.
The UUID for Vehicle.Powertrain.TractionBattery.Charging.PowerLoss is 88f40bbeb80b5dfb97ceba13269665c5
Feedback
Do you think this Vehicle Signal specification needs enhancement? Do you want to discuss with experts? Try the following ressources to get in touch with the VSS community:
$ databroker-cli
sdv.databroker.v1 > connect
[connect] OK
sdv.databroker.v1 > get Vehicle.Powertrain.TractionBattery.Charging.StartStopCharging
[get] OK
Vehicle.Powertrain.TractionBattery.Charging.StartStopCharging: ( NotAvailable )sdv.databroker.v1 > set Vehicle.Powertrain.TractionBattery.Charging.StartStopCharging Foo
[set] OK
Digital Auto: Playground
playground.digital.auto provides an in-browser, rapid prototyping environment utilizing the COVESA APIs for connected vehicles.
The UUID for Vehicle.Powertrain.TractionBattery.Charging.StartStopCharging is 80506d3e9a2557c2b52f74a50d89593f
Feedback
Do you think this Vehicle Signal specification needs enhancement? Do you want to discuss with experts? Try the following ressources to get in touch with the VSS community:
$ databroker-cli
sdv.databroker.v1 > connect
[connect] OK
sdv.databroker.v1 > get Vehicle.Powertrain.TractionBattery.Charging.Temperature
[get] OK
Vehicle.Powertrain.TractionBattery.Charging.Temperature: ( NotAvailable )sdv.databroker.v1 > set Vehicle.Powertrain.TractionBattery.Charging.Temperature 0[set] OK
Digital Auto: Playground
playground.digital.auto provides an in-browser, rapid prototyping environment utilizing the COVESA APIs for connected vehicles.
The UUID for Vehicle.Powertrain.TractionBattery.Charging.Temperature is c3c0ef3a41db5df1bab659803adbc7ba
Feedback
Do you think this Vehicle Signal specification needs enhancement? Do you want to discuss with experts? Try the following ressources to get in touch with the VSS community:
The UUID for Vehicle.Powertrain.TractionBattery.Charging.Timer is cd5b57ada627510e83f90832efed9d5a
Children
This vehicle signal is a branch or structure and thus has sub-pages:
Vehicle.Powertrain.TractionBattery.Charging.Timer.Mode (Defines timer mode for charging: INACTIVE - no timer set, charging may start as soon as battery is connected to a charger. START_TIME - charging shall start at Charging.Timer.Time. END_TIME - charging shall be finished (reach Charging.ChargeLimit) at Charging.Timer.Time. When charging is completed the vehicle shall change mode to ‘inactive’ or set a new Charging.Timer.Time. Charging shall start immediately if mode is ‘starttime’ or ’endtime’ and Charging.Timer.Time is a time in the past.)
Do you think this Vehicle Signal specification needs enhancement? Do you want to discuss with experts? Try the following ressources to get in touch with the VSS community:
Defines timer mode for charging: INACTIVE - no timer set, charging may start as soon as battery is connected to a charger. START_TIME - charging shall start at Charging.Timer.Time. END_TIME - charging shall be finished (reach Charging.ChargeLimit) at Charging.Timer.Time. When charging is completed the vehicle shall change mode to ‘inactive’ or set a new Charging.Timer.Time. Charging shall start immediately if mode is ‘starttime’ or ’endtime’ and Charging.Timer.Time is a time in the past.
Navigation
flowchart LR
Vehicle-->Powertrain
Powertrain-->TractionBattery
TractionBattery-->Charging
Charging-->Timer
Timer-->Mode
$ databroker-cli
sdv.databroker.v1 > connect
[connect] OK
sdv.databroker.v1 > get Vehicle.Powertrain.TractionBattery.Charging.Timer.Mode
[get] OK
Vehicle.Powertrain.TractionBattery.Charging.Timer.Mode: ( NotAvailable )sdv.databroker.v1 > set Vehicle.Powertrain.TractionBattery.Charging.Timer.Mode Foo
[set] OK
Digital Auto: Playground
playground.digital.auto provides an in-browser, rapid prototyping environment utilizing the COVESA APIs for connected vehicles.
The UUID for Vehicle.Powertrain.TractionBattery.Charging.Timer.Mode is b09fb52261735977af275dda1904a7a1
Feedback
Do you think this Vehicle Signal specification needs enhancement? Do you want to discuss with experts? Try the following ressources to get in touch with the VSS community:
Time for next charging-related action, formatted according to ISO 8601 with UTC time zone. Value has no significance if Charging.Timer.Mode is ‘inactive’.
Navigation
flowchart LR
Vehicle-->Powertrain
Powertrain-->TractionBattery
TractionBattery-->Charging
Charging-->Timer
Timer-->Time
$ databroker-cli
sdv.databroker.v1 > connect
[connect] OK
sdv.databroker.v1 > get Vehicle.Powertrain.TractionBattery.Charging.Timer.Time
[get] OK
Vehicle.Powertrain.TractionBattery.Charging.Timer.Time: ( NotAvailable )sdv.databroker.v1 > set Vehicle.Powertrain.TractionBattery.Charging.Timer.Time Foo
[set] OK
Digital Auto: Playground
playground.digital.auto provides an in-browser, rapid prototyping environment utilizing the COVESA APIs for connected vehicles.
The UUID for Vehicle.Powertrain.TractionBattery.Charging.Timer.Time is c08dcaeda02b5e26aacd7e2542f0fc90
Feedback
Do you think this Vehicle Signal specification needs enhancement? Do you want to discuss with experts? Try the following ressources to get in touch with the VSS community:
The time needed for the current charging process to reach Charging.ChargeLimit. 0 if charging is complete or no charging process is active or planned.
Comment:
Shall consider time set by Charging.Timer.Time. E.g. if charging shall start in 3 hours and 2 hours of charging is needed, then Charging.TimeToComplete shall report 5 hours.
Navigation
flowchart LR
Vehicle-->Powertrain
Powertrain-->TractionBattery
TractionBattery-->Charging
Charging-->TimeToComplete
$ databroker-cli
sdv.databroker.v1 > connect
[connect] OK
sdv.databroker.v1 > get Vehicle.Powertrain.TractionBattery.Charging.TimeToComplete
[get] OK
Vehicle.Powertrain.TractionBattery.Charging.TimeToComplete: ( NotAvailable )sdv.databroker.v1 > set Vehicle.Powertrain.TractionBattery.Charging.TimeToComplete 0[set] OK
Digital Auto: Playground
playground.digital.auto provides an in-browser, rapid prototyping environment utilizing the COVESA APIs for connected vehicles.
The UUID for Vehicle.Powertrain.TractionBattery.Charging.TimeToComplete is c6439c2e068652b08383b9654e2e784a
Feedback
Do you think this Vehicle Signal specification needs enhancement? Do you want to discuss with experts? Try the following ressources to get in touch with the VSS community:
$ databroker-cli
sdv.databroker.v1 > connect
[connect] OK
sdv.databroker.v1 > get Vehicle.Powertrain.TractionBattery.PowerLoss
[get] OK
Vehicle.Powertrain.TractionBattery.PowerLoss: ( NotAvailable )sdv.databroker.v1 > set Vehicle.Powertrain.TractionBattery.PowerLoss 0[set] OK
Digital Auto: Playground
playground.digital.auto provides an in-browser, rapid prototyping environment utilizing the COVESA APIs for connected vehicles.
The UUID for Vehicle.Powertrain.TractionBattery.PowerLoss is 880082aafe025cb3a5776b623f9a48b5
Feedback
Do you think this Vehicle Signal specification needs enhancement? Do you want to discuss with experts? Try the following ressources to get in touch with the VSS community:
$ databroker-cli
sdv.databroker.v1 > connect
[connect] OK
sdv.databroker.v1 > get Vehicle.Powertrain.TractionBattery.Range
[get] OK
Vehicle.Powertrain.TractionBattery.Range: ( NotAvailable )sdv.databroker.v1 > set Vehicle.Powertrain.TractionBattery.Range 0[set] OK
Digital Auto: Playground
playground.digital.auto provides an in-browser, rapid prototyping environment utilizing the COVESA APIs for connected vehicles.
The UUID for Vehicle.Powertrain.TractionBattery.Range is c0376a425e5d578d9d86ae0dc2ad9778
Feedback
Do you think this Vehicle Signal specification needs enhancement? Do you want to discuss with experts? Try the following ressources to get in touch with the VSS community:
$ databroker-cli
sdv.databroker.v1 > connect
[connect] OK
sdv.databroker.v1 > get Vehicle.Powertrain.TractionBattery.AccumulatedChargedEnergy
[get] OK
Vehicle.Powertrain.TractionBattery.AccumulatedChargedEnergy: ( NotAvailable )sdv.databroker.v1 > set Vehicle.Powertrain.TractionBattery.AccumulatedChargedEnergy 0[set] OK
Digital Auto: Playground
playground.digital.auto provides an in-browser, rapid prototyping environment utilizing the COVESA APIs for connected vehicles.
The UUID for Vehicle.Powertrain.TractionBattery.AccumulatedChargedEnergy is 739d06021d795da0877bc0ef3c107de1
Feedback
Do you think this Vehicle Signal specification needs enhancement? Do you want to discuss with experts? Try the following ressources to get in touch with the VSS community:
$ databroker-cli
sdv.databroker.v1 > connect
[connect] OK
sdv.databroker.v1 > get Vehicle.Powertrain.TractionBattery.AccumulatedChargedThroughput
[get] OK
Vehicle.Powertrain.TractionBattery.AccumulatedChargedThroughput: ( NotAvailable )sdv.databroker.v1 > set Vehicle.Powertrain.TractionBattery.AccumulatedChargedThroughput 0[set] OK
Digital Auto: Playground
playground.digital.auto provides an in-browser, rapid prototyping environment utilizing the COVESA APIs for connected vehicles.
The UUID for Vehicle.Powertrain.TractionBattery.AccumulatedChargedThroughput is 6d038ccc313351fba3a9104c1158a207
Feedback
Do you think this Vehicle Signal specification needs enhancement? Do you want to discuss with experts? Try the following ressources to get in touch with the VSS community:
$ databroker-cli
sdv.databroker.v1 > connect
[connect] OK
sdv.databroker.v1 > get Vehicle.Powertrain.TractionBattery.AccumulatedConsumedEnergy
[get] OK
Vehicle.Powertrain.TractionBattery.AccumulatedConsumedEnergy: ( NotAvailable )sdv.databroker.v1 > set Vehicle.Powertrain.TractionBattery.AccumulatedConsumedEnergy 0[set] OK
Digital Auto: Playground
playground.digital.auto provides an in-browser, rapid prototyping environment utilizing the COVESA APIs for connected vehicles.
The UUID for Vehicle.Powertrain.TractionBattery.AccumulatedConsumedEnergy is b844cb96765f574d8d31edb09ccaef81
Feedback
Do you think this Vehicle Signal specification needs enhancement? Do you want to discuss with experts? Try the following ressources to get in touch with the VSS community:
$ databroker-cli
sdv.databroker.v1 > connect
[connect] OK
sdv.databroker.v1 > get Vehicle.Powertrain.TractionBattery.AccumulatedConsumedThroughput
[get] OK
Vehicle.Powertrain.TractionBattery.AccumulatedConsumedThroughput: ( NotAvailable )sdv.databroker.v1 > set Vehicle.Powertrain.TractionBattery.AccumulatedConsumedThroughput 0[set] OK
Digital Auto: Playground
playground.digital.auto provides an in-browser, rapid prototyping environment utilizing the COVESA APIs for connected vehicles.
The UUID for Vehicle.Powertrain.TractionBattery.AccumulatedConsumedThroughput is f3e2ca21f3b550288d494827c9a172dd
Feedback
Do you think this Vehicle Signal specification needs enhancement? Do you want to discuss with experts? Try the following ressources to get in touch with the VSS community:
The following is a list of VSS supported built-in datatypes:
Name
Type
Min
Max
uint8
unsigned 8-bit integer
0
255
int8
signed 8-bit integer
-128
127
uint16
unsigned 16-bit integer
0
65535
int16
signed 16-bit integer
-32768
32767
uint32
unsigned 32-bit integer
0
4294967295
int32
signed 32-bit integer
-2147483648
2147483647
uint64
unsigned 64-bit integer
0
2^64 - 1
int64
signed 64-bit integer
-2^63
2^63 - 1
boolean
boolean value
0/false
1/true
float
floating point number
-3.4e -38
3.4e 38
double
double precision floating point number
-1.7e -300
1.7e 300
string
character string
n/a
n/a
Min, max and default values defined in a Vehicle Signal Specification must be in the supported range of the data type.
5.1.12.2.9 - CurrentCurrent
Full qualified VSS Path:
Vehicle.Powertrain.TractionBattery.CurrentCurrent
Description:
Current current flowing in/out of battery. Positive = Current flowing in to battery, e.g. during charging. Negative = Current flowing out of battery, e.g. during driving.
Navigation
flowchart LR
Vehicle-->Powertrain
Powertrain-->TractionBattery
TractionBattery-->CurrentCurrent
$ databroker-cli
sdv.databroker.v1 > connect
[connect] OK
sdv.databroker.v1 > get Vehicle.Powertrain.TractionBattery.CurrentCurrent
[get] OK
Vehicle.Powertrain.TractionBattery.CurrentCurrent: ( NotAvailable )sdv.databroker.v1 > set Vehicle.Powertrain.TractionBattery.CurrentCurrent 0[set] OK
Digital Auto: Playground
playground.digital.auto provides an in-browser, rapid prototyping environment utilizing the COVESA APIs for connected vehicles.
The UUID for Vehicle.Powertrain.TractionBattery.CurrentCurrent is 7a1488e0c83f50a6b69d8ea85c5bb592
Feedback
Do you think this Vehicle Signal specification needs enhancement? Do you want to discuss with experts? Try the following ressources to get in touch with the VSS community:
The following is a list of VSS supported built-in datatypes:
Name
Type
Min
Max
uint8
unsigned 8-bit integer
0
255
int8
signed 8-bit integer
-128
127
uint16
unsigned 16-bit integer
0
65535
int16
signed 16-bit integer
-32768
32767
uint32
unsigned 32-bit integer
0
4294967295
int32
signed 32-bit integer
-2147483648
2147483647
uint64
unsigned 64-bit integer
0
2^64 - 1
int64
signed 64-bit integer
-2^63
2^63 - 1
boolean
boolean value
0/false
1/true
float
floating point number
-3.4e -38
3.4e 38
double
double precision floating point number
-1.7e -300
1.7e 300
string
character string
n/a
n/a
Min, max and default values defined in a Vehicle Signal Specification must be in the supported range of the data type.
5.1.12.2.10 - CurrentPower
Full qualified VSS Path:
Vehicle.Powertrain.TractionBattery.CurrentPower
Description:
Current electrical energy flowing in/out of battery. Positive = Energy flowing in to battery, e.g. during charging. Negative = Energy flowing out of battery, e.g. during driving.
Navigation
flowchart LR
Vehicle-->Powertrain
Powertrain-->TractionBattery
TractionBattery-->CurrentPower
$ databroker-cli
sdv.databroker.v1 > connect
[connect] OK
sdv.databroker.v1 > get Vehicle.Powertrain.TractionBattery.CurrentPower
[get] OK
Vehicle.Powertrain.TractionBattery.CurrentPower: ( NotAvailable )sdv.databroker.v1 > set Vehicle.Powertrain.TractionBattery.CurrentPower 0[set] OK
Digital Auto: Playground
playground.digital.auto provides an in-browser, rapid prototyping environment utilizing the COVESA APIs for connected vehicles.
The UUID for Vehicle.Powertrain.TractionBattery.CurrentPower is 8859e1b0386a5eda880a9c30cd0dfa8e
Feedback
Do you think this Vehicle Signal specification needs enhancement? Do you want to discuss with experts? Try the following ressources to get in touch with the VSS community:
$ databroker-cli
sdv.databroker.v1 > connect
[connect] OK
sdv.databroker.v1 > get Vehicle.Powertrain.TractionBattery.CurrentVoltage
[get] OK
Vehicle.Powertrain.TractionBattery.CurrentVoltage: ( NotAvailable )sdv.databroker.v1 > set Vehicle.Powertrain.TractionBattery.CurrentVoltage 0[set] OK
Digital Auto: Playground
playground.digital.auto provides an in-browser, rapid prototyping environment utilizing the COVESA APIs for connected vehicles.
The UUID for Vehicle.Powertrain.TractionBattery.CurrentVoltage is 7b54ea22ee7d5f559da552aefcc07222
Feedback
Do you think this Vehicle Signal specification needs enhancement? Do you want to discuss with experts? Try the following ressources to get in touch with the VSS community:
$ databroker-cli
sdv.databroker.v1 > connect
[connect] OK
sdv.databroker.v1 > get Vehicle.Powertrain.TractionBattery.GrossCapacity
[get] OK
Vehicle.Powertrain.TractionBattery.GrossCapacity: ( NotAvailable )sdv.databroker.v1 > set Vehicle.Powertrain.TractionBattery.GrossCapacity 0[set] OK
Digital Auto: Playground
playground.digital.auto provides an in-browser, rapid prototyping environment utilizing the COVESA APIs for connected vehicles.
The UUID for Vehicle.Powertrain.TractionBattery.GrossCapacity is 5460530488435dc8bfa1298bf47a993d
Feedback
Do you think this Vehicle Signal specification needs enhancement? Do you want to discuss with experts? Try the following ressources to get in touch with the VSS community:
The following is a list of VSS supported built-in datatypes:
Name
Type
Min
Max
uint8
unsigned 8-bit integer
0
255
int8
signed 8-bit integer
-128
127
uint16
unsigned 16-bit integer
0
65535
int16
signed 16-bit integer
-32768
32767
uint32
unsigned 32-bit integer
0
4294967295
int32
signed 32-bit integer
-2147483648
2147483647
uint64
unsigned 64-bit integer
0
2^64 - 1
int64
signed 64-bit integer
-2^63
2^63 - 1
boolean
boolean value
0/false
1/true
float
floating point number
-3.4e -38
3.4e 38
double
double precision floating point number
-1.7e -300
1.7e 300
string
character string
n/a
n/a
Min, max and default values defined in a Vehicle Signal Specification must be in the supported range of the data type.
5.1.12.2.13 - Id
Full qualified VSS Path:
Vehicle.Powertrain.TractionBattery.Id
Description:
Battery Identification Number as assigned by OEM.
Comment:
This could be serial number, part number plus serial number, UUID, or any other identifier that the OEM want to use to uniquely identify the battery individual.
Navigation
flowchart LR
Vehicle-->Powertrain
Powertrain-->TractionBattery
TractionBattery-->Id
$ databroker-cli
sdv.databroker.v1 > connect
[connect] OK
sdv.databroker.v1 > get Vehicle.Powertrain.TractionBattery.Id
[get] OK
Vehicle.Powertrain.TractionBattery.Id: ( NotAvailable )sdv.databroker.v1 > set Vehicle.Powertrain.TractionBattery.Id Foo
[set] OK
Digital Auto: Playground
playground.digital.auto provides an in-browser, rapid prototyping environment utilizing the COVESA APIs for connected vehicles.
The UUID for Vehicle.Powertrain.TractionBattery.Id is c8279874660c55b38c7ac64a8503a519
Feedback
Do you think this Vehicle Signal specification needs enhancement? Do you want to discuss with experts? Try the following ressources to get in touch with the VSS community:
Indicating if the ground (negative terminator) of the traction battery is connected to the powertrain.
Comment:
It might be possible to disconnect the traction battery used by an electric powertrain. This is achieved by connectors, typically one for plus and one for minus.
Navigation
flowchart LR
Vehicle-->Powertrain
Powertrain-->TractionBattery
TractionBattery-->IsGroundConnected
$ databroker-cli
sdv.databroker.v1 > connect
[connect] OK
sdv.databroker.v1 > get Vehicle.Powertrain.TractionBattery.IsGroundConnected
[get] OK
Vehicle.Powertrain.TractionBattery.IsGroundConnected: ( NotAvailable )sdv.databroker.v1 > set Vehicle.Powertrain.TractionBattery.IsGroundConnected false[set] OK
Digital Auto: Playground
playground.digital.auto provides an in-browser, rapid prototyping environment utilizing the COVESA APIs for connected vehicles.
The UUID for Vehicle.Powertrain.TractionBattery.IsGroundConnected is dd38d1c7ee12530aac03f49ad01d5c04
Feedback
Do you think this Vehicle Signal specification needs enhancement? Do you want to discuss with experts? Try the following ressources to get in touch with the VSS community:
Indicating if the power (positive terminator) of the traction battery is connected to the powertrain.
Comment:
It might be possible to disconnect the traction battery used by an electric powertrain. This is achieved by connectors, typically one for plus and one for minus.
Navigation
flowchart LR
Vehicle-->Powertrain
Powertrain-->TractionBattery
TractionBattery-->IsPowerConnected
$ databroker-cli
sdv.databroker.v1 > connect
[connect] OK
sdv.databroker.v1 > get Vehicle.Powertrain.TractionBattery.IsPowerConnected
[get] OK
Vehicle.Powertrain.TractionBattery.IsPowerConnected: ( NotAvailable )sdv.databroker.v1 > set Vehicle.Powertrain.TractionBattery.IsPowerConnected false[set] OK
Digital Auto: Playground
playground.digital.auto provides an in-browser, rapid prototyping environment utilizing the COVESA APIs for connected vehicles.
The UUID for Vehicle.Powertrain.TractionBattery.IsPowerConnected is e30ef59fc2a25f6b8990248e19a5cdf9
Feedback
Do you think this Vehicle Signal specification needs enhancement? Do you want to discuss with experts? Try the following ressources to get in touch with the VSS community:
$ databroker-cli
sdv.databroker.v1 > connect
[connect] OK
sdv.databroker.v1 > get Vehicle.Powertrain.TractionBattery.MaxVoltage
[get] OK
Vehicle.Powertrain.TractionBattery.MaxVoltage: ( NotAvailable )sdv.databroker.v1 > set Vehicle.Powertrain.TractionBattery.MaxVoltage 0[set] OK
Digital Auto: Playground
playground.digital.auto provides an in-browser, rapid prototyping environment utilizing the COVESA APIs for connected vehicles.
The UUID for Vehicle.Powertrain.TractionBattery.MaxVoltage is a81264a0ef0c55d288671cfc62c4add5
Feedback
Do you think this Vehicle Signal specification needs enhancement? Do you want to discuss with experts? Try the following ressources to get in touch with the VSS community:
$ databroker-cli
sdv.databroker.v1 > connect
[connect] OK
sdv.databroker.v1 > get Vehicle.Powertrain.TractionBattery.NetCapacity
[get] OK
Vehicle.Powertrain.TractionBattery.NetCapacity: ( NotAvailable )sdv.databroker.v1 > set Vehicle.Powertrain.TractionBattery.NetCapacity 0[set] OK
Digital Auto: Playground
playground.digital.auto provides an in-browser, rapid prototyping environment utilizing the COVESA APIs for connected vehicles.
The UUID for Vehicle.Powertrain.TractionBattery.NetCapacity is 9c68fe42cb81501eb6349f8c9b0b6899
Feedback
Do you think this Vehicle Signal specification needs enhancement? Do you want to discuss with experts? Try the following ressources to get in touch with the VSS community:
$ databroker-cli
sdv.databroker.v1 > connect
[connect] OK
sdv.databroker.v1 > get Vehicle.Powertrain.TractionBattery.NominalVoltage
[get] OK
Vehicle.Powertrain.TractionBattery.NominalVoltage: ( NotAvailable )sdv.databroker.v1 > set Vehicle.Powertrain.TractionBattery.NominalVoltage 0[set] OK
Digital Auto: Playground
playground.digital.auto provides an in-browser, rapid prototyping environment utilizing the COVESA APIs for connected vehicles.
The UUID for Vehicle.Powertrain.TractionBattery.NominalVoltage is 3eccae5633185b998d5bdb6ea33cd926
Feedback
Do you think this Vehicle Signal specification needs enhancement? Do you want to discuss with experts? Try the following ressources to get in touch with the VSS community:
$ databroker-cli
sdv.databroker.v1 > connect
[connect] OK
sdv.databroker.v1 > get Vehicle.Powertrain.TractionBattery.ProductionDate
[get] OK
Vehicle.Powertrain.TractionBattery.ProductionDate: ( NotAvailable )sdv.databroker.v1 > set Vehicle.Powertrain.TractionBattery.ProductionDate Foo
[set] OK
Digital Auto: Playground
playground.digital.auto provides an in-browser, rapid prototyping environment utilizing the COVESA APIs for connected vehicles.
The UUID for Vehicle.Powertrain.TractionBattery.ProductionDate is c9509ba4d76c56d9a8c1d6e2280ae02f
Feedback
Do you think this Vehicle Signal specification needs enhancement? Do you want to discuss with experts? Try the following ressources to get in touch with the VSS community:
Do you think this Vehicle Signal specification needs enhancement? Do you want to discuss with experts? Try the following ressources to get in touch with the VSS community:
Physical state of charge of the high voltage battery, relative to net capacity. This is not necessarily the state of charge being displayed to the customer.
Navigation
flowchart LR
Vehicle-->Powertrain
Powertrain-->TractionBattery
TractionBattery-->StateOfCharge
StateOfCharge-->Current
$ databroker-cli
sdv.databroker.v1 > connect
[connect] OK
sdv.databroker.v1 > get Vehicle.Powertrain.TractionBattery.StateOfCharge.Current
[get] OK
Vehicle.Powertrain.TractionBattery.StateOfCharge.Current: ( NotAvailable )sdv.databroker.v1 > set Vehicle.Powertrain.TractionBattery.StateOfCharge.Current 0[set] OK
Digital Auto: Playground
playground.digital.auto provides an in-browser, rapid prototyping environment utilizing the COVESA APIs for connected vehicles.
The UUID for Vehicle.Powertrain.TractionBattery.StateOfCharge.Current is 2e647ca3a1ff5e52af137aab240642da
Feedback
Do you think this Vehicle Signal specification needs enhancement? Do you want to discuss with experts? Try the following ressources to get in touch with the VSS community:
$ databroker-cli
sdv.databroker.v1 > connect
[connect] OK
sdv.databroker.v1 > get Vehicle.Powertrain.TractionBattery.StateOfCharge.Displayed
[get] OK
Vehicle.Powertrain.TractionBattery.StateOfCharge.Displayed: ( NotAvailable )sdv.databroker.v1 > set Vehicle.Powertrain.TractionBattery.StateOfCharge.Displayed 0[set] OK
Digital Auto: Playground
playground.digital.auto provides an in-browser, rapid prototyping environment utilizing the COVESA APIs for connected vehicles.
The UUID for Vehicle.Powertrain.TractionBattery.StateOfCharge.Displayed is 1bfcc228293b5512aafe2508ab0500d2
Feedback
Do you think this Vehicle Signal specification needs enhancement? Do you want to discuss with experts? Try the following ressources to get in touch with the VSS community:
The following is a list of VSS supported built-in datatypes:
Name
Type
Min
Max
uint8
unsigned 8-bit integer
0
255
int8
signed 8-bit integer
-128
127
uint16
unsigned 16-bit integer
0
65535
int16
signed 16-bit integer
-32768
32767
uint32
unsigned 32-bit integer
0
4294967295
int32
signed 32-bit integer
-2147483648
2147483647
uint64
unsigned 64-bit integer
0
2^64 - 1
int64
signed 64-bit integer
-2^63
2^63 - 1
boolean
boolean value
0/false
1/true
float
floating point number
-3.4e -38
3.4e 38
double
double precision floating point number
-1.7e -300
1.7e 300
string
character string
n/a
n/a
Min, max and default values defined in a Vehicle Signal Specification must be in the supported range of the data type.
5.1.12.2.21 - StateOfHealth
Full qualified VSS Path:
Vehicle.Powertrain.TractionBattery.StateOfHealth
Description:
Calculated battery state of health at standard conditions.
Comment:
Exact formula is implementation dependent. Could be e.g. current capacity at 20 degrees Celsius divided with original capacity at the same temperature.
Navigation
flowchart LR
Vehicle-->Powertrain
Powertrain-->TractionBattery
TractionBattery-->StateOfHealth
$ databroker-cli
sdv.databroker.v1 > connect
[connect] OK
sdv.databroker.v1 > get Vehicle.Powertrain.TractionBattery.StateOfHealth
[get] OK
Vehicle.Powertrain.TractionBattery.StateOfHealth: ( NotAvailable )sdv.databroker.v1 > set Vehicle.Powertrain.TractionBattery.StateOfHealth 0[set] OK
Digital Auto: Playground
playground.digital.auto provides an in-browser, rapid prototyping environment utilizing the COVESA APIs for connected vehicles.
The UUID for Vehicle.Powertrain.TractionBattery.StateOfHealth is 4d982c47f3245048bcfec1190973a3ed
Feedback
Do you think this Vehicle Signal specification needs enhancement? Do you want to discuss with experts? Try the following ressources to get in touch with the VSS community:
Do you think this Vehicle Signal specification needs enhancement? Do you want to discuss with experts? Try the following ressources to get in touch with the VSS community:
$ databroker-cli
sdv.databroker.v1 > connect
[connect] OK
sdv.databroker.v1 > get Vehicle.Powertrain.TractionBattery.Temperature.Average
[get] OK
Vehicle.Powertrain.TractionBattery.Temperature.Average: ( NotAvailable )sdv.databroker.v1 > set Vehicle.Powertrain.TractionBattery.Temperature.Average 0[set] OK
Digital Auto: Playground
playground.digital.auto provides an in-browser, rapid prototyping environment utilizing the COVESA APIs for connected vehicles.
The UUID for Vehicle.Powertrain.TractionBattery.Temperature.Average is ae28e502137f56b9a037ed9b32bc04e1
Feedback
Do you think this Vehicle Signal specification needs enhancement? Do you want to discuss with experts? Try the following ressources to get in touch with the VSS community:
$ databroker-cli
sdv.databroker.v1 > connect
[connect] OK
sdv.databroker.v1 > get Vehicle.Powertrain.TractionBattery.Temperature.Max
[get] OK
Vehicle.Powertrain.TractionBattery.Temperature.Max: ( NotAvailable )sdv.databroker.v1 > set Vehicle.Powertrain.TractionBattery.Temperature.Max 0[set] OK
Digital Auto: Playground
playground.digital.auto provides an in-browser, rapid prototyping environment utilizing the COVESA APIs for connected vehicles.
The UUID for Vehicle.Powertrain.TractionBattery.Temperature.Max is 07aa7c8ba1d355398d7469c2b337152a
Feedback
Do you think this Vehicle Signal specification needs enhancement? Do you want to discuss with experts? Try the following ressources to get in touch with the VSS community:
$ databroker-cli
sdv.databroker.v1 > connect
[connect] OK
sdv.databroker.v1 > get Vehicle.Powertrain.TractionBattery.Temperature.Min
[get] OK
Vehicle.Powertrain.TractionBattery.Temperature.Min: ( NotAvailable )sdv.databroker.v1 > set Vehicle.Powertrain.TractionBattery.Temperature.Min 0[set] OK
Digital Auto: Playground
playground.digital.auto provides an in-browser, rapid prototyping environment utilizing the COVESA APIs for connected vehicles.
The UUID for Vehicle.Powertrain.TractionBattery.Temperature.Min is 4e3f630fefa7558fa302b175bc7eb5c7
Feedback
Do you think this Vehicle Signal specification needs enhancement? Do you want to discuss with experts? Try the following ressources to get in touch with the VSS community:
Do you think this Vehicle Signal specification needs enhancement? Do you want to discuss with experts? Try the following ressources to get in touch with the VSS community:
$ databroker-cli
sdv.databroker.v1 > connect
[connect] OK
sdv.databroker.v1 > get Vehicle.Powertrain.ElectricMotor.CoolantTemperature
[get] OK
Vehicle.Powertrain.ElectricMotor.CoolantTemperature: ( NotAvailable )sdv.databroker.v1 > set Vehicle.Powertrain.ElectricMotor.CoolantTemperature 0[set] OK
Digital Auto: Playground
playground.digital.auto provides an in-browser, rapid prototyping environment utilizing the COVESA APIs for connected vehicles.
The UUID for Vehicle.Powertrain.ElectricMotor.CoolantTemperature is 3c5ea8c7700956518f2ae7a2a0f34f1c
Feedback
Do you think this Vehicle Signal specification needs enhancement? Do you want to discuss with experts? Try the following ressources to get in touch with the VSS community:
$ databroker-cli
sdv.databroker.v1 > connect
[connect] OK
sdv.databroker.v1 > get Vehicle.Powertrain.ElectricMotor.MaxRegenTorque
[get] OK
Vehicle.Powertrain.ElectricMotor.MaxRegenTorque: ( NotAvailable )sdv.databroker.v1 > set Vehicle.Powertrain.ElectricMotor.MaxRegenTorque 0[set] OK
Digital Auto: Playground
playground.digital.auto provides an in-browser, rapid prototyping environment utilizing the COVESA APIs for connected vehicles.
The UUID for Vehicle.Powertrain.ElectricMotor.MaxRegenTorque is 0e5190c2517b55aa80fcb9bf698e02d6
Feedback
Do you think this Vehicle Signal specification needs enhancement? Do you want to discuss with experts? Try the following ressources to get in touch with the VSS community:
$ databroker-cli
sdv.databroker.v1 > connect
[connect] OK
sdv.databroker.v1 > get Vehicle.Powertrain.ElectricMotor.Power
[get] OK
Vehicle.Powertrain.ElectricMotor.Power: ( NotAvailable )sdv.databroker.v1 > set Vehicle.Powertrain.ElectricMotor.Power 0[set] OK
Digital Auto: Playground
playground.digital.auto provides an in-browser, rapid prototyping environment utilizing the COVESA APIs for connected vehicles.
The UUID for Vehicle.Powertrain.ElectricMotor.Power is 46b86286fba059349a733fed9a0e3232
Feedback
Do you think this Vehicle Signal specification needs enhancement? Do you want to discuss with experts? Try the following ressources to get in touch with the VSS community:
$ databroker-cli
sdv.databroker.v1 > connect
[connect] OK
sdv.databroker.v1 > get Vehicle.Powertrain.ElectricMotor.Speed
[get] OK
Vehicle.Powertrain.ElectricMotor.Speed: ( NotAvailable )sdv.databroker.v1 > set Vehicle.Powertrain.ElectricMotor.Speed 0[set] OK
Digital Auto: Playground
playground.digital.auto provides an in-browser, rapid prototyping environment utilizing the COVESA APIs for connected vehicles.
The UUID for Vehicle.Powertrain.ElectricMotor.Speed is ca961aa6ca435095a89f9d404a5d849d
Feedback
Do you think this Vehicle Signal specification needs enhancement? Do you want to discuss with experts? Try the following ressources to get in touch with the VSS community:
$ databroker-cli
sdv.databroker.v1 > connect
[connect] OK
sdv.databroker.v1 > get Vehicle.Powertrain.ElectricMotor.Temperature
[get] OK
Vehicle.Powertrain.ElectricMotor.Temperature: ( NotAvailable )sdv.databroker.v1 > set Vehicle.Powertrain.ElectricMotor.Temperature 0[set] OK
Digital Auto: Playground
playground.digital.auto provides an in-browser, rapid prototyping environment utilizing the COVESA APIs for connected vehicles.
The UUID for Vehicle.Powertrain.ElectricMotor.Temperature is 1b7c15e5341052139995bfacea2c05b2
Feedback
Do you think this Vehicle Signal specification needs enhancement? Do you want to discuss with experts? Try the following ressources to get in touch with the VSS community:
$ databroker-cli
sdv.databroker.v1 > connect
[connect] OK
sdv.databroker.v1 > get Vehicle.Powertrain.ElectricMotor.Torque
[get] OK
Vehicle.Powertrain.ElectricMotor.Torque: ( NotAvailable )sdv.databroker.v1 > set Vehicle.Powertrain.ElectricMotor.Torque 0[set] OK
Digital Auto: Playground
playground.digital.auto provides an in-browser, rapid prototyping environment utilizing the COVESA APIs for connected vehicles.
The UUID for Vehicle.Powertrain.ElectricMotor.Torque is aceffe768ddf5b828fff0975349d2433
Feedback
Do you think this Vehicle Signal specification needs enhancement? Do you want to discuss with experts? Try the following ressources to get in touch with the VSS community:
$ databroker-cli
sdv.databroker.v1 > connect
[connect] OK
sdv.databroker.v1 > get Vehicle.Powertrain.ElectricMotor.EngineCode
[get] OK
Vehicle.Powertrain.ElectricMotor.EngineCode: ( NotAvailable )sdv.databroker.v1 > set Vehicle.Powertrain.ElectricMotor.EngineCode Foo
[set] OK
Digital Auto: Playground
playground.digital.auto provides an in-browser, rapid prototyping environment utilizing the COVESA APIs for connected vehicles.
The UUID for Vehicle.Powertrain.ElectricMotor.EngineCode is e4102a5142ed501495e5edafd3d36dfb
Feedback
Do you think this Vehicle Signal specification needs enhancement? Do you want to discuss with experts? Try the following ressources to get in touch with the VSS community:
$ databroker-cli
sdv.databroker.v1 > connect
[connect] OK
sdv.databroker.v1 > get Vehicle.Powertrain.ElectricMotor.MaxPower
[get] OK
Vehicle.Powertrain.ElectricMotor.MaxPower: ( NotAvailable )sdv.databroker.v1 > set Vehicle.Powertrain.ElectricMotor.MaxPower 0[set] OK
Digital Auto: Playground
playground.digital.auto provides an in-browser, rapid prototyping environment utilizing the COVESA APIs for connected vehicles.
The UUID for Vehicle.Powertrain.ElectricMotor.MaxPower is 825ec7911ee958abb199b9f7903df3a6
Feedback
Do you think this Vehicle Signal specification needs enhancement? Do you want to discuss with experts? Try the following ressources to get in touch with the VSS community:
$ databroker-cli
sdv.databroker.v1 > connect
[connect] OK
sdv.databroker.v1 > get Vehicle.Powertrain.ElectricMotor.MaxRegenPower
[get] OK
Vehicle.Powertrain.ElectricMotor.MaxRegenPower: ( NotAvailable )sdv.databroker.v1 > set Vehicle.Powertrain.ElectricMotor.MaxRegenPower 0[set] OK
Digital Auto: Playground
playground.digital.auto provides an in-browser, rapid prototyping environment utilizing the COVESA APIs for connected vehicles.
The UUID for Vehicle.Powertrain.ElectricMotor.MaxRegenPower is 7f2cb2650ba95485b7156ffe76e27366
Feedback
Do you think this Vehicle Signal specification needs enhancement? Do you want to discuss with experts? Try the following ressources to get in touch with the VSS community:
$ databroker-cli
sdv.databroker.v1 > connect
[connect] OK
sdv.databroker.v1 > get Vehicle.Powertrain.ElectricMotor.MaxTorque
[get] OK
Vehicle.Powertrain.ElectricMotor.MaxTorque: ( NotAvailable )sdv.databroker.v1 > set Vehicle.Powertrain.ElectricMotor.MaxTorque 0[set] OK
Digital Auto: Playground
playground.digital.auto provides an in-browser, rapid prototyping environment utilizing the COVESA APIs for connected vehicles.
The UUID for Vehicle.Powertrain.ElectricMotor.MaxTorque is cf31eabcde5151f589e9b0f7a6090512
Feedback
Do you think this Vehicle Signal specification needs enhancement? Do you want to discuss with experts? Try the following ressources to get in touch with the VSS community:
Vehicle.Powertrain.Transmission.TorqueDistribution (Torque distribution between front and rear axle in percent. -100% = Full torque to front axle, 0% = 50:50 Front/Rear, 100% = Full torque to rear axle.)
Do you think this Vehicle Signal specification needs enhancement? Do you want to discuss with experts? Try the following ressources to get in touch with the VSS community:
$ databroker-cli
sdv.databroker.v1 > connect
[connect] OK
sdv.databroker.v1 > get Vehicle.Powertrain.Transmission.ClutchEngagement
[get] OK
Vehicle.Powertrain.Transmission.ClutchEngagement: ( NotAvailable )sdv.databroker.v1 > set Vehicle.Powertrain.Transmission.ClutchEngagement 0[set] OK
Digital Auto: Playground
playground.digital.auto provides an in-browser, rapid prototyping environment utilizing the COVESA APIs for connected vehicles.
The UUID for Vehicle.Powertrain.Transmission.ClutchEngagement is 2890bd4a2b6a56c19b62d7bd95151fc6
Feedback
Do you think this Vehicle Signal specification needs enhancement? Do you want to discuss with experts? Try the following ressources to get in touch with the VSS community:
$ databroker-cli
sdv.databroker.v1 > connect
[connect] OK
sdv.databroker.v1 > get Vehicle.Powertrain.Transmission.ClutchWear
[get] OK
Vehicle.Powertrain.Transmission.ClutchWear: ( NotAvailable )sdv.databroker.v1 > set Vehicle.Powertrain.Transmission.ClutchWear 0[set] OK
Digital Auto: Playground
playground.digital.auto provides an in-browser, rapid prototyping environment utilizing the COVESA APIs for connected vehicles.
The UUID for Vehicle.Powertrain.Transmission.ClutchWear is c113405ad165571a9d53ae4cf55dc929
Feedback
Do you think this Vehicle Signal specification needs enhancement? Do you want to discuss with experts? Try the following ressources to get in touch with the VSS community:
$ databroker-cli
sdv.databroker.v1 > connect
[connect] OK
sdv.databroker.v1 > get Vehicle.Powertrain.Transmission.CurrentGear
[get] OK
Vehicle.Powertrain.Transmission.CurrentGear: ( NotAvailable )sdv.databroker.v1 > set Vehicle.Powertrain.Transmission.CurrentGear 0[set] OK
Digital Auto: Playground
playground.digital.auto provides an in-browser, rapid prototyping environment utilizing the COVESA APIs for connected vehicles.
The UUID for Vehicle.Powertrain.Transmission.CurrentGear is cd0ba1d772565e16bff46cbd5c9361da
Feedback
Do you think this Vehicle Signal specification needs enhancement? Do you want to discuss with experts? Try the following ressources to get in touch with the VSS community:
$ databroker-cli
sdv.databroker.v1 > connect
[connect] OK
sdv.databroker.v1 > get Vehicle.Powertrain.Transmission.DiffLockFrontEngagement
[get] OK
Vehicle.Powertrain.Transmission.DiffLockFrontEngagement: ( NotAvailable )sdv.databroker.v1 > set Vehicle.Powertrain.Transmission.DiffLockFrontEngagement 0[set] OK
Digital Auto: Playground
playground.digital.auto provides an in-browser, rapid prototyping environment utilizing the COVESA APIs for connected vehicles.
The UUID for Vehicle.Powertrain.Transmission.DiffLockFrontEngagement is 5149afe37fbd5c24847b5820821abc02
Feedback
Do you think this Vehicle Signal specification needs enhancement? Do you want to discuss with experts? Try the following ressources to get in touch with the VSS community:
$ databroker-cli
sdv.databroker.v1 > connect
[connect] OK
sdv.databroker.v1 > get Vehicle.Powertrain.Transmission.DiffLockRearEngagement
[get] OK
Vehicle.Powertrain.Transmission.DiffLockRearEngagement: ( NotAvailable )sdv.databroker.v1 > set Vehicle.Powertrain.Transmission.DiffLockRearEngagement 0[set] OK
Digital Auto: Playground
playground.digital.auto provides an in-browser, rapid prototyping environment utilizing the COVESA APIs for connected vehicles.
The UUID for Vehicle.Powertrain.Transmission.DiffLockRearEngagement is 197c939bd1405613b80179becec6db83
Feedback
Do you think this Vehicle Signal specification needs enhancement? Do you want to discuss with experts? Try the following ressources to get in touch with the VSS community:
$ databroker-cli
sdv.databroker.v1 > connect
[connect] OK
sdv.databroker.v1 > get Vehicle.Powertrain.Transmission.DriveType
[get] OK
Vehicle.Powertrain.Transmission.DriveType: ( NotAvailable )sdv.databroker.v1 > set Vehicle.Powertrain.Transmission.DriveType UNKNOWN
[set] OK
Digital Auto: Playground
playground.digital.auto provides an in-browser, rapid prototyping environment utilizing the COVESA APIs for connected vehicles.
The UUID for Vehicle.Powertrain.Transmission.DriveType is 0e480b76fb2d5f8bb08fb586f90ee6ae
Feedback
Do you think this Vehicle Signal specification needs enhancement? Do you want to discuss with experts? Try the following ressources to get in touch with the VSS community:
$ databroker-cli
sdv.databroker.v1 > connect
[connect] OK
sdv.databroker.v1 > get Vehicle.Powertrain.Transmission.GearChangeMode
[get] OK
Vehicle.Powertrain.Transmission.GearChangeMode: ( NotAvailable )sdv.databroker.v1 > set Vehicle.Powertrain.Transmission.GearChangeMode Foo
[set] OK
Digital Auto: Playground
playground.digital.auto provides an in-browser, rapid prototyping environment utilizing the COVESA APIs for connected vehicles.
The UUID for Vehicle.Powertrain.Transmission.GearChangeMode is ff3c69378c2f598286e51f7dac13adaa
Feedback
Do you think this Vehicle Signal specification needs enhancement? Do you want to discuss with experts? Try the following ressources to get in touch with the VSS community:
$ databroker-cli
sdv.databroker.v1 > connect
[connect] OK
sdv.databroker.v1 > get Vehicle.Powertrain.Transmission.GearCount
[get] OK
Vehicle.Powertrain.Transmission.GearCount: ( NotAvailable )sdv.databroker.v1 > set Vehicle.Powertrain.Transmission.GearCount 0[set] OK
Digital Auto: Playground
playground.digital.auto provides an in-browser, rapid prototyping environment utilizing the COVESA APIs for connected vehicles.
The UUID for Vehicle.Powertrain.Transmission.GearCount is 84293f40d3ed57f1a08992d97b1a9ccd
Feedback
Do you think this Vehicle Signal specification needs enhancement? Do you want to discuss with experts? Try the following ressources to get in touch with the VSS community:
Is electrical powertrain mechanically connected/engaged to the drivetrain or not. False = Disconnected/Disengaged. True = Connected/Engaged.
Comment:
In some hybrid solutions it is possible to disconnect/disengage the electrical powertrain mechanically to avoid induced voltage reaching a too high level when driving at high speed.
Navigation
flowchart LR
Vehicle-->Powertrain
Powertrain-->Transmission
Transmission-->IsElectricalPowertrainEngaged
$ databroker-cli
sdv.databroker.v1 > connect
[connect] OK
sdv.databroker.v1 > get Vehicle.Powertrain.Transmission.IsElectricalPowertrainEngaged
[get] OK
Vehicle.Powertrain.Transmission.IsElectricalPowertrainEngaged: ( NotAvailable )sdv.databroker.v1 > set Vehicle.Powertrain.Transmission.IsElectricalPowertrainEngaged false[set] OK
Digital Auto: Playground
playground.digital.auto provides an in-browser, rapid prototyping environment utilizing the COVESA APIs for connected vehicles.
The UUID for Vehicle.Powertrain.Transmission.IsElectricalPowertrainEngaged is 6660cf1d88d15430b1e7c8908a7b769b
Feedback
Do you think this Vehicle Signal specification needs enhancement? Do you want to discuss with experts? Try the following ressources to get in touch with the VSS community:
$ databroker-cli
sdv.databroker.v1 > connect
[connect] OK
sdv.databroker.v1 > get Vehicle.Powertrain.Transmission.IsLowRangeEngaged
[get] OK
Vehicle.Powertrain.Transmission.IsLowRangeEngaged: ( NotAvailable )sdv.databroker.v1 > set Vehicle.Powertrain.Transmission.IsLowRangeEngaged false[set] OK
Digital Auto: Playground
playground.digital.auto provides an in-browser, rapid prototyping environment utilizing the COVESA APIs for connected vehicles.
The UUID for Vehicle.Powertrain.Transmission.IsLowRangeEngaged is 63ba7593926b574ebbe4f90b28557e78
Feedback
Do you think this Vehicle Signal specification needs enhancement? Do you want to discuss with experts? Try the following ressources to get in touch with the VSS community:
$ databroker-cli
sdv.databroker.v1 > connect
[connect] OK
sdv.databroker.v1 > get Vehicle.Powertrain.Transmission.IsParkLockEngaged
[get] OK
Vehicle.Powertrain.Transmission.IsParkLockEngaged: ( NotAvailable )sdv.databroker.v1 > set Vehicle.Powertrain.Transmission.IsParkLockEngaged false[set] OK
Digital Auto: Playground
playground.digital.auto provides an in-browser, rapid prototyping environment utilizing the COVESA APIs for connected vehicles.
The UUID for Vehicle.Powertrain.Transmission.IsParkLockEngaged is 1578da3f925e54ac9df978abd0195408
Feedback
Do you think this Vehicle Signal specification needs enhancement? Do you want to discuss with experts? Try the following ressources to get in touch with the VSS community:
$ databroker-cli
sdv.databroker.v1 > connect
[connect] OK
sdv.databroker.v1 > get Vehicle.Powertrain.Transmission.PerformanceMode
[get] OK
Vehicle.Powertrain.Transmission.PerformanceMode: ( NotAvailable )sdv.databroker.v1 > set Vehicle.Powertrain.Transmission.PerformanceMode Foo
[set] OK
Digital Auto: Playground
playground.digital.auto provides an in-browser, rapid prototyping environment utilizing the COVESA APIs for connected vehicles.
The UUID for Vehicle.Powertrain.Transmission.PerformanceMode is 6b5cfd85cb595e559503ccf993be04dd
Feedback
Do you think this Vehicle Signal specification needs enhancement? Do you want to discuss with experts? Try the following ressources to get in touch with the VSS community:
$ databroker-cli
sdv.databroker.v1 > connect
[connect] OK
sdv.databroker.v1 > get Vehicle.Powertrain.Transmission.SelectedGear
[get] OK
Vehicle.Powertrain.Transmission.SelectedGear: ( NotAvailable )sdv.databroker.v1 > set Vehicle.Powertrain.Transmission.SelectedGear 0[set] OK
Digital Auto: Playground
playground.digital.auto provides an in-browser, rapid prototyping environment utilizing the COVESA APIs for connected vehicles.
The UUID for Vehicle.Powertrain.Transmission.SelectedGear is 490fd99b9d5f562eb180c19e8cef5e12
Feedback
Do you think this Vehicle Signal specification needs enhancement? Do you want to discuss with experts? Try the following ressources to get in touch with the VSS community:
$ databroker-cli
sdv.databroker.v1 > connect
[connect] OK
sdv.databroker.v1 > get Vehicle.Powertrain.Transmission.Temperature
[get] OK
Vehicle.Powertrain.Transmission.Temperature: ( NotAvailable )sdv.databroker.v1 > set Vehicle.Powertrain.Transmission.Temperature 0[set] OK
Digital Auto: Playground
playground.digital.auto provides an in-browser, rapid prototyping environment utilizing the COVESA APIs for connected vehicles.
The UUID for Vehicle.Powertrain.Transmission.Temperature is 4f5e48c3511b5e1abff11aa7ec62dd18
Feedback
Do you think this Vehicle Signal specification needs enhancement? Do you want to discuss with experts? Try the following ressources to get in touch with the VSS community:
$ databroker-cli
sdv.databroker.v1 > connect
[connect] OK
sdv.databroker.v1 > get Vehicle.Powertrain.Transmission.TorqueDistribution
[get] OK
Vehicle.Powertrain.Transmission.TorqueDistribution: ( NotAvailable )sdv.databroker.v1 > set Vehicle.Powertrain.Transmission.TorqueDistribution 0[set] OK
Digital Auto: Playground
playground.digital.auto provides an in-browser, rapid prototyping environment utilizing the COVESA APIs for connected vehicles.
The UUID for Vehicle.Powertrain.Transmission.TorqueDistribution is d3bcaaf973d3512287817049db9bd677
Feedback
Do you think this Vehicle Signal specification needs enhancement? Do you want to discuss with experts? Try the following ressources to get in touch with the VSS community:
$ databroker-cli
sdv.databroker.v1 > connect
[connect] OK
sdv.databroker.v1 > get Vehicle.Powertrain.Transmission.TravelledDistance
[get] OK
Vehicle.Powertrain.Transmission.TravelledDistance: ( NotAvailable )sdv.databroker.v1 > set Vehicle.Powertrain.Transmission.TravelledDistance 0[set] OK
Digital Auto: Playground
playground.digital.auto provides an in-browser, rapid prototyping environment utilizing the COVESA APIs for connected vehicles.
The UUID for Vehicle.Powertrain.Transmission.TravelledDistance is b9dd66f20c7f5b12a046766b94dc20c1
Feedback
Do you think this Vehicle Signal specification needs enhancement? Do you want to discuss with experts? Try the following ressources to get in touch with the VSS community:
$ databroker-cli
sdv.databroker.v1 > connect
[connect] OK
sdv.databroker.v1 > get Vehicle.Powertrain.Transmission.Type
[get] OK
Vehicle.Powertrain.Transmission.Type: ( NotAvailable )sdv.databroker.v1 > set Vehicle.Powertrain.Transmission.Type UNKNOWN
[set] OK
Digital Auto: Playground
playground.digital.auto provides an in-browser, rapid prototyping environment utilizing the COVESA APIs for connected vehicles.
The UUID for Vehicle.Powertrain.Transmission.Type is f83b9e5464d85a0288fcb32c164d3c63
Feedback
Do you think this Vehicle Signal specification needs enhancement? Do you want to discuss with experts? Try the following ressources to get in touch with the VSS community:
$ databroker-cli
sdv.databroker.v1 > connect
[connect] OK
sdv.databroker.v1 > get Vehicle.Powertrain.AccumulatedBrakingEnergy
[get] OK
Vehicle.Powertrain.AccumulatedBrakingEnergy: ( NotAvailable )sdv.databroker.v1 > set Vehicle.Powertrain.AccumulatedBrakingEnergy 0[set] OK
Digital Auto: Playground
playground.digital.auto provides an in-browser, rapid prototyping environment utilizing the COVESA APIs for connected vehicles.
The UUID for Vehicle.Powertrain.AccumulatedBrakingEnergy is 0dd466d28d3d5ad094f2015adafb91a5
Feedback
Do you think this Vehicle Signal specification needs enhancement? Do you want to discuss with experts? Try the following ressources to get in touch with the VSS community:
Do you think this Vehicle Signal specification needs enhancement? Do you want to discuss with experts? Try the following ressources to get in touch with the VSS community:
$ databroker-cli
sdv.databroker.v1 > connect
[connect] OK
sdv.databroker.v1 > get Vehicle.Powertrain.CombustionEngine.AspirationType
[get] OK
Vehicle.Powertrain.CombustionEngine.AspirationType: ( NotAvailable )sdv.databroker.v1 > set Vehicle.Powertrain.CombustionEngine.AspirationType UNKNOWN
[set] OK
Digital Auto: Playground
playground.digital.auto provides an in-browser, rapid prototyping environment utilizing the COVESA APIs for connected vehicles.
The UUID for Vehicle.Powertrain.CombustionEngine.AspirationType is 3ca6a8ff30275c20a9d8d6d6829574eb
Feedback
Do you think this Vehicle Signal specification needs enhancement? Do you want to discuss with experts? Try the following ressources to get in touch with the VSS community:
$ databroker-cli
sdv.databroker.v1 > connect
[connect] OK
sdv.databroker.v1 > get Vehicle.Powertrain.CombustionEngine.CompressionRatio
[get] OK
Vehicle.Powertrain.CombustionEngine.CompressionRatio: ( NotAvailable )sdv.databroker.v1 > set Vehicle.Powertrain.CombustionEngine.CompressionRatio Foo
[set] OK
Digital Auto: Playground
playground.digital.auto provides an in-browser, rapid prototyping environment utilizing the COVESA APIs for connected vehicles.
The UUID for Vehicle.Powertrain.CombustionEngine.CompressionRatio is ead42922511051a0a0a1b634781f3c09
Feedback
Do you think this Vehicle Signal specification needs enhancement? Do you want to discuss with experts? Try the following ressources to get in touch with the VSS community:
Do you think this Vehicle Signal specification needs enhancement? Do you want to discuss with experts? Try the following ressources to get in touch with the VSS community:
$ databroker-cli
sdv.databroker.v1 > connect
[connect] OK
sdv.databroker.v1 > get Vehicle.Powertrain.CombustionEngine.DieselExhaustFluid.Capacity
[get] OK
Vehicle.Powertrain.CombustionEngine.DieselExhaustFluid.Capacity: ( NotAvailable )sdv.databroker.v1 > set Vehicle.Powertrain.CombustionEngine.DieselExhaustFluid.Capacity 0[set] OK
Digital Auto: Playground
playground.digital.auto provides an in-browser, rapid prototyping environment utilizing the COVESA APIs for connected vehicles.
The UUID for Vehicle.Powertrain.CombustionEngine.DieselExhaustFluid.Capacity is 863c16ad452b5cf5b7a37f58bdda14c3
Feedback
Do you think this Vehicle Signal specification needs enhancement? Do you want to discuss with experts? Try the following ressources to get in touch with the VSS community:
$ databroker-cli
sdv.databroker.v1 > connect
[connect] OK
sdv.databroker.v1 > get Vehicle.Powertrain.CombustionEngine.DieselExhaustFluid.IsLevelLow
[get] OK
Vehicle.Powertrain.CombustionEngine.DieselExhaustFluid.IsLevelLow: ( NotAvailable )sdv.databroker.v1 > set Vehicle.Powertrain.CombustionEngine.DieselExhaustFluid.IsLevelLow false[set] OK
Digital Auto: Playground
playground.digital.auto provides an in-browser, rapid prototyping environment utilizing the COVESA APIs for connected vehicles.
The UUID for Vehicle.Powertrain.CombustionEngine.DieselExhaustFluid.IsLevelLow is 811af3fe4f7f5270b4119bb66cff8759
Feedback
Do you think this Vehicle Signal specification needs enhancement? Do you want to discuss with experts? Try the following ressources to get in touch with the VSS community:
$ databroker-cli
sdv.databroker.v1 > connect
[connect] OK
sdv.databroker.v1 > get Vehicle.Powertrain.CombustionEngine.DieselExhaustFluid.Level
[get] OK
Vehicle.Powertrain.CombustionEngine.DieselExhaustFluid.Level: ( NotAvailable )sdv.databroker.v1 > set Vehicle.Powertrain.CombustionEngine.DieselExhaustFluid.Level 0[set] OK
Digital Auto: Playground
playground.digital.auto provides an in-browser, rapid prototyping environment utilizing the COVESA APIs for connected vehicles.
The UUID for Vehicle.Powertrain.CombustionEngine.DieselExhaustFluid.Level is f5b0269b58ff5a8e8399f6d96963a3b6
Feedback
Do you think this Vehicle Signal specification needs enhancement? Do you want to discuss with experts? Try the following ressources to get in touch with the VSS community:
$ databroker-cli
sdv.databroker.v1 > connect
[connect] OK
sdv.databroker.v1 > get Vehicle.Powertrain.CombustionEngine.DieselExhaustFluid.Range
[get] OK
Vehicle.Powertrain.CombustionEngine.DieselExhaustFluid.Range: ( NotAvailable )sdv.databroker.v1 > set Vehicle.Powertrain.CombustionEngine.DieselExhaustFluid.Range 0[set] OK
Digital Auto: Playground
playground.digital.auto provides an in-browser, rapid prototyping environment utilizing the COVESA APIs for connected vehicles.
The UUID for Vehicle.Powertrain.CombustionEngine.DieselExhaustFluid.Range is 124afbee975c5a67b316413f7b805eac
Feedback
Do you think this Vehicle Signal specification needs enhancement? Do you want to discuss with experts? Try the following ressources to get in touch with the VSS community:
Do you think this Vehicle Signal specification needs enhancement? Do you want to discuss with experts? Try the following ressources to get in touch with the VSS community:
$ databroker-cli
sdv.databroker.v1 > connect
[connect] OK
sdv.databroker.v1 > get Vehicle.Powertrain.CombustionEngine.DieselParticulateFilter.DeltaPressure
[get] OK
Vehicle.Powertrain.CombustionEngine.DieselParticulateFilter.DeltaPressure: ( NotAvailable )sdv.databroker.v1 > set Vehicle.Powertrain.CombustionEngine.DieselParticulateFilter.DeltaPressure 0[set] OK
Digital Auto: Playground
playground.digital.auto provides an in-browser, rapid prototyping environment utilizing the COVESA APIs for connected vehicles.
The UUID for Vehicle.Powertrain.CombustionEngine.DieselParticulateFilter.DeltaPressure is a6f476775c60531b93acb835e0bc6ab6
Feedback
Do you think this Vehicle Signal specification needs enhancement? Do you want to discuss with experts? Try the following ressources to get in touch with the VSS community:
$ databroker-cli
sdv.databroker.v1 > connect
[connect] OK
sdv.databroker.v1 > get Vehicle.Powertrain.CombustionEngine.DieselParticulateFilter.InletTemperature
[get] OK
Vehicle.Powertrain.CombustionEngine.DieselParticulateFilter.InletTemperature: ( NotAvailable )sdv.databroker.v1 > set Vehicle.Powertrain.CombustionEngine.DieselParticulateFilter.InletTemperature 0[set] OK
Digital Auto: Playground
playground.digital.auto provides an in-browser, rapid prototyping environment utilizing the COVESA APIs for connected vehicles.
The UUID for Vehicle.Powertrain.CombustionEngine.DieselParticulateFilter.InletTemperature is 70e90d202d3054bd967e67dce95c8ef2
Feedback
Do you think this Vehicle Signal specification needs enhancement? Do you want to discuss with experts? Try the following ressources to get in touch with the VSS community:
$ databroker-cli
sdv.databroker.v1 > connect
[connect] OK
sdv.databroker.v1 > get Vehicle.Powertrain.CombustionEngine.DieselParticulateFilter.OutletTemperature
[get] OK
Vehicle.Powertrain.CombustionEngine.DieselParticulateFilter.OutletTemperature: ( NotAvailable )sdv.databroker.v1 > set Vehicle.Powertrain.CombustionEngine.DieselParticulateFilter.OutletTemperature 0[set] OK
Digital Auto: Playground
playground.digital.auto provides an in-browser, rapid prototyping environment utilizing the COVESA APIs for connected vehicles.
The UUID for Vehicle.Powertrain.CombustionEngine.DieselParticulateFilter.OutletTemperature is e2b7f9d97bec5c0d94ade71a5e2f6518
Feedback
Do you think this Vehicle Signal specification needs enhancement? Do you want to discuss with experts? Try the following ressources to get in touch with the VSS community:
$ databroker-cli
sdv.databroker.v1 > connect
[connect] OK
sdv.databroker.v1 > get Vehicle.Powertrain.CombustionEngine.ECT
[get] OK
Vehicle.Powertrain.CombustionEngine.ECT: ( NotAvailable )sdv.databroker.v1 > set Vehicle.Powertrain.CombustionEngine.ECT 0[set] OK
Digital Auto: Playground
playground.digital.auto provides an in-browser, rapid prototyping environment utilizing the COVESA APIs for connected vehicles.
The UUID for Vehicle.Powertrain.CombustionEngine.ECT is fff3cad23cac5b189a1a075c3ab562cd
Feedback
Do you think this Vehicle Signal specification needs enhancement? Do you want to discuss with experts? Try the following ressources to get in touch with the VSS community:
$ databroker-cli
sdv.databroker.v1 > connect
[connect] OK
sdv.databroker.v1 > get Vehicle.Powertrain.CombustionEngine.EngineCoolantCapacity
[get] OK
Vehicle.Powertrain.CombustionEngine.EngineCoolantCapacity: ( NotAvailable )sdv.databroker.v1 > set Vehicle.Powertrain.CombustionEngine.EngineCoolantCapacity 0[set] OK
Digital Auto: Playground
playground.digital.auto provides an in-browser, rapid prototyping environment utilizing the COVESA APIs for connected vehicles.
The UUID for Vehicle.Powertrain.CombustionEngine.EngineCoolantCapacity is 90b5b64808ea5f4fa2798d96143b0d60
Feedback
Do you think this Vehicle Signal specification needs enhancement? Do you want to discuss with experts? Try the following ressources to get in touch with the VSS community:
$ databroker-cli
sdv.databroker.v1 > connect
[connect] OK
sdv.databroker.v1 > get Vehicle.Powertrain.CombustionEngine.EngineHours
[get] OK
Vehicle.Powertrain.CombustionEngine.EngineHours: ( NotAvailable )sdv.databroker.v1 > set Vehicle.Powertrain.CombustionEngine.EngineHours 0[set] OK
Digital Auto: Playground
playground.digital.auto provides an in-browser, rapid prototyping environment utilizing the COVESA APIs for connected vehicles.
The UUID for Vehicle.Powertrain.CombustionEngine.EngineHours is a23a62e24f58514d961890f53262e4e0
Feedback
Do you think this Vehicle Signal specification needs enhancement? Do you want to discuss with experts? Try the following ressources to get in touch with the VSS community:
$ databroker-cli
sdv.databroker.v1 > connect
[connect] OK
sdv.databroker.v1 > get Vehicle.Powertrain.CombustionEngine.EngineOilCapacity
[get] OK
Vehicle.Powertrain.CombustionEngine.EngineOilCapacity: ( NotAvailable )sdv.databroker.v1 > set Vehicle.Powertrain.CombustionEngine.EngineOilCapacity 0[set] OK
Digital Auto: Playground
playground.digital.auto provides an in-browser, rapid prototyping environment utilizing the COVESA APIs for connected vehicles.
The UUID for Vehicle.Powertrain.CombustionEngine.EngineOilCapacity is 2ca7af6facb55a13885989faa9bc6ca7
Feedback
Do you think this Vehicle Signal specification needs enhancement? Do you want to discuss with experts? Try the following ressources to get in touch with the VSS community:
$ databroker-cli
sdv.databroker.v1 > connect
[connect] OK
sdv.databroker.v1 > get Vehicle.Powertrain.CombustionEngine.EngineOilLevel
[get] OK
Vehicle.Powertrain.CombustionEngine.EngineOilLevel: ( NotAvailable )sdv.databroker.v1 > set Vehicle.Powertrain.CombustionEngine.EngineOilLevel Foo
[set] OK
Digital Auto: Playground
playground.digital.auto provides an in-browser, rapid prototyping environment utilizing the COVESA APIs for connected vehicles.
The UUID for Vehicle.Powertrain.CombustionEngine.EngineOilLevel is e3813f59e94b509eb865fd97255a8a4f
Feedback
Do you think this Vehicle Signal specification needs enhancement? Do you want to discuss with experts? Try the following ressources to get in touch with the VSS community:
$ databroker-cli
sdv.databroker.v1 > connect
[connect] OK
sdv.databroker.v1 > get Vehicle.Powertrain.CombustionEngine.EOP
[get] OK
Vehicle.Powertrain.CombustionEngine.EOP: ( NotAvailable )sdv.databroker.v1 > set Vehicle.Powertrain.CombustionEngine.EOP 0[set] OK
Digital Auto: Playground
playground.digital.auto provides an in-browser, rapid prototyping environment utilizing the COVESA APIs for connected vehicles.
The UUID for Vehicle.Powertrain.CombustionEngine.EOP is 76c7039dc7975ec3a003f0f4a04895ec
Feedback
Do you think this Vehicle Signal specification needs enhancement? Do you want to discuss with experts? Try the following ressources to get in touch with the VSS community:
$ databroker-cli
sdv.databroker.v1 > connect
[connect] OK
sdv.databroker.v1 > get Vehicle.Powertrain.CombustionEngine.EOT
[get] OK
Vehicle.Powertrain.CombustionEngine.EOT: ( NotAvailable )sdv.databroker.v1 > set Vehicle.Powertrain.CombustionEngine.EOT 0[set] OK
Digital Auto: Playground
playground.digital.auto provides an in-browser, rapid prototyping environment utilizing the COVESA APIs for connected vehicles.
The UUID for Vehicle.Powertrain.CombustionEngine.EOT is eae6f5eae04f530e80f6b024f95b767d
Feedback
Do you think this Vehicle Signal specification needs enhancement? Do you want to discuss with experts? Try the following ressources to get in touch with the VSS community:
$ databroker-cli
sdv.databroker.v1 > connect
[connect] OK
sdv.databroker.v1 > get Vehicle.Powertrain.CombustionEngine.IdleHours
[get] OK
Vehicle.Powertrain.CombustionEngine.IdleHours: ( NotAvailable )sdv.databroker.v1 > set Vehicle.Powertrain.CombustionEngine.IdleHours 0[set] OK
Digital Auto: Playground
playground.digital.auto provides an in-browser, rapid prototyping environment utilizing the COVESA APIs for connected vehicles.
The UUID for Vehicle.Powertrain.CombustionEngine.IdleHours is 6caa3d7e669c5cc6aecd4a6be9a302d4
Feedback
Do you think this Vehicle Signal specification needs enhancement? Do you want to discuss with experts? Try the following ressources to get in touch with the VSS community:
$ databroker-cli
sdv.databroker.v1 > connect
[connect] OK
sdv.databroker.v1 > get Vehicle.Powertrain.CombustionEngine.IsRunning
[get] OK
Vehicle.Powertrain.CombustionEngine.IsRunning: ( NotAvailable )sdv.databroker.v1 > set Vehicle.Powertrain.CombustionEngine.IsRunning false[set] OK
Digital Auto: Playground
playground.digital.auto provides an in-browser, rapid prototyping environment utilizing the COVESA APIs for connected vehicles.
The UUID for Vehicle.Powertrain.CombustionEngine.IsRunning is 57652c27679757398c44d56af7a044d3
Feedback
Do you think this Vehicle Signal specification needs enhancement? Do you want to discuss with experts? Try the following ressources to get in touch with the VSS community:
$ databroker-cli
sdv.databroker.v1 > connect
[connect] OK
sdv.databroker.v1 > get Vehicle.Powertrain.CombustionEngine.MAF
[get] OK
Vehicle.Powertrain.CombustionEngine.MAF: ( NotAvailable )sdv.databroker.v1 > set Vehicle.Powertrain.CombustionEngine.MAF 0[set] OK
Digital Auto: Playground
playground.digital.auto provides an in-browser, rapid prototyping environment utilizing the COVESA APIs for connected vehicles.
The UUID for Vehicle.Powertrain.CombustionEngine.MAF is 1e222ed8c48b5dcea60e43ac8af7d6df
Feedback
Do you think this Vehicle Signal specification needs enhancement? Do you want to discuss with experts? Try the following ressources to get in touch with the VSS community:
$ databroker-cli
sdv.databroker.v1 > connect
[connect] OK
sdv.databroker.v1 > get Vehicle.Powertrain.CombustionEngine.MAP
[get] OK
Vehicle.Powertrain.CombustionEngine.MAP: ( NotAvailable )sdv.databroker.v1 > set Vehicle.Powertrain.CombustionEngine.MAP 0[set] OK
Digital Auto: Playground
playground.digital.auto provides an in-browser, rapid prototyping environment utilizing the COVESA APIs for connected vehicles.
The UUID for Vehicle.Powertrain.CombustionEngine.MAP is 28d4354fa34056369acb857aa7cc76ac
Feedback
Do you think this Vehicle Signal specification needs enhancement? Do you want to discuss with experts? Try the following ressources to get in touch with the VSS community:
$ databroker-cli
sdv.databroker.v1 > connect
[connect] OK
sdv.databroker.v1 > get Vehicle.Powertrain.CombustionEngine.MaxPower
[get] OK
Vehicle.Powertrain.CombustionEngine.MaxPower: ( NotAvailable )sdv.databroker.v1 > set Vehicle.Powertrain.CombustionEngine.MaxPower 0[set] OK
Digital Auto: Playground
playground.digital.auto provides an in-browser, rapid prototyping environment utilizing the COVESA APIs for connected vehicles.
The UUID for Vehicle.Powertrain.CombustionEngine.MaxPower is 81fbdd5e90f557a38b96578a38dc137d
Feedback
Do you think this Vehicle Signal specification needs enhancement? Do you want to discuss with experts? Try the following ressources to get in touch with the VSS community:
$ databroker-cli
sdv.databroker.v1 > connect
[connect] OK
sdv.databroker.v1 > get Vehicle.Powertrain.CombustionEngine.MaxTorque
[get] OK
Vehicle.Powertrain.CombustionEngine.MaxTorque: ( NotAvailable )sdv.databroker.v1 > set Vehicle.Powertrain.CombustionEngine.MaxTorque 0[set] OK
Digital Auto: Playground
playground.digital.auto provides an in-browser, rapid prototyping environment utilizing the COVESA APIs for connected vehicles.
The UUID for Vehicle.Powertrain.CombustionEngine.MaxTorque is 471cd478c1e8597f8e97c85b4e4ebe26
Feedback
Do you think this Vehicle Signal specification needs enhancement? Do you want to discuss with experts? Try the following ressources to get in touch with the VSS community:
$ databroker-cli
sdv.databroker.v1 > connect
[connect] OK
sdv.databroker.v1 > get Vehicle.Powertrain.CombustionEngine.NumberOfCylinders
[get] OK
Vehicle.Powertrain.CombustionEngine.NumberOfCylinders: ( NotAvailable )sdv.databroker.v1 > set Vehicle.Powertrain.CombustionEngine.NumberOfCylinders 0[set] OK
Digital Auto: Playground
playground.digital.auto provides an in-browser, rapid prototyping environment utilizing the COVESA APIs for connected vehicles.
The UUID for Vehicle.Powertrain.CombustionEngine.NumberOfCylinders is b2cd342c218257e88d214cdb511df82b
Feedback
Do you think this Vehicle Signal specification needs enhancement? Do you want to discuss with experts? Try the following ressources to get in touch with the VSS community:
$ databroker-cli
sdv.databroker.v1 > connect
[connect] OK
sdv.databroker.v1 > get Vehicle.Powertrain.CombustionEngine.NumberOfValvesPerCylinder
[get] OK
Vehicle.Powertrain.CombustionEngine.NumberOfValvesPerCylinder: ( NotAvailable )sdv.databroker.v1 > set Vehicle.Powertrain.CombustionEngine.NumberOfValvesPerCylinder 0[set] OK
Digital Auto: Playground
playground.digital.auto provides an in-browser, rapid prototyping environment utilizing the COVESA APIs for connected vehicles.
The UUID for Vehicle.Powertrain.CombustionEngine.NumberOfValvesPerCylinder is 44633204726e561ca21beff31f3fef80
Feedback
Do you think this Vehicle Signal specification needs enhancement? Do you want to discuss with experts? Try the following ressources to get in touch with the VSS community:
$ databroker-cli
sdv.databroker.v1 > connect
[connect] OK
sdv.databroker.v1 > get Vehicle.Powertrain.CombustionEngine.OilLifeRemaining
[get] OK
Vehicle.Powertrain.CombustionEngine.OilLifeRemaining: ( NotAvailable )sdv.databroker.v1 > set Vehicle.Powertrain.CombustionEngine.OilLifeRemaining 0[set] OK
Digital Auto: Playground
playground.digital.auto provides an in-browser, rapid prototyping environment utilizing the COVESA APIs for connected vehicles.
The UUID for Vehicle.Powertrain.CombustionEngine.OilLifeRemaining is 94303734c68c5353a02625f652103918
Feedback
Do you think this Vehicle Signal specification needs enhancement? Do you want to discuss with experts? Try the following ressources to get in touch with the VSS community:
$ databroker-cli
sdv.databroker.v1 > connect
[connect] OK
sdv.databroker.v1 > get Vehicle.Powertrain.CombustionEngine.Power
[get] OK
Vehicle.Powertrain.CombustionEngine.Power: ( NotAvailable )sdv.databroker.v1 > set Vehicle.Powertrain.CombustionEngine.Power 0[set] OK
Digital Auto: Playground
playground.digital.auto provides an in-browser, rapid prototyping environment utilizing the COVESA APIs for connected vehicles.
The UUID for Vehicle.Powertrain.CombustionEngine.Power is 20e8b5d2187758c2848ed421248c180d
Feedback
Do you think this Vehicle Signal specification needs enhancement? Do you want to discuss with experts? Try the following ressources to get in touch with the VSS community:
$ databroker-cli
sdv.databroker.v1 > connect
[connect] OK
sdv.databroker.v1 > get Vehicle.Powertrain.CombustionEngine.Speed
[get] OK
Vehicle.Powertrain.CombustionEngine.Speed: ( NotAvailable )sdv.databroker.v1 > set Vehicle.Powertrain.CombustionEngine.Speed 0[set] OK
Digital Auto: Playground
playground.digital.auto provides an in-browser, rapid prototyping environment utilizing the COVESA APIs for connected vehicles.
The UUID for Vehicle.Powertrain.CombustionEngine.Speed is 557ce24c5a4d51cc825059c948ac9e29
Feedback
Do you think this Vehicle Signal specification needs enhancement? Do you want to discuss with experts? Try the following ressources to get in touch with the VSS community:
$ databroker-cli
sdv.databroker.v1 > connect
[connect] OK
sdv.databroker.v1 > get Vehicle.Powertrain.CombustionEngine.Torque
[get] OK
Vehicle.Powertrain.CombustionEngine.Torque: ( NotAvailable )sdv.databroker.v1 > set Vehicle.Powertrain.CombustionEngine.Torque 0[set] OK
Digital Auto: Playground
playground.digital.auto provides an in-browser, rapid prototyping environment utilizing the COVESA APIs for connected vehicles.
The UUID for Vehicle.Powertrain.CombustionEngine.Torque is b81f504bdb57513299ae6e9402ec7bcd
Feedback
Do you think this Vehicle Signal specification needs enhancement? Do you want to discuss with experts? Try the following ressources to get in touch with the VSS community:
$ databroker-cli
sdv.databroker.v1 > connect
[connect] OK
sdv.databroker.v1 > get Vehicle.Powertrain.CombustionEngine.TPS
[get] OK
Vehicle.Powertrain.CombustionEngine.TPS: ( NotAvailable )sdv.databroker.v1 > set Vehicle.Powertrain.CombustionEngine.TPS 0[set] OK
Digital Auto: Playground
playground.digital.auto provides an in-browser, rapid prototyping environment utilizing the COVESA APIs for connected vehicles.
The UUID for Vehicle.Powertrain.CombustionEngine.TPS is 1ddb77860de558b4876ffb399a442bda
Feedback
Do you think this Vehicle Signal specification needs enhancement? Do you want to discuss with experts? Try the following ressources to get in touch with the VSS community:
$ databroker-cli
sdv.databroker.v1 > connect
[connect] OK
sdv.databroker.v1 > get Vehicle.Powertrain.CombustionEngine.Bore
[get] OK
Vehicle.Powertrain.CombustionEngine.Bore: ( NotAvailable )sdv.databroker.v1 > set Vehicle.Powertrain.CombustionEngine.Bore 0[set] OK
Digital Auto: Playground
playground.digital.auto provides an in-browser, rapid prototyping environment utilizing the COVESA APIs for connected vehicles.
The UUID for Vehicle.Powertrain.CombustionEngine.Bore is 1618fb16035b5464961570cc1afd934e
Feedback
Do you think this Vehicle Signal specification needs enhancement? Do you want to discuss with experts? Try the following ressources to get in touch with the VSS community:
$ databroker-cli
sdv.databroker.v1 > connect
[connect] OK
sdv.databroker.v1 > get Vehicle.Powertrain.CombustionEngine.Configuration
[get] OK
Vehicle.Powertrain.CombustionEngine.Configuration: ( NotAvailable )sdv.databroker.v1 > set Vehicle.Powertrain.CombustionEngine.Configuration UNKNOWN
[set] OK
Digital Auto: Playground
playground.digital.auto provides an in-browser, rapid prototyping environment utilizing the COVESA APIs for connected vehicles.
The UUID for Vehicle.Powertrain.CombustionEngine.Configuration is 586be4567fe059ee9e6cf42901c2e773
Feedback
Do you think this Vehicle Signal specification needs enhancement? Do you want to discuss with experts? Try the following ressources to get in touch with the VSS community:
$ databroker-cli
sdv.databroker.v1 > connect
[connect] OK
sdv.databroker.v1 > get Vehicle.Powertrain.CombustionEngine.Displacement
[get] OK
Vehicle.Powertrain.CombustionEngine.Displacement: ( NotAvailable )sdv.databroker.v1 > set Vehicle.Powertrain.CombustionEngine.Displacement 0[set] OK
Digital Auto: Playground
playground.digital.auto provides an in-browser, rapid prototyping environment utilizing the COVESA APIs for connected vehicles.
The UUID for Vehicle.Powertrain.CombustionEngine.Displacement is 94dbd928847150ab842c00fa5caaf272
Feedback
Do you think this Vehicle Signal specification needs enhancement? Do you want to discuss with experts? Try the following ressources to get in touch with the VSS community:
$ databroker-cli
sdv.databroker.v1 > connect
[connect] OK
sdv.databroker.v1 > get Vehicle.Powertrain.CombustionEngine.EngineCode
[get] OK
Vehicle.Powertrain.CombustionEngine.EngineCode: ( NotAvailable )sdv.databroker.v1 > set Vehicle.Powertrain.CombustionEngine.EngineCode Foo
[set] OK
Digital Auto: Playground
playground.digital.auto provides an in-browser, rapid prototyping environment utilizing the COVESA APIs for connected vehicles.
The UUID for Vehicle.Powertrain.CombustionEngine.EngineCode is 4ec845911b8e5b64b2cb1d34063184de
Feedback
Do you think this Vehicle Signal specification needs enhancement? Do you want to discuss with experts? Try the following ressources to get in touch with the VSS community:
$ databroker-cli
sdv.databroker.v1 > connect
[connect] OK
sdv.databroker.v1 > get Vehicle.Powertrain.CombustionEngine.StrokeLength
[get] OK
Vehicle.Powertrain.CombustionEngine.StrokeLength: ( NotAvailable )sdv.databroker.v1 > set Vehicle.Powertrain.CombustionEngine.StrokeLength 0[set] OK
Digital Auto: Playground
playground.digital.auto provides an in-browser, rapid prototyping environment utilizing the COVESA APIs for connected vehicles.
The UUID for Vehicle.Powertrain.CombustionEngine.StrokeLength is 1bdfdab7904d51ed93e101b84ea54ddf
Feedback
Do you think this Vehicle Signal specification needs enhancement? Do you want to discuss with experts? Try the following ressources to get in touch with the VSS community:
The following is a list of VSS supported built-in datatypes:
Name
Type
Min
Max
uint8
unsigned 8-bit integer
0
255
int8
signed 8-bit integer
-128
127
uint16
unsigned 16-bit integer
0
65535
int16
signed 16-bit integer
-32768
32767
uint32
unsigned 32-bit integer
0
4294967295
int32
signed 32-bit integer
-2147483648
2147483647
uint64
unsigned 64-bit integer
0
2^64 - 1
int64
signed 64-bit integer
-2^63
2^63 - 1
boolean
boolean value
0/false
1/true
float
floating point number
-3.4e -38
3.4e 38
double
double precision floating point number
-1.7e -300
1.7e 300
string
character string
n/a
n/a
Min, max and default values defined in a Vehicle Signal Specification must be in the supported range of the data type.
5.1.12.7 - PowerOptimizeLevel
Full qualified VSS Path:
Vehicle.Powertrain.PowerOptimizeLevel
Description:
Power optimization level for this branch/subsystem. A higher number indicates more aggressive power optimization. Level 0 indicates that all functionality is enabled, no power optimization enabled. Level 10 indicates most aggressive power optimization mode, only essential functionality enabled.
Navigation
flowchart LR
Vehicle-->Powertrain
Powertrain-->PowerOptimizeLevel
$ databroker-cli
sdv.databroker.v1 > connect
[connect] OK
sdv.databroker.v1 > get Vehicle.Powertrain.PowerOptimizeLevel
[get] OK
Vehicle.Powertrain.PowerOptimizeLevel: ( NotAvailable )sdv.databroker.v1 > set Vehicle.Powertrain.PowerOptimizeLevel 0[set] OK
Digital Auto: Playground
playground.digital.auto provides an in-browser, rapid prototyping environment utilizing the COVESA APIs for connected vehicles.
The UUID for Vehicle.Powertrain.PowerOptimizeLevel is d740b02e2fb35c07bf88a6e5ebe2f6e4
Feedback
Do you think this Vehicle Signal specification needs enhancement? Do you want to discuss with experts? Try the following ressources to get in touch with the VSS community:
$ databroker-cli
sdv.databroker.v1 > connect
[connect] OK
sdv.databroker.v1 > get Vehicle.Powertrain.Range
[get] OK
Vehicle.Powertrain.Range: ( NotAvailable )sdv.databroker.v1 > set Vehicle.Powertrain.Range 0[set] OK
Digital Auto: Playground
playground.digital.auto provides an in-browser, rapid prototyping environment utilizing the COVESA APIs for connected vehicles.
The UUID for Vehicle.Powertrain.Range is ea4b6de772d65d20b1fa611f997aa7b8
Feedback
Do you think this Vehicle Signal specification needs enhancement? Do you want to discuss with experts? Try the following ressources to get in touch with the VSS community:
The following is a list of VSS supported built-in datatypes:
Name
Type
Min
Max
uint8
unsigned 8-bit integer
0
255
int8
signed 8-bit integer
-128
127
uint16
unsigned 16-bit integer
0
65535
int16
signed 16-bit integer
-32768
32767
uint32
unsigned 32-bit integer
0
4294967295
int32
signed 32-bit integer
-2147483648
2147483647
uint64
unsigned 64-bit integer
0
2^64 - 1
int64
signed 64-bit integer
-2^63
2^63 - 1
boolean
boolean value
0/false
1/true
float
floating point number
-3.4e -38
3.4e 38
double
double precision floating point number
-1.7e -300
1.7e 300
string
character string
n/a
n/a
Min, max and default values defined in a Vehicle Signal Specification must be in the supported range of the data type.
5.1.12.9 - Type
Full qualified VSS Path:
Vehicle.Powertrain.Type
Description:
Defines the powertrain type of the vehicle.
Comment:
For vehicles with a combustion engine (including hybrids) more detailed information on fuels supported can be found in FuelSystem.SupportedFuelTypes and FuelSystem.SupportedFuels.
Navigation
flowchart LR
Vehicle-->Powertrain
Powertrain-->Type
$ databroker-cli
sdv.databroker.v1 > connect
[connect] OK
sdv.databroker.v1 > get Vehicle.Powertrain.Type
[get] OK
Vehicle.Powertrain.Type: ( NotAvailable )sdv.databroker.v1 > set Vehicle.Powertrain.Type Foo
[set] OK
Digital Auto: Playground
playground.digital.auto provides an in-browser, rapid prototyping environment utilizing the COVESA APIs for connected vehicles.
The UUID for Vehicle.Powertrain.Type is 2a000da4204658a4a6e3ecd5176bdfba
Feedback
Do you think this Vehicle Signal specification needs enhancement? Do you want to discuss with experts? Try the following ressources to get in touch with the VSS community:
Do you think this Vehicle Signal specification needs enhancement? Do you want to discuss with experts? Try the following ressources to get in touch with the VSS community:
$ databroker-cli
sdv.databroker.v1 > connect
[connect] OK
sdv.databroker.v1 > get Vehicle.Trailer.IsConnected
[get] OK
Vehicle.Trailer.IsConnected: ( NotAvailable )sdv.databroker.v1 > set Vehicle.Trailer.IsConnected false[set] OK
Digital Auto: Playground
playground.digital.auto provides an in-browser, rapid prototyping environment utilizing the COVESA APIs for connected vehicles.
The UUID for Vehicle.Trailer.IsConnected is 77f28ed03c125ac9a19d22e9436b0ec4
Feedback
Do you think this Vehicle Signal specification needs enhancement? Do you want to discuss with experts? Try the following ressources to get in touch with the VSS community:
$ databroker-cli
sdv.databroker.v1 > connect
[connect] OK
sdv.databroker.v1 > get Vehicle.Width
[get] OK
Vehicle.Width: ( NotAvailable )sdv.databroker.v1 > set Vehicle.Width 0[set] OK
Digital Auto: Playground
playground.digital.auto provides an in-browser, rapid prototyping environment utilizing the COVESA APIs for connected vehicles.
The UUID for Vehicle.Width is b4aabe144e3259adb1459a2e25fec9bd
Feedback
Do you think this Vehicle Signal specification needs enhancement? Do you want to discuss with experts? Try the following ressources to get in touch with the VSS community:
Do you think this Vehicle Signal specification needs enhancement? Do you want to discuss with experts? Try the following ressources to get in touch with the VSS community:
$ databroker-cli
sdv.databroker.v1 > connect
[connect] OK
sdv.databroker.v1 > get Vehicle.Acceleration.Lateral
[get] OK
Vehicle.Acceleration.Lateral: ( NotAvailable )sdv.databroker.v1 > set Vehicle.Acceleration.Lateral 0[set] OK
Digital Auto: Playground
playground.digital.auto provides an in-browser, rapid prototyping environment utilizing the COVESA APIs for connected vehicles.
The UUID for Vehicle.Acceleration.Lateral is 7522c5d6b7665b16a099643b2700e93c
Feedback
Do you think this Vehicle Signal specification needs enhancement? Do you want to discuss with experts? Try the following ressources to get in touch with the VSS community:
$ databroker-cli
sdv.databroker.v1 > connect
[connect] OK
sdv.databroker.v1 > get Vehicle.Acceleration.Longitudinal
[get] OK
Vehicle.Acceleration.Longitudinal: ( NotAvailable )sdv.databroker.v1 > set Vehicle.Acceleration.Longitudinal 0[set] OK
Digital Auto: Playground
playground.digital.auto provides an in-browser, rapid prototyping environment utilizing the COVESA APIs for connected vehicles.
The UUID for Vehicle.Acceleration.Longitudinal is 3d511fe7232b5841be311b37f322de5a
Feedback
Do you think this Vehicle Signal specification needs enhancement? Do you want to discuss with experts? Try the following ressources to get in touch with the VSS community:
$ databroker-cli
sdv.databroker.v1 > connect
[connect] OK
sdv.databroker.v1 > get Vehicle.Acceleration.Vertical
[get] OK
Vehicle.Acceleration.Vertical: ( NotAvailable )sdv.databroker.v1 > set Vehicle.Acceleration.Vertical 0[set] OK
Digital Auto: Playground
playground.digital.auto provides an in-browser, rapid prototyping environment utilizing the COVESA APIs for connected vehicles.
The UUID for Vehicle.Acceleration.Vertical is a4a8a7c4ac5b52deb0b3ee4ed8787c59
Feedback
Do you think this Vehicle Signal specification needs enhancement? Do you want to discuss with experts? Try the following ressources to get in touch with the VSS community:
Do you think this Vehicle Signal specification needs enhancement? Do you want to discuss with experts? Try the following ressources to get in touch with the VSS community:
$ databroker-cli
sdv.databroker.v1 > connect
[connect] OK
sdv.databroker.v1 > get Vehicle.AngularVelocity.Pitch
[get] OK
Vehicle.AngularVelocity.Pitch: ( NotAvailable )sdv.databroker.v1 > set Vehicle.AngularVelocity.Pitch 0[set] OK
Digital Auto: Playground
playground.digital.auto provides an in-browser, rapid prototyping environment utilizing the COVESA APIs for connected vehicles.
The UUID for Vehicle.AngularVelocity.Pitch is 42236f4a01f45313a97fdd9b6848ce4f
Feedback
Do you think this Vehicle Signal specification needs enhancement? Do you want to discuss with experts? Try the following ressources to get in touch with the VSS community:
$ databroker-cli
sdv.databroker.v1 > connect
[connect] OK
sdv.databroker.v1 > get Vehicle.AngularVelocity.Roll
[get] OK
Vehicle.AngularVelocity.Roll: ( NotAvailable )sdv.databroker.v1 > set Vehicle.AngularVelocity.Roll 0[set] OK
Digital Auto: Playground
playground.digital.auto provides an in-browser, rapid prototyping environment utilizing the COVESA APIs for connected vehicles.
The UUID for Vehicle.AngularVelocity.Roll is 221e6b93881e5771bcbd03e0849e0075
Feedback
Do you think this Vehicle Signal specification needs enhancement? Do you want to discuss with experts? Try the following ressources to get in touch with the VSS community:
$ databroker-cli
sdv.databroker.v1 > connect
[connect] OK
sdv.databroker.v1 > get Vehicle.AngularVelocity.Yaw
[get] OK
Vehicle.AngularVelocity.Yaw: ( NotAvailable )sdv.databroker.v1 > set Vehicle.AngularVelocity.Yaw 0[set] OK
Digital Auto: Playground
playground.digital.auto provides an in-browser, rapid prototyping environment utilizing the COVESA APIs for connected vehicles.
The UUID for Vehicle.AngularVelocity.Yaw is 4114c41552565c1f9035670cabe2a611
Feedback
Do you think this Vehicle Signal specification needs enhancement? Do you want to discuss with experts? Try the following ressources to get in touch with the VSS community:
The following is a list of VSS supported built-in datatypes:
Name
Type
Min
Max
uint8
unsigned 8-bit integer
0
255
int8
signed 8-bit integer
-128
127
uint16
unsigned 16-bit integer
0
65535
int16
signed 16-bit integer
-32768
32767
uint32
unsigned 32-bit integer
0
4294967295
int32
signed 32-bit integer
-2147483648
2147483647
uint64
unsigned 64-bit integer
0
2^64 - 1
int64
signed 64-bit integer
-2^63
2^63 - 1
boolean
boolean value
0/false
1/true
float
floating point number
-3.4e -38
3.4e 38
double
double precision floating point number
-1.7e -300
1.7e 300
string
character string
n/a
n/a
Min, max and default values defined in a Vehicle Signal Specification must be in the supported range of the data type.
5.1.17 - AverageSpeed
Full qualified VSS Path:
Vehicle.AverageSpeed
Description:
Average speed for the current trip.
Comment:
A new trip is considered to start when engine gets enabled (e.g. LowVoltageSystemState in ON or START mode). A trip is considered to end when engine is no longer enabled. The signal may however keep the value of the last trip until a new trip is started. Calculation of average speed may exclude periods when the vehicle for example is not moving or transmission is in neutral.
$ databroker-cli
sdv.databroker.v1 > connect
[connect] OK
sdv.databroker.v1 > get Vehicle.AverageSpeed
[get] OK
Vehicle.AverageSpeed: ( NotAvailable )sdv.databroker.v1 > set Vehicle.AverageSpeed 0[set] OK
Digital Auto: Playground
playground.digital.auto provides an in-browser, rapid prototyping environment utilizing the COVESA APIs for connected vehicles.
The UUID for Vehicle.AverageSpeed is 43a489636a665c3abb99b63174eb552b
Feedback
Do you think this Vehicle Signal specification needs enhancement? Do you want to discuss with experts? Try the following ressources to get in touch with the VSS community:
$ databroker-cli
sdv.databroker.v1 > connect
[connect] OK
sdv.databroker.v1 > get Vehicle.CargoVolume
[get] OK
Vehicle.CargoVolume: ( NotAvailable )sdv.databroker.v1 > set Vehicle.CargoVolume 0[set] OK
Digital Auto: Playground
playground.digital.auto provides an in-browser, rapid prototyping environment utilizing the COVESA APIs for connected vehicles.
The UUID for Vehicle.CargoVolume is 789feabca2e8560ea3c1852371b4096e
Feedback
Do you think this Vehicle Signal specification needs enhancement? Do you want to discuss with experts? Try the following ressources to get in touch with the VSS community:
$ databroker-cli
sdv.databroker.v1 > connect
[connect] OK
sdv.databroker.v1 > get Vehicle.CurbWeight
[get] OK
Vehicle.CurbWeight: ( NotAvailable )sdv.databroker.v1 > set Vehicle.CurbWeight 0[set] OK
Digital Auto: Playground
playground.digital.auto provides an in-browser, rapid prototyping environment utilizing the COVESA APIs for connected vehicles.
The UUID for Vehicle.CurbWeight is 69ac6ca079de59d19737f75e4c5c4342
Feedback
Do you think this Vehicle Signal specification needs enhancement? Do you want to discuss with experts? Try the following ressources to get in touch with the VSS community:
$ databroker-cli
sdv.databroker.v1 > connect
[connect] OK
sdv.databroker.v1 > get Vehicle.CurrentOverallWeight
[get] OK
Vehicle.CurrentOverallWeight: ( NotAvailable )sdv.databroker.v1 > set Vehicle.CurrentOverallWeight 0[set] OK
Digital Auto: Playground
playground.digital.auto provides an in-browser, rapid prototyping environment utilizing the COVESA APIs for connected vehicles.
The UUID for Vehicle.CurrentOverallWeight is 75599d7628bb5f35839055269d3ad205
Feedback
Do you think this Vehicle Signal specification needs enhancement? Do you want to discuss with experts? Try the following ressources to get in touch with the VSS community:
$ databroker-cli
sdv.databroker.v1 > connect
[connect] OK
sdv.databroker.v1 > get Vehicle.EmissionsCO2
[get] OK
Vehicle.EmissionsCO2: ( NotAvailable )sdv.databroker.v1 > set Vehicle.EmissionsCO2 0[set] OK
Digital Auto: Playground
playground.digital.auto provides an in-browser, rapid prototyping environment utilizing the COVESA APIs for connected vehicles.
The UUID for Vehicle.EmissionsCO2 is b73e8f1ed17d584fad3f088c666dc2a5
Feedback
Do you think this Vehicle Signal specification needs enhancement? Do you want to discuss with experts? Try the following ressources to get in touch with the VSS community:
$ databroker-cli
sdv.databroker.v1 > connect
[connect] OK
sdv.databroker.v1 > get Vehicle.GrossWeight
[get] OK
Vehicle.GrossWeight: ( NotAvailable )sdv.databroker.v1 > set Vehicle.GrossWeight 0[set] OK
Digital Auto: Playground
playground.digital.auto provides an in-browser, rapid prototyping environment utilizing the COVESA APIs for connected vehicles.
The UUID for Vehicle.GrossWeight is 9671cb551dd8570fbe5d7cd797265e6a
Feedback
Do you think this Vehicle Signal specification needs enhancement? Do you want to discuss with experts? Try the following ressources to get in touch with the VSS community:
$ databroker-cli
sdv.databroker.v1 > connect
[connect] OK
sdv.databroker.v1 > get Vehicle.Height
[get] OK
Vehicle.Height: ( NotAvailable )sdv.databroker.v1 > set Vehicle.Height 0[set] OK
Digital Auto: Playground
playground.digital.auto provides an in-browser, rapid prototyping environment utilizing the COVESA APIs for connected vehicles.
The UUID for Vehicle.Height is 9784d39f68b8541f90c355178ded7d7c
Feedback
Do you think this Vehicle Signal specification needs enhancement? Do you want to discuss with experts? Try the following ressources to get in touch with the VSS community:
The following is a list of VSS supported built-in datatypes:
Name
Type
Min
Max
uint8
unsigned 8-bit integer
0
255
int8
signed 8-bit integer
-128
127
uint16
unsigned 16-bit integer
0
65535
int16
signed 16-bit integer
-32768
32767
uint32
unsigned 32-bit integer
0
4294967295
int32
signed 32-bit integer
-2147483648
2147483647
uint64
unsigned 64-bit integer
0
2^64 - 1
int64
signed 64-bit integer
-2^63
2^63 - 1
boolean
boolean value
0/false
1/true
float
floating point number
-3.4e -38
3.4e 38
double
double precision floating point number
-1.7e -300
1.7e 300
string
character string
n/a
n/a
Min, max and default values defined in a Vehicle Signal Specification must be in the supported range of the data type.
5.1.24 - IsBrokenDown
Full qualified VSS Path:
Vehicle.IsBrokenDown
Description:
Vehicle breakdown or any similar event causing vehicle to stop on the road, that might pose a risk to other road users. True = Vehicle broken down on the road, due to e.g. engine problems, flat tire, out of gas, brake problems. False = Vehicle not broken down.
Comment:
Actual criteria and method used to decide if a vehicle is broken down is implementation specific.
$ databroker-cli
sdv.databroker.v1 > connect
[connect] OK
sdv.databroker.v1 > get Vehicle.IsBrokenDown
[get] OK
Vehicle.IsBrokenDown: ( NotAvailable )sdv.databroker.v1 > set Vehicle.IsBrokenDown false[set] OK
Digital Auto: Playground
playground.digital.auto provides an in-browser, rapid prototyping environment utilizing the COVESA APIs for connected vehicles.
The UUID for Vehicle.IsBrokenDown is 469ebd2a76b45e5b97b799262a085330
Feedback
Do you think this Vehicle Signal specification needs enhancement? Do you want to discuss with experts? Try the following ressources to get in touch with the VSS community:
$ databroker-cli
sdv.databroker.v1 > connect
[connect] OK
sdv.databroker.v1 > get Vehicle.IsMoving
[get] OK
Vehicle.IsMoving: ( NotAvailable )sdv.databroker.v1 > set Vehicle.IsMoving false[set] OK
Digital Auto: Playground
playground.digital.auto provides an in-browser, rapid prototyping environment utilizing the COVESA APIs for connected vehicles.
The UUID for Vehicle.IsMoving is db69549cc7375e919c2a2883b41cd19c
Feedback
Do you think this Vehicle Signal specification needs enhancement? Do you want to discuss with experts? Try the following ressources to get in touch with the VSS community:
$ databroker-cli
sdv.databroker.v1 > connect
[connect] OK
sdv.databroker.v1 > get Vehicle.Length
[get] OK
Vehicle.Length: ( NotAvailable )sdv.databroker.v1 > set Vehicle.Length 0[set] OK
Digital Auto: Playground
playground.digital.auto provides an in-browser, rapid prototyping environment utilizing the COVESA APIs for connected vehicles.
The UUID for Vehicle.Length is 885f1be6842a513582e52a42edb3176f
Feedback
Do you think this Vehicle Signal specification needs enhancement? Do you want to discuss with experts? Try the following ressources to get in touch with the VSS community:
The UUID for Vehicle.LowVoltageBattery is ab8c5816d44f55b68f6e1d6d9e5acb0b
Children
This vehicle signal is a branch or structure and thus has sub-pages:
Vehicle.LowVoltageBattery.CurrentCurrent (Current current flowing in/out of the low voltage battery. Positive = Current flowing in to battery, e.g. during charging or driving. Negative = Current flowing out of battery, e.g. when using the battery to start a combustion engine.)
Do you think this Vehicle Signal specification needs enhancement? Do you want to discuss with experts? Try the following ressources to get in touch with the VSS community:
Current current flowing in/out of the low voltage battery. Positive = Current flowing in to battery, e.g. during charging or driving. Negative = Current flowing out of battery, e.g. when using the battery to start a combustion engine.
Navigation
flowchart LR
Vehicle-->LowVoltageBattery
LowVoltageBattery-->CurrentCurrent
$ databroker-cli
sdv.databroker.v1 > connect
[connect] OK
sdv.databroker.v1 > get Vehicle.LowVoltageBattery.CurrentCurrent
[get] OK
Vehicle.LowVoltageBattery.CurrentCurrent: ( NotAvailable )sdv.databroker.v1 > set Vehicle.LowVoltageBattery.CurrentCurrent 0[set] OK
Digital Auto: Playground
playground.digital.auto provides an in-browser, rapid prototyping environment utilizing the COVESA APIs for connected vehicles.
The UUID for Vehicle.LowVoltageBattery.CurrentCurrent is e1d76e489d505b03ace30771ba4291b1
Feedback
Do you think this Vehicle Signal specification needs enhancement? Do you want to discuss with experts? Try the following ressources to get in touch with the VSS community:
$ databroker-cli
sdv.databroker.v1 > connect
[connect] OK
sdv.databroker.v1 > get Vehicle.LowVoltageBattery.CurrentVoltage
[get] OK
Vehicle.LowVoltageBattery.CurrentVoltage: ( NotAvailable )sdv.databroker.v1 > set Vehicle.LowVoltageBattery.CurrentVoltage 0[set] OK
Digital Auto: Playground
playground.digital.auto provides an in-browser, rapid prototyping environment utilizing the COVESA APIs for connected vehicles.
The UUID for Vehicle.LowVoltageBattery.CurrentVoltage is 1394234e8b975a279959ae82e03df786
Feedback
Do you think this Vehicle Signal specification needs enhancement? Do you want to discuss with experts? Try the following ressources to get in touch with the VSS community:
$ databroker-cli
sdv.databroker.v1 > connect
[connect] OK
sdv.databroker.v1 > get Vehicle.LowVoltageBattery.NominalCapacity
[get] OK
Vehicle.LowVoltageBattery.NominalCapacity: ( NotAvailable )sdv.databroker.v1 > set Vehicle.LowVoltageBattery.NominalCapacity 0[set] OK
Digital Auto: Playground
playground.digital.auto provides an in-browser, rapid prototyping environment utilizing the COVESA APIs for connected vehicles.
The UUID for Vehicle.LowVoltageBattery.NominalCapacity is d9f32612cb2f58d3b863a0dae21ff7af
Feedback
Do you think this Vehicle Signal specification needs enhancement? Do you want to discuss with experts? Try the following ressources to get in touch with the VSS community:
$ databroker-cli
sdv.databroker.v1 > connect
[connect] OK
sdv.databroker.v1 > get Vehicle.LowVoltageBattery.NominalVoltage
[get] OK
Vehicle.LowVoltageBattery.NominalVoltage: ( NotAvailable )sdv.databroker.v1 > set Vehicle.LowVoltageBattery.NominalVoltage 0[set] OK
Digital Auto: Playground
playground.digital.auto provides an in-browser, rapid prototyping environment utilizing the COVESA APIs for connected vehicles.
The UUID for Vehicle.LowVoltageBattery.NominalVoltage is bd5d4b6ee33f507fb49782505c3040e0
Feedback
Do you think this Vehicle Signal specification needs enhancement? Do you want to discuss with experts? Try the following ressources to get in touch with the VSS community:
$ databroker-cli
sdv.databroker.v1 > connect
[connect] OK
sdv.databroker.v1 > get Vehicle.MaxTowBallWeight
[get] OK
Vehicle.MaxTowBallWeight: ( NotAvailable )sdv.databroker.v1 > set Vehicle.MaxTowBallWeight 0[set] OK
Digital Auto: Playground
playground.digital.auto provides an in-browser, rapid prototyping environment utilizing the COVESA APIs for connected vehicles.
The UUID for Vehicle.MaxTowBallWeight is fec550f2064750e8b65b54fbf1368d68
Feedback
Do you think this Vehicle Signal specification needs enhancement? Do you want to discuss with experts? Try the following ressources to get in touch with the VSS community:
$ databroker-cli
sdv.databroker.v1 > connect
[connect] OK
sdv.databroker.v1 > get Vehicle.MaxTowWeight
[get] OK
Vehicle.MaxTowWeight: ( NotAvailable )sdv.databroker.v1 > set Vehicle.MaxTowWeight 0[set] OK
Digital Auto: Playground
playground.digital.auto provides an in-browser, rapid prototyping environment utilizing the COVESA APIs for connected vehicles.
The UUID for Vehicle.MaxTowWeight is a1b8fd65897654aa8a418bccf443f1f3
Feedback
Do you think this Vehicle Signal specification needs enhancement? Do you want to discuss with experts? Try the following ressources to get in touch with the VSS community:
$ databroker-cli
sdv.databroker.v1 > connect
[connect] OK
sdv.databroker.v1 > get Vehicle.RoofLoad
[get] OK
Vehicle.RoofLoad: ( NotAvailable )sdv.databroker.v1 > set Vehicle.RoofLoad 0[set] OK
Digital Auto: Playground
playground.digital.auto provides an in-browser, rapid prototyping environment utilizing the COVESA APIs for connected vehicles.
The UUID for Vehicle.RoofLoad is 97dc98269a19591d9efa455a8d943c16
Feedback
Do you think this Vehicle Signal specification needs enhancement? Do you want to discuss with experts? Try the following ressources to get in touch with the VSS community:
$ databroker-cli
sdv.databroker.v1 > connect
[connect] OK
sdv.databroker.v1 > get Vehicle.Speed
[get] OK
Vehicle.Speed: ( NotAvailable )sdv.databroker.v1 > set Vehicle.Speed 0[set] OK
Digital Auto: Playground
playground.digital.auto provides an in-browser, rapid prototyping environment utilizing the COVESA APIs for connected vehicles.
The UUID for Vehicle.Speed is efe50798638d55fab18ab7d43cc490e9
Feedback
Do you think this Vehicle Signal specification needs enhancement? Do you want to discuss with experts? Try the following ressources to get in touch with the VSS community:
The following is a list of VSS supported built-in datatypes:
Name
Type
Min
Max
uint8
unsigned 8-bit integer
0
255
int8
signed 8-bit integer
-128
127
uint16
unsigned 16-bit integer
0
65535
int16
signed 16-bit integer
-32768
32767
uint32
unsigned 32-bit integer
0
4294967295
int32
signed 32-bit integer
-2147483648
2147483647
uint64
unsigned 64-bit integer
0
2^64 - 1
int64
signed 64-bit integer
-2^63
2^63 - 1
boolean
boolean value
0/false
1/true
float
floating point number
-3.4e -38
3.4e 38
double
double precision floating point number
-1.7e -300
1.7e 300
string
character string
n/a
n/a
Min, max and default values defined in a Vehicle Signal Specification must be in the supported range of the data type.
5.1.32 - StartTime
Full qualified VSS Path:
Vehicle.StartTime
Description:
Start time of current or latest trip, formatted according to ISO 8601 with UTC time zone.
Comment:
This signal is supposed to be set whenever a new trip starts. A new trip is considered to start when engine gets enabled (e.g. LowVoltageSystemState in ON or START mode). A trip is considered to end when engine is no longer enabled. The default value indicates that the vehicle never has been started, or that latest start time is unknown.
$ databroker-cli
sdv.databroker.v1 > connect
[connect] OK
sdv.databroker.v1 > get Vehicle.StartTime
[get] OK
Vehicle.StartTime: ( NotAvailable )sdv.databroker.v1 > set Vehicle.StartTime 0000-01-01T00:00Z
[set] OK
Digital Auto: Playground
playground.digital.auto provides an in-browser, rapid prototyping environment utilizing the COVESA APIs for connected vehicles.
The UUID for Vehicle.StartTime is 3790b5f4513c5a3d90a0503a965bbbe0
Feedback
Do you think this Vehicle Signal specification needs enhancement? Do you want to discuss with experts? Try the following ressources to get in touch with the VSS community:
$ databroker-cli
sdv.databroker.v1 > connect
[connect] OK
sdv.databroker.v1 > get Vehicle.TraveledDistance
[get] OK
Vehicle.TraveledDistance: ( NotAvailable )sdv.databroker.v1 > set Vehicle.TraveledDistance 0[set] OK
Digital Auto: Playground
playground.digital.auto provides an in-browser, rapid prototyping environment utilizing the COVESA APIs for connected vehicles.
The UUID for Vehicle.TraveledDistance is 32c3c3585f105d8aa5566ef5a038a741
Feedback
Do you think this Vehicle Signal specification needs enhancement? Do you want to discuss with experts? Try the following ressources to get in touch with the VSS community:
The following is a list of VSS supported built-in datatypes:
Name
Type
Min
Max
uint8
unsigned 8-bit integer
0
255
int8
signed 8-bit integer
-128
127
uint16
unsigned 16-bit integer
0
65535
int16
signed 16-bit integer
-32768
32767
uint32
unsigned 32-bit integer
0
4294967295
int32
signed 32-bit integer
-2147483648
2147483647
uint64
unsigned 64-bit integer
0
2^64 - 1
int64
signed 64-bit integer
-2^63
2^63 - 1
boolean
boolean value
0/false
1/true
float
floating point number
-3.4e -38
3.4e 38
double
double precision floating point number
-1.7e -300
1.7e 300
string
character string
n/a
n/a
Min, max and default values defined in a Vehicle Signal Specification must be in the supported range of the data type.
5.1.34 - TraveledDistanceSinceStart
Full qualified VSS Path:
Vehicle.TraveledDistanceSinceStart
Description:
Distance traveled since start of current trip.
Comment:
A new trip is considered to start when engine gets enabled (e.g. LowVoltageSystemState in ON or START mode). A trip is considered to end when engine is no longer enabled. The signal may however keep the value of the last trip until a new trip is started.
$ databroker-cli
sdv.databroker.v1 > connect
[connect] OK
sdv.databroker.v1 > get Vehicle.TraveledDistanceSinceStart
[get] OK
Vehicle.TraveledDistanceSinceStart: ( NotAvailable )sdv.databroker.v1 > set Vehicle.TraveledDistanceSinceStart 0[set] OK
Digital Auto: Playground
playground.digital.auto provides an in-browser, rapid prototyping environment utilizing the COVESA APIs for connected vehicles.
The UUID for Vehicle.TraveledDistanceSinceStart is cfc6efd2793152e487f9fe3f4e03fd5d
Feedback
Do you think this Vehicle Signal specification needs enhancement? Do you want to discuss with experts? Try the following ressources to get in touch with the VSS community:
$ databroker-cli
sdv.databroker.v1 > connect
[connect] OK
sdv.databroker.v1 > get Vehicle.TravelledDistance
[get] OK
Vehicle.TravelledDistance: ( NotAvailable )sdv.databroker.v1 > set Vehicle.TravelledDistance 0[set] OK
Digital Auto: Playground
playground.digital.auto provides an in-browser, rapid prototyping environment utilizing the COVESA APIs for connected vehicles.
The UUID for Vehicle.TravelledDistance is 90be9d7b0ac15b75a83027ea3b73b65b
Feedback
Do you think this Vehicle Signal specification needs enhancement? Do you want to discuss with experts? Try the following ressources to get in touch with the VSS community:
The following is a list of VSS supported built-in datatypes:
Name
Type
Min
Max
uint8
unsigned 8-bit integer
0
255
int8
signed 8-bit integer
-128
127
uint16
unsigned 16-bit integer
0
65535
int16
signed 16-bit integer
-32768
32767
uint32
unsigned 32-bit integer
0
4294967295
int32
signed 32-bit integer
-2147483648
2147483647
uint64
unsigned 64-bit integer
0
2^64 - 1
int64
signed 64-bit integer
-2^63
2^63 - 1
boolean
boolean value
0/false
1/true
float
floating point number
-3.4e -38
3.4e 38
double
double precision floating point number
-1.7e -300
1.7e 300
string
character string
n/a
n/a
Min, max and default values defined in a Vehicle Signal Specification must be in the supported range of the data type.
5.1.36 - TripDuration
Full qualified VSS Path:
Vehicle.TripDuration
Description:
Duration of latest trip.
Comment:
This signal is not assumed to be continuously updated, but instead set to 0 when a trip starts and set to the the actual duration of the trip when a trip ends. A new trip is considered to start when engine gets enabled (e.g. LowVoltageSystemState in ON or START mode). A trip is considered to end when engine is no longer enabled.
$ databroker-cli
sdv.databroker.v1 > connect
[connect] OK
sdv.databroker.v1 > get Vehicle.TripDuration
[get] OK
Vehicle.TripDuration: ( NotAvailable )sdv.databroker.v1 > set Vehicle.TripDuration 0[set] OK
Digital Auto: Playground
playground.digital.auto provides an in-browser, rapid prototyping environment utilizing the COVESA APIs for connected vehicles.
The UUID for Vehicle.TripDuration is 84b9558ad33555389791b57d505f27a8
Feedback
Do you think this Vehicle Signal specification needs enhancement? Do you want to discuss with experts? Try the following ressources to get in touch with the VSS community:
$ databroker-cli
sdv.databroker.v1 > connect
[connect] OK
sdv.databroker.v1 > get Vehicle.TripMeterReading
[get] OK
Vehicle.TripMeterReading: ( NotAvailable )sdv.databroker.v1 > set Vehicle.TripMeterReading 0[set] OK
Digital Auto: Playground
playground.digital.auto provides an in-browser, rapid prototyping environment utilizing the COVESA APIs for connected vehicles.
The UUID for Vehicle.TripMeterReading is 81f51ebfe29c591190171d7b96e1c948
Feedback
Do you think this Vehicle Signal specification needs enhancement? Do you want to discuss with experts? Try the following ressources to get in touch with the VSS community:
$ databroker-cli
sdv.databroker.v1 > connect
[connect] OK
sdv.databroker.v1 > get Vehicle.LowVoltageSystemState
[get] OK
Vehicle.LowVoltageSystemState: ( NotAvailable )sdv.databroker.v1 > set Vehicle.LowVoltageSystemState Foo
[set] OK
Digital Auto: Playground
playground.digital.auto provides an in-browser, rapid prototyping environment utilizing the COVESA APIs for connected vehicles.
The UUID for Vehicle.LowVoltageSystemState is d7391ceb132e5519b02d4c13d5513d99
Feedback
Do you think this Vehicle Signal specification needs enhancement? Do you want to discuss with experts? Try the following ressources to get in touch with the VSS community:
Do you think this Vehicle Signal specification needs enhancement? Do you want to discuss with experts? Try the following ressources to get in touch with the VSS community:
$ databroker-cli
sdv.databroker.v1 > connect
[connect] OK
sdv.databroker.v1 > get Vehicle.VehicleIdentification.AcrissCode
[get] OK
Vehicle.VehicleIdentification.AcrissCode: ( NotAvailable )sdv.databroker.v1 > set Vehicle.VehicleIdentification.AcrissCode Foo
[set] OK
Digital Auto: Playground
playground.digital.auto provides an in-browser, rapid prototyping environment utilizing the COVESA APIs for connected vehicles.
The UUID for Vehicle.VehicleIdentification.AcrissCode is 115a821e8e0b57f08e4b9e61e85d7156
Feedback
Do you think this Vehicle Signal specification needs enhancement? Do you want to discuss with experts? Try the following ressources to get in touch with the VSS community:
$ databroker-cli
sdv.databroker.v1 > connect
[connect] OK
sdv.databroker.v1 > get Vehicle.VehicleIdentification.BodyType
[get] OK
Vehicle.VehicleIdentification.BodyType: ( NotAvailable )sdv.databroker.v1 > set Vehicle.VehicleIdentification.BodyType Foo
[set] OK
Digital Auto: Playground
playground.digital.auto provides an in-browser, rapid prototyping environment utilizing the COVESA APIs for connected vehicles.
The UUID for Vehicle.VehicleIdentification.BodyType is e6d5c71ecec95d68b0b59bb7e93af759
Feedback
Do you think this Vehicle Signal specification needs enhancement? Do you want to discuss with experts? Try the following ressources to get in touch with the VSS community:
$ databroker-cli
sdv.databroker.v1 > connect
[connect] OK
sdv.databroker.v1 > get Vehicle.VehicleIdentification.Brand
[get] OK
Vehicle.VehicleIdentification.Brand: ( NotAvailable )sdv.databroker.v1 > set Vehicle.VehicleIdentification.Brand Foo
[set] OK
Digital Auto: Playground
playground.digital.auto provides an in-browser, rapid prototyping environment utilizing the COVESA APIs for connected vehicles.
The UUID for Vehicle.VehicleIdentification.Brand is 19fd645ff5385767bcdbf5dd4313483f
Feedback
Do you think this Vehicle Signal specification needs enhancement? Do you want to discuss with experts? Try the following ressources to get in touch with the VSS community:
$ databroker-cli
sdv.databroker.v1 > connect
[connect] OK
sdv.databroker.v1 > get Vehicle.VehicleIdentification.DateVehicleFirstRegistered
[get] OK
Vehicle.VehicleIdentification.DateVehicleFirstRegistered: ( NotAvailable )sdv.databroker.v1 > set Vehicle.VehicleIdentification.DateVehicleFirstRegistered Foo
[set] OK
Digital Auto: Playground
playground.digital.auto provides an in-browser, rapid prototyping environment utilizing the COVESA APIs for connected vehicles.
The UUID for Vehicle.VehicleIdentification.DateVehicleFirstRegistered is 046f47acf62e50bd863d6568d73743d7
Feedback
Do you think this Vehicle Signal specification needs enhancement? Do you want to discuss with experts? Try the following ressources to get in touch with the VSS community:
$ databroker-cli
sdv.databroker.v1 > connect
[connect] OK
sdv.databroker.v1 > get Vehicle.VehicleIdentification.KnownVehicleDamages
[get] OK
Vehicle.VehicleIdentification.KnownVehicleDamages: ( NotAvailable )sdv.databroker.v1 > set Vehicle.VehicleIdentification.KnownVehicleDamages Foo
[set] OK
Digital Auto: Playground
playground.digital.auto provides an in-browser, rapid prototyping environment utilizing the COVESA APIs for connected vehicles.
The UUID for Vehicle.VehicleIdentification.KnownVehicleDamages is e87f352cddb15e94b340506b17207586
Feedback
Do you think this Vehicle Signal specification needs enhancement? Do you want to discuss with experts? Try the following ressources to get in touch with the VSS community:
$ databroker-cli
sdv.databroker.v1 > connect
[connect] OK
sdv.databroker.v1 > get Vehicle.VehicleIdentification.MeetsEmissionStandard
[get] OK
Vehicle.VehicleIdentification.MeetsEmissionStandard: ( NotAvailable )sdv.databroker.v1 > set Vehicle.VehicleIdentification.MeetsEmissionStandard Foo
[set] OK
Digital Auto: Playground
playground.digital.auto provides an in-browser, rapid prototyping environment utilizing the COVESA APIs for connected vehicles.
The UUID for Vehicle.VehicleIdentification.MeetsEmissionStandard is d75dedbfadca54d8b6c7261c37ad5d83
Feedback
Do you think this Vehicle Signal specification needs enhancement? Do you want to discuss with experts? Try the following ressources to get in touch with the VSS community:
$ databroker-cli
sdv.databroker.v1 > connect
[connect] OK
sdv.databroker.v1 > get Vehicle.VehicleIdentification.Model
[get] OK
Vehicle.VehicleIdentification.Model: ( NotAvailable )sdv.databroker.v1 > set Vehicle.VehicleIdentification.Model Foo
[set] OK
Digital Auto: Playground
playground.digital.auto provides an in-browser, rapid prototyping environment utilizing the COVESA APIs for connected vehicles.
The UUID for Vehicle.VehicleIdentification.Model is dd3d3b72e6a85b3695ba25f829255403
Feedback
Do you think this Vehicle Signal specification needs enhancement? Do you want to discuss with experts? Try the following ressources to get in touch with the VSS community:
$ databroker-cli
sdv.databroker.v1 > connect
[connect] OK
sdv.databroker.v1 > get Vehicle.VehicleIdentification.OptionalExtras
[get] OK
Vehicle.VehicleIdentification.OptionalExtras: ( NotAvailable )sdv.databroker.v1 > set Vehicle.VehicleIdentification.OptionalExtras 0[set] OK
Digital Auto: Playground
playground.digital.auto provides an in-browser, rapid prototyping environment utilizing the COVESA APIs for connected vehicles.
The UUID for Vehicle.VehicleIdentification.OptionalExtras is d9ecc64b0c995595967e05009d6fc1b9
Feedback
Do you think this Vehicle Signal specification needs enhancement? Do you want to discuss with experts? Try the following ressources to get in touch with the VSS community:
$ databroker-cli
sdv.databroker.v1 > connect
[connect] OK
sdv.databroker.v1 > get Vehicle.VehicleIdentification.ProductionDate
[get] OK
Vehicle.VehicleIdentification.ProductionDate: ( NotAvailable )sdv.databroker.v1 > set Vehicle.VehicleIdentification.ProductionDate Foo
[set] OK
Digital Auto: Playground
playground.digital.auto provides an in-browser, rapid prototyping environment utilizing the COVESA APIs for connected vehicles.
The UUID for Vehicle.VehicleIdentification.ProductionDate is 5683877c4bac504d915b268c9476c190
Feedback
Do you think this Vehicle Signal specification needs enhancement? Do you want to discuss with experts? Try the following ressources to get in touch with the VSS community:
$ databroker-cli
sdv.databroker.v1 > connect
[connect] OK
sdv.databroker.v1 > get Vehicle.VehicleIdentification.PurchaseDate
[get] OK
Vehicle.VehicleIdentification.PurchaseDate: ( NotAvailable )sdv.databroker.v1 > set Vehicle.VehicleIdentification.PurchaseDate Foo
[set] OK
Digital Auto: Playground
playground.digital.auto provides an in-browser, rapid prototyping environment utilizing the COVESA APIs for connected vehicles.
The UUID for Vehicle.VehicleIdentification.PurchaseDate is 31302f8b57e85c4197afda3e3201fce8
Feedback
Do you think this Vehicle Signal specification needs enhancement? Do you want to discuss with experts? Try the following ressources to get in touch with the VSS community:
$ databroker-cli
sdv.databroker.v1 > connect
[connect] OK
sdv.databroker.v1 > get Vehicle.VehicleIdentification.VehicleConfiguration
[get] OK
Vehicle.VehicleIdentification.VehicleConfiguration: ( NotAvailable )sdv.databroker.v1 > set Vehicle.VehicleIdentification.VehicleConfiguration Foo
[set] OK
Digital Auto: Playground
playground.digital.auto provides an in-browser, rapid prototyping environment utilizing the COVESA APIs for connected vehicles.
The UUID for Vehicle.VehicleIdentification.VehicleConfiguration is 2526c7ba4c8458c78000a9e5f2fe89d5
Feedback
Do you think this Vehicle Signal specification needs enhancement? Do you want to discuss with experts? Try the following ressources to get in touch with the VSS community:
$ databroker-cli
sdv.databroker.v1 > connect
[connect] OK
sdv.databroker.v1 > get Vehicle.VehicleIdentification.VehicleInteriorColor
[get] OK
Vehicle.VehicleIdentification.VehicleInteriorColor: ( NotAvailable )sdv.databroker.v1 > set Vehicle.VehicleIdentification.VehicleInteriorColor Foo
[set] OK
Digital Auto: Playground
playground.digital.auto provides an in-browser, rapid prototyping environment utilizing the COVESA APIs for connected vehicles.
The UUID for Vehicle.VehicleIdentification.VehicleInteriorColor is 67a8b069b8bf573993d51959c24f04e2
Feedback
Do you think this Vehicle Signal specification needs enhancement? Do you want to discuss with experts? Try the following ressources to get in touch with the VSS community:
$ databroker-cli
sdv.databroker.v1 > connect
[connect] OK
sdv.databroker.v1 > get Vehicle.VehicleIdentification.VehicleInteriorType
[get] OK
Vehicle.VehicleIdentification.VehicleInteriorType: ( NotAvailable )sdv.databroker.v1 > set Vehicle.VehicleIdentification.VehicleInteriorType Foo
[set] OK
Digital Auto: Playground
playground.digital.auto provides an in-browser, rapid prototyping environment utilizing the COVESA APIs for connected vehicles.
The UUID for Vehicle.VehicleIdentification.VehicleInteriorType is 4c4eed302b2e51daa9b6f5f398987a77
Feedback
Do you think this Vehicle Signal specification needs enhancement? Do you want to discuss with experts? Try the following ressources to get in touch with the VSS community:
$ databroker-cli
sdv.databroker.v1 > connect
[connect] OK
sdv.databroker.v1 > get Vehicle.VehicleIdentification.VehicleModelDate
[get] OK
Vehicle.VehicleIdentification.VehicleModelDate: ( NotAvailable )sdv.databroker.v1 > set Vehicle.VehicleIdentification.VehicleModelDate Foo
[set] OK
Digital Auto: Playground
playground.digital.auto provides an in-browser, rapid prototyping environment utilizing the COVESA APIs for connected vehicles.
The UUID for Vehicle.VehicleIdentification.VehicleModelDate is c71b63f83dea536bac58e62bbe537f11
Feedback
Do you think this Vehicle Signal specification needs enhancement? Do you want to discuss with experts? Try the following ressources to get in touch with the VSS community:
$ databroker-cli
sdv.databroker.v1 > connect
[connect] OK
sdv.databroker.v1 > get Vehicle.VehicleIdentification.VehicleSeatingCapacity
[get] OK
Vehicle.VehicleIdentification.VehicleSeatingCapacity: ( NotAvailable )sdv.databroker.v1 > set Vehicle.VehicleIdentification.VehicleSeatingCapacity 0[set] OK
Digital Auto: Playground
playground.digital.auto provides an in-browser, rapid prototyping environment utilizing the COVESA APIs for connected vehicles.
The UUID for Vehicle.VehicleIdentification.VehicleSeatingCapacity is 7ae5db0e0482555686b9be71dd8a0c38
Feedback
Do you think this Vehicle Signal specification needs enhancement? Do you want to discuss with experts? Try the following ressources to get in touch with the VSS community:
$ databroker-cli
sdv.databroker.v1 > connect
[connect] OK
sdv.databroker.v1 > get Vehicle.VehicleIdentification.VehicleSpecialUsage
[get] OK
Vehicle.VehicleIdentification.VehicleSpecialUsage: ( NotAvailable )sdv.databroker.v1 > set Vehicle.VehicleIdentification.VehicleSpecialUsage Foo
[set] OK
Digital Auto: Playground
playground.digital.auto provides an in-browser, rapid prototyping environment utilizing the COVESA APIs for connected vehicles.
The UUID for Vehicle.VehicleIdentification.VehicleSpecialUsage is 7e6e8a48f54a5549a8f6af8f1dc5eb8d
Feedback
Do you think this Vehicle Signal specification needs enhancement? Do you want to discuss with experts? Try the following ressources to get in touch with the VSS community:
$ databroker-cli
sdv.databroker.v1 > connect
[connect] OK
sdv.databroker.v1 > get Vehicle.VehicleIdentification.VIN
[get] OK
Vehicle.VehicleIdentification.VIN: ( NotAvailable )sdv.databroker.v1 > set Vehicle.VehicleIdentification.VIN Foo
[set] OK
Digital Auto: Playground
playground.digital.auto provides an in-browser, rapid prototyping environment utilizing the COVESA APIs for connected vehicles.
The UUID for Vehicle.VehicleIdentification.VIN is 6f0b6fa8c34f589baa92e565bc9df5bd
Feedback
Do you think this Vehicle Signal specification needs enhancement? Do you want to discuss with experts? Try the following ressources to get in touch with the VSS community:
$ databroker-cli
sdv.databroker.v1 > connect
[connect] OK
sdv.databroker.v1 > get Vehicle.VehicleIdentification.WMI
[get] OK
Vehicle.VehicleIdentification.WMI: ( NotAvailable )sdv.databroker.v1 > set Vehicle.VehicleIdentification.WMI Foo
[set] OK
Digital Auto: Playground
playground.digital.auto provides an in-browser, rapid prototyping environment utilizing the COVESA APIs for connected vehicles.
The UUID for Vehicle.VehicleIdentification.WMI is e7c86defbcd554a79f90ba85de58e133
Feedback
Do you think this Vehicle Signal specification needs enhancement? Do you want to discuss with experts? Try the following ressources to get in touch with the VSS community:
$ databroker-cli
sdv.databroker.v1 > connect
[connect] OK
sdv.databroker.v1 > get Vehicle.VehicleIdentification.Year
[get] OK
Vehicle.VehicleIdentification.Year: ( NotAvailable )sdv.databroker.v1 > set Vehicle.VehicleIdentification.Year 0[set] OK
Digital Auto: Playground
playground.digital.auto provides an in-browser, rapid prototyping environment utilizing the COVESA APIs for connected vehicles.
The UUID for Vehicle.VehicleIdentification.Year is 9a76b0aca8e45f6fb33dbaf5b976b8b5
Feedback
Do you think this Vehicle Signal specification needs enhancement? Do you want to discuss with experts? Try the following ressources to get in touch with the VSS community:
Do you think this Vehicle Signal specification needs enhancement? Do you want to discuss with experts? Try the following ressources to get in touch with the VSS community:
$ databroker-cli
sdv.databroker.v1 > connect
[connect] OK
sdv.databroker.v1 > get Vehicle.VersionVSS.Label
[get] OK
Vehicle.VersionVSS.Label: ( NotAvailable )sdv.databroker.v1 > set Vehicle.VersionVSS.Label Foo
[set] OK
Digital Auto: Playground
playground.digital.auto provides an in-browser, rapid prototyping environment utilizing the COVESA APIs for connected vehicles.
The UUID for Vehicle.VersionVSS.Label is 7c92cd50d24b5662922b27cb9a327e53
Feedback
Do you think this Vehicle Signal specification needs enhancement? Do you want to discuss with experts? Try the following ressources to get in touch with the VSS community:
$ databroker-cli
sdv.databroker.v1 > connect
[connect] OK
sdv.databroker.v1 > get Vehicle.VersionVSS.Major
[get] OK
Vehicle.VersionVSS.Major: ( NotAvailable )sdv.databroker.v1 > set Vehicle.VersionVSS.Major 3[set] OK
Digital Auto: Playground
playground.digital.auto provides an in-browser, rapid prototyping environment utilizing the COVESA APIs for connected vehicles.
The UUID for Vehicle.VersionVSS.Major is 5edf1a338c975cbb84d4ce3cfe1aa4b4
Feedback
Do you think this Vehicle Signal specification needs enhancement? Do you want to discuss with experts? Try the following ressources to get in touch with the VSS community:
$ databroker-cli
sdv.databroker.v1 > connect
[connect] OK
sdv.databroker.v1 > get Vehicle.VersionVSS.Minor
[get] OK
Vehicle.VersionVSS.Minor: ( NotAvailable )sdv.databroker.v1 > set Vehicle.VersionVSS.Minor 1[set] OK
Digital Auto: Playground
playground.digital.auto provides an in-browser, rapid prototyping environment utilizing the COVESA APIs for connected vehicles.
The UUID for Vehicle.VersionVSS.Minor is 6e70a598dbc7534c96c58c18e9888cfd
Feedback
Do you think this Vehicle Signal specification needs enhancement? Do you want to discuss with experts? Try the following ressources to get in touch with the VSS community:
$ databroker-cli
sdv.databroker.v1 > connect
[connect] OK
sdv.databroker.v1 > get Vehicle.VersionVSS.Patch
[get] OK
Vehicle.VersionVSS.Patch: ( NotAvailable )sdv.databroker.v1 > set Vehicle.VersionVSS.Patch 1[set] OK
Digital Auto: Playground
playground.digital.auto provides an in-browser, rapid prototyping environment utilizing the COVESA APIs for connected vehicles.
The UUID for Vehicle.VersionVSS.Patch is 69858f224af459338b9bfbff436dda45
Feedback
Do you think this Vehicle Signal specification needs enhancement? Do you want to discuss with experts? Try the following ressources to get in touch with the VSS community:
The following is a list of VSS supported built-in datatypes:
Name
Type
Min
Max
uint8
unsigned 8-bit integer
0
255
int8
signed 8-bit integer
-128
127
uint16
unsigned 16-bit integer
0
65535
int16
signed 16-bit integer
-32768
32767
uint32
unsigned 32-bit integer
0
4294967295
int32
signed 32-bit integer
-2147483648
2147483647
uint64
unsigned 64-bit integer
0
2^64 - 1
int64
signed 64-bit integer
-2^63
2^63 - 1
boolean
boolean value
0/false
1/true
float
floating point number
-3.4e -38
3.4e 38
double
double precision floating point number
-1.7e -300
1.7e 300
string
character string
n/a
n/a
Min, max and default values defined in a Vehicle Signal Specification must be in the supported range of the data type.
6 - Incubator
The Leda Incubator project is a place for new software-defined-vehicle related software components which are in incubation state.
The goal of the Eclipse Leda Incubator is to foster collaboration in the Eclipse Software Defined Vehicle (SDV) ecosystem, and hopefully results in work proceeding to contribution by their original authors into upstream projects. The Eclipse Leda Incubator would not make any releases itself.
The project hosts software-defined vehicle components which are fitting into the general Eclipse Leda scope, but do not fit to either being part of Leda itself, which should be upstreamed into other projects in the future, or which are still highly experimental and should not be considered for any kind of production use.
6.1 - Cloud Connector
The cloud connector is used in the context of Device Provisioning and cloud backend connectivity.
Overview
Leda Cloud Connector for Azure IoT Hub is a fork (extended and adapted) of the generic Eclipse Kanto’s Azure connector that is being able to process cloud-to-device and device-to-cloud messages as defined for the Software-Defined Vehicle cloud backend.
Runtime
The SDV cloud connector will come up with pluggable architecture that will allow easy transformation of the incoming cloud-to-device command messages (SDV message envelope) to a format suitable and understandable by the rest of the in-vehicle components and vice-versa. It shall be possible to map SDV messages to and from Eclipse Hono and Eclipse Ditto messages using simple configuration, rules written in JSON; thus allowing this component to work together with other Eclipse Kanto components too.
The Cloud Connector can either be installed natively into the system image by using the respective Yocto recipe leda-contrib-cloud-connector_git.bb, or the cloud connector can be deployed as a container.
Native Installation
A native installation has the advantage that no additional container runtime is required. In some vehicle system architectures, there are separate devices for connectivity and for general computation. The actual physical device for connectivity may hence have less ressources available which then requires a native installation of such core components.
Add the recipe to the image in your Yocto configuration:
IMAGE_INSTALL+="leda-contrib-cloud-connector"
Override the configuration in /etc/cloud-connector/config.json
Create the device certificate
The cloud-connector can be managed (start, stop, restart) using systemd: systemctl restart cloud-connector
Container Installation
When the connectivity components can be deployed on the more generic compute module, where a container runtime is available, the cloud connector can also be deployed as a container. This is the default for the Eclipse Leda quickstart images.
Initial deployment and configuration steps are:
On first start, the auto deployment will deploy and start the cloud connector container automatically, but with invalid default values or missing device certificates.
The user needs to adapt the device authentication to suit his needs, e.g. creating and providing a device certificate. Check the /data/containers/cloud-connector.json deployment descriptor for the correct location of the certificate files.
After this configuration has been done once, the container needs to be restarted using the Kanto CLI: kanto-cm restart -n cloud-connector
6.2 - OpenTelemetry Integration
The OpenTelemetry integration shall be used to connect the edge device’s application log files to an existing DevOps infrastructure on the cloud side.
Status: Open for initial contribution
Background
The legacy approach to logging of vehicle applications is outdated and prevents application developers from retrieving near-time information
on the application’s health in a fleet. Existing log or remote diagnostic systems for vehicles may still use a “file upload on remote request” approach.
For a more streamlined and updated way of accessing applications logs, the idea is to expore the use of current Cloud DevOps methods and
technologies and apply them to remote vehicle edge system devices.
Goals and Wishlist
Collect logs from containerized applications (and system logs) on the edge device
Control the edge’s log manager configuration remotely and on-demand:
Enable and disable
One-shot activation schedules
Changing log levels
Apply filtering or sampling configurations
Trigger logging based on locally evaluated, dynamic conditions (IF condition=true THEN stream logs and metrics of app X for 15 minutes)
Retrieve and stream log messages from the edge device to an existing cloud backend (e.g. Grafana, Loki, ELK, Prometheus).
The point here being that the endpoints should be vendor-neutral and use open standard protocols.
Retrieve application logs in different ways:
streamed near-time debug/trace logs for application developers in development and testing environments
streamed error logs for fleet operators for production environments
packaged, file-based logs for offroad (offline) vehicles
Retrieve container metrics, such as CPU, memory, disk i/o, network usage and other I/O
This is interesting for application developers, for system integrators and for fleet operators to optimize their products and services.
Enable distributed tracing of application requests using span IDs, trace IDs or correlation IDs
For future troubleshooting and support purposes, an integration of cloud-side applications and edge-side applications into commercial operation
of distributed vehicle systems may become necessary.
The self update agent is used in the context of OTA Self Updates.
Overview
The Self Update Agent (SUA) as part of the Eclipse Leda Incubator project proposal is a software component responsible for performing updates of system-level components of the connectivity device, such as
Boot Loader
Operating System
Device Firmware
Hardware Drivers
… other parts of the system, which cannot be deployed as containerized packages or may require a reboot of the device.
Implementation and Deployment
SUA is using the RAUC framework via D-Bus calls, but it is designed in a way that switching to other updating solution shall be possible. SUA may be controlled by an external higher-level orchestration component via defined MQTT messages, which carry necessary for update data, such as version and URL of the update bundle. Update process feedback and the end result are also communicated via defined MQTT messages. Software Update Agent is implemented in C++ and configured to be running inside of a container.
A native installation has the advantage that no additional container runtime is required. In some vehicle system architectures, there are separate devices for connectivity and for general computation. The actual physical device for connectivity may hence have less ressources available which then requires a native installation of such core components.
Add the recipe to the image in your Yocto configuration:
IMAGE_INSTALL+="leda-contrib-self-update-agent"
The self update agent can be managed (start, stop, restart) using systemd: systemctl restart self-update-agent
Container Installation
When the component can be deployed on the more generic compute module, where a container runtime is available, the self update agent can also be deployed as a container. This is the default for the Eclipse Leda quickstart images.
Initial deployment and configuration steps are:
On first start, the auto deployment will deploy and start the self update agent container automatically.
The self update agent will then connect to the locally running mosquitto server, awaiting update requests.
The default configuration will use the location /data/selfupdates/ to write and read update files.
Vehicle Update Manager (VUM) is an extended version of the Eclipse Kanto Container Manager that is being able to handle new desired state for the software on the whole vehicle device.
Implementation
The desired state comes as a multi document YAML content and it includes a list of container resources:
Container
Configuration
VUM detects the system-level update custom resource and passes it for further processing to the Self Update Agent.
VUM also monitors the self-update agent and the control plane, and compiles and report the current state of the device.
Running BitBake to build your own images requires some extra setup on the build machine. Please see the following chapters for more information about the build process itself and how to setup a development and build infrastructure.
For reporting security vulnerabilities, please follow our Security Policy.
7.1 - Concepts
The example build configurations in this repository are based on the official BitBake Quickstart tutorial and have been extended to include Leda SDV components.
Build Setup
To set up your own BitBake build configuration, follow the BitBake documentation and include meta-leda in your bblayers.conf and add the SDV packages into your local.conf.
The Leda build is mainly using the kas tool for a simplified maintenance of the BitBake Configuration files. The kas configuration files are located in kas/
The SDV.EDGE stack is based on a containerized architecture and the intention is to have as much components containerized as possible, to ensure a high degree of isolation and updateability. To ensure some degree of flexibility and control, certain core components may also be installed as native services.
To automatically deploy the containers of the SDV reference implementation and example applications and services, the build configurations will deploy a couple of deployment specifiction files into the auto-deployment folder /data/var/containers/manifests.
At start time, these containers will be automatically deployed:
Cloud Connector
Self Update Agent
Vehicle Update Manager
Vehicle API / Vehicle Abstraction Layer
Data Broker (Eclipse Kuksa)
Example Seat Service (CAN-bus implementation)
For a full list of containers, see meta-leda-components/recipes-sdv/eclipse-leda/kanto-containers
Recipes for containerized applications
OpenEmbedded’s meta-virtualization already contains some recipes and reusabled classes for building virtualization and containerized applications.
meta-leda extends that functionality by using skopeo to package container images. To minimize the runtime requirements (dependencies, disk usage), an approach to pre-load container images and its layers directly into the content storage of the container runtime is followed.
Building containers with Yocto
For components which can either be installed natively or as container, it can be beneficial to build these containers using Yocto as well. An example is in meta-leda-distro-container/recipes-sdv/sdv-containers/cyclonedds-example-container_0.1.bb.
7.2 - Metalayer
Initializing BitBake environment
Initialize the build environment and start the build for QEMU:
kas build kas/leda-qemux86-64.yaml
Building specific recipes
General usage:
kas build kas/leda-qemux86-64.yaml --target <recipename>
Metalayer Structure
meta-leda-bsp
\-- classes // Reusable BitBake Classes, eg for offline container image pre-caching
\-- conf // Distribution specific configurations, eg version numbers, release codename
\-- recipes-bsp // Board Support Packages, eg specifics for QEMU and Raspberry Pi
meta-leda-components
\-- classes // Reusable BitBake Classes, eg for offline container image pre-caching
\-- conf // Distribution specific configurations, eg version numbers, release codename
\-- recipes-sdv
|-- eclipse-leda // Build recipes for Eclipse Leda Incubator components
|-- eclipse-kuksa // Build recipes for Eclipse Kuksa
|-- eclipse-cyclonedds // Build recipes for Eclipse CycloneDDS
|-- northstar // Build recipes for Northstar Container Runtime
|-- packagegroups // Grouping packages
\-- sdv-base // SDV Base Bundle: fstab, can0.network
|--- base-files
|--- SDV Core Utilities
\--- SDV Utilities
|-- sdv-containers // Container images recipes for pre-caching / airgap installation
|--- Cloud Agent
|--- Data Broker
|--- Feeder CAN
|--- OTel Collector
|--- Self Update Agent
|--- Vehicle Update manager
|--- Example Seat Service
\--- ...
|-- sdv-core // SDV Core Bundle
|--- SDV RAUC Bundle // RAUC Update Bundle Manifest
\-- tools // Convenience tools for the "full" image, eg nerdctl and kantui
meta-leda-distro
\-- classes // Reusable BitBake Classes, eg for offline container image pre-caching
\-- conf // Distribution specific configurations, eg version numbers, release codename
\-- recipes-containers // Container related configuration recipes (containerd, nerdctl)
\-- recipes-core // Core recipes (base-files, systemd)
\-- recipes-kernel // Kernel configuration, eg kernel modules, logging, virtio
\-- recipes-sdv-distro // Image definitions
\-- wic // WIC Kickstarter files - Partition layouts
meta-leda-distro-container
\-- classes // Reusable BitBake Classes, eg for offline container image pre-caching
\-- conf // Distribution specific configurations, eg version numbers, release codename
\-- recipes-sdv // Build containers with Yocto
Base Bundle
Contains the recipes to build and install the minimal set of dependencies for the SDV stack on the edge device. With these minimal components, the SDV stack should be able to bootstrap itself.
CAN-Bus Kernel Configuration
To enable support for CAN bus related modules, the kernel needs to be reconfigured. This is done by the sdv-canbus-modules.inc include file in the recipes-kernel/linux folder, which patches Poky’s linux-yocto recipe.
Verifying and displaying the current kernel configuration: bitbake -e virtual/kernel
To verify the recipe and the kernel configuration: bitbake linux-yocto -c kernel_configcheck -f
The kernel config file can be found in:
./tmp/work/qemux86_64-poky-linux/linux-yocto/*/linux-qemux86_64-standard-build/.config
Core Bundle
Contains the recipes to build and install additional SDV components, which are required for a proper runtime setup.
Containers
Contains the recipes for pre-installing specific containers into the container management at runtime. This is mainly for pre-caching container image layers onto the device to speed up the initial deployment but can also be used to enable offline usecases.
Build Host System Requirements
Yocto Project 4.0 (kirkstone) or higher
100GB+ free disk space per build configuration
Online connection for fetching sources and container images
7.3 - Setup development environment
There are multiple variants on how to set up a build environment:
with GitHub Codespaces - recommended for developers with restricted internet access, such as corporate proxies, or with Windows hosts
When using GitHub Codespaces with submodules and private repositories,
a separate tool for git authentication is required (see VSCode issue #109050), as the authentication token provided to the GitHub Codespaces virtual machine only allows access to the main repository.
curl -LO https://raw.githubusercontent.com/GitCredentialManager/git-credential-manager/main/src/linux/Packaging.Linux/install-from-source.sh &&
sh ./install-from-source.sh &&
git-credential-manager-core configure
7.3.1.1 - Advanced topics
Git Authentication
For private repositories, we need to separately authenticate against the submodule repositories, as
GitHub Codespaces will only inject a token with access rights to the current repository.
After setting up your VSCode DevContainer or GitHub Codespace you can proceed with the actual build process. Here you have two choices - either using the kas-build system or setting up the build manually.
Building with kas
This is the easiest way to build leda semi-automatically
cd /workspaces/meta-leda-fork/
Open the VSCode terminal and run kas build
Note: you can alter the build options by modifying the .config.yaml file in the trunk of the repository
Building manually
You can also build Leda manually if more customization of the build process is required.
export LEDA_WORKDIR=/workspaces/meta-leda-fork/
cd ${LEDA_WORKDIR}
Clone the Poky repository with the required release, e.g. kirkstone and pull updates if necessary:
You can also build one of the target recipies this way:
DISTRO=leda bitbake kanto-container-management
Note: in this case you can set the target architecture and other build options in the build/local.conf file
7.3.5 - Restricted Internet
Developers working in a corporate environment may face challenges when building Leda-based images, pulling SDV containers, etc.,
usually due to a restrictive corporate proxy. Thus the objective of this page is to collect helpful guides for mitigating such problems.
HTTP(S) proxy
First you might need to configure your http(s) SOCKS proxy such that the BitBake shell uses it for do_fetch recipe tasks. By default, http_proxy and https_proxy
environment variables are part of the BB_ENV_PASSTHROUGH list and are directly passed from the current environment to BitBake. If you are still facing http(s)_proxy
issues during do_fetch tasks, you might want to check the Working Behind a Network Proxy @ Yocto Project Wiki.
GOPROXY
GOPROXY is a golang-specific mechanism for fetching dependencies during build-time. What is more, gomod-type BitBake recipes pull their external dependencies during
the do_compile task, instead of the do_fetch task leading to further issues. The simplest workaround is to set-up a local (caching) goproxy container on
the build host and make BitBake use that. The following steps assume that the build host has docker installed and working, with access to the docker hub registry.
Hosting a local goproxy server
Start by setting up the goproxy container in host networking mode.
NOTE: Don’t forget to substitute <PROXY_IP> and <PROXY_PORT> with the appropriate address of your HTTP(S) proxy.
This will start a local caching goproxy on port 8081 with a volume named cacheDir for caching the downloaded Go packages. The goproxy container can be configured
further to provide access to private Go-package registries. For more information on its configuration take a look at goproxyio/goproxy on GitHub.
Using the local goproxy server for BitBake builds
Since the main objective of BitBake/kas is to facilitate reproducible builds, only certain variables from the host environment are used for the build. Go, however,
looks at the GOPROXY environmental variable to decide on which proxy to use. That’s why you should first start by exporting the GOPROXY variable in the terminal
from which you will later run the build:
exportGOPROXY="http://127.0.0.1:8081"
To make BitBake use the value of the variable you just exported for the build, you should add it to its “environment passtrough” list:
If you are using kas as a top-level build tool, to set the value of the GOPROXY variable for builds, all you need to do is to add it the env-section of your
kas-config yaml. For example:
Kas will handle the exporting of the variable and adding it to BitBake’s passtrough list automatically from there.
Airgapped container installation
Sometimes devices might not have internet access on first boot and therefore the SDV containers that are needed for provisioning and updating a SDV-image
will not be available.
Build-Time
The meta-leda layer provides an opitional distro feature that pre-downloads and injects a minimal set of SDV container images in Kanto’s local container registry
on first boot.
IMPORTANT: This will lead to a significant increase of the image size since all containers are downloaded as self-contained tarballs and therefore “layer reuse”
is not possible.
To enable this distro feature, add to your local.conf:
If you are using the sdv-image-data image recipe packagegroup-sdv-airgap-containers will be automatically installed when the distro-feature is enabled.
Therefore all you need to add to your local.conf will be:
Note: If you see a message from ctr that the “image might be filtered out” this means that you might have pulled an image for an architecture that
does not match the one of your device.
The image is then reachable via ssh root@192.168.7.2
This will write a file qemu.pid in the current directory including the process ID of QEMU. Once done, kill -9 <qemu.pid> kills the process.
Running with kas-shell
If you’ve chosen to build the Leda image with kas, you can use the kas-shell to run QEMU, with kas setting up the environment for you. To do that change to the main working directory and run:
kas shell -c 'runqemu slirp nographic ovmf sdv-image-full'
DHCP Configuration
As the Leda Quickstart image will try to retrieve its IP address via DHCP broadcast request, it is good to run a DHCP daemon on the host, listening on the respective TAP network interface of QEMU. This will then simulate a LAN with DHCP server and let’s us control which IP address gets assigned to multiple QEMU instances.
The run-dhcp.sh utility will run an ISC-DHCP server on the host. The default configuration has a couple of MAC addresses preconfigured.
7.5 - Automated Tests
Eclipse Leda is using the Robot Framework for black box tests and system tests.
The black box tests are supposed to only use public API from SDV components, for example the MQTT interface of the Self Update Agent.
The system tests are supposed to test on Leda Distro level and can use shell and SSH commands to verify system behavior, e.g. performing a reboot.
Test Execution: an external trigger, such as the ./test-docker.sh shell script, starts the leda-tests container.
Docker Compose ensures that the needed containers are built and started.
The test cases and test resources are copied into the leda-tests container at build time.
The Robot process is started and performs the execution of all test cases
Black box test cases use the MQTT interface to connect to the test target and publish messages
System level test cases use SSH to connect to the test target and execute commands
Test reports are written to a mounted volume, so that they are available on the host for further processing
Run the tests
The easiest way to run the test cases is to run it in the Docker Compose setup:
Optional: Build both images (qemuarm64 and qemux86-64) using kas / BitBake. If you omit this step, docker compose will download the latest container images from the Eclipse Leda Container Registry on ghcr.io.
kas build kas/leda-qemux86-64.yml
kas build kas/leda-qemuarm64.yml
Switch to the docker-snapshot directory:
cd resources/docker-snapshot/
Run the Leda Tests
./test-docker.sh
Test Reports
The output of test-docker.sh will show the test results from Robot.
The test reports and debug logs are available on the host’s filesystem in the path resources/docker-snapshot/leda-tests-reports
output.xml - The main Robot output report
report.html - A Robot HTML summary report
leda-tests-xunit.xml - A xUnit report file suitable for rendering with various tools
log.html - A Robot HTML report with the test execution log
leda-tests-debug.log - Debug log file of the test execution, helpful during implementation of test cases and troubleshooting of failed tests
The xunit report is being used to visualize the test execution results in the GitHub Workflow:
Example Test Report:
Adding new tests
The tests are located in the following locations of the leda-distro repository:
resources/docker-snapshot/dockerfiles/leda-tests - Robot Tests which are executed inside of a Docker Compose setup
tests/src/robot - Robot Tests which can be executed on the build host with a Leda Runqemu instance running
General steps are:
Decide whether to implement a system-level test or a black-box integration test
Add the test case to an existing, matching .robot file. If no matching test suite can be found, create a new .robot file. Prefix with the order number, e.g. 33__my-new-test.robot
Check if a refactoring of new keywords may be worthwhile for better reusability.
7.5.1 - Robot Keywords
In the Leda Robot Tests, keywords are used for reusable functionality. Common keywords are defined in resources/docker-snapshot/dockerfiles/leda-tests/leda_keywords.resource
The goal is to treat the Leda Quickstart image as a black box, utilizing as much as possible with public APIs.
Interaction with Self Update Agent
Trigger to start update: Send a “Desired State Request” to the target, to install a RAUC Update Bundle
Connect and Subscribe to Listen: Wait for the asynchronous messages which indicate a successful installation of an update
Arbitrary Commands
Nevertheless, during implementation of test cases, it may be necessary to execute lower level processes for system level tests. For that, a fallback is possible to execute arbitrary test commands via remote SSH connection. These commands are executed through another docker container running in the same Docker network (leda-network) and allow access to the target QEMU instances:
Leda Execute: Execute an arbitrary shell command via SSH on the test target
7.5.2 - Rust Tests
Note: The Rust tests are being replaced with test cases implemented in Robot.
Cross Compiling to X86_64 on Ubuntu 20.04
There is currently a step to cross-compile tests to X86_64. In order to successfully run the step, you need to make sure that the following artifacts are available on the runner:
rustc + cargo: curl https://sh.rustup.rs -sSf | sh
You may restart your current shell so that all components are available as env vars.
7.6 - GitHub Workflow
Manually creating a Release triggers the release workflow.
The release workflow calls the build workflow.
The build workflow indirectly depends on the sstate cache being prebuilt manually (see optimizations below)
The build workflow runs a full build of the SDV-Image-All disk image for all target machines.
A separate job is used for each target machine, to ensure an image build for a target machine can finish within 6 hours.
Each build contains the creation of SBOM artifacts and the check for CVEs. The SBOM artifacts are in SPDX JSON format and packaged per target machine’s disk image (SDV-Image-Full to include all packages).
The OSS License Scanning (using the OSS Review Toolkit) is done asynchronously on a separate fork, as it currently uses a proprietary infrastructure. The ORT-based infrastructure of Eclipse is planned to be used in the future. The web report is attached as a build artifact on the internal fork and not accessible by public currently.
Once the build workflow’s jobs are finished, the release workflow will finalize by attaching the release artifacts as assets to the release.
Note: While the build workflow and release workflows are in progress, the GitHub release page of that release does not show any other assets besides the source archives. The release artifacts (eclipse-leda-.tar.xz) will only be visible once all workflows have finished.
Limitations on standard runners
As the GitHub-managed runners are optimized for ephemeral build use cases and a Yocto-based build process is very consuming in regards to CPU and disk capacity, a few optimizations need to be done before being able to run a full build or even a release workflow on limited GitHub-managed standard runners.
In general, GitHub recommends to split a build process into smaller chunks, which can then fit into the constraints.
Optimizations
The following optimizations have been implemented for the Eclipse Leda public repository and its build workflow:
Remote SState Cache: To minimize build time and disk usage, a remote sstate-cache mirror is being used. The mirror is hosted by one of the project sponsors on european Azure infrastructure and available as public HTTP mirror to anonymous Leda builds. The mirror is provided as best-effort, does not provide any kind of service level and may not be available at all times.
Note: To use the mirror, set the BB_HASHSERVE, MIRROR_SERVER, SSTATE_MIRRORS and related configuration settings. See the mirrors.yaml for a full sample.
Prebuilding: To fill the remote sstate cache mirror, another build infrastructure is being used. The repository fork has been configured with additional credentials to authenticate against the remote mirror for uploading the built packages. To ensure these steps are not run on the public OSS repository, the workflow steps use additional conditions to check for the owner of the repository. This is a workaround due to a known issue on GitHub Actions.
Chunking of the build steps: To minimize bandwidth transfer, a local GitHub Action Cache is being used. This cache is per target machine and filled with a separate workflow. The Prebuild sstate build jobs will run the BitBake process for 4 hours and then gracefully shut down. The build process will finish the current tasks. The remaining time (max. runtime for GitHub Runners is 6 hours) is used to package and upload the packages to the cache. If the 4 hours of build time are not enough, it may be required to re-run the same job more often.
Note: The disadvantage of this approach is that each run requires a significant lead time where the remote cache is downloaded, the recipes get parsed again, the build task dependencies are compiled etc. On a persistent runner, this time can be spared.
Rerun on sstate miss: When BitBake is missing a package in the sstate mirror (it may exist in the Hash Equivalence Server though), BitBake will log an Error and continue to run the recipe. However, as the cache-miss is logged as error, BitBake will exit with an error code, indicating a failed build, which in turn would mark the GitHub Job as failed, too. To circumvent this problem, the BitBake build process is executed in a loop (max. 3 retries) to ensure that with the current state, all packages can be built without errors, eventually succeeding with the buid.
Always upload GitHub Cache: Under normal circumstances, the GitHub Cache action will update the cache on success of the build job - to not poison the cache with failed builds. However, as the Leda build workflows run for a very long time and may fail due to other reasons, the goal is to still reuse the sstate-cache as much as possible. For that reason, the pat-s/always-upload-cache GitHub action is being used, as it will also upload the cache on failed builds.
7.7 - Runqemu
The content of this page has been marked outdated by the core development team.
If you would like to contribute and help keeping this documentation up to date,
please fork https://github.com/eclipse-leda/leda
and create a pull request.
QEMU’s command line option can get quiet complex. Yocto is providing a convenient wrapper script called runqemu, which takes configurations into account which have been populated during the build process and also takes care of TAP networking setup and teardown. Unfortunately, it can only be used within an OpenEmbedded build environment.
Running without runqemu: when you need more control over qemu options
/workspaces/leda-distro/build-sdv-x86_64 (imageformatcleanup ✗) $ ls -al /dev/kvm
crw-rw---- 1 root kvm 10, 232 May 16 06:46 /dev/kvm
7.8 - License Compliance
The Eclipse Leda distro is being scanned, audited and reviewed for OSS license and IP compliance.
The current state of this progress is shown in this documentation.
Our friends from the Eclipse Oniro project
have been so kind to set up a build and scan for Eclipse Leda as well.
We’re currently reusing that infrastructure, until we can either merge the
build infrastructure or set it up on our own, depending on how things continue.
There are additional BitBake / kas configurations, which need to be used for the build before the OSS compliance toolchain can be used with the build directory:
The scanned licenses report contains all potentially used license types. For each finding, a human audit is required for deciding which license is actually being in use.
Numbers: 41% percent don’t need human audit, 50% has been manually audited and cleared, 10% work is left to do
Package
Status
Expected License Result
Risk
Task
containerd
Audit Open
Apache-2.0, BSD
Green
elfutils
Audit Open
GPL-3.0
Red
Remove/Replace: Why is it installed?
expat
Audit Open
MIT
Green
gcc
Audit Open
GPL-3.0
Red
Remove: No need for gcc on Leda image
libgcc
Audit Open
GPL-3.0
Red
Remove: No need for gcc on Leda image
json-glib
Done
Partly GPL-3.0
Yellow
Check which parts are GPL-3.0
libffi
Audit Open
Partly GPL-3.0
Yellow
Needed? Check which parts are GPL-3.0
libidn2
Done
Partly GPL-3.0
Yellow
Needed? Check which parts are GPL-3.0
libunistring
Done
Partly GPL-3.0
Yellow
Needed? Check which parts are GPL-3.0
libxcrypt
Audit Open
Mixed
Red
Check licenses, Needed?
linux-firmware-rpidistro
Done
Mixed
Red
Check licenses
onig
Audit Open
BSD-2
Red
Check licenses, Needed?
popt
Audit Open
FSF, Mixed
Red
Check licenses, Needed?
rauc
Audit Open
Apache-2.0
Green
runc-opencontainers
Done
BSD-3
Green
sudo
Audit Open
BSD-3
Green
zstd
Done
Partly GPL-3.0
Yellow
Needed? Check which parts are GPL-3.0
kanto-auto-deployer
Audit Open
Apache-2.0, EPL-2.0
Green
linux-raspberrypi
Done
GPL-2.0 + 50 others
Green
Check other licenses
Note: excerpt, current work in progress
Yocto Configuration
Our distro configuration and the image definitions use the following license-compliance related settings:
INHERIT+="archiver"ARCHIVER_MODE[src]="patched"COPYLEFT_LICENSE_INCLUDE='GPL* LGPL*'COPYLEFT_LICENSE_EXCLUDE='CLOSED Proprietary MIT BSD'COPYLEFT_RECIPE_TYPES="target"ARCHIVER_MODE[mirror]="combined"# Some licenses require the license text to accompany the binary. You can achieve this by adding the following:COPY_LIC_MANIFEST="1"COPY_LIC_DIRS="1"LICENSE_CREATE_PACKAGE="1"# Vulnerability ScanningINHERIT+="cve-check"
A new release is triggered manually from its GitHub web page Releases section. By
clicking on the Draft new release button, the release process starts:
Select a branch to use as code base for the release
With Publish the release action the release workflow located in .github/workflows/release.yml will be triggered. This
will start building the distro image files for the supported platforms, running the test cases and generating reports as
junit xml and license scanning. If the image generation and the test runs are successful the artifacts: images, test
binaries and qa reports will be attached as assets to the release.
The build (build.yml) and release (release.yml) workflows share a common reusable workflow (base.yml). In this way the
release workflow repeats the build actions without duplicating the code.
Note: These are just for manual testing, as we intend to extend the automated tests as much as possible.
Operating system level
Run sdv-health on the shell
Verify disk partitions and RAUC status, e.g. rauc status
Verify network interface and CAN-Bus with ip addr
Container runtime
Check status of containers with kantui
7.11 - Developing and Maintaining Utils
The Leda teams provides some custom utilities that allow for a more integrated end-user experience. They can be found in the main leda-utils repository on GitHub: eclipse-leda/leda-utils.
The following pages are meant to serve as both internal documentation and general guidelines when developing for Leda.
Bash
Leda uses the classic Bourne shell as its main shell, thus all scripts should be sh-compatible (use the #!/bin/sh shebang). As a Poky+OE-based distro we use BusyBox for core-utils. To check explicitly for “bashisms” in your scripts, the
checkbashisms tool might be useful.
The current main branch for leda-distro (and meta-leda) is based on the Kirkstone Yocto/Poky release.
Toolchain version
The version of the Rust toolchain available in OE (Kirkstone) is 1.59.0. Make sure to target 1.59.0 (or earlier) when developing Rust-based utils for leda. To set 1.59.0 as your default Rust version on your development machine:
This will make sure the Cargo.lock is re-generated with packages matching the Rust version. The cargo.bbclass on which Rust recipes are based, requires all Rust crates + their version (matching the Cargo.toml) to be specified as a “SRC_URI +=”. This can become tedious and error-prone if done by hand. That’s why meta-rust provides a tool called cargo-bitbake that generates a minimal recipe with all the crates it finds in the Cargo.lock files of the project.
Note this recipe will only build your Rust crate. To deploy/install your binary you have to define a .inc file with the same name as the recipe that would handle the installation.
The built-in proc_macros crate is not being imported properly by meta-rust (Kirkstone), thus breaking all library crates that define a proc_macro (meta-rust issue 266). To fix this create a libstd-rs_%.bbappend file containing the single line:
S="${RUSTSRC}/library/test"
meta-leda already provides this fix here, so it should not be necessary to implement it again.
“Fat” Link time optimization
LTO is a nice feature of LLVM that can optimize even through language boundaries at link-time, but leads to longer overall build times. That is why Rust by default uses “thin” LTO which may result in larger/slower binaries. “Fat” LTO can be enabled when building release binaries by adding to the Cargo.toml file the following section:
[profile.release]lto=true
For kantui this leads to reduction of the final binary size from ~8 MiB to ~5 MiB.
More information on profile-optimizations can be found here.
Note: Stripping the debug symbols completely results in further binary size reduction, but BitBake fails with a QA problem when deploying stripped binaries.
Kanto container management binds to a unix socket (default: /run/container-management/container-management.sock) and exposes a gRPC interface which can be used to obtain all the functionality of the kanto-cm cli programatically.
The easiest way to access this API through Rust is by creating a new Rust crate:
$ cargo new talk-to-kanto
Dependencies
The most feature-rich gRPC library for Rust right now is tonic. Add the following to your Cargo.toml to make tonic and the tokio async runtime available to your crate. Tower and hyper are needed to be able to bind to the unix socket.
Here it is important to know that tonic does not like deeply nested protobufs such as those for kanto-cm. That is why the line .include_file("mod.rs") re-exports everything in a seperate module which can later be included in the main.rs file.
"#[derive(serde::Serialize, serde::Deserialize)]" makes all structures (de-)serializable via serde.
Importing generated Rust modules
Now in src/main.rs add the following to import the generated Rust modules:
This is a bit of a hack, because currently, tonic+tower don’t support binding directly to an unix socket. Thus in this case we attemp to make an http connection to a non-existent service on port 5051. When this fails, the fallback method connect_with_connector() is called where a tokio UnixStream is returned and the communication channel is generated from that.
Making a simple gRPC call to kanto-cm
All that is left is to use the opened channel to issue a simple “list containers” request to kanto.
// Generate a CM client, that handles containers-related requests (see protobufs)
letmutclient=cm_services::containers_client::ContainersClient::new(channel);letrequest=tonic::Request::new(cm_services::ListContainersRequest{});letresponse=client.list(request).await?;
Since we made all tonic-generated structures (de-)serializable we can use serde_json::to_string() to print the response as a json string.
println!("{}",serde_json::to_string(&response)?);
7.11.1.2 - Kanto Auto deployer (KAD)
TLDR: To deploy a container in the final Leda image, all you generally need to do is add the manifest in the kanto-containers directory and re-build.
Kanto-CM does not provide (currently) a stable feature that allows for the automatic deployment of containers through manifest files similar to k3s’ automated deployment of k8s-manifests found in the /var/lib/rancher/k3s/server/manifests directory.
This can be worked around via a bash script for each container that runs on boot and makes sure it’s deployed. Even though this approach is functional it is not very structured and would require a lot repeating code.
The compiled binary takes a path to a directory containing the json manifests, parses them into Rust structures and sends gRPC requests to kanto container management to deploy these containers.
Manifest structure
Because Kanto CM uses different JSON formats for the interal state representation of the container (from the gRPC API) and for the deployment via the Container Management-native init_dir-mechanism, KAD supports both through the “manifests_parser” module.
The conversion between formats is automatic (logged as a warning when it’s attempted)
so you do not need to provide extra options when using one or the other.
Container Management Manifests Format
This is the CM-native format, described in the Kanto-CM documentation.
It is the recommended format since KAD is supposed to be replaced by native CM deployment modules in the future and this manifest
format will be compatible with that.
It also allows you to ommit options (defaults will be used). KAD will issue a log warning when the “manifests_parser” attempts to convert this manifest format
to the gRPC message format (internal state representation).
Internal State Representation
The KAD “native” manifests format uses the exact same structure for its manifests as the internal representation of container state in kanto container management.
This manifest format does not allow keys in the json to be ommited, so these manifests are generally larger/noisier.
For example:
The only difference to the actual internal state representation is that fields in the manifest can be left empty ("") if they are not important for the deployment. These values will be filled in with defaults by kanto-cm after deployment.
For example, you do not need to specify the container “id” in the manifest, as an unique uuid would be assigned automatically after deployment.
Container deployment in Leda
Kanto-auto-deployer can run as a one-shot util that goes through the manifest folder (default: /data/var/containers/manifests) and deploys required containers.
When you pass the --daemon flag it would enable the “filewatcher” module that would continuously monitor the provided path for changes/creation of manifests.
The Bitbake recipe for building and installing the auto deployer service can be found at kanto-auto-deployer_git.bb.
This recipe also takes all manifests in the kanto-containers directory and installs them in the directory specified by the KANTO_MANIFESTS_DIR BitBake variable (weak default: /var/containers/manifests).
Important: To deploy a container in the final Leda image, all you generally need to do is add the manifest in the kanto-containers directory and re-build.
Conditional compilation of the filewatcher module
To reduce binary bloat the --daemon option is namespaced under the filewatcher conditional compilation flag (enabled by default).
To compile KAD without the filewatcher module run: cargo build --release --no-default-features.
(Implemented in Leda Utils PR#35)
7.11.1.3 - Kantui
The k8s ecosystem comes with a lot of utilies that allow for the easier management of containers (such as k9s). The kantui util aims to be a “nice” text user interface that lets the user start/stop/remove/get logs of deployed containers in kanto-cm.
It spins up two threads - an UI thread (drawing/updating UI) and an IO thread (communicating with kanto-cm via gRPC). The communication between these two threads happens over an async-priority-channel with ListContainers request having a lower priority than Start/Stop/Remove/Get Logs (“user interaction”) requests.
This in an “eventually fair” mechanism of communication. That way even if kanto-cm is handling a slow request (such as stopping a container that does not respect SIGTERM) the UI thread is never blocked, allowing for a responsive-feeling UI. The size of the channel is 5 requests and the UI is running at 30 fps. Thus even if the UI gets out-of-sync with the actual state of container management it would be “only” for 5 out 30 frames.
Cursive and ncurses-rs
The cursive crate is used as a high level “framework” as it allows very easy handling of UI events via callbacks, though this might be prone to callback hell.
The default backend for cursive is ncurses-rs which a very thin Rust wrapper over the standart ncurses library. This in theory would be the optimal backend for our case as ncurses is a very old and stable library that has buffering (other backends lead to flickering of the UI on updates) and is dynamically linked (smaller final binary size).
The ncurses-rs wrapper however is not well-suited to cross-compilation as it has a custom build.rs that generates a small C program, compiles it for the target and tries to run it on the host. The only reason for this C program to exist is to check the width of the char type. Obviously, the char type on the host and the target might be of different width and this binary might not even run on the host machine if the host and target architectures are different.
After coming to the conclusion that the ncurses-rs backend was not suitable, kantui was migrated to the termion backend + the cursive_buffered_backend crate which mitigates the flickering issue.
The gRPC channel can get blocked thus effectively “blocking” the IO-thread until it is freed-up again. Maybe open a new channel for each request (slow/resource heavy)?
Reorganize the code a bit, move all generic functionally in the lib.rs.
7.11.2 - Shell Utils
7.11.2.1 - sdv-health
A general utility for monitoring the status of important sdv services/containers/devices.
Checking the status of kanto-cm containers
Kanto CM containers are split into two groups - required and optional. Both groups are checked, but only a warning is issued when an optional container is missing/not working.
General code for checking the status is:
if[ -n "$KANTO_CM_CONTAINERS_OPT"];thenprintf -- "$SEPARATOR\n"printf -- "${COL_WHITE}[Kanto CM Containers (OPTIONAL)]${COL_NC}\n"if[[${CM_STATUS} != *"inactive"* ]];then# "Optional containers"KANTO_CM_LIST=$(${KANTO_CMD} list)# removes tabs, splits on pipe and takes the container name column ($2)FOUND_CONTAINERS=($(echo"$KANTO_CM_LIST"| awk -F'|''{gsub(/\t/, ""); print $2}'))# array with all kanto container names# removes tabs, splits on pipe and takes the container status colum ($4)FOUND_CONTAINERS_STATES=($(echo"$KANTO_CM_LIST"| awk -F'|''{gsub(/\t/, ""); print $4}'))# array with all kanto container statesKANTO_CM_CONTAINERS_ARR=($KANTO_CM_CONTAINERS_OPT)for expectedCtr in ${KANTO_CM_CONTAINERS_ARR[@]};doCTR_IDX=$(get_array_element_index ${expectedCtr}${FOUND_CONTAINERS[@]})if[ ! -z $CTR_IDX];thenstatus=${FOUND_CONTAINERS_STATES[$CTR_IDX]}if["$status"="Running"];thenprintf" * %-40s : $TEXT_OK\n""${expectedCtr}"elseprintf" * %-40s : $TEXT_WARN (%s)\n""${expectedCtr}""$status"fielseprintf" * %-40s : $TEXT_WARN (%s)\n""${expectedCtr}""NOT FOUND"fidoneelseprintf" * %-40s : $TEXT_FAIL (%s)\n""Kanto Container Management""Unavailable"fifi
Here it is important to know that kanto-cm list outputs the list of containers in a different order every time it’s called. That is why, kanto-cm list is invoked once and its output is stored in a variable:
So we use awk to split on pipe (column), strip unecessary tabs. print $2 then gives us the container name and print $4 - its status.
sdv-health then proceeds to check if every container specified in the list is available and if its status is Running.
Note: Exited is considered a fail-state.
Checking kanto-cm socket
This is a simple test -s check for the default socket path.
8 - Customizing
When you want to reuse Leda for your custom setup or hardware we do not directly provide BSPs for (see Hardware) you can reference the following chapters. They describe the general approaches for different level of customization - from deploying different sets of containers from those provided by default to building completely custom distros based on meta-leda.
8.1 - Custom Distros
The Leda project aims to provide a BitBake meta-layer for building custom images within the SDV context. The Leda quickstart image serves as an experimentation and development platform but is not production-ready. The focus of the meta-leda meta-layer is to offer reusable components for custom SDV images.
This documentation section is aimed at anyone who wishes to build such a custom image.
Hardware
The Leda Quickstart image directly provides BSP-recipes for the following platforms:
QEMUx86-64 (64 bit)
QEMUARM64 (64 bit)
QEMUARM (32 bit)
Raspberry Pi 4B (64 bit)
Other hardware would require customizing your image with additional BSP-layers.
kas and meta-layers
We recommend (and use for the quickstart image) the kas tool developed by Siemens as a way to help with reproducible builds. It is, however, not required and you would still need to
define your own distro meta-layer on top of meta-leda. The Leda quickstart image kas-files can be found here: leda-distro/kas. Most of the distro-configuration can be found
in the common-kirkstone.yaml file.
Other than meta-leda you will need the following external meta-layers:
From here on we will assume that you are working with kas as your main build tool.
Setting up your custom image
Create a new repository for your distro. Create a top-level container meta-layer that would contain your distro-specific configurations which will be explained below.
In the root of the repository create a .config.yaml that would be used by kas to build your image. The minimal kas-config file can be found in the tool’s official documentation Project Configuration.
Referencing leda-distro/kas/common-kirkstone.yaml, add to this minimal configuration all required meta-layers from above and sub-layers from meta-leda you will need.
From this point on you can use kas build from the root of your repository or kas build /path/to/.config.yaml from anywhere to start the build process.
General distro configuration
The place you should start is by configuring your custom distribution. The BitBake mechanism for doing so can be found in the official BitBake documentation: 22 Creating Your Own Distribution.
require conf/distro/include/buildinfo.inc # -> Defines entries for /etc/buildrequire conf/distro/include/leda-distro-features.inc # -> Defines the quickstart image features. Use it as a guide for your distro.require conf/distro/include/leda-package-blacklist.inc # -> Defines blacklisted packages (e.g. alsa)include conf/machine/${MACHINE}-extra.conf # -> Defines ${MACHINE}-specific configuration files FSTAB, wks, etc. Would be elaborated on further down.
QB_KERNEL_CMDLINE_APPEND="net.ifnames=0 panic=5 ip=dhcp ip=192.168.7.2::192.168.7.1:255.255.255.0::eth0:off rootwait"# -> QEMU-specific kernel command line with which all images/partitions are booted
The only required contents of your distro-config file are the following (all other includes and distro features are optional):
# in the main leda.confDISTRO="<distro_name>"# should be the same as the <distro_name>.confDISTRO_NAME="<long_distro_name>"DISTRO_VERSION="<version>"DISTRO_CODENAME="<distro_codename>"# imported with require conf/distro/include/leda-distro-features.inc in Leda QuickstartDISTRO_FEATURES:append =" virtualization"# required for containerdDISTRO_FEATURES:append =" sdv"# required by the sdv-packagegroupsDISTRO_FEATURES:append =" rauc"# required for the rauc integration
Machine-specific configs
The “extra” machine specific-configs the meta-leda-bsp layer provides can be found here: meta-leda-bsp/conf/machine. These files here provide examples on how to configure machine specific options such as the Linux Kernel image type, bootloader configuration, etc. E.g. if you need a working example of how to set up U-Boot for your machine, you might reference common-qemu-arm.inc since the Leda quickstart QEMUARM (64bit and 32bit) images use U-Boot as a bootloader.
Partitioning your storage
The Leda quickstart image uses RAUC as a way to do A/B partition type updates. We also add a third “rescue” partition and a persistent “data” partition. Generally, the Leda quickstart image partitions its storage as so:
Where the partitions SDV_A and SDV_B are managed/updated by RAUC. They are read-only (SDV_A has the sdv-image-full image installed, SDV_B - sdv-image-minimal). All container/user data is in the last DATA partition (grows dynamically to fill out the storage). The boot partition contains the U-Boot/Grub bootloaders and their environment.
GRUBENV is reserved for future boot-partition updates and saving the GRUB/U-Boot environment. Currently unused in the Leda quickstart image.
In the RESCUE partition the sdv-image-rescue image is installed, which is a “fallback” image for recovering the system if both partitions SDV_A and SDV_B get corrupted.
This partition scheme has to be seen, as of course, a suggestion (you are free to use any RAUC-compatible one) but is important for understanding the later sections on this page.
WIC/WKS
To partition your storage you will need to define your custom .wks-file that defines the partition table type, the bootloader, and the order and size of partitions.
More details on OpenEmbedded Kickstart files can be found in the official documentation for Yocto: OpenEmbedded Kickstart (.wks) Reference. In short, .wks-files provide a reproducible way to partition your storage.
IMPORTANT: the path to your .wks-file should be provided via the WKS_FILES= BitBake variable. For example, in the quickstart image for QEMUARM64 this variable is set in qemuarm64-extra.conf.
Again, example .wks/.wks.in files are provided in meta-leda/meta-leda-distro/wic. We will now take a look at the qemuarm64 .wks-file:
bootloader --ptable gpt
part --source bootimg-partition --ondisk vda --fstype=vfat --label BOOT --active --align 4096 --size 100 --use-uuid
# Second Bootloader Partition (empty, for future updates)
part --fixed-size 10M --ondisk vda --align 4096 --no-table
# Empty partition (on x86, this is grubenv - we store RAUC Status here as well)
part --fixed-size 10M --ondisk vda --align 4096
part --source rootfs --rootfs-dir=sdv-image-rescue --ondisk vda --fstype=ext4 --label rescue --align 1024
part --source rootfs --rootfs-dir=sdv-image-full --ondisk vda --fstype=ext4 --label root_a --align 4096
part --source rootfs --rootfs-dir=sdv-image-minimal --ondisk vda --fstype=ext4 --label root_b --align 4096
part --fixed-size 2048M --source rootfs --rootfs-dir=sdv-image-data --ondisk vda --fstype=ext4 --label data --align 4096
As you can see it directly implements the partition scheme described above. The partition table type is defined with the bootloader --ptable gpt line and every line after that corresponds to a partition from the diagram above.
Please note, that the order in which the part lines in the .wks-file appear would be the order of the partitions.
Here it is important to note that for the VFAT boot partition the label should be uppercase and you should add the --use-uuid option. Otherwise, it might not be mounted properly in the final Linux distro.
FSTAB
.wks-files partition your storage, define partition tables, filesystem types and install images, but do nothing about actually mounting said partitions in the Linux userspace. This is the job of the FSTAB file. More information about writing a FSTAB file can be found in the Linux FSTAB manpage.
FSTAB files are installed through the OE-core recipe base-files_<version>.bb. To install a custom FSTAB in your image create a recipes-core/base-files directory in your container meta-layer and create a base-files_%.bbappend inside.
Use this .bbappend to prepend the directory containing your custom FSTAB to the FILESEXTRAPATHS list for that recipe.
An example can be found in meta-leda/meta-leda-distro/recipes-core/base-files/ where you would find the needed .bbappend file and the meta-leda/meta-leda-distro/recipes-core/base-files/base-files/<machine> directory containing the actual FSTAB files.
# Eclipse Leda - fstab for qemuarm64 RAUC redundant boot setup
/dev/root / auto defaults,noatime 1 1
proc /proc proc defaults 0 0
devpts /dev/pts devpts mode=0620,ptmxmode=0666,gid=5 0 0
tmpfs /run tmpfs mode=0755,nodev,nosuid,strictatime 0 0
tmpfs /var/volatile tmpfs defaults 0 0
# Add mount for boot, grubenv and data partition
LABEL=BOOT /boot vfat defaults,nofail,noatime 0 0
LABEL=grubenv /grubenv auto defaults,nofail,noatime 0 0
LABEL=data /data auto defaults,nofail,noatime 0 2
Here only the BOOT, grubenv, and data partitions are mounted by label.
The root partition depends on the image (sdv-image-full/minimal/rescue) that has been currently booted. Here /dev/root is a “special variable” that is set from the root= option in the kernel command line. This is important to be able
to boot from the different partitions via a custom bootloader script (and as a consequence these partitions are to be managed by RAUC).
Integrating RAUC
Whether you are using GRUB or U-Boot, integrating RAUC requires custom bootloader scripting. The official documentation for integrating RAUC can be found here: 6. Integration.
This documentation can, however, be quite complicated. Concise, self-contained examples for proper integration of the most popular targets can be found in the meta-rauc-community repository.
RAUC needs three certificates for building, signing and verifying bundles. In-depth documentation on providing said certificates can be
found in the official RAUC documentation 6.11.3 Bundle Generation
and Generating Testing Certificates.
Those certificates, when signed by an appropriate certificate authority/root certificate, are production secrets and SHOULD be protected
from being leaked. Similarly, development certificates - generated by following the guide from meta-rauc linked above or taken directly from the Leda Distro example certificates - should NOT be used in production.
With that disclaimer in mind and 3 certificates available, you need to set the following 4 variables in your local.conf:
Absolute paths are used, as those certificates might be located on a locally mounted (only during build time) secure storage.
For the RAUC Keyring you can use all available BitBake fetchers (e.g. git, gitsm, etc.) to obtain it during build time.
For a more concrete example how to set-up those paths you can always reference our common-kirkstone.yaml.
GRUB
All Leda-Quickstart images are U-Boot based and thus, they cannot provide examples for GRUB integration.
The meta-rauc-community/meta-rauc-qemux86/ meta-layer however has an example GRUB integration of RAUC and it is recommended that you start there if you decide to use GRUB.
U-Boot
Note: The following sub-sections are based on the official U-Boot source which the OE recipes use. Your BSP may provide another hardware-specific fork of U-Boot that may or may not be entirely compatible with this integration guide. (e.g. fw_utils not being available)
The rpi4-64 target, for example, directly uses meta-rauc-community/meta-rauc-raspberrypi which also has a great README, explaining the details of the integration. This meta-layer includes quite a lot of rpi4-64 specific recipes and depends on the fact that the meta-raspberrypi layer provides a recipe for custom boot scripts. Such a recipe, in general, for U-Boot-based targets is not available and has to be manually created. That is why, meta-rauc-community/meta-rauc-sunxi might provide a better example in a more general case.
The Leda quickstart images that use U-boot as a bootloader are based on the ideas in meta-rauc-sunxi. We will now go into more detail on how to integrate such a U-Boot target that requires a more “from-scratch” integration.
The U-Boot environment and “slot-counting”
RAUC “talks” to the bootloader and tracks how many times you have tried to boot a slot via the bootloader environment variables “BOOT_ORDER” and “BOOT_<SLOT_NAME>_LEFT”. Thus, U-Boot should be able to save its environment in a file
(uboot.env) somewhere that can be read by RAUC from userspace (the booted Linux image). This can be the VFAT BOOT partition, a flash chip, EEPROM, etc. which can be mounted in userspace and read by RAUC.
Note that while most of the steps for each of these storage options are the same, they might need some specific configuration. For example, the build for the Leda Quickstart QEMUARM64 patches the U-Boot defconfig file to point U-Boot to save its environment in the VFAT BOOT partition env_in_fat_qemuarm.patch. You can instead directly provide a custom defconfig in your machine-specific config (ref: qemuarm64-extra.conf).
uboot_%.bbappend
After ensuring that the device containing the U-Boot environment is correctly mounted in userspace (e.g. the BOOT partition as /boot). Create a custom uboot_%.bbappend file and as an example, you can use meta-leda/meta-leda-bsp/recipes-bsp/uboot/uboot-targets/qemuarm64.inc. This .bbappend should, generally do two things:
Take your custom boot.cmd.in script and compile it to a boot.scr (or boot.scr.uimg) file with mkimage.
Install the fw_env.config file in /etc/fw_env.config.
Optional: Apply any patches, custom settings, etc.
Note: if you are building for more than one U-Boot-based target extensive use of machine-specific overrides is recommended.
Custom boot.scr
If a custom boot.scr that was compiled with the mkimage tool is in the same partition as the U-Boot binary, U-Boot will run that on boot. This is the point of integration of RAUC and U-Boot. All concepts behind setting up such a script are explained in the rauc documentation.
As it can be seen in the examples, after the “slot retries counting” part of the script is done, the root= and rauc.slot= kernel command line arguments are set, the U-Boot environment is saved in the VFAT boot partition as uboot.env and the selected image is booted.
Then, from userspace RAUC reads the kernel command line (/proc/cmdline) and the uboot.env (through the fw_printenv/fw_setenv utilities) and decides (based on that) whether a slot is “Good” or “Bad”.
fw_env.config
For RAUC to be able to read and modify the U-Boot environment from userspace, it needs the fw_printenv/fw_setenv utilities to be installed in the distro. This can be done by installing the packages: "u-boot-fw-utils u-boot-env libubootenv" through IMAGE_INSTALL or RDEPENDS in a recipe.
This, however, is not enough since these utilities, in turn, have to be configured to know where U-Boot stores its environment. This is done through the /etc/fw_env.config file. An example of such a file with all of its different variations can be seen here fw_env.config.
The one for Leda quickstart contains a single line:
/boot/uboot.env 0x0000 0x4000
If you are unsure of the environment size and the device offset, check the defconfig file for your machine, where these two values should be specified as U-Boot compile-time configuration parameters.
You have setup U-Boot to save its environment in a known place (device, partition, etc).
This device storing the U-Boot environment is mounted in userspace.
You have provided a custom boot-script that does the RAUC slot counting.
You have installed fw_printenv/fw_setenv and properly setup the /etc/fw_env.config file.
The RAUC mark-good-service should successfully go through and mark both RAUC slots as “GOOD”.
Final steps - building and flashing
Build:
Run kas build in the root of your repository and wait for the build to finish successfully. If any BitBake errors occur during the build process, you need to fix them before a final flashable image can be built.
Flash:
Obtain the image-name.wic.bz2 and image-name.wic.bmap files from the tmp/deploy/images directory. Mount your storage and use bmaptool to quickly flash the built image. More information on flashing can be found in the Running on Raspberry Pi section of this documentation.
If everything works as intended you should see in the U-Boot output that it found /boot.scr and started executing it. This should lead to a successful boot of your custom Linux distro image with the RAUC-mark-good.service being marked as [OK] in the systemd logs (if your distro uses systemd).
8.2 - Deploying Containers
Kanto-auto-deployer (KAD)
This service has been implemented as a stopgap solution by the Leda team since as of now the Kanto CM-native mechanism
for initial container deployment does not suit the needs of the Leda Quickstart image well.
In-depth documentation on its operation and development can be found in Kanto Auto deployer.
In the Leda Distro KAD runs as a service that continuously monitors the directory defined with the BitBake variable KANTO_MANIFESTS_DEV_DIR in the distro config recipes.
By default, the Leda quickstart images use KANTO_MANIFESTS_DEV_DIR=/data/var/containers/manifests".
So, these manifests are again stored in the persistent data-partition and can be modified after the image has been deployed.
A standard set of containers is deployed through meta-leda, the manifests for which can be found in meta-leda/meta-leda-components/recipes-sdv/eclipse-leda/kanto-containers/core and meta-leda/meta-leda-components/recipes-sdv/eclipse-leda/kanto-containers/example.
The advantage of this service is that it can be restarted very quickly (systemctl restart kanto-auto-deployer), without having to restart the whole container-management service. The implemented filewatcher (the --daemon flag) allows you to quickly create/edit (or even touch them) container manifests on the device that would be on-the-fly deployed after saving. This allows for rapid testing when creating new container manifests.
Kanto Container Management init-dir
This feature of Kanto Container Managament by the Kanto Teams is currently under development and hence unstable. That is why it is not used as of the test-0.0.6 release of Leda Distro and 0.1.0-M1 release of meta-leda.
8.3 - FAQ
Frequently Asked Questions
Why is the performance very slow?
The performance of a system heavily relies on the infrastructure and the general setup.
On virtual setup (QEMU): Typical reasons for slow performance are software emulation, e.g. when you run an ARM-based image on an x86-based host machine. This requires QEMU to emulate the execution, which is very slow. When you run an x86-based image on an x86-based host machine, QEMU can leverage acceleration, such as KVM, which greatly improves the performance. For network performance issues, try to use TAP networking instead of SLIRP networking for QEMU. That requires more setup on the host though.
On hardware, such as Raspberry Pi, it should be fast. If the system startup takes very long, you may have an outdated image, please update to the latest version. Another cause of performance loss can be networking issues, especially if the system does not have transparent internet access, network requests (e.g. DNS) may time out and slowing down the startup. On startup, the container runtime may download newer versions of containers and unpack them, which takes a considerable amount of time depending on the size of the container images.
Why is my Bluetooth/Wifi driver missing?
Please check the latest release, as we’re continously adding features. If your driver is still missing, please open a new GitHub Issue. We can add Kernel Modules for supported hardware. If you hardware is not supported out of the box by the Eclipse Leda project, you need to build your own image and customize the Linux Kernel configuration. Please see the Yocto Project documentation on how to do that.
How do I connect to a WiFi network?
We use iwd/iwctl as high-level interfaces to manage wireless devices. For a guide on how to connect to a WiFi network with iwctl, you can check: Notes on using iwd/iwctl.
How can a container access CAN-Bus interfaces?
As using a CAN-Bus requires access to the host network interface, the container needs to run in privileged mode and it needs access to the host network interface. For a Kanto-CM container, simply add privileged: true to the container configuration. A more sophisticated setup involves using virtual CAN interfaces for each container and using a CAN gateway to route the traffic accordingly. However, using CAN-Bus is not in the focus of SDV-style applications, as we assume that Vehicle Services would be running on dedicated ECUs, offering higher-level interfaces to Vehicle Applications on other protocols, such as Some/IP.
Why does booting from SD-Card sometimes fail and enters maintenance mode?
This may depend on the quality or age of the SD-Card as well. Also, consumer-grade hardware like a Raspberry Pi may fail at times. Please try another SD-Card. Another reason may be high write operations to the SD-Card due to excessive data transfer (logging, container deployment etc.).
How can I install additional software in Leda?
As we’re using Yocto, there is no central repository for software packages. Thus, we did not include any kind of package manager. If you feel that the software you want to install is valuable for other Leda users as well, please open a new GitHub Issue and request the installation of the software. If the software is specific to your use case, you need to build your own image using Yocto. Alternatively, you may build a container for your software and deploy the container into the container runtime. Using kanto-cm or ctr you would be able to execute your software as a container. See the Cheatsheet for an example.
9 - Project Information
9.1 - Community
Thanks for your interest in this project and in our community.
Commits that are provided by non-committers must have a Signed-off-by field in
the footer indicating that the author is aware of the terms by which the
contribution has been provided to the project. The non-committer must
additionally have an Eclipse Foundation account and must have a signed Eclipse
Contributor Agreement (ECA) on file.
Note: When forking multiple repositories (eg most of the time, you also need to make modifications to meta-leda), please use the same branch name of each repository.
Make your changes following the code style guide for the respective type of content:
When you create new files make sure you include a proper license header at the top of the file (see License Header section below).
Make sure you include test cases for non-trivial features.
Make sure the test suite passes after your changes.
Commit your changes into that branch.
Use descriptive and meaningful commit messages. Start the first line of the commit message with the a GitHub Issue number if available and a title e.g. [#9865] Add token based authentication.
Squash multiple commits that are related to each other semantically into a single one.
Make sure you use the -s flag when committing as explained above.
Push your changes to your branch in your forked repository.
Once you’re satisfied with your contribution, open a Pull Request and Eclipse Leda Committers will start with the review of your changes.
Note: When working with multiple repositories, you need to open separate Pull Requests for each repository.
Adding Documentation to Hugo
Add the markdown document to the appropriate folder in the path leda/content/en.
Add the front-matter
---title:"title of the file"date:2022-05-09T13:43:25+05:30---
Additional front matter that can be added –
url : "specifying a definite url to the file"
weight : 10 (used for ordering your content in lists. Lower weight gets higher precedence.)
The images need to be put in path leda/static/assets. The image reference should be /assets/image.jpg in the markdown file.
(Note: Do not use relative paths or url)
In case you are creating a new folder, create _index.md file with the front matter only.
Install Docsy theme in the path leda/themes/docsy –
#Run this command from root directory of velocitas-docsgit clone https://github.com/google/docsy.git themes/docsy
Install pre-requisites
cd themes/docsy/userguide/
npm install
npm install --save-dev postcss
From the leda directory run the command hugo server visit localhost:1313 to see the rendered static site.
Submitting the Changes
Submit a pull request via the normal GitHub UI.
After Submitting
Do not use your branch for any other development, otherwise further changes that you make will be visible in the PR.
License Header
Please make sure any file you newly create contains a proper license header like this:
# /********************************************************************************# * Copyright (c) 2022 Contributors to the Eclipse Foundation# *# * See the NOTICE file(s) distributed with this work for additional# * information regarding copyright ownership.# *# * This program and the accompanying materials are made available under the# * terms of the Apache License 2.0 which is available at# * https://www.apache.org/licenses/LICENSE-2.0# *# * SPDX-License-Identifier: Apache-2.0# ********************************************************************************/
You should, of course, adapt this header to use the specific mechanism for comments pertaining to the type of file you create.
Important
Please do not forget to add your name/organization to the LICENSE file’s Copyright Holders section. If this is not the first contribution you make, then simply update the time period contained in the copyright entry to use the year of your first contribution as the lower boundary and the current year as the upper boundary, e.g.
Copyright 2017, 2018 ACME Corporation
Build
On every PR merge a pipeline run will be triggered. This run will trigger the hugo docs build
Hugo v0.98.0 extended is set up for the runner
Docsy theme is setup for beautification of static site
Then dependencies are installed for the theme
Static site is generated and stored in a folder "public"
The contents of public are committed to gh_pages branch which is exposed to host the github pages
Your privacy is important to us. The following Information is to provide you with all information relevant to data protection in order to be able to use the software, in a data protection compliant manner. It is provided as an information source for your solution-specific data protection and data privacy topics. This is not intended to provide and should not be relied on for legal advice.
Your Role
First things first: when you choose and use our software, you are most likely acting in the role of data controller, if personal related data is being processed. Therefore, you must ensure that the processing of personal data complies with the respective local legal requirements, e.g. when processing data within the scope of General Data Protection Regulation (GDPR) the legal requirements for a controller from the GDPR.
Where may the processing of personal related data be relevant?
When using our software in combination with other software components, personal data or data categories may be collected for the purpose of developing, testing and running in-vehicle applications (Vehicle Apps). Possible examples are the vehicle identification number (VIN), the number plate, GPS data, video data, audio data, or other measurement data. You can determine which data or data categories are collected when configuring the software. These data are stored in volatile memory and are deleted by shutting down the system. You are responsible for the compliant handling of the data in accordance with the applicable local law.
What have we done to make the software data protection friendly?
This section describes the measures taken to integrate the requirements of the data protection directly into the software development. The technical measures described below follow a “privacy by design” approach.
Local data: The software may save data permanently in local virtual storage (eg when run in QEMU Emulator) or on local physical storage (SD-Card on Raspberry PI). All collected or processed data can be deleted by either deleting the virtual storage file (*.qcow2), or by erasing the SD-Card.
Cloud storage: The software may send data to cloud endpoints controlled by you or your organization. Examples include connectivity data, device identification, device health, device telemetry, application metrics and application logs. Collection and processing of example data on the device is enabled by default. Sending of device data to cloud endpoints must be explicitly enabled by performing the device provisioning process. The actual cloud endpoints are determined and configured during the device provisioning process. All collected or processed data can be deleted on the cloud side in the respective cloud endpoints.
Vulnerabilities: The release process for this software is set up to always update to the newest package updates. The project will continously release new versions of the software. To protect personal data, it is advisable to always use the latest version of the software.
Important: When you use the Eclipse Leda quickstart images for non-volatile setups, it is essential to reconfigure the system and harden it, this includes but is not limited to the following configuration items:
Disable system user (root) password and login
Disable SSH login with password
Adding a new Linux user with restricted permissions
Adding SSH key based authentication
Container Resources and Configurations: Secrets, such as Device Identity Certificates for Cloud Connection and Access credentials for private Container Registries
9.6 - Security Policy
This project implements the Eclipse Foundation Security Policy

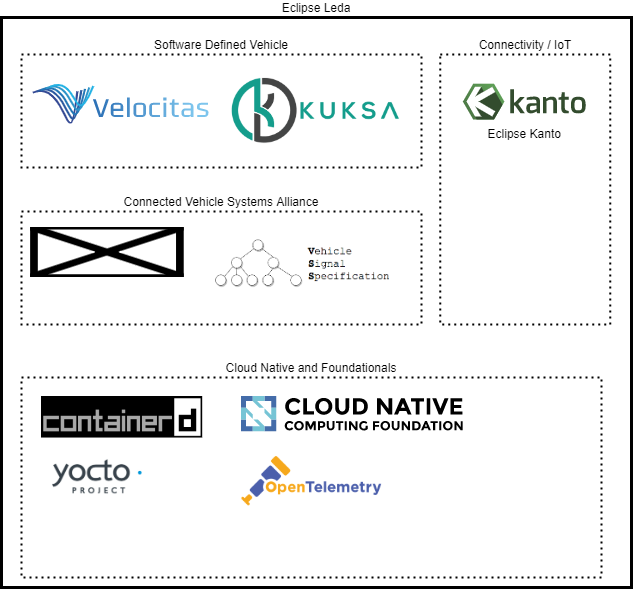


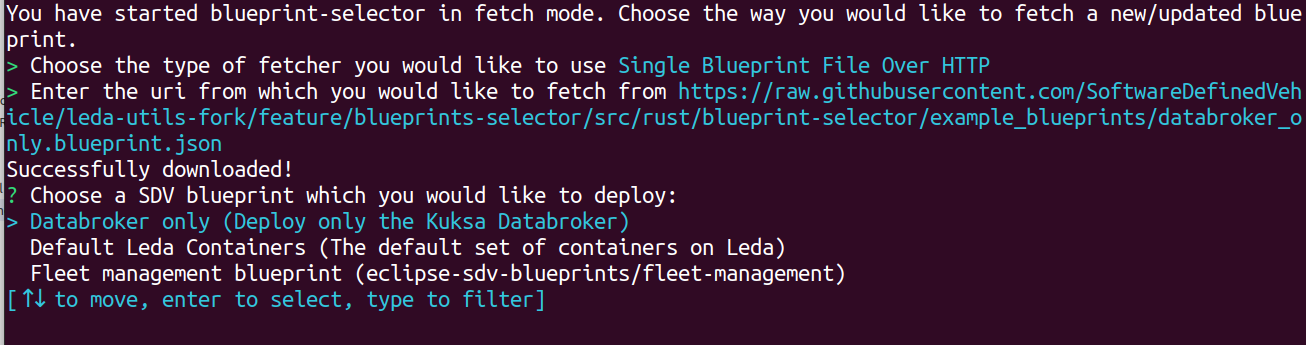


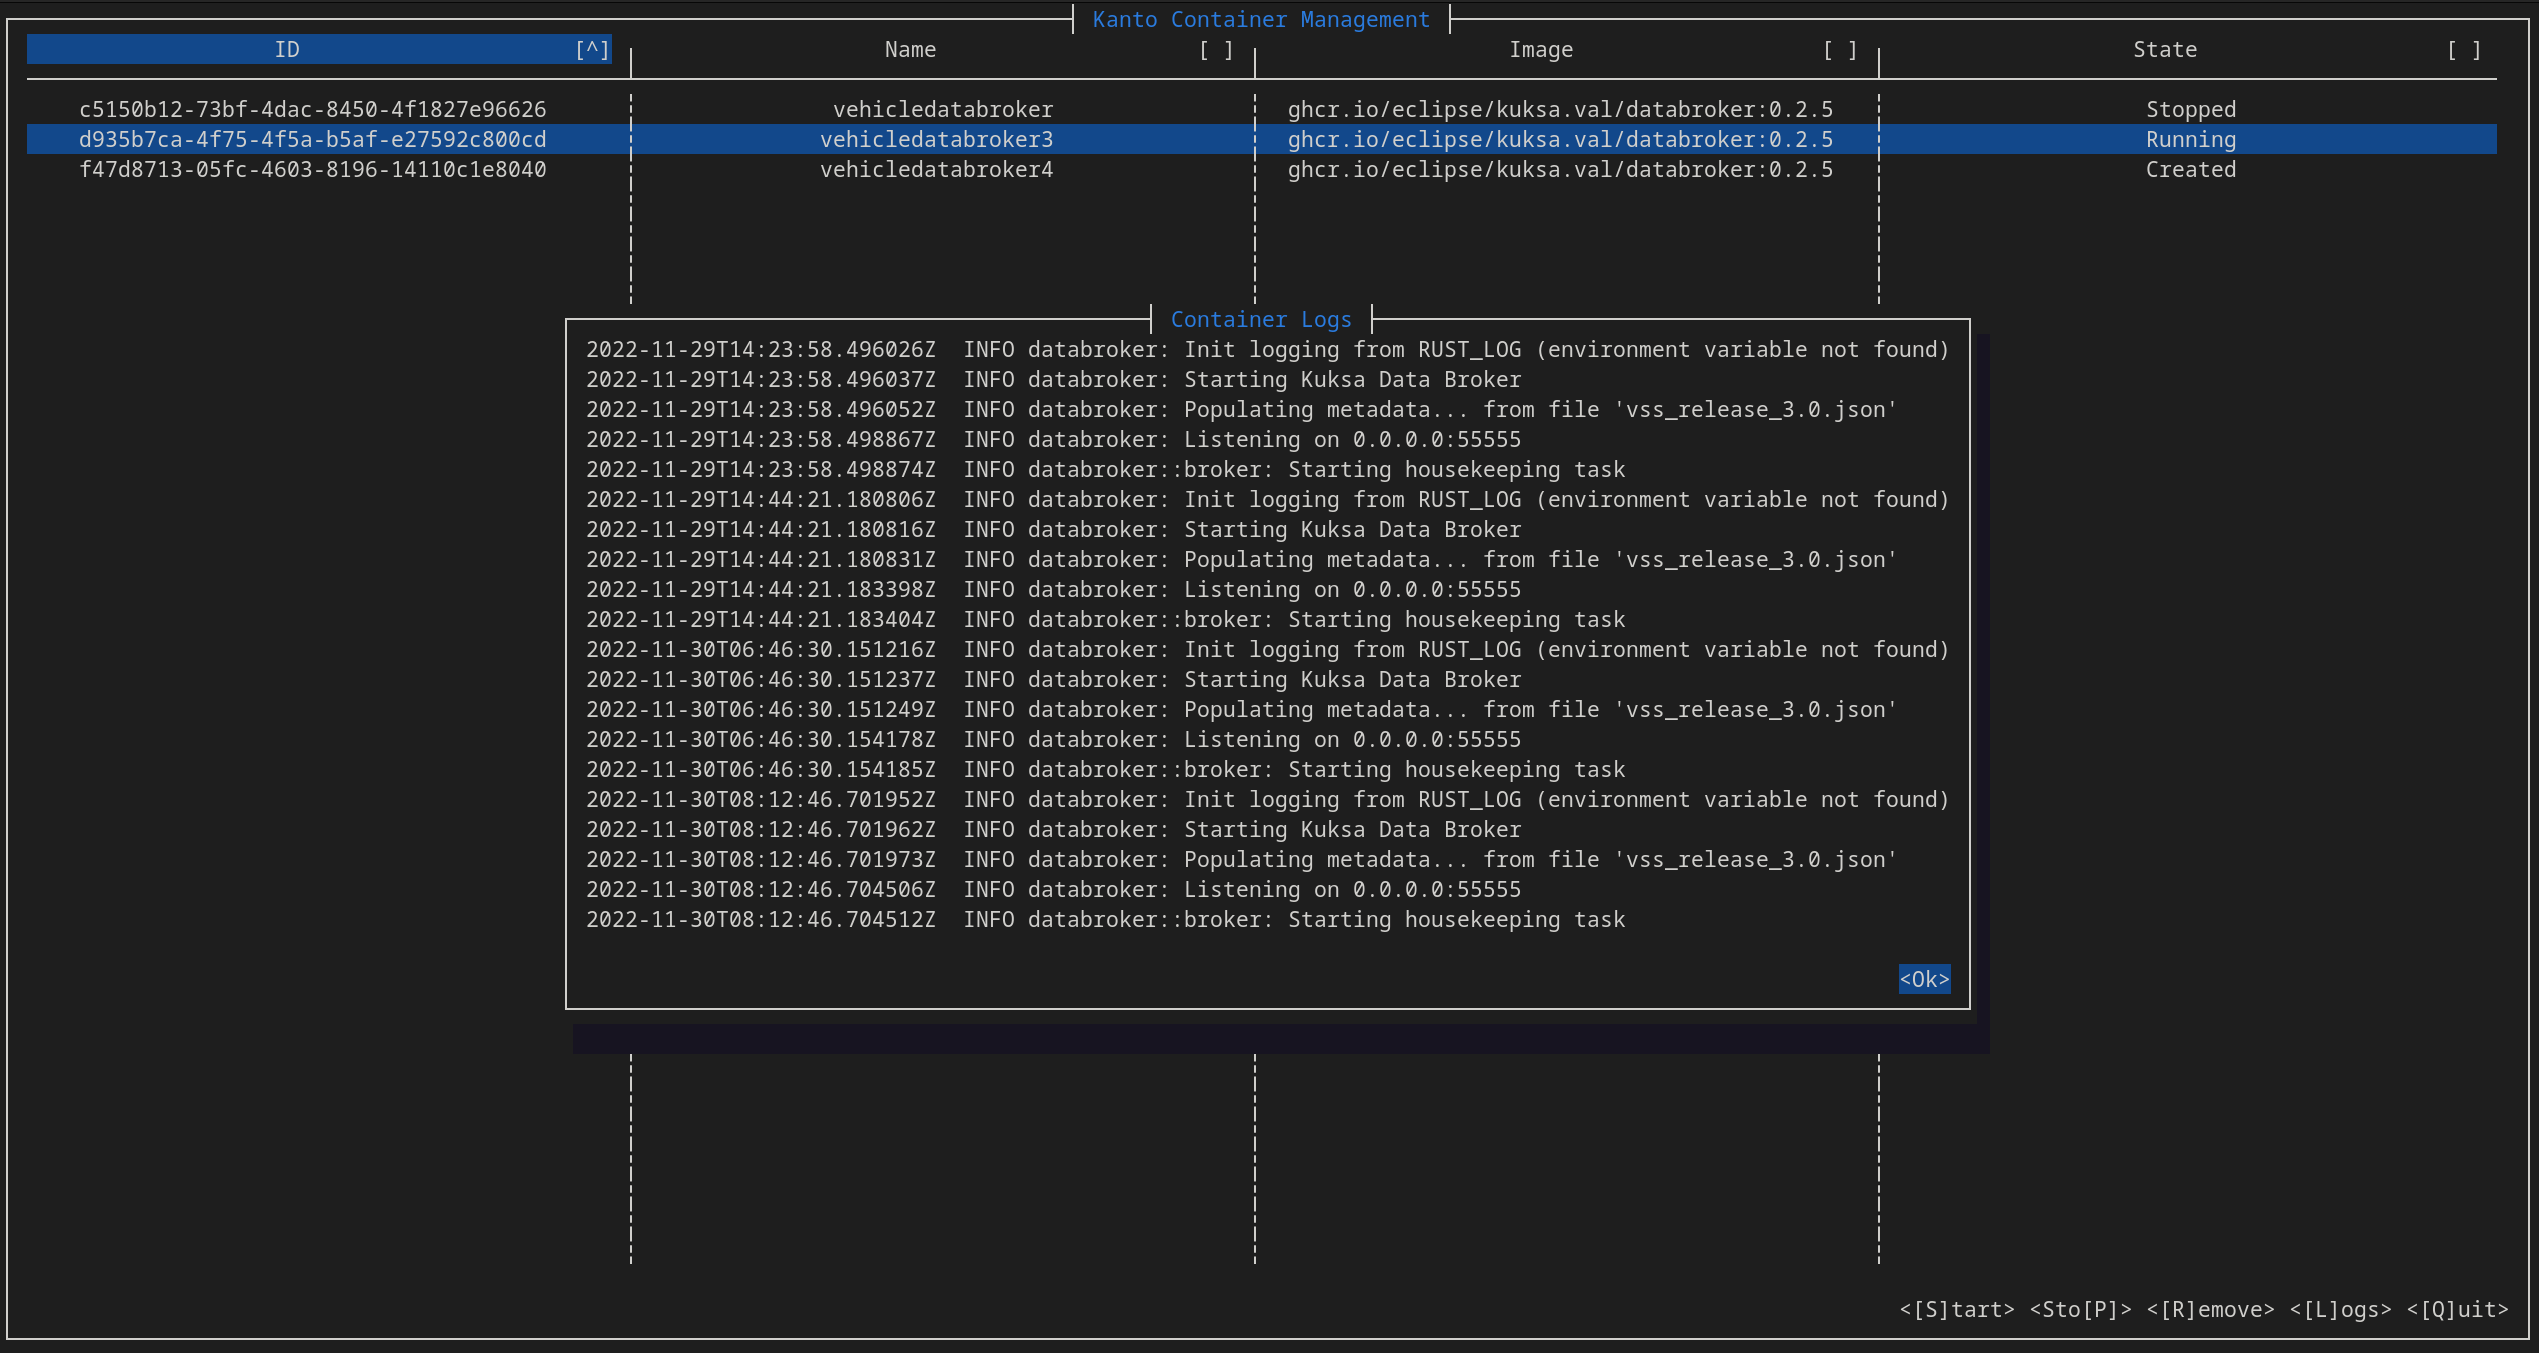