This is the multi-page printable view of this section.
Click here to print.
Return to the regular view of this page.
Building Leda
Running BitBake to build your own images requires some extra setup on the build machine. Please see the following chapters for more information about the build process itself and how to setup a development and build infrastructure.

If you are interested to contribute or to get in touch with us, please see our Community pages and Contribution Guidelines.
For reporting security vulnerabilities, please follow our Security Policy.
1 - Concepts
The example build configurations in this repository are based on the official BitBake Quickstart tutorial and have been extended to include Leda SDV components.
Build Setup
To set up your own BitBake build configuration, follow the BitBake documentation and include meta-leda in your bblayers.conf and add the SDV packages into your local.conf.
The Leda build is mainly using the kas tool for a simplified maintenance of the BitBake Configuration files. The kas configuration files are located in kas/
header:
  version: 12
distro: leda
machine: qemux86-64
target: sdv-image-all
repos:
  ...
 meta-leda:
    url: "https://github.com/eclipse-leda/meta-leda"
    refspec: main
    layers:
      meta-leda-bsp:
      meta-leda-components:
      meta-leda-distro:
The meta-leda layer conatins the BitBake Classes and Recipes to integrate SDV Components into a BitBake based build setup.
Please see https://github.com/eclipse-leda/meta-leda for more information.
Recipes for containerized components
The SDV.EDGE stack is based on a containerized architecture and the intention is to have as much components containerized as possible, to ensure a high degree of isolation and updateability. To ensure some degree of flexibility and control, certain core components may also be installed as native services.
To automatically deploy the containers of the SDV reference implementation and example applications and services, the build configurations will deploy a couple of deployment specifiction files into the auto-deployment folder /data/var/containers/manifests.
At start time, these containers will be automatically deployed:
- Cloud Connector
- Self Update Agent
- Vehicle Update Manager
- Vehicle API / Vehicle Abstraction Layer
- Data Broker (Eclipse Kuksa)
- Example Seat Service (CAN-bus implementation)
For a full list of containers, see meta-leda-components/recipes-sdv/eclipse-leda/kanto-containers
Recipes for containerized applications
OpenEmbedded’s meta-virtualization already contains some recipes and reusabled classes for building virtualization and containerized applications.
meta-leda extends that functionality by using skopeo to package container images. To minimize the runtime requirements (dependencies, disk usage), an approach to pre-load container images and its layers directly into the content storage of the container runtime is followed.
Building containers with Yocto
For components which can either be installed natively or as container, it can be beneficial to build these containers using Yocto as well. An example is in meta-leda-distro-container/recipes-sdv/sdv-containers/cyclonedds-example-container_0.1.bb.
2 - Metalayer
Initializing BitBake environment
Initialize the build environment and start the build for QEMU:
kas build kas/leda-qemux86-64.yaml
Building specific recipes
General usage:
kas build kas/leda-qemux86-64.yaml --target <recipename>
 meta-leda-bsp
 \-- classes                      // Reusable BitBake Classes, eg for offline container image pre-caching
 \-- conf                         // Distribution specific configurations, eg version numbers, release codename
 \-- recipes-bsp                  // Board Support Packages, eg specifics for QEMU and Raspberry Pi
 meta-leda-components
 \-- classes                      // Reusable BitBake Classes, eg for offline container image pre-caching
 \-- conf                         // Distribution specific configurations, eg version numbers, release codename
 \-- recipes-sdv
   |-- eclipse-leda               // Build recipes for Eclipse Leda Incubator components
   |-- eclipse-kuksa              // Build recipes for Eclipse Kuksa
   |-- eclipse-cyclonedds         // Build recipes for Eclipse CycloneDDS
   |-- northstar                  // Build recipes for Northstar Container Runtime
   |-- packagegroups              // Grouping packages
   \-- sdv-base                   // SDV Base Bundle: fstab, can0.network
     |--- base-files
     |--- SDV Core Utilities
     \--- SDV Utilities
   |-- sdv-containers             // Container images recipes for pre-caching / airgap installation
     |--- Cloud Agent
     |--- Data Broker
     |--- Feeder CAN
     |--- OTel Collector
     |--- Self Update Agent
     |--- Vehicle Update manager
     |--- Example Seat Service
     \--- ...
   |-- sdv-core                   // SDV Core Bundle
     |--- SDV RAUC Bundle         // RAUC Update Bundle Manifest
   \-- tools                      // Convenience tools for the "full" image, eg nerdctl and kantui
 meta-leda-distro
 \-- classes                      // Reusable BitBake Classes, eg for offline container image pre-caching
 \-- conf                         // Distribution specific configurations, eg version numbers, release codename
 \-- recipes-containers           // Container related configuration recipes (containerd, nerdctl)
 \-- recipes-core                 // Core recipes (base-files, systemd)
 \-- recipes-kernel               // Kernel configuration, eg kernel modules, logging, virtio
 \-- recipes-sdv-distro           // Image definitions
 \-- wic                          // WIC Kickstarter files - Partition layouts
meta-leda-distro-container
 \-- classes                      // Reusable BitBake Classes, eg for offline container image pre-caching
 \-- conf                         // Distribution specific configurations, eg version numbers, release codename
 \-- recipes-sdv                  // Build containers with Yocto
Base Bundle
Contains the recipes to build and install the minimal set of dependencies for the SDV stack on the edge device. With these minimal components, the SDV stack should be able to bootstrap itself.
CAN-Bus Kernel Configuration
To enable support for CAN bus related modules, the kernel needs to be reconfigured. This is done by the sdv-canbus-modules.inc include file in the recipes-kernel/linux folder, which patches Poky’s linux-yocto recipe.
Verifying and displaying the current kernel configuration: bitbake -e virtual/kernel
To verify the recipe and the kernel configuration: bitbake linux-yocto -c kernel_configcheck -f
The kernel config file can be found in:
./tmp/work/qemux86_64-poky-linux/linux-yocto/*/linux-qemux86_64-standard-build/.config
Core Bundle
Contains the recipes to build and install additional SDV components, which are required for a proper runtime setup.
Containers
Contains the recipes for pre-installing specific containers into the container management at runtime. This is mainly for pre-caching container image layers onto the device to speed up the initial deployment but can also be used to enable offline usecases.
Build Host System Requirements
- Yocto Project 4.0 (kirkstone) or higher
- 100GB+ free disk space per build configuration
- Online connection for fetching sources and container images
3 - Setup development environment
There are multiple variants on how to set up a build environment:
- with GitHub Codespaces - recommended for developers with restricted internet access, such as corporate proxies, or with Windows hosts
- with VSCode DevContainer - recommended for Linux hosts
- Custom setup - for teams
3.1 - Codespaces
Setting up Development Environment in GitHub Codespaces
Install the GitHub Codespaces Extension
Note: When using our DevContainer, the GitHub Codespaces extension is pre-installed.
- Start VSCode
- Go to Extensions
- Search for “GitHub Codespaces”
- Click Install
Alternatively, create a new codespace via the GitHub web interface:

Select a big enough machine type for Yocto/BitBake, e.g. 16 CPU. You need at leasst 50GB disk space.

Building Leda in a Github Codespace
After successfully obtaining and connecting to a codespace you can build Leda either with kas or manually:
Private Repositories
When using GitHub Codespaces with submodules and private repositories,
a separate tool for git authentication is required (see VSCode issue #109050), as the authentication token provided to the GitHub Codespaces virtual machine only allows access to the main repository.
Git Credential Manager:
https://aka.ms/gcm
Installation:
curl -LO https://raw.githubusercontent.com/GitCredentialManager/git-credential-manager/main/src/linux/Packaging.Linux/install-from-source.sh &&
sh ./install-from-source.sh &&
git-credential-manager-core configure
3.1.1 - Advanced topics
Git Authentication
For private repositories, we need to separately authenticate against the submodule repositories, as
GitHub Codespaces will only inject a token with access rights to the current repository.
-
Change to the users home directory
-
Install Git Credential Manager
curl -LO https://raw.githubusercontent.com/GitCredentialManager/git-credential-manager/main/src/linux/Packaging.Linux/install-from-source.sh &&
sh ./install-from-source.sh &&
git-credential-manager-core configure
-
Configure a credential store typ, e.g. git config --global credential.credentialStore plaintext
-
Verify with git config --global -l, it should show git-credential-manager-core as the credential helper.
Update the submodules
Run git submodule update --recursive
See VSCode Issue #109050 for details.
Setup skopeo
Skopeo is needed to download various files during the build:
sudo mkdir -p /run/containers/1000
sudo chmod a+w /run/containers/1000
skopeo login ghcr.io --authfile ~/auth.json --username <your GitHub User>
Enter your token when asked for the password.
3.2 - GitHub Runner
Create a new GitHub Runner for this repo
Start with creating a new azure VM:
- Ubuntu Server Latest, currently 20.04
- Size Standard D16ds v5
- The admin user should be called “runner”
Once the VM is ready:
- Stop the VM
- Go to “Disk” and resize the OS disk to 512 GB
- Start the VM again
Run the script to setup the runner
Log on to the VM as runner. Either copy the scripts/PrepVMasGHRunner.sh onto the VM or create a new script:
Copy the content of the PrepVMasGHRunner.sh from this repo into the new file, save it and make it executable:
Call it with the token and the next available nummer, see below how to get this items:
./prep.sh "ASYVOMU........DTCFCMBA" 3
In the Azure portal go the VM, go to the “network” section and delete the rule opening port 22.
Congratulation, you are done!
How to get the token and the number to call the script
In the repo, go to “Settings” -> “Actions”. You see the currently provisioned runners:

Pick the next number and pass it to the script.
To get the token press the green button in the above screenshot. The token is in the command:

3.3 - VSCode DevContainer
Preparation
- Obtain the Docker Engine for your distribution and add your non-privileged user to the docker group (
sudo usermod -aG docker $USER )
- Install Visual Studio Code
Visual Studio Code: Development Containers
- Open Visual Studio Code
- Open Command Palette (
F1) and select Clone repository in Container Volume
- Select
eclipse-leda/meta-leda and the main branch.
- Adapt proxy configurations if necessary (
.devcontainer/proxy.sh)
For a clean remote build machine, you may want to set up a development environment on GitHub CodeSpaces
Building Leda in a VSCode DevContainer:
After successfully setting up your DevContainer you can build Leda either with kas or manually:
Authentication
The build process requires online connection and you must be authenticated to access private repositories.
- Create a GitHub Personal Access Token (PAT) at https://github.com/settings/tokens and grant
read:packages permission
- Use
Configure SSO and authorize your PAT for the organization
- On the build host, authenticate to ghcr.io:
skopeo login ghcr.io --authfile ~/auth.json --username <username> and enter the PAT as password
- You may need to create the folder where skopeo is storing authentication information beforehand:
sudo mkdir -p /run/containers/1000
sudo chmod a+w /run/containers/1000
- Start the bitbake build process
3.4 - Building with kas/manually
After setting up your VSCode DevContainer or GitHub Codespace you can proceed with the actual build process. Here you have two choices - either using the kas-build system or setting up the build manually.
Building with kas
This is the easiest way to build leda semi-automatically
cd /workspaces/meta-leda-fork/- Open the VSCode terminal and run
kas build
- Note: you can alter the build options by modifying the .config.yaml file in the trunk of the repository
Building manually
You can also build Leda manually if more customization of the build process is required.
-
export LEDA_WORKDIR=/workspaces/meta-leda-fork/
-
cd ${LEDA_WORKDIR}
-
Clone the Poky repository with the required release, e.g. kirkstone and pull updates if necessary:
git clone git://git.yoctoproject.org/poky
cd poky
git checkout -t origin/kirkstone -b kirkstone
git config pull.rebase false
git pull
-
Prepare the build environment:
-
Dry-run a build of the Linux Kernel recipe using BitBake:
bitbake --dry-run linux-yocto
-
Checkout the meta-layer dependencies for Leda:
cd $LEDA_WORKDIR
git clone -b kirkstone https://github.com/rauc/meta-rauc.git meta-rauc
git clone -b kirkstone https://github.com/rauc/meta-rauc-community.git meta-rauc-community
git clone -b kirkstone https://git.yoctoproject.org/meta-virtualization meta-virtualization
git clone -b kirkstone https://git.openembedded.org/meta-openembedded meta-openembedded
-
Change to the poky/build directory (generated from the oe-init-build-env script automatically)
-
Add all the necessary meta-layers:
bitbake-layers add-layer ${LEDA_WORKDIR}/meta-rauc
bitbake-layers add-layer ${LEDA_WORKDIR}/meta-rauc-community/meta-rauc-qemux86
bitbake-layers add-layer ${LEDA_WORKDIR}/meta-openembedded/meta-oe
bitbake-layers add-layer ${LEDA_WORKDIR}/meta-openembedded/meta-filesystems
bitbake-layers add-layer ${LEDA_WORKDIR}/meta-openembedded/meta-python
bitbake-layers add-layer ${LEDA_WORKDIR}/meta-openembedded/meta-networking
bitbake-layers add-layer ${LEDA_WORKDIR}/meta-virtualization
bitbake-layers add-layer ${LEDA_WORKDIR}/meta-leda-components
bitbake-layers add-layer ${LEDA_WORKDIR}/meta-leda-bsp
bitbake-layers add-layer ${LEDA_WORKDIR}/meta-leda-distro
-
Dry run:
DISTRO=leda bitbake --dry-run sdv-image-all
-
Real build:
DISTRO=leda bitbake sdv-image-all
-
You can also build one of the target recipies this way:
DISTRO=leda bitbake kanto-container-management
-
Note: in this case you can set the target architecture and other build options in the build/local.conf file
3.5 - Restricted Internet
Developers working in a corporate environment may face challenges when building Leda-based images, pulling SDV containers, etc.,
usually due to a restrictive corporate proxy. Thus the objective of this page is to collect helpful guides for mitigating such problems.
HTTP(S) proxy
First you might need to configure your http(s) SOCKS proxy such that the BitBake shell uses it for do_fetch recipe tasks. By default, http_proxy and https_proxy
environment variables are part of the BB_ENV_PASSTHROUGH list and are directly passed from the current environment to BitBake. If you are still facing http(s)_proxy
issues during do_fetch tasks, you might want to check the Working Behind a Network Proxy @ Yocto Project Wiki.
GOPROXY
GOPROXY is a golang-specific mechanism for fetching dependencies during build-time. What is more, gomod-type BitBake recipes pull their external dependencies during
the do_compile task, instead of the do_fetch task leading to further issues. The simplest workaround is to set-up a local (caching) goproxy container on
the build host and make BitBake use that. The following steps assume that the build host has docker installed and working, with access to the docker hub registry.
Hosting a local goproxy server
Start by setting up the goproxy container in host networking mode.
docker run -d --env HTTP_PROXY="http://<PROXY_IP>:<PROXY_PORT>" --env HTTPS_PROXY="http://<PROXY_IP>:<PROXY_PORT>" -v cacheDir:/go --network host goproxy/goproxy
NOTE: Don’t forget to substitute <PROXY_IP> and <PROXY_PORT> with the appropriate address of your HTTP(S) proxy.
This will start a local caching goproxy on port 8081 with a volume named cacheDir for caching the downloaded Go packages. The goproxy container can be configured
further to provide access to private Go-package registries. For more information on its configuration take a look at goproxyio/goproxy on GitHub.
Using the local goproxy server for BitBake builds
Since the main objective of BitBake/kas is to facilitate reproducible builds, only certain variables from the host environment are used for the build. Go, however,
looks at the GOPROXY environmental variable to decide on which proxy to use. That’s why you should first start by exporting the GOPROXY variable in the terminal
from which you will later run the build:
export GOPROXY="http://127.0.0.1:8081"
To make BitBake use the value of the variable you just exported for the build, you should add it to its “environment passtrough” list:
export BB_ENV_PASSTHROUGH_ADDITIONS="${BB_ENV_PASSTHROUGH_ADDITIONS} GOPROXY"
Kas
If you are using kas as a top-level build tool, to set the value of the GOPROXY variable for builds, all you need to do is to add it the env-section of your
kas-config yaml. For example:
header:
  version: 12
machine: qemux86-64
env:
  GOPROXY: "http://127.0.0.1:8081"
Kas will handle the exporting of the variable and adding it to BitBake’s passtrough list automatically from there.
Airgapped container installation
Sometimes devices might not have internet access on first boot and therefore the SDV containers that are needed for provisioning and updating a SDV-image
will not be available.
Build-Time
The meta-leda layer provides an opitional distro feature that pre-downloads and injects a minimal set of SDV container images in Kanto’s local container registry
on first boot.
IMPORTANT: This will lead to a significant increase of the image size since all containers are downloaded as self-contained tarballs and therefore “layer reuse”
is not possible.
To enable this distro feature, add to your local.conf:
  DISTRO_FEATURES += " airgap-containers"
  PREINSTALLED_CTR_IMAGES_DIR = "/path/to/container/images"
  IMAGE_INSTALL += "packagegroup-sdv-airgap-containers"
If you are using the sdv-image-data image recipe packagegroup-sdv-airgap-containers will be automatically installed when the distro-feature is enabled.
Therefore all you need to add to your local.conf will be:
  DISTRO_FEATURES += " airgap-containers"
  PREINSTALLED_CTR_IMAGES_DIR = "/data/var/containers/images"
Note: Here we have assumed that the partition where sdv-image-data is installed is mounted as /data on the rootfs.
Manual
If you do not wish to use the airgap-containers distro-feature, you can manually download inject the container images in the kanto namespace with ctr.
-
Start on a machine with internet access and docker/ctr installed:
Pull the container image in your machine’s local registry:
ctr -n kanto-cm image pull <REGISTRY>/<IMAGE>:<TAG> --platform linux/<ARCH>
Where if you would like to download the Kuksa Databroker container for an arm64 device you would change the following:
<REGISTRY>/<IMAGE>:<TAG> -> ghcr.io/eclipse/kuksa.val/databroker:0.3.0
<ARCH> -> arm64
After the pull was successful, export the image as a tarball:
ctr -n kanto-cm images export <tarbal_name>.tar <REGISTRY>/<IMAGE>:<TAG> --platform --platform linux/<ARCH>
<REGISTRY>/<IMAGE>:<TAG> and <ARCH> should be the same as in the pull command, while <tarball_name> can be any name you would like.
-
Transfer the exported <tarball_name>.tar to your device to a folder of your choosing, e.g. /data/var/containers/images
-
Obtain a terminal connection to this device and go to the directory where you transferred the container image tarball.
-
Import the image to the kanto-cm registry by running:
ctr --namespace kanto-cm image import <tarball_name>.tar
Note: If you see a message from ctr that the “image might be filtered out” this means that you might have pulled an image for an architecture that
does not match the one of your device.
4 - Run the build
Run the full build
To setup the environment and build the Leda image, please refer to: Setup development environment.
Running QEMU from existing build
- Use
kas shell -c "runqemu qemux86-64 ovmf kvm nographic" <kas-configs> to execute the image.
- Replace
qemux86-64 with one of the other qemu machines, such as qemuarm64
- Use the keyword
slirp to enable user-networking which does not require root privileges on the host. tun is default but requires setup on the host.
- Continue with Device Provisioning
Variations of runqemu command line
- Use
runqemu ovmf
ovmf will enable the UEFI support for IA32 (x86) and X64 (x86-64) guests, for testing the dual-boot capabilities and SDV Self-Update mechanisms
- All other options are now part of the default Leda distribution configuration (see leda-qemu-settings.inc)
- Continue with Device Provisioning
Running QEMU in the background
To start QEMU in the background enter, use nohup and bring the process into the background.
nohup runqemu qemux86-64 nographic qemuparams="-m 2048 -pidfile qemu.pid" &
The image is then reachable via ssh root@192.168.7.2
This will write a file qemu.pid in the current directory including the process ID of QEMU. Once done, kill -9 <qemu.pid> kills the process.
Running with kas-shell
If you’ve chosen to build the Leda image with kas, you can use the kas-shell to run QEMU, with kas setting up the environment for you. To do that change to the main working directory and run:
kas shell -c 'runqemu slirp nographic ovmf sdv-image-full'
DHCP Configuration
As the Leda Quickstart image will try to retrieve its IP address via DHCP broadcast request, it is good to run a DHCP daemon on the host, listening on the respective TAP network interface of QEMU. This will then simulate a LAN with DHCP server and let’s us control which IP address gets assigned to multiple QEMU instances.
The run-dhcp.sh utility will run an ISC-DHCP server on the host. The default configuration has a couple of MAC addresses preconfigured.
5 - Automated Tests
Eclipse Leda is using the Robot Framework for black box tests and system tests.
The black box tests are supposed to only use public API from SDV components, for example the MQTT interface of the Self Update Agent.
The system tests are supposed to test on Leda Distro level and can use shell and SSH commands to verify system behavior, e.g. performing a reboot.

- Test Execution: an external trigger, such as the
./test-docker.sh shell script, starts the leda-tests container.
- Docker Compose ensures that the needed containers are built and started.
The test cases and test resources are copied into the leda-tests container at build time.
- The Robot process is started and performs the execution of all test cases
- Black box test cases use the MQTT interface to connect to the test target and publish messages
- System level test cases use SSH to connect to the test target and execute commands
- Test reports are written to a mounted volume, so that they are available on the host for further processing
Run the tests
The easiest way to run the test cases is to run it in the Docker Compose setup:
-
Clone the leda-distro repository:
git clone https://github.com/eclipse-leda/leda-distro
-
Optional: Build both images (qemuarm64 and qemux86-64) using kas / BitBake. If you omit this step, docker compose will download the latest container images from the Eclipse Leda Container Registry on ghcr.io.
 kas build kas/leda-qemux86-64.yml
 kas build kas/leda-qemuarm64.yml
-
Switch to the docker-snapshot directory:
cd resources/docker-snapshot/
-
Run the Leda Tests
./test-docker.sh
Test Reports
The output of test-docker.sh will show the test results from Robot.
The test reports and debug logs are available on the host’s filesystem in the path resources/docker-snapshot/leda-tests-reports
output.xml - The main Robot output reportreport.html - A Robot HTML summary reportleda-tests-xunit.xml - A xUnit report file suitable for rendering with various toolslog.html - A Robot HTML report with the test execution logleda-tests-debug.log - Debug log file of the test execution, helpful during implementation of test cases and troubleshooting of failed tests
The xunit report is being used to visualize the test execution results in the GitHub Workflow:
Example Test Report:

Adding new tests
The tests are located in the following locations of the leda-distro repository:
resources/docker-snapshot/dockerfiles/leda-tests - Robot Tests which are executed inside of a Docker Compose setuptests/src/robot - Robot Tests which can be executed on the build host with a Leda Runqemu instance running
General steps are:
- Decide whether to implement a system-level test or a black-box integration test
- Add the test case to an existing, matching
.robot file. If no matching test suite can be found, create a new .robot file. Prefix with the order number, e.g. 33__my-new-test.robot
- Check if a refactoring of new keywords may be worthwhile for better reusability.
5.1 - Robot Keywords
In the Leda Robot Tests, keywords are used for reusable functionality. Common keywords are defined in resources/docker-snapshot/dockerfiles/leda-tests/leda_keywords.resource
The goal is to treat the Leda Quickstart image as a black box, utilizing as much as possible with public APIs.
Interaction with Self Update Agent
Trigger to start update: Send a “Desired State Request” to the target, to install a RAUC Update BundleConnect and Subscribe to Listen: Wait for the asynchronous messages which indicate a successful installation of an update
Arbitrary Commands
Nevertheless, during implementation of test cases, it may be necessary to execute lower level processes for system level tests. For that, a fallback is possible to execute arbitrary test commands via remote SSH connection. These commands are executed through another docker container running in the same Docker network (leda-network) and allow access to the target QEMU instances:
Leda Execute: Execute an arbitrary shell command via SSH on the test target
5.2 - Rust Tests
Note: The Rust tests are being replaced with test cases implemented in Robot.
Cross Compiling to X86_64 on Ubuntu 20.04
There is currently a step to cross-compile tests to X86_64. In order to successfully run the step, you need to make sure that the following artifacts are available on the runner:
You may restart your current shell so that all components are available as env vars.
6 - GitHub Workflow

- Manually creating a Release triggers the release workflow.
- The release workflow calls the build workflow.
- The build workflow indirectly depends on the sstate cache being prebuilt manually (see optimizations below)
- The build workflow runs a full build of the SDV-Image-All disk image for all target machines.
- A separate job is used for each target machine, to ensure an image build for a target machine can finish within 6 hours.
- Each build contains the creation of SBOM artifacts and the check for CVEs. The SBOM artifacts are in SPDX JSON format and packaged per target machine’s disk image (SDV-Image-Full to include all packages).
- The OSS License Scanning (using the OSS Review Toolkit) is done asynchronously on a separate fork, as it currently uses a proprietary infrastructure. The ORT-based infrastructure of Eclipse is planned to be used in the future. The web report is attached as a build artifact on the internal fork and not accessible by public currently.
- Once the build workflow’s jobs are finished, the release workflow will finalize by attaching the release artifacts as assets to the release.
Note: While the build workflow and release workflows are in progress, the GitHub release page of that release does not show any other assets besides the source archives. The release artifacts (eclipse-leda-.tar.xz) will only be visible once all workflows have finished.
Limitations on standard runners
As the GitHub-managed runners are optimized for ephemeral build use cases and a Yocto-based build process is very consuming in regards to CPU and disk capacity, a few optimizations need to be done before being able to run a full build or even a release workflow on limited GitHub-managed standard runners.
Please see the documentation about GitHub Hosted Runners for current specs.
| Resource |
Standard GitHub Runner |
Recommended for Yocto |
| CPU |
2-core CPU (x86_64) |
16-core CPU (x86_64) |
| RAM |
7 GB of RAM |
16 GB of RAM |
| Disk |
14 GB of SSD |
128+ GB of SSD |
| Time |
max. 6 hours / job |
not limited |
In general, GitHub recommends to split a build process into smaller chunks, which can then fit into the constraints.
Optimizations
The following optimizations have been implemented for the Eclipse Leda public repository and its build workflow:
-
Remote SState Cache: To minimize build time and disk usage, a remote sstate-cache mirror is being used. The mirror is hosted by one of the project sponsors on european Azure infrastructure and available as public HTTP mirror to anonymous Leda builds. The mirror is provided as best-effort, does not provide any kind of service level and may not be available at all times.
Note: To use the mirror, set the BB_HASHSERVE, MIRROR_SERVER, SSTATE_MIRRORS and related configuration settings. See the mirrors.yaml for a full sample.

-
Prebuilding: To fill the remote sstate cache mirror, another build infrastructure is being used. The repository fork has been configured with additional credentials to authenticate against the remote mirror for uploading the built packages. To ensure these steps are not run on the public OSS repository, the workflow steps use additional conditions to check for the owner of the repository. This is a workaround due to a known issue on GitHub Actions.
-
Chunking of the build steps: To minimize bandwidth transfer, a local GitHub Action Cache is being used. This cache is per target machine and filled with a separate workflow. The Prebuild sstate build jobs will run the BitBake process for 4 hours and then gracefully shut down. The build process will finish the current tasks. The remaining time (max. runtime for GitHub Runners is 6 hours) is used to package and upload the packages to the cache. If the 4 hours of build time are not enough, it may be required to re-run the same job more often.
Note: The disadvantage of this approach is that each run requires a significant lead time where the remote cache is downloaded, the recipes get parsed again, the build task dependencies are compiled etc. On a persistent runner, this time can be spared.
-
Rerun on sstate miss: When BitBake is missing a package in the sstate mirror (it may exist in the Hash Equivalence Server though), BitBake will log an Error and continue to run the recipe. However, as the cache-miss is logged as error, BitBake will exit with an error code, indicating a failed build, which in turn would mark the GitHub Job as failed, too. To circumvent this problem, the BitBake build process is executed in a loop (max. 3 retries) to ensure that with the current state, all packages can be built without errors, eventually succeeding with the buid.
-
Always upload GitHub Cache: Under normal circumstances, the GitHub Cache action will update the cache on success of the build job - to not poison the cache with failed builds. However, as the Leda build workflows run for a very long time and may fail due to other reasons, the goal is to still reuse the sstate-cache as much as possible. For that reason, the pat-s/always-upload-cache GitHub action is being used, as it will also upload the cache on failed builds.
7 - Runqemu
The content of this page has been marked outdated by the core development team.
If you would like to contribute and help keeping this documentation up to date,
please fork https://github.com/eclipse-leda/leda
and create a pull request.
Check the Eclipse Get Involved! FAQ for pre-requisites
and the Eclipse Leda Contribution Guidelines
for general information.
QEMU’s command line option can get quiet complex. Yocto is providing a convenient wrapper script called runqemu, which takes configurations into account which have been populated during the build process and also takes care of TAP networking setup and teardown. Unfortunately, it can only be used within an OpenEmbedded build environment.
Running without runqemu: when you need more control over qemu options
qemu-system-x86_64 -kernel .\bzImage-qemux86-64.bin -nographic -m 2G -append "console=ttyS0 root=/dev/vda1" -drive file=.../sdv-image-full-qemux86-64.ext4
Running with runqemu: simple and some convenient flags are supported
runqemu ovmf sdv-image-full
Running with leda: no options, runs the default settings only
leda

The performance of qemux86_64 is much better when KVM can be used.
Try running with:
runqemu ovmf kvm
Note: You may need to set up KVM for your host machine first, please refer to How to enable KVM for Poky qemu
/workspaces/leda-distro/build-sdv-x86_64 (imageformatcleanup ✗) $ ls -al /dev/kvm
crw-rw---- 1 root kvm 10, 232 May 16 06:46 /dev/kvm
8 - License Compliance
The Eclipse Leda distro is being scanned, audited and reviewed for OSS license and IP compliance.
The current state of this progress is shown in this documentation.
Our friends from the Eclipse Oniro project
have been so kind to set up a build and scan for Eclipse Leda as well.
We’re currently reusing that infrastructure, until we can either merge the
build infrastructure or set it up on our own, depending on how things continue.
The tools being used:
The scan tools environment are available in leda-distro/resources/oss-compliance
There are additional BitBake / kas configurations, which need to be used for the build before the OSS compliance toolchain can be used with the build directory:
Current Status

Evaluation
- The scanned licenses report contains all potentially used license types. For each finding, a human audit is required for deciding which license is actually being in use.
- Numbers: 41% percent don’t need human audit, 50% has been manually audited and cleared, 10% work is left to do
| Package |
Status |
Expected License Result |
Risk |
Task |
| containerd |
Audit Open |
Apache-2.0, BSD |
Green |
|
| elfutils |
Audit Open |
GPL-3.0 |
Red |
Remove/Replace: Why is it installed? |
| expat |
Audit Open |
MIT |
Green |
|
| gcc |
Audit Open |
GPL-3.0 |
Red |
Remove: No need for gcc on Leda image |
| libgcc |
Audit Open |
GPL-3.0 |
Red |
Remove: No need for gcc on Leda image |
| json-glib |
Done |
Partly GPL-3.0 |
Yellow |
Check which parts are GPL-3.0 |
| libffi |
Audit Open |
Partly GPL-3.0 |
Yellow |
Needed? Check which parts are GPL-3.0 |
| libidn2 |
Done |
Partly GPL-3.0 |
Yellow |
Needed? Check which parts are GPL-3.0 |
| libunistring |
Done |
Partly GPL-3.0 |
Yellow |
Needed? Check which parts are GPL-3.0 |
| libxcrypt |
Audit Open |
Mixed |
Red |
Check licenses, Needed? |
| linux-firmware-rpidistro |
Done |
Mixed |
Red |
Check licenses |
| onig |
Audit Open |
BSD-2 |
Red |
Check licenses, Needed? |
| popt |
Audit Open |
FSF, Mixed |
Red |
Check licenses, Needed? |
| rauc |
Audit Open |
Apache-2.0 |
Green |
|
| runc-opencontainers |
Done |
BSD-3 |
Green |
|
| sudo |
Audit Open |
BSD-3 |
Green |
|
| zstd |
Done |
Partly GPL-3.0 |
Yellow |
Needed? Check which parts are GPL-3.0 |
| kanto-auto-deployer |
Audit Open |
Apache-2.0, EPL-2.0 |
Green |
|
| linux-raspberrypi |
Done |
GPL-2.0 + 50 others |
Green |
Check other licenses |
Note: excerpt, current work in progress
Yocto Configuration
Our distro configuration and the image definitions use the following license-compliance related settings:
Image-based configuration:
INCOMPATIBLE_LICENSE = "GPL-3.0* LGPL-3.0* AGPL-3.0*"
See meta-leda-distro/recipes-sdv-distro/images/sdv-image-all.bb
Global configuration:
INHERIT += "archiver"
ARCHIVER_MODE[src] = "patched"

COPYLEFT_LICENSE_INCLUDE = 'GPL* LGPL*'
COPYLEFT_LICENSE_EXCLUDE = 'CLOSED Proprietary MIT BSD'
COPYLEFT_RECIPE_TYPES = "target"
ARCHIVER_MODE[mirror] = "combined"

# Some licenses require the license text to accompany the binary. You can achieve this by adding the following:
COPY_LIC_MANIFEST = "1"
COPY_LIC_DIRS = "1"
LICENSE_CREATE_PACKAGE = "1"

# Vulnerability Scanning
INHERIT += "cve-check"
See meta-leda-distro/conf/distro/include/leda-oss-compliance.inc
9 - Miscellaneous
9.1 - Resource Consumptions
Baseline (no apps installed)
Baseline: 400 MB
Installed components:
- Container Management: runc, containerd, container-management
- System Services: systemd, openssh, mosquitto, mosquitto-clients
- No cloud connector or edgecontainerd yet.
- No self update agent
- No containers, no vehicle apps etc.
root@qemux86-64:/bin# df -h
Filesystem      Size  Used Avail Use% Mounted on
/dev/root       2.5G  506M  1.8G  22% /
root@qemux86-64:/# free
            total        used        free      shared  buff/cache   available
Mem:           1.9G      329.6M        1.4G       16.6M      222.2M        1.6G
Swap:
Component Details
Dependencies
- cni (container networking): 51 MB
- containerd-ctr: 26 MB
- containerd: 46 MB
- dapr cli: 38 MB
- helm cli: 43 MB
- runc: 10 MB
SDV Components
- vehicle-data-cli: 2.3 MB (dynamic)
Medium:
- Linux Kernel (Poky minimal / Leda distro kernel): 8 MB / 21 MB
- oci-image-tool: 9 MB
- oci-runtime-tool: 7 MB
- sshd: 1 MB
- libstdc++: 2 MB
- lic: 2 MB
- libcrypto: 3 MB
- containerd-shim: 7 MB
- containerd-shim-runc-v1: 9 MB
- containred-shim-runc-v2: 9 MB
- libsystemd: 1 MB
- busybox: 1 MB
9.2 - Partition Layout
The bootable Leda Quickstart images are disk image with multiple partitions:
- Two bootloader partitions, to enable A/B update process
- A separate partition to hold bootloader status information
- An optional rescue partition with basic operating system and tooling
- Two rootfs partitions with a full installation of the operating system, to enable A/B update process
- A data partition for storing container runtime data
Partition Layout for QEMU x86-64
The x86_64 image uses GRUB as a bootloader and the partition layout is as follows:

Partition Layout for QEMU ARM-64
The partition layout for QEMU ARM-based images are comparable, except:
- Bootloader is replaced with U-Boot
Partition Layout for Raspberry Pi
The partition layout for Raspberry Pi images are comparable, except:
- Bootloader is replaced with U-Boot
- The last partition (the data partition) is marked as growable, to allow the use of the larger SD-Card capacities for container runtime data
10 - Releasing
Versioning and Codenames
- Distribution Versioning is following the
x.y.z syntax for the distribution, e.g. Leda 0.0.1
- Build Versioning is following the git describe syntax:
v0.0.1-blank-168-g7e14c4c
- Latest tag name:
v0.0.1
- Branch name:
blank
- Number of commits behind:
168
- Short Commit ID:
g7e14c4c
- Codenames are taken from Wikipedia List of Motor Racing Tracks
- Initial codename is
Hockenheim
- Current distribution version can be taken from
/etc/issue:
root@qemux86-64:~# cat /etc/issue
Eclipse Leda v0.0.8
How to Release
A new release is triggered manually from its GitHub web page Releases section. By
clicking on the Draft new release button, the release process starts:
- Select a branch to use as code base for the release
- Create a tag using the standard pattern
vX.Y.Z
- Write a title
Release X.Y.Z and release notes
- Optionally select if this is a pre-release
- Publish the release
- Validate the release
With Publish the release action the release workflow located in .github/workflows/release.yml will be triggered. This
will start building the distro image files for the supported platforms, running the test cases and generating reports as
junit xml and license scanning. If the image generation and the test runs are successful the artifacts: images, test
binaries and qa reports will be attached as assets to the release.
The build (build.yml) and release (release.yml) workflows share a common reusable workflow (base.yml). In this way the
release workflow repeats the build actions without duplicating the code.
Eclipse Leda Version
root@qemux86-64:~# cat /etc/issue
Eclipse Leda v0.0.8
Exact Build Timestamp
root@qemux86-64:~# cat /etc/version
20220408135014
root@qemux86-64:~# cat /etc/timestamp
20220408135230
root@qemux86-64:~# cat /etc/build
-----------------------
Build Configuration:  |
-----------------------
DISTRO = leda
DISTRO_VERSION = 2022
DATETIME = 20220408135014
DISTRO_NAME = Eclipse Leda
IMAGE_BASENAME = core-image-minimal
MACHINE = qemux86-64
TUNE_PKGARCH = core2-64
MACHINE_FEATURES = alsa bluetooth usbgadget screen vfat x86 pci rtc qemu-usermode
DISTRO_FEATURES = acl alsa argp  debuginfod  ipv4 ipv6 largefile pcmcia usbgadget usbhost wifi xattr  zeroconf pci    vfat seccomp largefile  ptest multiarch  vulkan virtualization k8s seccomp raucg
COMMON_FEATURES =
IMAGE_FEATURES = debug-tweaks
TUNE_FEATURES = m64 core2
TARGET_FPU =
APP_URI_PREFIX =
APP_URI_BRANCH =
-----------------------
Layer Revisions:      |
-----------------------
meta              = honister:ee68ae307fd951b9de6b31dc6713ea29186b7749
meta-poky         = honister:ee68ae307fd951b9de6b31dc6713ea29186b7749
meta-yocto-bsp    = honister:ee68ae307fd951b9de6b31dc6713ea29186b7749
meta-leda          = main:30a5ff0a7e04dfa2c9b43175a49ac7a2ae0c64a9 -- modified
meta-rauc         = honister:3faf4cc4fcf558e99dad5aa8532fef2ecd566653
meta-filesystems  = honister:061b7fc74f887454251307ef119b808a90654d3f
meta-networking   = honister:061b7fc74f887454251307ef119b808a90654d3f
meta-oe           = honister:061b7fc74f887454251307ef119b808a90654d3f
meta-python       = honister:061b7fc74f887454251307ef119b808a90654d3f
meta-perl         = honister:061b7fc74f887454251307ef119b808a90654d3f
meta-virtualization = honister:bd7511c53b921c9ce4ba2fdb42778ca194ebc3e8
meta-security     = honister:fb77606aef461910db4836bad94d75758cc2688c
patch             = main:a041dad5be9444d55491b57cb6a669a44196566d -- modified
10.1 - Validating
Validating the release
Steps to validate if a release is properly working:
-
Create a new pre-release from your branch
-
Download the release artifacts onto a clean system.
Do not use your build environment, to minimize the impact of existing environment configuration from BitBake etc.
-
Run the run-leda scripts to execute Qemu
Note: You should test each of the release archives, for each target machine.
-
Follow the Device Provisioning guide
-
Perform some verification tests (see below)
-
Cleanup: Delete the pre-release and the git tag:
git push --delete origin <tagname>
Ideas for manual verification steps
Note: These are just for manual testing, as we intend to extend the automated tests as much as possible.
- Operating system level
- Run
sdv-health on the shell
- Verify disk partitions and RAUC status, e.g.
rauc status
- Verify network interface and CAN-Bus with
ip addr
- Container runtime
- Check status of containers with
kantui
11 - Developing and Maintaining Utils
The Leda teams provides some custom utilities that allow for a more integrated end-user experience. They can be found in the main leda-utils repository on GitHub: eclipse-leda/leda-utils.
The following pages are meant to serve as both internal documentation and general guidelines when developing for Leda.
Bash
Leda uses the classic Bourne shell as its main shell, thus all scripts should be sh-compatible (use the #!/bin/sh shebang). As a Poky+OE-based distro we use BusyBox for core-utils. To check explicitly for “bashisms” in your scripts, the
checkbashisms tool might be useful.
Utility-Specific Pages
The bash-based leda-utils are all deployed with the same recipe under the sdv-base packagegroup: meta-leda/meta-leda-components/recipes-sdv/sdv-base.
Rust
The current main branch for leda-distro (and meta-leda) is based on the Kirkstone Yocto/Poky release.
The version of the Rust toolchain available in OE (Kirkstone) is 1.59.0. Make sure to target 1.59.0 (or earlier) when developing Rust-based utils for leda. To set 1.59.0 as your default Rust version on your development machine:
$ rustup install 1.59.0
$ rustup default 1.59.0
$ cargo --version
cargo 1.59.0 (49d8809dc 2022-02-10)
Generating bitbake recipes with cargo-bitbake
After making sure your toolchain is on version 1.59.0 go trough a clean build of your Rust binary:
$ cd <rust_project_dir>
$ cargo clean
$ rm Cargo.lock
$ cargo build --release
This will make sure the Cargo.lock is re-generated with packages matching the Rust version. The cargo.bbclass on which Rust recipes are based, requires all Rust crates + their version (matching the Cargo.toml) to be specified as a “SRC_URI +=”. This can become tedious and error-prone if done by hand. That’s why meta-rust provides a tool called cargo-bitbake that generates a minimal recipe with all the crates it finds in the Cargo.lock files of the project.
$ cargo install --locked cargo-bitbake
$ cd <rust_project_dir>
$ cargo bitbake
This will generate a recipe in the project root which you can use as a starting point.
Example: kantui_git.bb
Note this recipe will only build your Rust crate. To deploy/install your binary you have to define a .inc file with the same name as the recipe that would handle the installation.
Example: kantui.inc
Known bugs
The built-in proc_macros crate is not being imported properly by meta-rust (Kirkstone), thus breaking all library crates that define a proc_macro (meta-rust issue 266). To fix this create a libstd-rs_%.bbappend file containing the single line:
S = "${RUSTSRC}/library/test"
meta-leda already provides this fix here, so it should not be necessary to implement it again.
“Fat” Link time optimization
LTO is a nice feature of LLVM that can optimize even through language boundaries at link-time, but leads to longer overall build times. That is why Rust by default uses “thin” LTO which may result in larger/slower binaries. “Fat” LTO can be enabled when building release binaries by adding to the Cargo.toml file the following section:
[profile.release]
lto = true
For kantui this leads to reduction of the final binary size from ~8 MiB to ~5 MiB.
More information on profile-optimizations can be found here.
Note: Stripping the debug symbols completely results in further binary size reduction, but BitBake fails with a QA problem when deploying stripped binaries.
Rust-based utilities
Utility-Specific Pages
11.1 - Rust Utils
11.1.1 - Communicating with Кanto-CM via gRPC
Kanto container management binds to a unix socket (default: /run/container-management/container-management.sock) and exposes a gRPC interface which can be used to obtain all the functionality of the kanto-cm cli programatically.
The easiest way to access this API through Rust is by creating a new Rust crate:
$ cargo new talk-to-kanto
Dependencies
The most feature-rich gRPC library for Rust right now is tonic. Add the following to your Cargo.toml to make tonic and the tokio async runtime available to your crate. Tower and hyper are needed to be able to bind to the unix socket.
[dependencies]
prost = "0.11"
tokio = { version = "1.0", features = [ "rt-multi-thread", "time", "fs", "macros", "net",] }
tokio-stream = { version = "0.1", features = ["net"] }
tonic = {version = "0.8.2" }
tower = { version = "0.4" }
http = "0.2"
hyper = { version = "0.14", features = ["full"] }
serde = { version = "1.0.147", features = ["derive"] }
serde_json = { version = "1.0.89", default-features = false, features = ["alloc"] }


[build-dependencies]
tonic-build =  "0.8.2"
Compiling protobufs
The easiest way to obtain the kanto-cm .proto files is to add the container management repo in your project root as a git submodule:
$ git submodule init
$ git submodule add https://github.com/eclipse-kanto/container-management.git
$ git submodule update --init --recursive
You should now have the container-management repository available.
To build the .proto files during compile time, define a custom build.rs in the project root
Add the following main function to the build.rs:
fn main() -> Result<(), Box<dyn std::error::Error>> {
    tonic_build::configure()
        .build_server(false)
        .include_file("mod.rs")
        .type_attribute(".", "#[derive(serde::Serialize, serde::Deserialize)]")
        .compile(
            &["api/services/containers/containers.proto"],
            &["container-management/containerm/"],
        )?;
    Ok(())
}
Here it is important to know that tonic does not like deeply nested protobufs such as those for kanto-cm. That is why the line .include_file("mod.rs") re-exports everything in a seperate module which can later be included in the main.rs file.
"#[derive(serde::Serialize, serde::Deserialize)]" makes all structures (de-)serializable via serde.
Importing generated Rust modules
Now in src/main.rs add the following to import the generated Rust modules:
pub mod cm {
    tonic::include_proto!("mod");
}
use cm::github::com::eclipse_kanto::container_management::containerm::api::services::containers as cm_services;
use cm::github::com::eclipse_kanto::container_management::containerm::api::types::containers as cm_types;
Now all kanto-cm services as namespaced under cm_services.
Obtaining a unix socket channel
To obtain a unix socket channel:
use tokio::net::UnixStream;
use tonic::transport::{Endpoint, Uri};
use tower::service_fn;

let socket_path = "/run/container-management/container-management.sock";

let channel = Endpoint::try_from("http://[::]:50051")?
    .connect_with_connector(service_fn(move |_: Uri| UnixStream::connect(socket_path)))
    .await?;
This is a bit of a hack, because currently, tonic+tower don’t support binding directly to an unix socket. Thus in this case we attemp to make an http connection to a non-existent service on port 5051. When this fails, the fallback method connect_with_connector() is called where a tokio UnixStream is returned and the communication channel is generated from that.
Making a simple gRPC call to kanto-cm
All that is left is to use the opened channel to issue a simple “list containers” request to kanto.
// Generate a CM client, that handles containers-related requests (see protobufs)
let mut client = cm_services::containers_client::ContainersClient::new(channel);
let request = tonic::Request::new(cm_services::ListContainersRequest {});
let response = client.list(request).await?;
Since we made all tonic-generated structures (de-)serializable we can use serde_json::to_string() to print the response as a json string.
println!("{}", serde_json::to_string(&response)?);
11.1.2 - Kanto Auto deployer (KAD)
TLDR: To deploy a container in the final Leda image, all you generally need to do is add the manifest in the kanto-containers directory and re-build.
Kanto-CM does not provide (currently) a stable feature that allows for the automatic deployment of containers through manifest files similar to k3s’ automated deployment of k8s-manifests found in the /var/lib/rancher/k3s/server/manifests directory.
This can be worked around via a bash script for each container that runs on boot and makes sure it’s deployed. Even though this approach is functional it is not very structured and would require a lot repeating code.
That is why the “Kanto Auto deployer” tool was developed. It directly implements the ideas in Communicating with Кanto-CM via gRPC.
The compiled binary takes a path to a directory containing the json manifests, parses them into Rust structures and sends gRPC requests to kanto container management to deploy these containers.
Manifest structure
Because Kanto CM uses different JSON formats for the interal state representation of the container (from the gRPC API) and for the deployment via the Container Management-native init_dir-mechanism, KAD supports both through the “manifests_parser” module.
The conversion between formats is automatic (logged as a warning when it’s attempted)
so you do not need to provide extra options when using one or the other.
This is the CM-native format, described in the Kanto-CM documentation.
It is the recommended format since KAD is supposed to be replaced by native CM deployment modules in the future and this manifest
format will be compatible with that.
It also allows you to ommit options (defaults will be used). KAD will issue a log warning when the “manifests_parser” attempts to convert this manifest format
to the gRPC message format (internal state representation).
Internal State Representation
The KAD “native” manifests format uses the exact same structure for its manifests as the internal representation of container state in kanto container management.
This manifest format does not allow keys in the json to be ommited, so these manifests are generally larger/noisier.
For example:
{
    "id": "",
    "name": "databroker",
    "image": {
        "name": "ghcr.io/eclipse/kuksa.val/databroker:0.2.5",
        "decrypt_config": null
    },
    "host_name": "",
    "domain_name": "",
    "resolv_conf_path": "",
    "hosts_path": "",
    "hostname_path": "",
    "mounts": [],
    "hooks": [],
    "host_config": {
        "devices": [],
        "network_mode": "bridge",
        "privileged": false,
        "restart_policy": {
            "maximum_retry_count": 0,
            "retry_timeout": 0,
            "type": "unless-stopped"
        },
        "runtime": "io.containerd.runc.v2",
        "extra_hosts": [],
        "port_mappings": [
            {
              "protocol": "tcp",
              "container_port": 55555,
              "host_ip": "localhost",
              "host_port": 30555,
              "host_port_end": 30555
            }
        ],
        "log_config": {
            "driver_config": {
                "type": "json-file",
                "max_files": 2,
                "max_size": "1M",
                "root_dir": ""
            },
            "mode_config": {
                "mode": "blocking",
                "max_buffer_size": ""
            }
        },
        "resources": null
    },
    "io_config": {
        "attach_stderr": false,
        "attach_stdin": false,
        "attach_stdout": false,
        "open_stdin": false,
        "stdin_once": false,
        "tty": false
    },
    "config": {
        "env": [
            "RUST_LOG=info",
            "vehicle_data_broker=debug"
        ],
        "cmd": []
    },
    "network_settings": null,
    "state": {
        "pid": -1,
        "started_at": "",
        "error": "",
        "exit_code": 0,
        "finished_at": "",
        "exited": false,
        "dead": false,
        "restarting": false,
        "paused": false,
        "running": false,
        "status": "",
        "oom_killed": false
    },
    "created": "",
    "manually_stopped": false,
    "restart_count": 0
}
The only difference to the actual internal state representation is that fields in the manifest can be left empty ("") if they are not important for the deployment. These values will be filled in with defaults by kanto-cm after deployment.
For example, you do not need to specify the container “id” in the manifest, as an unique uuid would be assigned automatically after deployment.
Container deployment in Leda
Kanto-auto-deployer can run as a one-shot util that goes through the manifest folder (default: /data/var/containers/manifests) and deploys required containers.
When you pass the --daemon flag it would enable the “filewatcher” module that would continuously monitor the provided path for changes/creation of manifests.
The Bitbake recipe for building and installing the auto deployer service can be found at kanto-auto-deployer_git.bb.
This recipe also takes all manifests in the kanto-containers directory and installs them in the directory specified by the KANTO_MANIFESTS_DIR BitBake variable (weak default: /var/containers/manifests).
Important: To deploy a container in the final Leda image, all you generally need to do is add the manifest in the kanto-containers directory and re-build.
Conditional compilation of the filewatcher module
To reduce binary bloat the --daemon option is namespaced under the filewatcher conditional compilation flag (enabled by default).
To compile KAD without the filewatcher module run: cargo build --release --no-default-features.
(Implemented in Leda Utils PR#35)
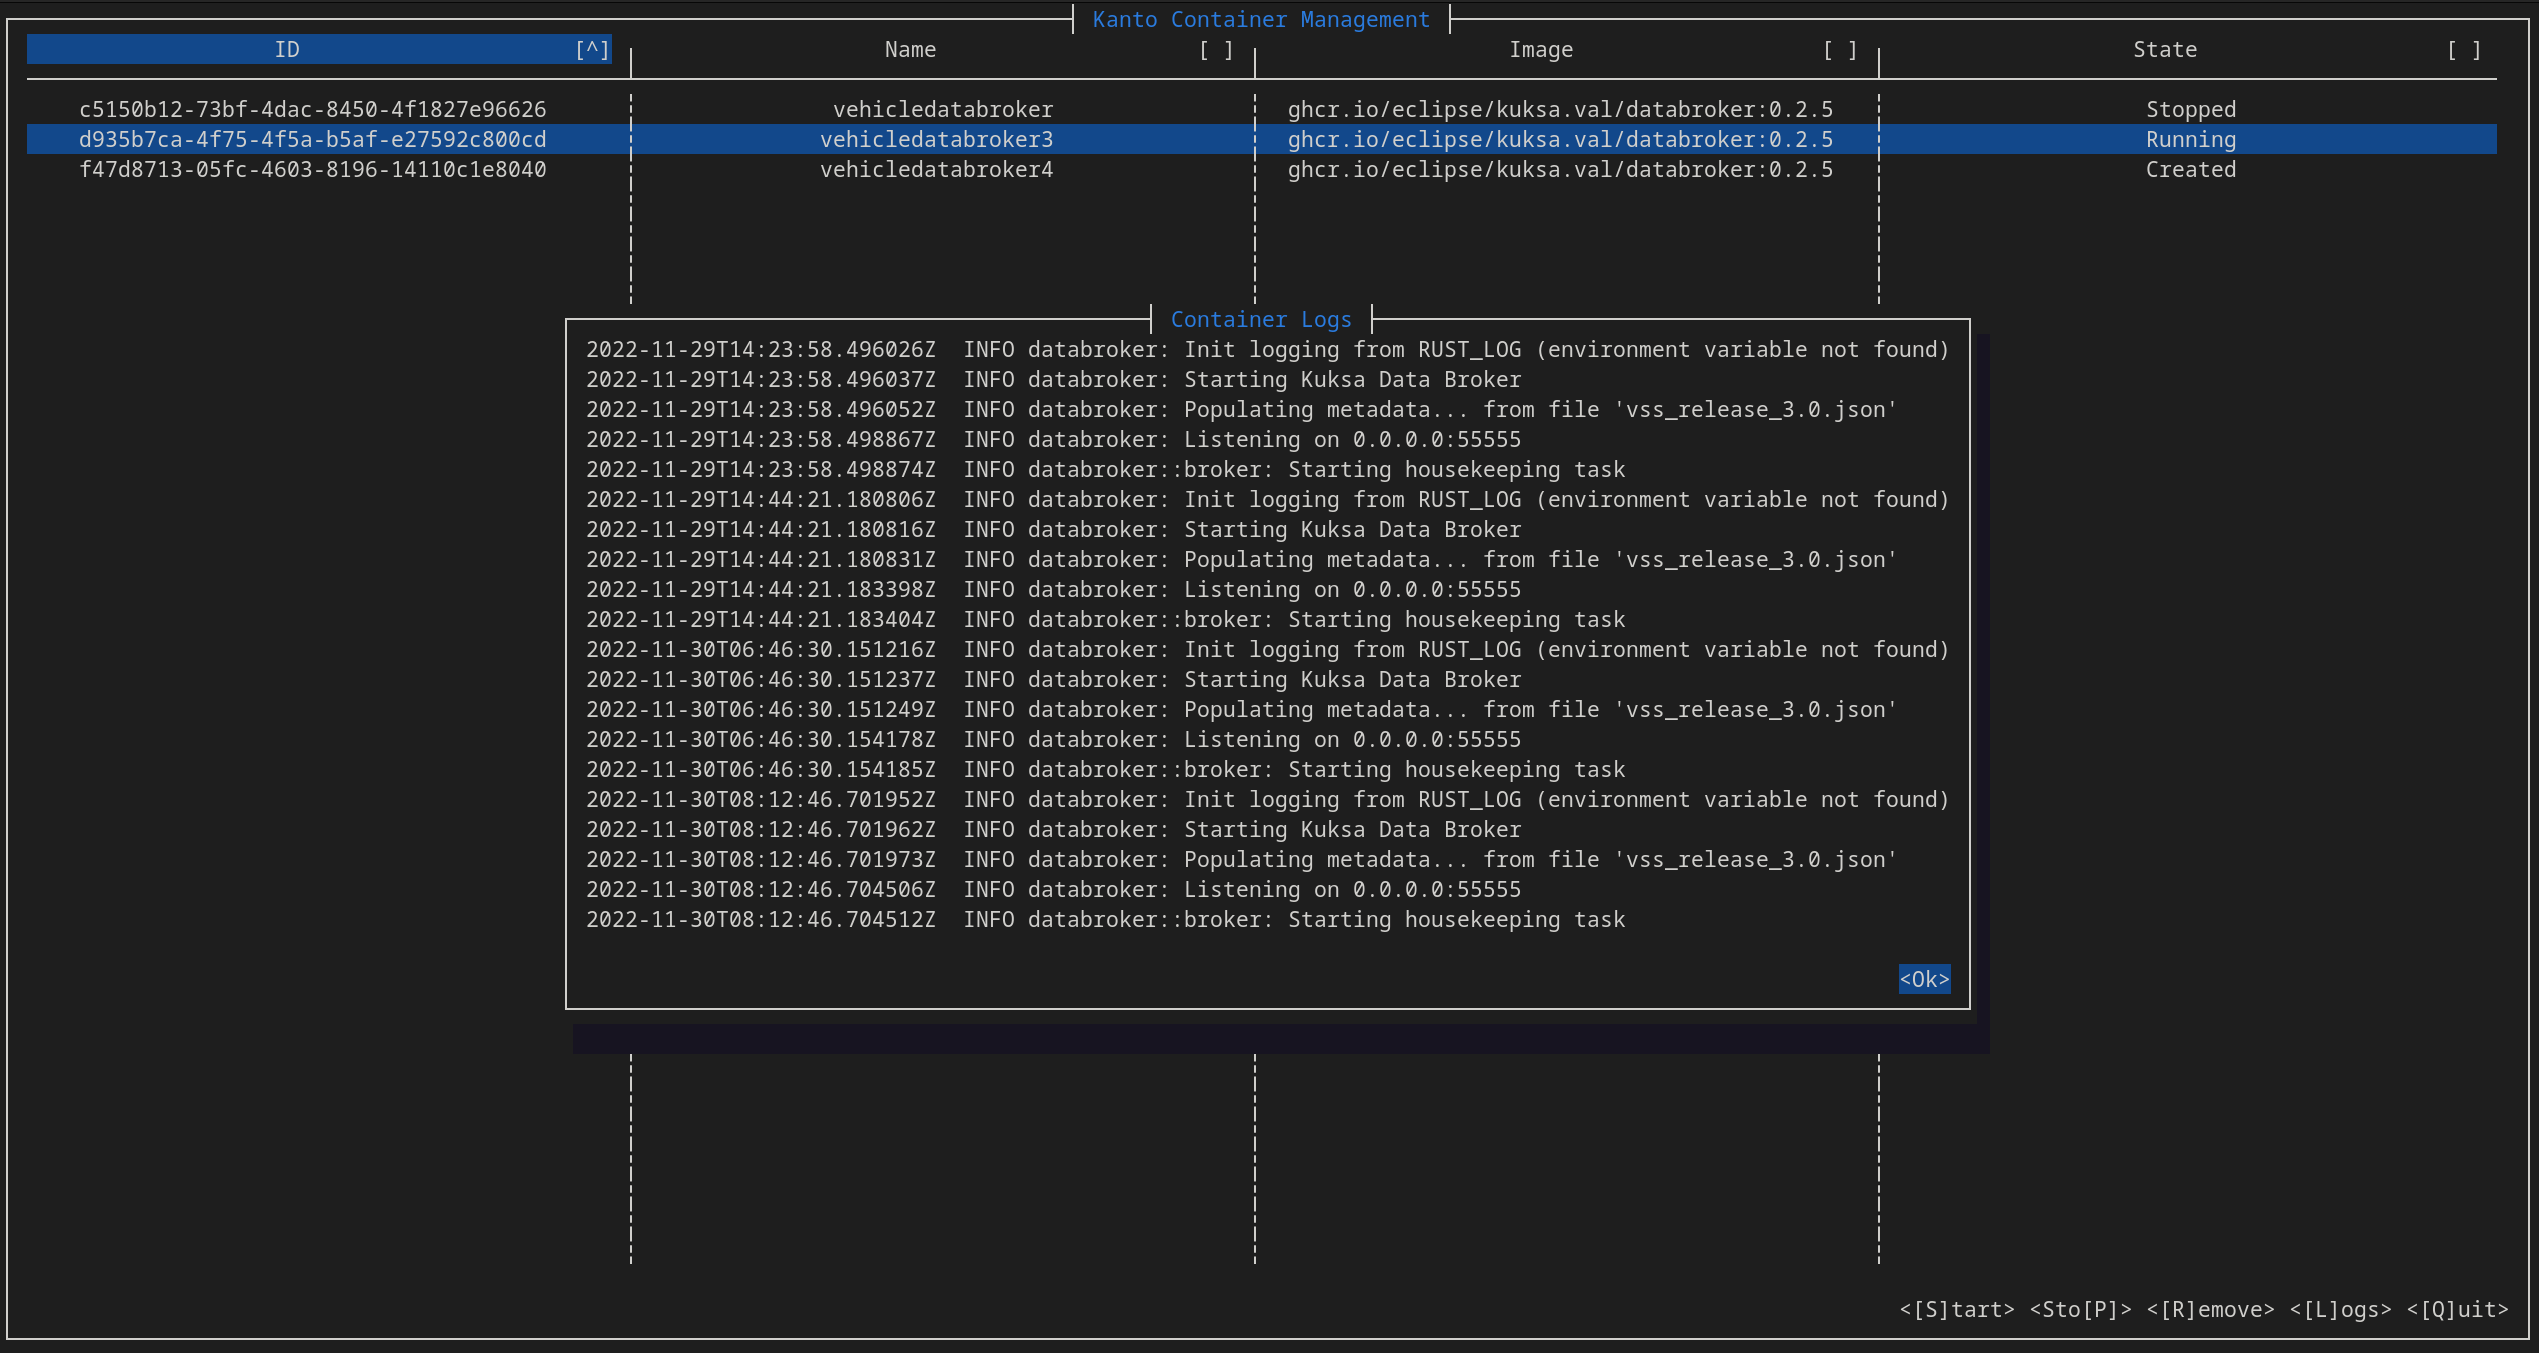
11.1.3 - Kantui
The k8s ecosystem comes with a lot of utilies that allow for the easier management of containers (such as k9s). The kantui util aims to be a “nice” text user interface that lets the user start/stop/remove/get logs of deployed containers in kanto-cm.
Development notes
This tool is again based on the ideas in Communicating with Кanto-CM via gRPC.
It spins up two threads - an UI thread (drawing/updating UI) and an IO thread (communicating with kanto-cm via gRPC). The communication between these two threads happens over an async-priority-channel with ListContainers request having a lower priority than Start/Stop/Remove/Get Logs (“user interaction”) requests.
This in an “eventually fair” mechanism of communication. That way even if kanto-cm is handling a slow request (such as stopping a container that does not respect SIGTERM) the UI thread is never blocked, allowing for a responsive-feeling UI. The size of the channel is 5 requests and the UI is running at 30 fps. Thus even if the UI gets out-of-sync with the actual state of container management it would be “only” for 5 out 30 frames.
Cursive and ncurses-rs
The cursive crate is used as a high level “framework” as it allows very easy handling of UI events via callbacks, though this might be prone to callback hell.
The default backend for cursive is ncurses-rs which a very thin Rust wrapper over the standart ncurses library. This in theory would be the optimal backend for our case as ncurses is a very old and stable library that has buffering (other backends lead to flickering of the UI on updates) and is dynamically linked (smaller final binary size).
The ncurses-rs wrapper however is not well-suited to cross-compilation as it has a custom build.rs that generates a small C program, compiles it for the target and tries to run it on the host. The only reason for this C program to exist is to check the width of the char type. Obviously, the char type on the host and the target might be of different width and this binary might not even run on the host machine if the host and target architectures are different.
After coming to the conclusion that the ncurses-rs backend was not suitable, kantui was migrated to the termion backend + the cursive_buffered_backend crate which mitigates the flickering issue.
[dependencies]
...
cursive_buffered_backend = "0.5.0"

[dependencies.cursive]
default-features=false
version = "0.16.2"
features = ["termion-backend"]
This completely drops the need for ncurses-rs but results in a slightly bigger binary (all statically linked).
Bitbake Recipe
The recipe was created following the guidelines in Generating bitbake recipes with cargo-bitbake and can be found in meta-leda/meta-leda-components/recipes-sdv/eclipse-leda/.
Future improvement notes
-
The gRPC channel can get blocked thus effectively “blocking” the IO-thread until it is freed-up again. Maybe open a new channel for each request (slow/resource heavy)?
-
Reorganize the code a bit, move all generic functionally in the lib.rs.
11.2 - Shell Utils
11.2.1 - sdv-health
A general utility for monitoring the status of important sdv services/containers/devices.
Checking the status of kanto-cm containers
Kanto CM containers are split into two groups - required and optional. Both groups are checked, but only a warning is issued when an optional container is missing/not working.
General code for checking the status is:
if [ -n "$KANTO_CM_CONTAINERS_OPT" ]; then
	printf -- "$SEPARATOR\n"

	printf -- "${COL_WHITE}[Kanto CM Containers (OPTIONAL)]${COL_NC}\n"
	if [[ ${CM_STATUS} != *"inactive"*  ]]; then

		# "Optional containers"
		KANTO_CM_LIST=$(${KANTO_CMD} list)
		# removes tabs, splits on pipe and takes the container name column ($2)
		FOUND_CONTAINERS=($(echo "$KANTO_CM_LIST" | awk -F'|' '{gsub(/\t/, ""); print $2}')) # array with all kanto container names
		# removes tabs, splits on pipe and takes the container status colum ($4)
		FOUND_CONTAINERS_STATES=($(echo "$KANTO_CM_LIST" | awk -F'|' '{gsub(/\t/, ""); print $4}')) # array with all kanto container states
		KANTO_CM_CONTAINERS_ARR=( $KANTO_CM_CONTAINERS_OPT )

		for expectedCtr in ${KANTO_CM_CONTAINERS_ARR[@]}; do
			CTR_IDX=$(get_array_element_index ${expectedCtr} ${FOUND_CONTAINERS[@]})
			if [ ! -z $CTR_IDX ]; then
				status=${FOUND_CONTAINERS_STATES[$CTR_IDX]}
				if [ "$status" = "Running" ]; then
					printf "  * %-40s : $TEXT_OK\n" "${expectedCtr}"
				else
					printf "  * %-40s : $TEXT_WARN (%s)\n" "${expectedCtr}" "$status"
				fi
			else
				printf "  * %-40s : $TEXT_WARN (%s)\n" "${expectedCtr}" "NOT FOUND"
			fi
		done

	else
		printf "  * %-40s : $TEXT_FAIL (%s)\n" "Kanto Container Management" "Unavailable"
	fi

fi
Here it is important to know that kanto-cm list outputs the list of containers in a different order every time it’s called. That is why, kanto-cm list is invoked once and its output is stored in a variable:
KANTO_CM_LIST=$(${KANTO_CMD} list)
Output:
ID                                      |Name                                   |Image                                                                                                                          |Status         |Finished At                     |Exit Code   |
-------------------------------------   |-------------------------------------  |------------------------------------------------------------                                                                   |----------     |------------------------------  |----------  |
d82a406e-80d7-4d2c-8044-3799544fc39a    |vum                                    |ghcr.io/eclipse-leda/leda-contrib-vehicle-update-manager/vehicleupdatemanager:main-1d8dca55a755c4b3c7bc06eabfa06ad49e068a48    |Running        |                                |0           |
0f079856-767c-4e8d-b4df-a2323392849f    |cloudconnector                         |ghcr.io/eclipse-leda/leda-contrib-cloud-connector/cloudconnector:main-47c01227a620a3dbd85b66e177205c06c0f7a52e                 |Exited         |2023-01-31T11:58:01.564126452Z  |1           |
e4cf317e-c2d3-42c7-8f12-8ecf6f9d5d7a    |databroker                             |ghcr.io/eclipse/kuksa.val/databroker:0.2.5                                                                                     |Running        |                                |0           |
6440a9b6-4fb8-4735-b3de-484286ac705b    |feedercan                              |ghcr.io/eclipse/kuksa.val.feeders/dbc2val:v0.1.1                                                                               |Running        |                                |0           |
efbd572b-3331-4f19-9b17-7c69511ec5ca    |hvacservice-example                    |ghcr.io/eclipse/kuksa.val.services/hvac_service:v0.1.0                                                                         |Running        |                                |0           |
6d9a6f07-1659-4b51-9ddb-6e9ade64f2fd    |seatservice-example                    |ghcr.io/eclipse/kuksa.val.services/seat_service:v0.1.0                                                                         |Running        |                                |0           |
06b0ddf2-7c91-41e4-9a00-4213ee361cdf    |sua                                    |ghcr.io/eclipse-leda/leda-contrib-self-update-agent/self-update-agent:build-12                                                 |Running        |                                |0           |
So we use awk to split on pipe (column), strip unecessary tabs. print $2 then gives us the container name and print $4 - its status.
sdv-health then proceeds to check if every container specified in the list is available and if its status is Running.
Note: Exited is considered a fail-state.
Checking kanto-cm socket
This is a simple test -s check for the default socket path.