- Download latest Eclipse Leda release
- Run Eclipse Leda
- on emulated Qemu devices or
- on Raspberry Pi 4
- Configure device, e.g. provision the device
- Explore the device tools
- Develop your first Vehicle App using Eclipse Velocitas template
- Deploy a Vehicle App to the device
This is the multi-page printable view of this section. Click here to print.
Getting Started
- 1: Introduction to SDV concepts
- 2: Download latest release
- 3: Running on Docker
- 4: Running on Raspberry Pi
- 4.1: CAN-Bus extensions
- 5: Running on QEMU
- 5.1: CAN Bus
- 5.2: Transferring Files
- 6: Running on Linux
- 7: Cheatsheet
- 8: Utilities
- 8.1: SDV Health
- 8.2: KantUI
- 8.3: SDV Device Info
- 8.4: SDV Provision
- 8.5: SDV MotD
- 8.6: CAN Forward
- 8.7: Kanto Auto Deployer (KAD)
- 8.8: SDV Container Exec
- 8.9: SDV Kanto-Ctl
- 8.10: Blueprint Selector
- 9: Wifi Configuration
- 10: GPS Connectivity
1 - Introduction to SDV concepts
This page introduces the main concepts around Eclipse Leda, Eclipse Kuksa, Eclipse Velocitas, and Eclipse Kanto for developing and deploying applications for a software defined vehicle (SDV). The intention is to introduce the main concepts and how these projects interact. When you are already familiar with the general ideas of the Eclipse SDV, you can also jump to a hands-on tutorial on how to develop a seat adjuster application or replicate an Eclipse SDV Blueprint for managing vehicle fleets using Eclipse SDV concepts and technologies.
Abstract Architecture
For the software defined vehicle we may assume the following abstract architecture.

The architecture evolves around actuators and sensors in a vehicle, like the state of a passenger seat or a door, which get controlled by connected ECUs. These ECUs react to and produce signals, which they communicate over automotive communication systems like CAN or SOME/IP. To establish a more flexible interaction between these ECUs and make the overall vehicle more software-defined, we assume various vehicle applications which want to interact with the actuators and sensors, e.g., to control a seat based on a saved driver profile. The architecture contains a vehicle abstraction layer between the ECUs and the vehicle applications. This abstraction layer introduces a potential control point for security and safety considerations and generally decouples the application logic from the more deeply embedded soft- and hardware layers.
Vehicle Abstraction Layer
As the name implies the vehicle abstraction layers offers abstract ways to interact with the underlying vehicle.
Vehicle Signal Specification (VSS)
We need a joint data model for the potential signals with which an application can interact. We propose to use the Vehicle Signal Specification (VSS) from the Connected Vehicle Systems Alliance (COVESA) for this.

VSS essentially defines a rule set of how to express the definition of signals in a vehicle. This definition bases a tree structure where each domain, like body control, gets an individual sub-tree. The authors of VSS further provide a default tree of signals to be expected in a vehicle. However, it is common practice to tailor the default tree for a specific vehicle model by adding overlays.
VSS allows modeling and structuring of the data from a vehicle but does not define interfaces for the interaction with this data since this depends on the used communication technology and further circumstances like whether VSS data gets processed inside the vehicle or off-board.
For our architecture, we therefore add the Eclipse Kuksa.val databroker from the Eclipse Kuksa project.
Eclipse KUKSA.val databroker
The Eclipse Kuksa.val databroker acts as a vehicle abstraction layer by brokering VSS signals between vehicle applications
and deeply embedded systems in the vehicle. Enabling this abstraction requires a vehicle-specific component to translate between the Kuksa.val databroker and
the underlying transport systems and ECUs.
With Eclipse Kuksa, we refer to these software components as providers and further differentiate between actuation and data providers.

For actuators, the Kuksa.val databroker stores the desired and the current state. Typically, an application would perform a control operation by setting the target state and monitoring the current state. It is then the task of the actuation provider to perform the action while the data provider updates the current state according to signals sent on the vehicle bus. To get notified of any changes, applications, and providers can subscribe to specific signals at the Kuksa.val databroker.
The Kuksa.val databroker is written in Rust and offers communication over gRCP. To make life easier for developers using the Kuksa.val databroker there is a Python-client which can be integrated in own applications. When developing with other languages, you may have to generate client code yourself with the gRPC tooling. Either way, these clients allow the development of vehicle applications and providers.
Vehicle Application Development
When developing an application to interact with the abstraction layer, there are a couple of aspects to cover, which are not specific to a single application. Because of that, some projects are evolving around the application development phase.
Eclipse Autowrx and digital.auto Playground
A good starting point to figure out what signals are available is the website of the digital.auto playground based on Eclipse Autowrx.

In the next step, you can ideate on new applications, start coding, and get fast feedback using the prototyping feature of the playground. Once you are confident with the initial version, you can continue the development journey with the help of Eclipse Velocitas, which comes with several features making the life of vehicle application developers easier.

Eclipse Velocitas
Eclipse Velocitas™ is an open source project providing a development tool chain to create containerized Vehicle Apps, offering a development experience to increase the speed of a development team (velocity).
Among other things, Eclipse Velocitas provides a template repository. To kick-start the development of a new application, you can create an individual repository from this template. As an alternative, Eclipse Velocitas provides a CLI application with which you can configure the creation of a tailored vehicle application repository. Either way, the resulting repository contains skeleton code for the actual application and comes with pre-defined GitHub Actions workflows to automate the testing and releasing of applications as containers. The repository further contains the Dockerfile for a dev container that setups a development and vehicle environment on the developer machine. It is then possible to interact with this container through VSCode.
Another aspect of Eclipse Velocitas is the so-called vehicle model. Here it becomes possible to take a custom vehicle model expressed in VSS and generate a tailored SDK with specific domain classes to interact with a Kuksa.val databroker using the same model. This way, we can directly develop against the used vehicle model.

A typical Eclipse Velocitas application development flow then may contain the following steps:
- create Repository
- build and run Dev Container locally from VSCode
- start vehicle runtime in Dev container
- develop vehicle application and integration tests
- commit and push vehicle applications to trigger tests in GitHub Actions workflows
- trigger release workflow in GitHub
As a result of the Release workflow, the generated repository contains a Container image with the vehicle application. A target device, e.g., a vehicle or test device, can pull and execute this container.
Vehicle Providers and Emulation
The underlying assumption when developing a vehicle application against the vehicle abstraction layer is that components below the abstraction fulfill the requests coming from the application. In other words: Developers have to assume that there are providers for the signals with which their application interacts. For a production-ready vehicle, this should be the case. But during development and testing the creation of such providers adds overhead and is a potential cause for further errors. An alternative is to use pre-developed services or even a generalized vehicle mock service which acts as such a provider. Developers can alter the vehicle mock service by defining the desired behavior through a Python-based DSL.

Vehicle Application Runtime
The next step is to bring the application to the target device and the vehicle. There are various options for how to run and orchestrate vehicle application containers. Some originate from general IT scenarios like Kubernetes or Docker Compose, and others focus more on automotive and IoT-use cases like Eclipse Kanto. So a vehicle application developer now faces the challenge of picking a runtime and integrating this runtime with required infrastructure components like the Kuksa.val databroker or respective Kuksa.val providers to enable the vehicle application.
Eclipse Leda
Among other things, Eclipse Leda already provides such a target platform through a Linux-based distribution of pre-integrated Eclipse SDV components. See the architecture page for more details on the elements in Eclipse Leda. For the container execution, Eclipse Leda utilizes Eclipse Kanto, which implements lightweight management of OCI-compliant containers and comes by default with containerd. It is possible to manage the containers either through a CLI or by writing container manifest files and placing them in a dedicated folder on the file system from where Eclipse Kanto automatically performs them.
Service Exchange
Another challenge when deploying multiple components that need to collaborate as services is how they find and communicate with each other. In Eclipse Kanto, the discovery and exchange can happen over container indetifiers or topics on a local MQTT broker. The Eclipse SDV community already came up with other approaches for the service exchange topic like Eclipse uProtocol, Eclipse Chariott or Eclipse Zenoh.
Seat Adjuster
To see the explained concepts in action, it is best to build your own application. The Seat Adjuster is good starting point with specific examples.
2 - Download latest release
Latest Release Artifacts
Note: There are no official releases yet.
The artifacts available on the Release page are for testing the build and release workflows.
They should be considered as unstable nightly builds from the main branch.
Releases marked -M1, -M2, -RC1 etc. are preparations for official releases according to the Eclipse Release process.
Go to the Eclipse Leda Releases page and download the release archive for the respective machine. The release archives container the disk image and the respective Linux kernel:
| Machine | Filename | Description |
|---|---|---|
| QEMU x86_64 | eclipse-leda-qemu-x86_64.tar.xz | For running QEMU x86 64-Bit |
| QEMU ARM 64 | eclipse-leda-qemu-arm64.tar.xz | For running QEMU ARM 64-Bit |
| Raspberry Pi 4 | eclipse-leda-raspberrypi.tar.xz | For running on Raspberry Pi 4 (SD-Card Image) |
Using GitHub CLI tool
To download all files of the latest release using the GitHub CLI:
-
Install GitHub CLI, e.g. for Ubuntu:
curl -fsSL https://cli.github.com/packages/githubcli-archive-keyring.gpg | sudo dd of=/usr/share/keyrings/githubcli-archive-keyring.gpg echo "deb [arch=$(dpkg --print-architecture) signed-by=/usr/share/keyrings/githubcli-archive-keyring.gpg] https://cli.github.com/packages stable main" | sudo tee /etc/apt/sources.list.d/github-cli.list > /dev/null sudo apt update sudo apt install gh -
Authenticate to GitHub:
gh auth login -
Download Leda latest release:
On Linux:
mkdir leda && cd leda

gh release download \
  --pattern '*.zip' \
  --pattern 'eclipse-leda-*' \
  --repo eclipse-leda/leda-distro
On Windows:
gh release download --pattern "*.zip" --pattern "eclipse-leda-*" --repo eclipse-leda/leda-distro -
Continue with Running Eclipse Leda on QEMU or Running Eclipse Leda on Raspberry Pi 4
3 - Running on Docker
By using the dockerized Leda quickstart images, the SDV vehicle edge components can be evaluated on emulated X86-64 and ARM64 system images, without having to install QEMU and dependencies manually.

If you want to execute the image without Docker, please see Running on QEMU. This allows to tweak the startup script, modify the emulated hardware device and set up advanced network configurations.
There are two options to run Leda:
- Docker: Simple, restricted to one container
- Docker Compose: Advanced, allows networking between containers
Recommendations
- A Linux host with 4 vCPUs, 8GB of RAM and SSD storage is recommended
- Docker
Docker
The easiest way is to run a single instance of Leda in a Docker container:
-
Run the Leda Docker quickstart image:
docker run -it ghcr.io/eclipse-leda/leda-distro/leda-quickstart-x86 -
Login with
root -
Stop the Docker container
shutdown nowNote: If you need to stop the container from outside, use the
docker stop <id>command from a separate terminal.
Privileged Containers
When run as a privileged container, QEMU will try to set up a TAP network and use KVM acceleration. Network and CPU will be faster, depending on the host system.
To be able to use these host devices, QEMU needs access to the following devices:
/dev/kvm/dev/net/tun
Example command:
docker run -it --privileged --device=/dev/kvm:/dev/kvm --device=/dev/net/tun:/dev/net/tun ghcr.io/eclipse-leda/leda-distro/leda-quickstart-x86
Exposing additional ports
To also expose ports to connect to ssh, mqtt or the Kuksa databroker, add the port mappings to the Docker command:
docker run -it --privileged -p 2222:2222 -p 1883:1883 -p 30555:30555 ghcr.io/eclipse-leda/leda-distro/leda-quickstart-x86:latest
The following ports are specifically of interest and exposed by the docker container:
2222for SSH (mapped internally to22)1880- free slot reserved for user service1883for MQTT8888- free slot reserved for user service30555for Kuksa Databroker
Note: In unprivileged mode, only these ports are mapped by the Docker container and forwarded to the Leda system. In privileged mode, all TCP ports can be exposed, which will then be forwarded from the Docker container into the Leda system. See the entrypoint script for details.
Running ARM-64 version
To run the ARM-64 bit version of the image, use the leda-quickstart-arm64 container image:
docker run -it ghcr.io/eclipse-leda/leda-distro/leda-quickstart-arm64:latest
Docker Compose
A more convenient way to setup advanced scenarios is to use Docker Compose. There is a Docker Compose configuration for an Eclipse Leda setup in resources/docker-compose.
It will start up the following containers:
- Leda Quickstart image (QEMU x86-64)
- Leda Quickstart image (QEMU ARM-64)
- Web Server with pre-built RAUC Update Bundles
- MQTT Bridge
- DNS Proxy (Allows QEMU to use the Docker DNS)
Usage
Get the Docker Compose configuration file and additional dockerfiles from the https://github.com/eclipse-leda/leda-distro repository:
git clone --filter=blob:none https://github.com/eclipse-leda/leda-distro
cd leda-distro/resources/docker-compose
Starting the containers with:
docker compose up --detach --wait
Log in to a development shell inside of the docker network:
docker compose run --rm devshell
Stopping the containers:
docker compose down
Docker Compose Services
Checking all containers are running or exited successfully:
$ docker compose ps
NAME                 COMMAND                  SERVICE              STATUS              PORTS
leda-arm64           "/docker/leda-quicks…"   leda-arm64           running (healthy)   1883/tcp, 0.0.0.0:2002->2222/tcp, 0.0.0.0:30556->30555/tcp
leda-bundle-server   "/docker-entrypoint.…"   leda-bundle-server   running (healthy)   0.0.0.0:8080->80/tcp
leda-dns-proxy       "dnsmasq -k"             dns-proxy            running             53/tcp, 0.0.0.0:5353->53/udp
leda-initializer     "/bin/sh -c /root/le…"   leda-initializer     exited (0)
leda-mqtt-broker     "/docker-entrypoint.…"   mqtt-broker          running (healthy)   0.0.0.0:1883->1883/tcp
leda-x86             "/docker/leda-quicks…"   leda-x86             running (healthy)   1883/tcp, 0.0.0.0:30555->30555/tcp, 0.0.0.0:2001->2222/tcp
Network setup
As the networking is a bit more complicated to set up with emulated network inside of QEMU, the following explanation is helpful to understand networking better.
- All docker compose containers are attached to a network called
leda-bridgeandleda-networkand can see each other - The QEMU instances use a TAP network inside of each leda-quickstart-xxx container and do a NAT network translation to their own container
- The Docker internal DNS server is being used. This is implemented by a DNS Proxy container, which will forward incoming DNS requests to the Docker DNS running on the 127.0.0.x network.
- In unprivileged mode: Only the exposed ports are forwarded from the docker container into the QEMU process:
mosquitto
1883, ssh2222and kuksa.val databroker30555. In privileged mode, all TCP ports are forwarded from the Docker container into the QEMU process and the special port2222is forwarded to ssh port.
Developer Shell
Developer Shell:
docker compose run --rm devshell
From there, you can log in to either Leda on QEMU x86-64, or log in to Leda on QEMU ARM-64.
ssh leda-x86
ssh leda-arm64
To run an additional terminal in the developer shell, execute this:
docker compose exec devshell /bin/bash
Interacting with Eclipse Leda
- Check the general system status
sdv-health
Device Provisioning
-
Run the provisioning script:
sdv-provision -
Copy the fingerprints
-
Go to Azure IoT Hub, create a new device
-
Use the certificate’s common name (CN) as Device Id - on Leda, this defaults to a part of the MAC Address
-
Select
X.509 Self-Signedauthentication type and enter both fingerprints -
Click Save
MQTT Broker Bridge
graph LR;
A["MQTT Container
on docker host
localhost:1883"] -- Bridge --> B[leda-x86:31883]; A -- Bridge --> C[leda-arm64:31883]; B-->B1[mosquitto service
leda-x86:1883]; C-->C1[mosquitto service
leda-arm64:1883];
on docker host
localhost:1883"] -- Bridge --> B[leda-x86:31883]; A -- Bridge --> C[leda-arm64:31883]; B-->B1[mosquitto service
leda-x86:1883]; C-->C1[mosquitto service
leda-arm64:1883];
The Docker Compose setup will also start an Eclipse Mosquitto message broker as a bridge to both Leda instances. This allows a user or developer to monitor messages sent by or received by both virtual devices.
Connect your MQTT client to mqtt-broker.leda-network by using the exposed port 1883 on the host:
mosquitto_sub -h localhost -p 1883 -t '#' -v
Docker Networking
You need to enable IP forwarding from Docker containers to make networking work.
The containers (leda-arm64, leda-x86) need to run with --privileged as they change iptables rules for proper forwarding of network packets.
See Docker documentation for bridge networking for details.
sudo sysctl net.ipv4.conf.all.forwarding=1
sudo iptables -P FORWARD ACCEPT
Each Eclipse Leda instance (ARM64, x86_64) is running within a QEMU emulated network (192.168.7.2), which itself is contained
in a containerized network called leda-network (192.168.8.x).
The containers wrapping the QEMU instances will forward the following ports to the respective QEMU process:
- SSH on port 2222
- Mosquitto on port 1883
DHCP and DNS setup
Each Leda-QEMU container is running a local DHCP on the tap0 network interface and listens for DHCP requests by the Leda Distro running inside of QEMU.
The DHCP server will respond with the same IP address (192.168.7.2) to the request from QEMU.
The DHCP response contains a DNS nameserver pointing to the dns-proxy.leda-network (192.168.8.14) IP,
which in turn forwards to Docker’s internal 127.0.0.11 nameserver.
This allows the QEMU guests to resolve Docker Compose Services by their service name, e.g. leda-bundle-server.leda-network.
Volumes
The /root path inside of the Leda containers is mounted as a volume and contains the raw disk image and runner scripts for the QEMU Leda distribution.
Changes on the QEMU filesystem are made persistent on a copy of the QCOW2 disk image, so that restarting the device will keep any changes.
To reset to the original state, delete the respective docker volumes and restart the containers:
docker compose down
docker compose rm --force --stop --volumes
docker volume rm leda-arm64
docker volume rm leda-x86
Profiles
Profiles can be used to determine which containers (services) docker compose should be starting by default.
This is mostly used to have the devshell container not start up by default.
tools: Contains docker containers which are not essential at runtime, must useful for testing and development purposes
4 - Running on Raspberry Pi
What you need:
- A Raspberry Pi 4B (64 Bit) with 2 GiB of RAM or more, recommended is 8 GiB
- Network connection (Ethernet or Wifi) with transparent internet access
- Optional keyboard and display (makes it easier to troubleshoot)
Steps:
-
Download the latest released SD-Card Image:
eclipse-leda-raspberrypi.tar.xz -
Uncompress the SD Card image:
apt-get install -y xz-utils tar xf eclipse-leda-raspberrypi.tar.xz bzip2 -d -f sdv-image-all-raspberrypi4-64.wic.bz2 -
Flash the
sdv-image-all-raspberrypi4.wicfile to an SD-Card- On Linux:
- Install bmap tools:
sudo apt-get install -y bmap-tools - Insert SD Card and check which device is mounted:
sudo fdisk -l - Unmount the device:
sudo umount /dev/mmcblk[X] sudo bmaptool copy --bmap sdv-image-all-raspberrypi4-64.wic.bmap sdv-image-all-raspberrypi4-64.wic /dev/mmcblk[X]- Note: Using
bmapis much faster but works the same as with plaindd if=<wic-file> of=dev/mmcblk[x].
- Install bmap tools:
- On Windows:
- On Linux:
-
Optional: If you need to adapt the network configuration eg Wifi credentials, edit the configuration files on the
bootpartition. -
Shutdown the Raspberry and insert the SD-Card into the Raspberry Pi SD-Card slot at the bottom
-
Power on your Raspberry to boot the image
-
Login with
root -
Check disk space:
-
The
raspberry-growdisksystem service will do this automatically on first boot. -
To manually enlarge the available disk space on the SD-Card, resize the disk partition:
parted /dev/mmcblk0 resizepart 6 100% && resize2fs /dev/mmcblk0p6.Note: Due to changes in the disk partition, the partition number (
6in the example) may have changed. -
Verify with
df -h.
-
-
Verify and wait until container runtime is started:
systemctl status container-management -
Optional: Check the system health:
sdv-health -
Continue with Device Provisioning
4.1 - CAN-Bus extensions
The Eclipse Leda quickstart image has CAN-Bus kernel modules and some CAN hardware drivers pre-installed. However, some hardware configuration needs to be adapted at boot time depending on the specific CAN-Extension being attached to the device.
On Raspberry Pi, there is a /boot/config.txt file where you can configure the dtoverlay options accordingly.
Note: After modification, the device requires rebooting for the changes to take effect.
MCP2515 based modules
Products:
dtoverlay=mcp2515-can0,oscillator=12000000,interrupt=25,spimaxfrequency=2000000
MCP2518FD based modules
Products:
dtoverlay=2xMCP2517FD
#dtoverlay=2xMCP2518FD-spi0
5 - Running on QEMU
If you want to execute the image without building first, grab the latest release or build artifacts from https://github.com/eclipse-leda/leda-distro/
Recommendations
- A Linux host with 8 vCPUs, 16GB of RAM and SSD storage is recommended
- Your Linux user should be sudoer to allow TAP network interfaces to be set up
QEMU x86_64
-
Install Qemu, e.g. for Ubuntu:
sudo apt-get update -y sudo apt-get install -y xz-utils qemu-system-x86-64 -
Download latest Eclipse Leda release
-
Uncompress the archive
tar xf eclipse-leda-qemu-x86_64.tar.xz -
Run QEMU on Linux:
./run-leda.sh -
Run QEMU on Windows:
run-leda.cmd
-
Login as
rootwithout password on login prompt -
Verify and wait until container runtime is started:
systemctl status container-management -
Optional: Check the system health:
sdv-health
Note: The status of some containers (e.g. cloud connector) are expected to stay in FAILED status as long as the Device Provisioning steps are not completed.
-
Continue with Device Provisioning
QEMU ARM 64-Bit
-
Install Qemu, e.g. for ARM 64-Bit:
sudo apt install qemu-system-aarch64 -
Download latest Eclipse Leda release
-
Uncompress the archive
tar xf eclipse-leda-qemu-arm64.tar.xz -
Run QEMU on Linux:
./run-leda.sh -
Run QEMU on Windows:
run-leda.cmd -
Login as
rootwithout password on login prompt -
Verify and wait until container runtime is started:
systemctl status container-management -
Optional: Check the system health:
sdv-healthNote: The status of some containers (e.g. cloud connector) are expected to stay in FAILED status as long as the Device Provisioning steps are not completed.
-
Continue with Device Provisioning
5.1 - CAN Bus
Note: The configuration mentioned in this chapter is already enabled in the run-leda.sh script.
QEMU
General documentation about using CAN-Bus in Qemu: https://www.qemu.org/docs/master/system/devices/can.html
Enabling Virtual CAN Bus interfaces (vcan)
No special parameters are necessary for qemu, as vcan is virtual:
runqemu qemux86-64 nographic slirp qemuparams="-m 2048"
Bring interface up:
ip link add dev vcan0 type vcan
ip link set vcan0 up
Enabling CAN Bus interfaces (can)
Standalone CAN within Qemu
To run a standalone CAN setup, qemu must be instructed to emulate a specific CAN hardware device. We will be using the kvaser_pci device in this example:
runqemu qemux86-64 nographic slirp qemuparams="-m 2048 -object can-bus,id=canbus0 -device kvaser_pci,canbus=canbus0"
After the image has booted, load the Linux Kernel Module kvaser_pci device driver and configure the CAN-Bus device (eg bitrate) before bringing the interface up:
root@qemux86-64:~# modprobe kvaser_pci

root@qemux86-64:~# dmesg | grep kvaser
[    9.565149] kvaser_pci 0000:00:04.0: initializing device 10e8:8406
[    9.569308] kvaser_pci 0000:00:04.0: reg_base=00000000d5a68095 conf_addr=000000002b3c7ef6 irq=20
[    9.596942] kvaser_pci 0000:00:04.0: xilinx version=13 number of channels=0

root@qemux86-64:~# ip link show type can
4: can0: <NOARP,ECHO> mtu 16 qdisc noop state DOWN mode DEFAULT group default qlen 10
    link/can
Configure the interface:
root@qemux86-64:~# ip link set can0 type can bitrate 1000000
[  165.519919] kvaser_pci 0000:00:04.0 can0: setting BTR0=0x00 BTR1=0x14

root@qemux86-64:~# ip link set can0 up
[  186.906065] IPv6: ADDRCONF(NETDEV_CHANGE): can0: link becomes ready

root@qemux86-64:~# ip link show type can
4: can0: <NOARP,UP,LOWER_UP,ECHO> mtu 16 qdisc pfifo_fast state UP mode DEFAULT group default qlen 10
    link/can
Tunneling a CAN Interface from the Host
runqemu qemux86-64 nographic slirp qemuparams="-m 2048 -object can-bus,id=canbus0 -object can-host-socketcan,id=canhost0,if=can0,canbus=canbus0 -device kvaser_pci,canbus=canbus0"
Bring interface up:
ip link add dev can0 type can
ip link set can0 type can bitrate 1000000
ip link set can0 up
ip link show type can
Raspberry Pi CAN HAT Extensions
Supported boards:
- Boards with a Microchip MCP251x based CAN chip, such as Waveshare CAN HAT or PiCAN 2
Verify driver is loaded:
# dmesg | grep mcp
[    8.23543] mcp251x spi0.0 can0: MCP2515 successfully initialized
Verify SocketCAN network interface shows up:
# ip link show type can
3: can0: <NOARP,ECHO> mtu 16 qdisc noop state DOWN mode DEFAULT roup default qlen 10
Continue with configuring the CAN chip and bring up the SocketCAN network interface:
# ip link set can0 type can bitrate 1000000
# ip link set can0 up
# ip link show type can
Linux Kernel Modules
The following Linux Kernel modules are available on the quickstart images:
Note: For QEMU, only kvaser_pci is used
Leda main Kernel
- peak_pciefd - Socket-CAN driver for PEAK PCAN PCIe/M.2 FD family cards
- m_can - CAN bus driver for Bosch M_CAN controller
- m_can_pci - CAN bus driver for Bosch M_CAN controller on PCI bus
- m_can_platform - M_CAN driver for IO Mapped Bosch controllers
- softing - Softing DPRAM CAN driver
- cc770_platform - Socket-CAN driver for CC770 on the platform bus
- cc770_isa - Socket-CAN driver for CC770 on the ISA bus
- cc770 - cc770CAN netdevice driver
- ifi_canfd - CAN bus driver for IFI CANFD controller
- kvaser_usb - CAN driver for Kvaser CAN/USB devices
- etas_es58x - Socket CAN driver for ETAS ES58X USB adapters
- ucan - Driver for Theobroma Systems UCAN devices
- peak_usb - CAN driver for PEAK-System USB adapters
- kvaser_pciefd - CAN driver for Kvaser CAN/PCIe devices
- kvaser_pci - Socket-CAN driver for KVASER PCAN PCI cards
- f81601 - Fintek F81601 PCIE to 2 CANBUS adaptor driver
- sja1000_isa - Socket-CAN driver for SJA1000 on the ISA bus
- plx_pci - Socket-CAN driver for PLX90xx PCI-bridge cards with the SJA1000 chips
- sja1000 - sja1000CAN netdevice driver
- ems_pci - Socket-CAN driver for EMS CPC-PCI/PCIe/104P CAN cards
- peak_pci - Socket-CAN driver for PEAK PCAN PCI family cards
- sja1000_platform - Socket-CAN driver for SJA1000 on the platform bus
- vxcan - Virtual CAN Tunnel
- c_can_platform - Platform CAN bus driver for Bosch C_CAN controller
- c_can - CAN bus driver for Bosch C_CAN controller
- c_can_pci - PCI CAN bus driver for Bosch C_CAN/D_CAN controller
- slcan - serial line CAN interface
- can_dev - CAN device driver interface
- vcan - virtual CAN interface
- can-isotop - PF_CAN isotp 15765-2:2016 protocol
- can-gw - PF_CAN netlink gateway
- can-j1939 - PF_CAN SAE J1939
- can-raw - PF_CAN raw protocol
- can-bcm - PF_CAN broadcast manager protocol
- can - Controller Area Network PF_CAN core
Raspberry Pi
The following Linux Kernel modules are available on the quickstart image for Raspberry Pi:
- can - Controller Area Network PF_CAN core
- vxcan - Virtual CAN Tunnel
- can-dev - CAN device driver interface
- can-bcm - PF_CAN broadcast manager protocol
- can-gw - PF_CAN netlink gateway
- can-raw - PF_CAN raw protocol
- can-isotop - PF_CAN isotp 15765-2:2016 protocol
- can-j1939 - PF_CAN SAE J1939
- vcan - virtual CAN interface
- slcan - serial line CAN interface
- mcp251x - Microchip 251x/25625 CAN driver
- mcp251xfd - Microchip 251xFD Family CAN controller driver
- ems_usb - CAN driver for EMS Dr. Thomas Wuensche CAN/USB interfaces
- gs_usb - Socket CAN device driver for Geschwister Schneider UG
- peak_usb - CAN driver for PEAK-System USB adapters
5.2 - Transferring Files
Sharing a directory with the guest
When you want to copy files between the host and the guest, an easy way is to use an SFTP tunnel.
With sshfs, you can mount a local directory to a remote directory via SSH.
Pre-Requisites
Installation of needed packages:
- Run
apt-get install sshfson your host - Enable
CORE_IMAGE_EXTRA_INSTALL += " openssh-sftp-server"inlocal.confof your image (e.g. in the local_conf_header section in your kas file) - Verify SFTP connection working with
sftp -P 2222 root@localhost
Transfering files from host to guest
When you want to copy files from the host to the guest, an easy way is to use an SFTP tunnel.
With sshfs, you can mount a local directory to a remote directory via SSH.
- Create a mount point on your host:
mkdir remote - Open the SSH Filesystem tunnel:
sshfs root@localhost:/ remote/ -p 2222 - Check files:
ls -al remote/- you should see the root filesystem of the device now - You can now easily copy files:
cp foo.txt remote/home/root/
Transfering files from guest to host
Note: The reverse direction, e.g. initiating an SSH tunnel from within the device to the host, is currently not supported by the installed software on the image.
6 - Running on Linux
To run the main components of the SDV EDGE stack on an existing Linux distribution (e.g. Debian, Ubuntu, Raspberry Pi OS), you need to install the following packages.
Please note that since this is not a full-system installation, but an additional installation, there are some differences compared to the usual Leda installation on Docker/QEMU/Devices using our Quickstart image:
- The Self-Update use case is not used, as the distribution-specific channels apply. E.g. it does not make sense to use the Leda infrastructure to flash a full system image.
- The configuration differs slightly and you need to put some more work into getting the examples to work out of the box. This may include different port numbers, different paths of volume mounts for containers etc.
Debian-based Linux distributions
Tested on x86_64 via Docker:
- Debian 11
- Debian 12
- Ubuntu 20.04
- Ubuntu 22.04
- Ubuntu 23.10
Note: Ubuntu 18.04 is not supported, as the glibc is outdated.
Pre-Requisuites
The SDV stack requires the following packages to be present on the target system:
-
Mosquitto (adapt configuration, see below)
-
Data folders
-
Storage for Self Update Bundles:
mkdir -p /data/selfupdates -
Device Certificates Folder:
# Required by Cloud Connector
mkdir -p /data/var/certificates/
touch /data/var/certificates/device.crt
touch /data/var/certificates/device.key
-
-
systemd (Optional: You can also manually start the services)
-
D-Bus (Optional: This is for Self Update Agent to RAUC integration)
-
RAUC (Optional: Only for Self-Update Use Case or testing purposes)
Installation Steps
Note: The steps below are examples for x86 platform. If you deploy on ARM64 platform, adapt the filenames accordingly.
-
Update repository and install dependencies:
apt-get update apt-get -y install ca-certificates mosquitto wget # Optional: apt-get -y install dbus rauc -
Download the Debian package from the Eclipse Kanto release page
wget "https://github.com/eclipse-kanto/kanto/releases/download/v0.1.0-M3/kanto_0.1.0-M3_linux_x86_64.deb"
apt-get install -y ./kanto_0.1.0-M3_linux_x86_64.deb

# Check if Kanto has been installed
command -v container-management
command -v kanto-cm
systemctl status container-management
Note: This will also install
containerd. -
Download the Debian packages from the Eclipse Leda Utilities release page:
wget "https://github.com/eclipse-leda/leda-utils/releases/download/v0.0.2/eclipse-leda-utils_0.0.2.0.00680_all.deb" apt-get install -y ./eclipse-leda-utils_0.0.2.0.00680_all.deb command -v sdv-health wget "https://github.com/eclipse-leda/leda-utils/releases/download/v0.0.2/eclipse-leda-kantui_0.0.2.0.00680_amd64.deb" apt-get install -y ./eclipse-leda-kantui_0.0.2.0.00680_amd64.deb command -v kantui wget "https://github.com/eclipse-leda/leda-utils/releases/download/v0.0.2/eclipse-leda-kanto-auto-deployer_0.0.2.0.00680_amd64.deb" apt-get install -y ./eclipse-leda-kanto-auto-deployer_0.0.2.0.00680_amd64.deb command -v kanto-auto-deployer -
Download the Debian package
eclipse-leda-container-*.debfrom the Eclipse Meta-Leda release page:wget "https://github.com/eclipse-leda/meta-leda/releases/download/0.1.0-M2/eclipse-leda-containers_0.1.0.2.0.422_all.deb" apt-get install -y ./eclipse-leda-containers_0.1.0.2.0.422_all.deb -
Run the
kanto-auto-deployerto deploy the core components:kanto-auto-deployer /var/containers/manifestsTo install the example containers, run the following:
kanto-auto-deployer /var/containers/manifests/examples
Configuration Hacks
-
Mosquitto must be configured to allow anonymous access and listen on the network interface available to the containers. The easiest (and least secure!) configuration would be:
/etc/mosquitto/conf.d/public.conf:listener 1883 0.0.0.0 allow_anonymous trueAttention: Only apply this configuration on a device in a secured network, or adapt the configuration accordingly (e.g. specify internal IP address)
7 - Cheatsheet
This cheat sheet gives you an overview of common command line commands to interact with the tools available on the quickstart image.
General Commands
| Category | Task | Command |
|---|---|---|
| General | Overall info | sdv-health |
| Show device info | sdv-device-info |
|
| Device provisioning | sdv-provision |
|
| Switch Keyboard layout | loadkeys de |
|
| System | System load | htop |
| Disk free | df -h -t ext4 |
|
| Memory free | free -h |
|
| Network | Interfaces summary | networkctl |
| Ethernet status | networkctl status enp0s2 |
|
| Routing table | route |
|
| Active listeners | netstat -l -n -t |
|
| Multicast for Some/IP | route add -net 224.0.0.0 netmask 240.0.0.0 dev eth0 |
|
| Kanto-CM | Show all containers | kanto-cm list |
| User interface | kantui |
|
| Service logs | journalctl -f -l -t container-management |
|
| Auto deployments | See /data/var/containers/manifests/ |
|
| Development deployments | See /data/var/containers/manifests_dev/ |
|
| Restart a container | kanto-cm restart -n <containername> |
|
| Manage config | sdv-kanto-ctl |
|
| Shell in container | sdv-ctr-exec <containerId> <command> |
|
| Add Private Registry | sdv-kanto-ctl add-registry -h <host> -u <user> -p <pass> |
|
| ContainerD | Show images | ctr --address /data/run/containerd/containerd/containerd.sock --namespace=kanto-cm i ls |
| Import local archive | ctr --address /data/run/containerd/containerd.sock --namespace=kanto-cm i import <docker.tar> |
|
| Prune containers | nerdctl system prune --all |
|
| Mosquitto | Show all messages | mosquitto_sub -v -t '#' -h localhost |
| Send message | mosquitto_pub -t '<target/topic>' -h localhost -m '{"foo":"bar"}' |
|
| Connectivity status | mosquitto_rr --quiet -h localhost -t 'edge/thing/request' -e 'edge/thing/response' -m '' |
|
| RAUC Self Update | Current boot status | rauc status |
| Switch to other boot slot | rauc status mark-active other |
|
| CAN-Bus | CAN Dump | candump -l any,0:0,#FFFFFFFF |
Configuring NTP
A failed download of container images may be caused by out-of-sync clock, thus failing the TLS certificate validation. A hardware device without hardware clock (such as the Raspberry Pi) relies on network time. In some (corporate) networks, there might be rogue NTP servers and it might be necessary to override the NTP sources.
To reset NTP server to a public server, follow these steps:
# Check NTP clock sync
timedatectl timesync-status
# Add your NTP server
vi /etc/systemd/timesyncd.conf
# Restart container management
systemctl restart container-management
systemctl restart kanto-auto-deployer
Reset container deployment
When things go really wrong and the container runtime is unable deploy containers properly, it may be necessary to reset the internal state.
This is achieved by stopping the container runtime(s) and deleting the /var/lib/container-management folder:
# Stop all container runtimes
systemctl stop container-management
systemctl stop containerd

# Delete the persistence of container management
# Attention! Here be dragons
rm -rf /var/lib/container-management

# Restart the container runtimes
systemctl start containerd
systemctl start container-management

# Redeploy the containers
systemctl restart kanto-auto-deployer
Running custom ad-hoc containers
To install arbitrary containers, create the container using the kanto-cm command line tool.
If it’s not a background service, but a cli tool, adding the --t --i options allows console access.
root@qemux86-64:~# kanto-cm remove --name python
root@qemux86-64:~# kanto-cm create --name python --t --i --privileged docker.io/library/python:3.8.16-slim-bullseye
bf9deca4-dbf1-4132-9ba7-e0f378bd34a7
root@qemux86-64:~# kanto-cm start --name python --a --i
Python 3.8.16 (default, Jan 24 2023, 00:19:05)
[GCC 10.2.1 20210110] on linux
Type "help", "copyright", "credits" or "license" for more information.
>>> quit()
Raspberry Pi Overlays
Edit /boot/config.txt and reboot:
# Disable to fix non-working standard Raspberry Pi 7" display
# dtoverlay=vc4-kms-v3d

# PiCAN 2
# dtoverlay=mcp2515-can0,oscillator=16000000,interrupt=25

# Waveshare RS485 CAN Hat
# dtoverlay=mcp2515-can0,oscillator=12000000,interrupt=25,spimaxfrequency=2000000
8 - Utilities
The quickstart image contains the following utilities. These utility scripts are meant to be convenience tools for users and developers. They help to experiment with the container deployment, device provisioning or vehicle data access.
- sdv-health: Show SDV software components health status
- kantui: A text user interface for kanto-cm to manage containers (start, stop, logs, redeploy all)
- sdv-device-info: Show and update device information
- sdv-provision: Generate device certificates and configuration of cloud connection
- sdv-motd: Message-of-the-Day shown after login prompt
- can-forward: Forwarding a CAN-bus network interface into a containerized Vehicle Application
- kanto-auto-deployer: Automatically deploys containers on boot. Runs as a systemd service, and can also be invoked by a user directly.
- sdv-ctr-exec: Execute arbitrary commands in existing containers
- sdv-kanto-ctl: Manage the Kanto Container Management configuration via CLI
- blueprint-selector: Deploy and fetch new SDV blueprints easily with an interactive CLI
Note: These scripts are not meant to be reused or called from production software. Their behaviour or command line syntax is not a stable API and should not be trusted for automation purposes. For details, please see leda-utils
8.1 - SDV Health
Health check
The sdv-health utility displays a status overview of some important dependencies and device configurations for the SDV edge stack. The sdv health utility can be configured using the sdv.conf configuration file.
Usage:
# sdv-health
Example output:

Version Information
The Leda image version and build time will be displayed at the top in the first category:
- OS Release: Year and codename of the release version
- Image Version: Name of the image and more specific version information, such as the git tag or commit id
- Build timestamp in
yyyMMddHHmmssnotation
Note: The information is read from the system base file in
/etc/os-release:
root@qemux86-64:~# cat /etc/os-release
BUILD_ID="20230309083051"
DISTRO_CODENAME="Dracon"
ID=leda
IMAGE_VERSION="0.0.5-41-g82f2b12"
NAME="Eclipse Leda"
PRETTY_NAME="Eclipse Leda 2023 (Dracon)"
VERSION="2023 (Dracon)"
VERSION_CODENAME="Dracon"
VERSION_ID=0.0.5-41-g82f2b12
Bus networks
If available, vehicle bus network information, such as the status of the CAN-Bus, will be displayed iin its own category. This helps to quickly identify if there problems with the hardware connectivity for automotive bus networks.
Ports
The health utility checks the TCP ports of specific services. This helps to identify if these services are up and running and potentiallyconnectable via external network interfaces.
Services and Containers
The services category shows the status of required and optional containers. The required containers are supposed to be up and running for the SDV.EDGE stack to be correctly up and running. If any of these core components have a failed state, the functionality is impacted.
The optional containers are for additional features and for example applications. These containers may not be necessary for each use case and hence will be marked as a warning if they are not up and running. The overview still helps to identify which containers are working properly.
Errors, Warnings, Failed states
When there are errors or warnings related to the status of SDV related components, the health utility will print out these error states, and if available also a more detailed error message.
In the following example, the health utility helps the troubleshooting process:
- The container runtime is properly started: “Kanto CM” is OK in the “SDV Ports” section and the “container-management” service is OK in the “SDV Services” section".
- Some containers are in state “OK”, which means there is no general issue with the container runtime.
- The cloud connector is in a “Stopped” state, which indicates that the user manually stopped the container by using “kanto-cm stop -n cloud-connector”.
- The sua container is in a “Exited” state, which indicates the process exited with an error code.

8.2 - KantUI
The KantoUI tool is a text-based user interface for conveniently managing containers in the Kanto Container Management. It supports simple navigation using keyboard and mouse to select a specific container. Commands to start, stop, remove and re-deploy containers are available along with a functionality to retrieve the application logs of a selected container.
Kanto User Interface
Usage:
kantui
Example output:

Command Line Options
Print command line help:
root@qemux86-64:~# kantui --help
kantui 0.2.0
A TUI for Kanto CM that allows easier management of deployed containers. Requires root.

USAGE:
    kantui [OPTIONS]

OPTIONS:
    -c, --config-file-path <CONFIG_FILE_PATH>
            Set a custom path for the kantui configuration file [default:
            /etc/kantui/kantui_conf.toml]

    -h, --help
            Print help information

    -V, --version
            Print version information

Note: All config values can be overridden through env variables prefixed with KANTUI_,
e.g. KANTUI_STOP_TIMEOUT=5 overrides the timeout before SIGKILL is sent to be 5 seconds.
Keyboard commands
- Arrow keys
UpandDownto select a container - Arrow keys
LeftandRightto select a column Enterto change the sort ordering of the currently selected columnSto start the selected container which is currently not runningPto stop the selected containerRto remove a containerLto show the log output of a containerDto redeploy an existing container (rereads deployment descriptor)Qto quit kantui
Note: The mouse can be used to select ui items when holding the
Shiftkey.
Starting, Stopping, Removing containers
To use the lifecycle commands on a container:
- Select a container by using the mouse or the arrow keys.
- The selected container is highlighted.
- Press one of the lifecycle commands, e.g.
s,porr - Wait for the value in the State column to change, before issueing the next command.
Note: When using the lifecycle commands for containers (Start, Stop, Remove), it may take a few seconds before the UI is updated with the status changes. The amount of time before a container is forcefully killed is determined by the
stop_timeoutconfiguration option.
Show container Logs
To view the container’s log output:
- Select a container by using the mouse or the arrow keys.
- Press the
Lkey - Log output will be displayed (tail, oldest messages first)
- Use the arrow keys
UpandDownor drag the scrollbar using your mouse to scroll through the log - Close the Log viewer by pressing
Enteror clicking on theOKbutton
Note: The log output is not followed automatically. Close the dialog and reopen to see new output.
Redeploying containers
To redeploy a container, e.g. when a deployment descriptor has changed on disk:
- Select a container by using the mouse or the arrow keys.
- Press the
Pkey to stop the container - Press the
Rkey to remove the container - Press the
Dkey to invoke the Kanto Auto Deployer, which will redeploy the missing containers
Note: Only containers managed by Kanto Auto Deployer will be redeployed.
Column Sorting
To sort a column:
- Select the column using the
LeftandRightarrow keys - Press
Enterto activate sorting - Press
Enteragain on a sorted column to invert sort order (Ascending -> Descending -> Ascending)
Note: The selected sort order is not persisted and will reset to the default on restart: By
ID, ascending
Configuration File
The default location of the configuration file is /etc/kantui/kantui_conf.toml:
# General Configuration Options
socket_path = "/run/container-management/container-management.sock" # Path to kanto-cm unix socket
stop_timeout = 5 # timeout (integer) in seconds before a SIGKILL is sent after a SIGTERM

[keyconfig]
start_btn_name = "[S]tart"
start_kbd_key = "s"

stop_btn_name = "Sto[P]"
stop_kbd_key = "p"

remove_btn_name = "[R]emove"
remove_kbd_key = "r"

logs_btn_name = "[L]ogs"
logs_kbd_key = "l"

quit_btn_name = "[Q]uit"
quit_kbd_key = "q"

redeploy_btn_name = "Re[D]eploy"
redeploy_kbd_key = "d"
# Includes a shell lexer so anything that would be a valid shell command can be used
# No pipes/redirects allowed.
# N.B.: Command inherits kantui's privileges (root)
redeploy_command = "systemctl restart kanto-auto-deployer.service"
8.3 - SDV Device Info
Displays the current device configuration, such as Device ID.
Note: Requires the Cloud Connector component to be configured and running.
Usage:
sdv-device-info

Usage
Synposis: ./sdv-device-info [options] [command]
Full help:
root@qemux86-64:~# sdv-device-info --help
sdv-device-info v0.2
Usage: /usr/bin/sdv-device-info [options] [command]
Show SDV device configuration information
Example: /usr/bin/sdv-device-info show

Commands:
 show                 : Display configuration (default command)
 help                 : This message
 env                  : Format output for use in scripts

Options:
 --ansi | -a      : Don't use colored output.
 --norestart | -n : Do not automatically restart services
 --verbose | -v   : Enable verbose mode.
 --help | -h      : This message.
Use in scripts
To use device information on other scripts, it may be useful to source the device information variables into the current environment variable context:
Synposis: source ./sdv-device-info env
Example:
$ source ./sdv-device-info env
$ echo $DEVICE_ID
exampledevice1
8.4 - SDV Provision
The provisioning helper script can be used to manually perform a device provisioning with a cloud backend.
It is meant as a convenient tool for developers, who wish to connect their device to a selfmanaged cloud backend directly. In a production environment, the device provisioning functionality is implemented either by the Cloud Connector component.
The provisioning script currently supports the following backend and authentication options:
- Azure IoT Hub
- Connection String
- Device Certificates
- Azure IoT Device Provisioning Service
- Device Certificates
Usage
The sdv-provision script is interactive and asks for the type of backend and authentication option:
root@qemux86-64:~# sdv-provision
Checking Eclipse Leda Device Provisioning configuration...
- Certificates directory exists
Checking Device ID
- Based on network device: eth0
- Device ID: 52-54-21-4c-f9-5a
Checking whether either IdScope or ConnectionString is configured
 - Neither Id Scope file nor ConnectionString found, needs manual configuration
Do you want to use the global Azure IoT Device Provisioning Service (DPS) by using an Id Scope, or do you want to use a direct connection to a specific Azure IoT Hub using a Connection String?
d) Azure IoT Device Provisioning Service (DPS) with Id Scope
h) Azure IoT Hub with Connection String
Choose:d
Please enter your Id Scope of the Azure IoT Device Provisioning Service:example
Recreating the Cloud Connector container...
Checking device certificates
- All device certificates are present
- Primary device certificate: /data/var/certificates/device.crt
- Primary device private key: /data/var/certificates/device.key
- Secondary device certificate: /data/var/certificates/device2.crt
- Secondary device private key: /data/var/certificates/device2.key
Fingerprints (add these to the Azure IoT Hub Device)
- Primary thumbprint: 1B172ED3D06F4E25AFFEF675ADCE519457FFFFFF
- Secondary thumbprint: B6CD5EACE96E9D0448BCB0BAED2DEE87AFFFFFFF
Once a configuration has been selected, the script will:
- Generate a random Device Id (based on physical network address)
- Store the Device Id in
/etc/deviceid - Generate a primary self-signed device certificate pair
- Generate a secondary self-signed device certificate pair
- Store the certificates in
/data/var/certificates/ - Reconfigure the container descriptor in
/data/var/containers/manifests_dev/cloudconnector.json - Restarting the Cloud Connector container
- Print the key fingerprints, used for onboarding the device in Azure IoT Device Provisioning Service
Reconfiguration
Note: Re-running the script will only print the existing configuration.
To reconfigure the device and use different options, perform the following steps:
-
Delete the generated files
rm /data/var/certificates/azure.idscope rm /data/var/certificates/azure.connectionstring rm /data/var/certificates/device*.crt rm /data/var/certificates/device*.key -
Rerun the script
sdv-provision
8.5 - SDV MotD
The sdv-motd script provides an alternative motd profile, which displays some additional information after login.
The script does not have any command line options.
Example output:

8.6 - CAN Forward
The can-forward help script can be used to forward an existing CAN-Bus interface on the host system to a container process.
Note: Warning! The script does not yet support Kanto (or containerd) as a container runtime. It has been implemented for k3s.
Usage
root@qemux86-64:~# can-forward --help

Usage:  /usr/bin/can-forward {-h} {-p PID} {-c container} <hw_can>

  hw_can          Host CAN hw interface to forward. Default: can0
  -c container    Attemmpt to get netns PID from a running container: (docker, ctr). Default: seat_service
  -p PID          Use provided PID for transferring vxcan interface (e.g.: docker inspect -f '{{ .State.Pid }}' container)
  -h              Prints this message
The script performs the following steps:
- Find the process ID of the target container process
- Check and modprobe
vxcan - Check and modprobe
can-gw - Create a new virtual CAN interface (
vxcanX) - Create a new virtual CAN interface (
vxcanX+1) - Link both interfaces together
- Move the second interface (
vxcanX+1) into the namespace of the target container - Set up a bi-directional CAN-Bus packet forwarding between both interfaces using
cangw
8.7 - Kanto Auto Deployer (KAD)
Automatically deploys containers to the Kanto Container Management based on deployment descriptors from a given path. All deployment descriptors in the manifests folder will be deployed (created and started) on startup of the service. The directory will then be monitored for creation of/changes to manifests and those changes will be redeployed.
Usage
Usage:
$ kanto-auto-deployer --help
kanto-auto-deployer 0.2.0
Automated deployment of Kanto Container Management Manifests

USAGE:
    kanto-auto-deployer [OPTIONS] [MANIFESTS_PATH]

ARGS:
    <MANIFESTS_PATH>    Set the path to the directory containing the manifests [default: .]

OPTIONS:
    -d, --daemon                   Run as a daemon that continuously monitors the provided path for
                                   changes
    -h, --help                     Print help information
    -s, --socket-cm <SOCKET_CM>    Set the path to the Kanto Container Management API socket
                                   [default: /run/container-management/container-management.sock]
    -V, --version                  Print version information
Example:
# Use container manifests from current working directory
root@qemux86-64:/data/var/containers/manifests# kanto-auto-deployer
[2023-04-18T10:27:21Z INFO  kanto_auto_deployer] Running initial deployment of "/data/var/containers/manifests"
[2023-04-18T10:27:21Z INFO  kanto_auto_deployer] Reading manifests from [/data/var/containers/manifests]
[2023-04-18T10:27:21Z WARN  kanto_auto_deployer::manifest_parser] Failed to load manifest directly. Will attempt auto-conversion from init-dir format.
[2023-04-18T10:27:21Z INFO  kanto_auto_deployer] Already exists [cloudconnector]
[2023-04-18T10:27:21Z WARN  kanto_auto_deployer::manifest_parser] Failed to load manifest directly. Will attempt auto-conversion from init-dir format.
[2023-04-18T10:27:21Z INFO  kanto_auto_deployer] Already exists [databroker]

# Use container manifests from specified directory
root@qemux86-64:~# kanto-auto-deployer /data/var/containers/manifests/
[2023-04-18T10:27:44Z INFO  kanto_auto_deployer] Running initial deployment of "/data/var/containers/manifests"
[2023-04-18T10:27:44Z INFO  kanto_auto_deployer] Reading manifests from [/data/var/containers/manifests]
[2023-04-18T10:27:44Z WARN  kanto_auto_deployer::manifest_parser] Failed to load manifest directly. Will attempt auto-conversion from init-dir format.
[2023-04-18T10:27:44Z INFO  kanto_auto_deployer] Already exists [cloudconnector]
[2023-04-18T10:27:44Z WARN  kanto_auto_deployer::manifest_parser] Failed to load manifest directly. Will attempt auto-conversion from init-dir format.
[2023-04-18T10:27:44Z INFO  kanto_auto_deployer] Already exists [databroker]
Nоte: The warnings from the manifest_parser module are normal and expected when the manifest is in the Container Management Manifests Format
Usage as systemd service
In the Leda quickstart images, kanto-auto-deployer is installed as a systemd service.
Note the service uses the
--daemonflag that asks KAD to continuously monitor the specified directory (see last line of logs).
The service unit configuration file is located in /lib/systemd/system/kanto-auto-deployer.service:
[Unit]
Description=Kanto Auto Deployer
After=network-online.target container-management.service
Wants=network-online.target container-management.service
Requires=container-management.service

[Install]
WantedBy=multi-user.target

[Service]
Restart=on-failure
RestartSec=5s
ExecStart=/usr/bin/kanto-auto-deployer /data/var/containers/manifests --daemon
Example output:
root@qemux86-64:/lib/systemd/system# systemctl status kanto-auto-deployer.service
* kanto-auto-deployer.service - Kanto Auto Deployer
     Loaded: loaded (/lib/systemd/system/kanto-auto-deployer.service; enabled; vendor preset: enabled)
     Active: active (running) since Tue 2023-04-18 10:22:10 UTC; 3min 55s ago
   Main PID: 525 (kanto-auto-depl)
      Tasks: 10 (limit: 4708)
     Memory: 1.4M
     CGroup: /system.slice/kanto-auto-deployer.service
             `- 525 /usr/bin/kanto-auto-deployer /data/var/containers/manifests --daemon

Apr 18 10:22:48 qemux86-64 kanto-auto-deployer[525]: [2023-04-18T10:22:48Z INFO  kanto_auto_deployer] Creating [sua]
Apr 18 10:23:04 qemux86-64 kanto-auto-deployer[525]: [2023-04-18T10:23:04Z INFO  kanto_auto_deployer] Created [sua]
Apr 18 10:23:04 qemux86-64 kanto-auto-deployer[525]: [2023-04-18T10:23:04Z INFO  kanto_auto_deployer] Starting [sua]
Apr 18 10:23:05 qemux86-64 kanto-auto-deployer[525]: [2023-04-18T10:23:05Z INFO  kanto_auto_deployer] Started [sua]
Apr 18 10:23:05 qemux86-64 kanto-auto-deployer[525]: [2023-04-18T10:23:05Z WARN  kanto_auto_deployer::manifest_parser] Failed to load manifest directly. Will attempt auto-conversion from init-dir format.
Apr 18 10:23:05 qemux86-64 kanto-auto-deployer[525]: [2023-04-18T10:23:05Z INFO  kanto_auto_deployer] Creating [vum]
Apr 18 10:23:10 qemux86-64 kanto-auto-deployer[525]: [2023-04-18T10:23:10Z INFO  kanto_auto_deployer] Created [vum]
Apr 18 10:23:10 qemux86-64 kanto-auto-deployer[525]: [2023-04-18T10:23:10Z INFO  kanto_auto_deployer] Starting [vum]
Apr 18 10:23:11 qemux86-64 kanto-auto-deployer[525]: [2023-04-18T10:23:11Z INFO  kanto_auto_deployer] Started [vum]
Apr 18 10:23:11 qemux86-64 kanto-auto-deployer[525]: [2023-04-18T10:23:11Z INFO  kanto_auto_deployer] Running in daemon mode. Continuously monitoring "/data/var/containers/manifests"
8.8 - SDV Container Exec
The sdv-ctr-exec wrapper allows to execute arbitrary user commands in existing containers.
Kanto Container Management cli tool (kanto-cm) only allows to manage the lifecycle of a container,
but does not allow to specify or override the entrypoint or command definitions of an existing container.
The ctr command line tool of containerd allows the execution of additional tasks in a running container.
Usage
As a convenient tool, sdv-ctr-exec allows the simple execution of arbitrary commands inside of containers.
This is especially useful for non-service-containers, or containers which have additional binaries (e.g. cli tools) embedded.
Usage:
root@qemux86-64:~# sdv-ctr-exec
/usr/bin/sdv-ctr-exec -h to print this message

Usage:
/usr/bin/sdv-ctr-exec <container-id> <command>
or
/usr/bin/sdv-ctr-exec -n <container-name> <command>
Example:
# Executing a containerized cli tool using sdv-ctr-exec
kanto-cm create --i --t --network=host --name=kuksa-client ghcr.io/eclipse/kuksa.val/kuksa-client:master
kanto-cm start --name=kuksa-client
sdv-ctr-exec -n kuksa-client /kuksa-client/bin/kuksa-client --port 30555 --protocol grpc --insecure
Alternatives
containerd: ctr
The above commands are equivalent to the following commands:
# Executing a containerized cli tool using ctr
ctr --namespace kanto-cm image pull ghcr.io/eclipse/kuksa.val/kuksa-client:master
ctr --namespace kanto-cm container create --net-host --tty ghcr.io/eclipse/kuksa.val/kuksa-client:master kuksa-client
ctr --namespace kanto-cm tasks start --detach kuksa-client
ctr --namespace kanto-cm tasks exec --tty --exec-id sometask kuksa-client /kuksa-client/bin/kuksa-client --port 30555 --protocol grpc --insecure
containerd: nerdctl
Note:
nerdctlis currently not installed on the Leda Quickstart images.
containerd: ctr and mounting
To execute a binary natively (outside of a containerized environment), the container image may be mounted to the host filesystem using the ctr snapshots mount commands.
This approach only works if the binary is compatible with the host environment (dependencies, libraries etc.).
$CONTAINER_IMAGE="ghcr.io/my-org/my-project/my-container"
ctr --namespace kanto-cm image pull $CONTAINER_IMAGE
ctr --namespace kanto-cm container create --net-host --tty $CONTAINER_IMAGE my-container
mkdir my-container
ctr --namespace=kanto-cm snapshots mount my-container my-container | $SHELL
cd my-container
./bin/my-application --help
8.9 - SDV Kanto-Ctl
Manage the Kanto Container Management configuration via CLI.
Note: Requires
jqto be installed.
Features:
- Add and remove container registries (for authentication purposes)
- Set primitive values in configuration
- Restart
container-management.serviceon configuration changes - Automatically back up configuration file
- Display changes to user

Usage
Synposis: ./sdv-kanto-ctl <command> [<options>]
Full help:
$ ./sdv-kanto-ctl --help
Eclipse Kanto Container Manager Configuration Utility
See https://eclipse.dev/kanto/docs/references/containers/container-manager-config/
Usage: ./sdv-kanto-ctl <command> {options}
Commands:
        add-registry -h <hostname> -u <username> -p <password>
                Adds or replaces a container registry authentication configuration
                -h or --hostname: Configure the hostname of the container registry (e.g. hub.docker.io, ghcr.io, ...)
                -u or --username: Configure the username
                -p or --password: Configure the password
        remove-registry -h <hostname>
                Removes the specified container registry
                -h or --hostname: The hostname of the container registry
        remove-all-registries
                Removes all configured container registries
        list-registries
                Prints all configured container registries
        show-config
                Print the container management configuration
        set <key> <value>
                Set a primitive configuration value. Key in JSON Dot-Notation
                Examples: ./sdv-kanto-ctl set containers.registry_configurations.MyRegistry.credentials.password foobar
                          ./sdv-kanto-ctl set things.enable true
Options:
        --no-reload : Do not reload the configuration and restart the container-management service automatically
        --ansi : Don't use colored output.
        --verbose | -v : Enable verbose mode.
        --help : This message.
Example: Private Container Registries
To be able to pull container images, the container runtime needs access to the container registry. Some container registries require authentication. The Kanto Container Manager can be configured to use credentials when accessing remote container registries.
In the Leda images, the sdv-kanto-ctl tools allows to easily add authentication to the container manager configuration:
sdv-kanto-ctl add-registry -h <registryhostname> -u <your_username> -p <your_password>
For example, to access container images from GitHub Packages in a private repository, you need a GitHub Personal Access Token (PAT) with the read: packages scope.
Then, add the repository as shown below:
sdv-kanto-ctl add-registry -h ghcr.io -u github -p <Your_GitHub_PersonalAccessToken>
sdv-kanto-ctl will make the necessary modifications to /etc/container-management/config.json and restarts the container-management.service systemd unit,
so that the changes take effect. You may need to recreate or restart the container if a previous pull failed.
Please see the Eclipse Kanto Container Manager Configuration reference for details.
Example: Enabling Things management
Enable the container manager digital twin representation.
sdv-kanto-ctl set things.enable true
Example: Container Stop Timeout
Kanto waits for a timeout before forcefully stopping a container. The default is 30 seconds in Kanto, and 10 seconds in the Leda quickstart image.
To change this behavior at runtime:
sdv-kanto-ctl set manager.default_ctrs_stop_timeout 2
8.10 - Blueprint Selector
A Rust application that reads all blueprint files in a directory and provides the user with an
interactive (supports filtering) menu to select the one to be deployed on the edge device via MQTT.
If no directory is provided the default one on a Leda Quickstart Image is: /data/var/containers/blueprints.

The “blueprint” files are desired state messages, that have the extension “.blueprint.json” (configurable) and an additional metadata header (required):
{
  "blueprintMetadata": {
    "name": "<NAME>",
    "description": "<Short Description>"
  },
  "activityId": "correlation-id",
  "timestamp": 1235466
  "payload": {} // This is the desired state message
}
The metadata header will be used to construct the list of options presented to the user. You can find example blueprints under the
example_blueprints directory in the leda-utils repository.
The selected blueprint is then published as an MQTT message on the vehicleupdate/desiredstate topic.
CLI options
To get all available configuration options use the --help/-h flag:
A user-friendly tool to select and deploy SDV blueprints

Usage: blueprint-selector [OPTIONS]

Options:
  -d, --blueprints-dir <BLUEPRINTS_DIR>
          The directory containing the SDV blueprints [default: /data/var/containers/blueprints]
  -f, --fetch-blueprints
          Start in fetch mode (presents a menu to fetch new/updated blueprints) from a remote repository
  -e, --blueprints-ext <BLUEPRINT_EXTENSION>
          Extension to use when iterating over the files in the blueprints directory [default: .blueprint.json]
      --mqtt-broker-host <HOST>
          Hostname/IP to the MQTT broker where the desired state message would be posted [default: 127.0.0.1]
      --mqtt-broker-port <PORT>
          Port for the MQTT broker [default: 1883]
      --mqtt-topic <TOPIC>
          Topic on which to publish the blueprint desired state message [default: vehicleupdate/desiredstate]
  -h, --help
          Print help
  -V, --version
          Print version
Normal mode
To run in normal mode use:
blueprint-selector
or if you’d like to provide a directory different from the default one, use:
blueprint-selector -d </path/to/dir>
Fetch mode
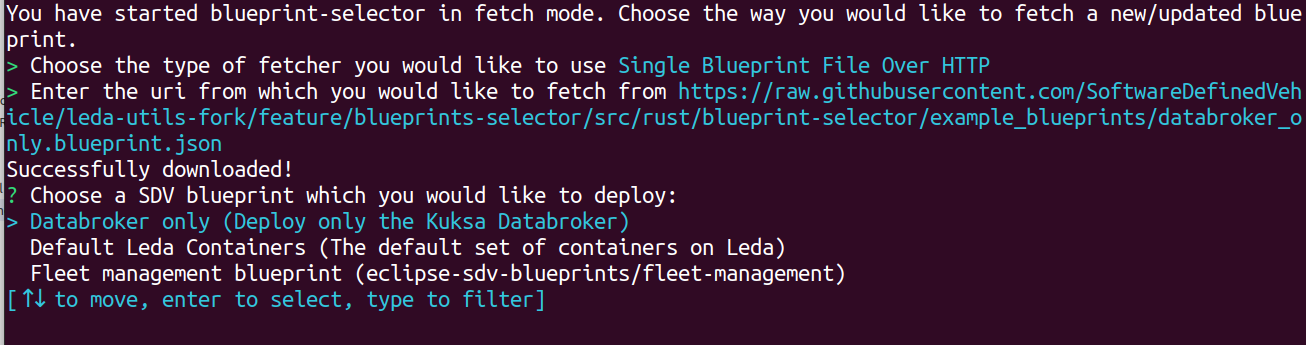
When starting the blueprint-selector with the -f/--fetch-blueprints flag, you will be presented with a selection of different
fetchers that allow you to download/update blueprints directly in the directory specified with the -d/--blueprints-dir flag
(or in the default directory if not specified).
For example:
blueprint-selector -fd </path/to/dir>

When you choose a fetcher, you will be asked for an URI and blueprint-selector will attempt to fetch the blueprints inside the directory specified by -d.
After providing a URI, pressing Enter, and a successful fetch, you will be brought back to the usual selector menu, this time including all successfully fetched manifests.
9 - Wifi Configuration
BSP packages for emulated WiFi devices (QEMU) and hardware device drivers are provided in meta-leda for supported hardware.
They usually do not require extra configuration.
For a guide on how to connect to a wireless network check the Connecting to Wi-Fi networks page.
Raspberry Pi 4B 64
The required kernel modules and binary blobs are provided with the sdv-wifi-kernel-config.inc config file and the packagegroup-sdv-rpi4wifi packagegroup. These
are included in sdv-image-full.bb and sdv-image-minimal.bb by default.
If you, however, decide to define your own custom image based on Custom Distros, you would have to make sure the packagegroup is installed to enable WiFi connectivity.
QEMU
QEMU images provide the kernel modules necessary to set-up a virtual wlan interface and connect it to a virtual wifi network. This can be useful in various testing scenarios.
To create and link a virtual WiFi interface to eth0, boot your QEMU image and run:
$ ip link add link eth0 name wlan0 type virt_wifi
The SSID of the virtual network you can connect to is VirtWifi.
Note: Leda Quickstart QEMU images set the name of the default virtual ethernet interface to eth0 through kernel CMDLINE configurations (net.ifnames=0 biosdevname=0).
If you are building a custom image with a different kernel CMDLINE replace eth0 with the name of your virtual interface (check ifconfig).
9.1 - Connecting to Wi-Fi networks
Here we will describe the basic steps on how to identify and connect to a WiFi network in interactive or headless mode.
Initial steps (identifying wlan interfaces)
Start by running:
$ ip a
 ...
3: wlan0: <BROADCAST,MULTICAST,UP,LOWER_UP> mtu 1500 qdisc fq_codel state DOWN group default qlen 1000
    link/ether <MAC> brd ff:ff:ff:ff:ff:ff
...
Note: Usually the name of the interface would be wlan0. It might however follow the newer “predictable interface names” standart.
Then the interface name would start with wl* with the remaining characters identifying a physical bus/chip/number/etc
corresponding to the interface. For simplicity we will wlan0 in all examples below.
Most likely your wlan interface would be in the state DOWN. To bring it up:
$ ip link set wlan0 up
Scanning for wireless networks
You can scan for wireless networks using either iw or wpa_cli.
$ iw wlan0 scan
Note: The output of this command can be quite verbose. You can grep for SSID to find the SSIDs of the networks around you.
$ wpa_cli scan && wpa_cli scan_results
The output of wpa_cli is cleaner and more readable so it is recommended to use that.
Connecting to a network
Once you have identified the SSID of your network you can connect to it by ussing the following commands:
$ wpa_passphrase <SSID> <Passphrase> >> /etc/wpa_supplicant.conf
$ systemctl restart wpa
You should now be connected to the wireless network. To confirm that, you can once again use ip a to check that wlan0 has been configured with an IP.
This configuration shall be remembered from now on and your interface will try to connect automaticatically to that network whenever it is available.
Headless Wi-Fi configuration
Similarly to the Raspbian, meta-leda provides a mechanism for headless configuration of Wi-Fi credentials for your device (Headless Raspberry Pi Setup).
To use this feature you have to prepapre your wpa_supplicant.conf ahead of time (check the reference above):
ctrl_interface=/var/run/wpa_supplicant
ctrl_interface_group=0
update_config=1

network={
        key_mgmt=NONE
}
network={
    ssid="<YOUR NETWORK NAME>"
    psk="<YOUR NETWORK PASSWORD>"
    key_mgmt=WPA-PSK
}
IMPORTANT: It is recommended that if you are creating this configuration file on Windows to use an editor such as Notepad++ that can save files using the
“Unix Line endings” (DOS vs. Unix Line Endings), or run it through a tool such as dos2unix
that can convert between the two file formats. Otherwise wpa_supplicant.conf might not be read properly in the Linux image.
Once you have your wpa_supplicant.conf put your SD-card in your Desktop machine and place the configuration file in the root of the BOOT partion.
When you boot your device it should now automatically connect to your Wi-Fi network.
10 - GPS Connectivity
GPSD
Leda Quickstart Images provide (within meta-leda) recipes for the integration and setup of GPSD. GPSD is a service daemon that monitors one or more GPSes or AIS receivers attached to a host computer through serial or USB ports, making all data on the location/course/velocity of the sensors available to be queried on TCP port 2947 of the host computer. To find out more about GPSD, check out its official documentation.
For easier interaction and debugging gpsd client utilities such as installed gpsfake, gpspipe, etc. are installed.
Service
GPSD is installed on Leda Quickstart Images as a service. To check its status and/or logs you can use the following two commands:
root@leda-525400123502:~# systemctl status gpsd.service
* gpsd.service - GPS (Global Positioning System) Daemon
     Loaded: loaded (/lib/systemd/system/gpsd.service; disabled; vendor preset: disabled)
     Active: active (running) since Mon 2023-10-02 11:19:54 UTC; 41min ago
     ...
and the socket:
root@leda-525400123502:~# systemctl status gpsd.socket
* gpsd.socket - GPS (Global Positioning System) Daemon Sockets
     Loaded: loaded (/lib/systemd/system/gpsd.socket; enabled; vendor preset: enabled)
     Active: active (running) since Mon 2023-10-02 11:19:30 UTC; 42min ago
    ...
With the location of the default config file being:
/etc/default/gpsd.default
By default, the GPSD service on Leda is configured to automatically discover USB devices (plug-and-play). In some cases, a system reboot might be required after plugging the USB GPS device.
Kuksa.val FeederGPS
The Kuksa GPS Feeder consumes gpsd as a data source and pushes location data to the kuksa.val server (databroker). It is installed as a pre-configured container on Leda Images through the feedergps.json container manifest. The container has an internal gpsd server (on port 2948) that connects to the host’s gpsd instance (on port 2947). With the provided container manifest feedergps should be plug-and-play.
Using pre-recorded GPS traces with gpsfake
Recording NMEA traces
It sometimes might be useful to mock gps services when testing, especially on QEMU virtual machines where emulated USB GPS hardware is not available. Pre-recorded traces should be in the NMEA-format.
To record a GPS trace in the NMEA format, on a device with physical GPS hardware, gpsd, and gpsd-client utilities installed, run:
gpspipe -R > gps_log.nmea
A sample NEMA file that can be used for testing is provided in the kuksa.val.feeders repository - simplelog_example.nmea.
Feeding NMEA traces to feedergps
Since the running gpsd service will interfere with the following steps, make sure to stop it first by running:
systemctl stop gpsd.service
systemctl stop gpsd.socket
To start gpsfake on port 2946 with gps_log.nmea as an input,
either in the background (by adding & at the end of the shell line) or in a separate shell session run:
root@leda-525400123502:~# gpsfake -P 2946 gps_log.nmea
/usr/bin/gpsfake:21: DeprecationWarning: The distutils package is deprecated and slated for removal in Python 3.12. Use setuptools or check PEP 632 for potential alternatives
  from distutils import spawn
Processing gps_log.nmea
gpsfake: log cycle of gps_log.nmea begins.
Note: you can safely ignore the distutils warning.
Then, run a foreground instance of gpsd that reads from gpsfake on port 2946 on the loopback interface only and forwards the traffic on port 2947 for all interfaces:
gpsd -GNS 2947 gpsd://127.0.0.1:2946
These extra steps are needed as feedergps requires the gpsd server on port 2947 to be available on the kanto-cm0 bridge, as it’s running as a container and gpsfake cannot be configured to listen on an interface different from the loopback.
Restart feedergps:
kanto-cm stop -n feedergps
kanto-cm start -n feedergps
Known issues
Sometimes the feedergps container is started before the databroker and/or gpsd which leads to the container not being able to connect to either of those services. In such cases, after you’ve made sure the databroker and gpsd are up and running, restart feedergps with:
kanto-cm stop -n feedergps
kanto-cm start -n feedergps