Custom Vehicle Signals
The Vehicle Signal Specification has a lot of standard Vehicle Signals already defined.
However, if you want to add additional custom signals or mappings from CAN-Bus for the Kuksa.VAL dbc2val feeder, the VSS data model needs to be customized and regenerated.
The following steps can be performed on a development machine to regenerate VSS data model with custom a vspec mapping.
- Concepts
- Setup workspace
- Defining the VSS Overlay
- Regenerate VSpec JSON
- Generate a candump
- Databroker and dbc2val containers
- Testing with data
Concepts
VSS Overlay
The VSS Overlay concept allows to override the standard signals in the specification with custom signals. It defines metadata attributes like signal name, datatype, description etc.
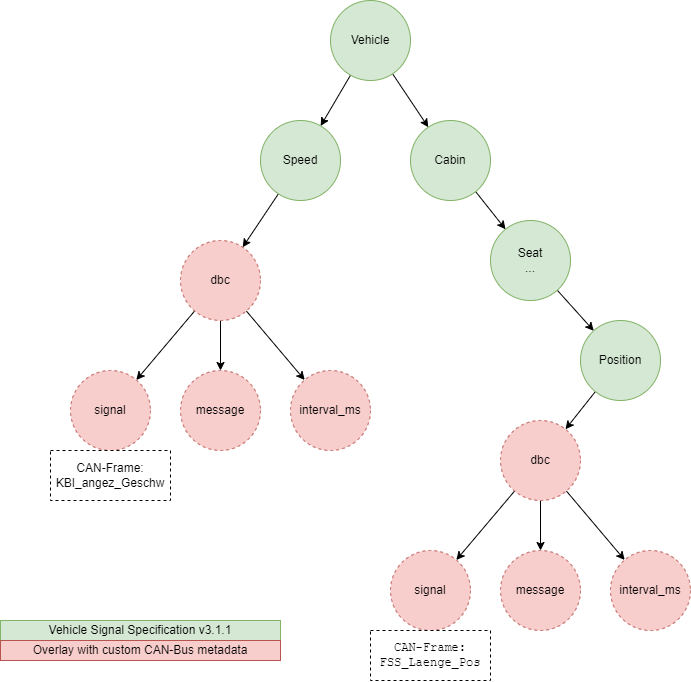
In addition, the vspec file allows to add custom metadata, such as the dbc node in the following example:
Vehicle.Speed:
  type: sensor
  datatype: float
  dbc:
    message: Kombi_01
    signal: KBI_angez_Geschw
    interval_ms: 1000
See Eclipse Kuksa documentation about dbc2val mapping for details.
There are also ways to automatically transform the CAN-Bus signal values into VSS values:
- Mapping of literal values, such as enums and booleans
- Mathematical transformations
- Full and partial transformations
Setup workspace
Required tools
- Git
- Docker
- Python 3
- can-utils
- a YAML/JSON text editor
Depending on your host OS, you may need to install the packages first:
sudo apt-get update
sudo apt-get install can-utils git docker python3
Workspace structure
You need the following files in your workspace folder:
./custom.dbc- The vehicle-specific DBC file. You can use the Tesla Model 3 example or check out the opendbc project../custom.vspec- The VSS overlay from the previous step
Defining the VSS Overlay
The definition of an VSS overlay is a manual process. It requires research, browsing the existing VSS catalog and deep knowledge of the vehicle signals. Especially knowing the semantic of a signal and how to map it between DBC and VSS is a complex task.
Note: The Leda team is not aware of any advanced tooling to support the automation of this task.
- Create a new file
custom.vspec. Use YAML format - For each identified signal:
- Look up if there already is a corresponding signal in VSS. You may use the Digital.Auto Playground or the spec directly.
- Add a new top-level entry to the custom.vspec file. The key is the full VSS path name in dot notation.
- Add the corresponding
dbcnode - Add the
signalattribute and enter the name of the CAN-Bus signal name in the DBC - Add additional attributes such as
interval_ms,messageortransform.Note: The attributes
signal,interval_msandtransformare evaluated by dbc2val. The attributemessageis only evaluated by the below demo script and is optional.
Example:
# CAN Message: Kombi_01
Vehicle.Speed:
  type: sensor
  datatype: float
  dbc:
    message: Kombi_01
    signal: KBI_angez_Geschw
    interval_ms: 1000

# CAN Message: FS_Position_01
Vehicle.Cabin.Seat.Row1.Pos1.Position:
  type: sensor
  datatype: float
  dbc:
    message: FS_Position_01
    signal: FSS_Laenge_Pos
    interval_ms: 1000
These two extensions will be added to the combined VSS tree:
Regenerating VSpec
The script vspec2json.py from COVESA VSS Tools can then be used to merge the overlay file with the standard specification.
For Leda devices, you can use kanto-cm to run the tool as a container:
# Copy custom.dbc and custom.vspec to /home/root
# Run in /home/root
kanto-cm create --name vspec2json --rp no --mp="/home/root:/data" ghcr.io/eclipse-leda/leda-vss-vspec2json:main
kanto-cm start --a --i --name vspec2json
For developer workstations, there is a convenient pre-built Docker container:
docker run --name vspec2json --rm -v `pwd`:/data ghcr.io/eclipse-leda/leda-vss-vspec2json:main
Or, if you want to run vspec2json from the sources, clone the repository and invoke it like this:
git clone \
    --recurse-submodules \
    --branch v3.1 \
    --single-branch \
    --depth 1 \
    https://github.com/COVESA/vehicle_signal_specification

python3 vehicle_signal_specification/vss-tools/vspec2json.py \
    -e dbc \
    -o custom.vspec \
    --uuid \
    --json-pretty \
    --json-all-extended-attributes \
    ../vehicle_signal_specification/spec/VehicleSignalSpecification.vspec \
    custom_vss_dbc.json
With the resulting file custom_vss_dbc.json and the corresponding DBC file, the dbc2val feeder can relay the signals to the databroker.
dbc2val can either read from a CAN-Dump file (generated by candump from can-utils) in an endless loop, or can listen on actual virtual or physical CAN interfaces.
The output should look like this:
$ ls
custom.dbc  custom.vspec
$ docker run --name vspec2json --rm -v `pwd`:/data ghcr.io/eclipse-leda/leda-vss-vspec2json:main
INFO     Output to json format
INFO     Known extended attributes: dbc
INFO     Added 54 units from /vss/spec/units.yaml
INFO     Loading vspec from /vss/spec/VehicleSignalSpecification.vspec...
INFO     Applying VSS overlay from /data/custom.vspec...
INFO     Autocreating implicit branch Vehicle
INFO     Autocreating implicit branch Cabin
INFO     Autocreating implicit branch Seat
INFO     Autocreating implicit branch Row1
INFO     Autocreating implicit branch Pos1
INFO     Calling exporter...
INFO     Generating JSON output...
INFO     Serializing pretty JSON...
INFO     All done.
$ ls
custom.dbc  custom.vspec  custom_vss_dbc.json
Databroker Container
Ensure the databroker container is up and running:
On developer workstation:
docker run --name databroker --detach --rm -p 55555:55555/tcp ghcr.io/eclipse/kuksa.val/databroker:0.3.1
On Leda device (if not already running)
kanto-cm start --name databroker
Testing with data
To see actual data, we need to use the candump or another CAN source and feed that data into the databroker. After that is running, we can use the databroker-cli tool to subscribe to the example VSS signals.
Generate a candump
To generate a candump for testing purposes, start the candump tool and listen for some packets.
In the following example, the first 20 CAN frames are being recorded and the command will exit.
candump -L -n 20 vcan0 > candump.log
If you do not have an external CAN source, you may want to simulate CAN frames. There is a Python library for parsing DBC files, which also let’s you encode and send the actual CAN messages.
An example script could look like this:
Note: Due to GPL-3 licensing, the Leda quickstart image does not contain some Python standard libraries. This script will not run on a Leda quickstart image.
import random
import time
from pprint import pprint

import yaml
import cantools
import can

can_bus = can.interface.Bus('vcan0', bustype='socketcan')
db = cantools.database.load_file('custom.dbc')
with open("custom.vspec", "r") as stream:
    try:
        vspec = yaml.safe_load(stream)

        for key in vspec:
            message_name=vspec[key]['dbc']['message']
            signal_name=vspec[key]['dbc']['signal']
            example_message = db.get_message_by_name(message_name)

            # Initialize an empty message
            data = {}
            for signal in example_message.signals:
                data[signal.name] = False

            pprint("Message: %s" % example_message)

            # Send 10 frames with random data
            for x in range(10):
                data[signal_name] = random.uniform(0,100)
                encoded_data = example_message.encode(data)
                message = can.Message(arbitration_id=example_message.frame_id, data=encoded_data)
                pprint("CAN Frame: %s" % message)
                can_bus.send(message)
                # Wait up to 1 second
                time.sleep(random.random())

    except yaml.YAMLError as exc:
        print(exc)
Example output:
"Message: message('Kombi_01', 0x30b, False, 8, {None: 'MQB'})"
('CAN Frame: Timestamp:        0.000000    ID: 0000030b    X Rx                '
 'DL:  8    00 00 00 00 00 00 b9 00')
('CAN Frame: Timestamp:        0.000000    ID: 0000030b    X Rx                '
 'DL:  8    00 00 00 00 00 00 16 00')
('CAN Frame: Timestamp:        0.000000    ID: 0000030b    X Rx                '
 'DL:  8    00 00 00 00 00 00 ca 00')
('CAN Frame: Timestamp:        0.000000    ID: 0000030b    X Rx                '
 'DL:  8    00 00 00 00 00 00 ad 00')
('CAN Frame: Timestamp:        0.000000    ID: 0000030b    X Rx                '
 'DL:  8    00 00 00 00 00 00 b0 00')
('CAN Frame: Timestamp:        0.000000    ID: 0000030b    X Rx                '
 'DL:  8    00 00 00 00 00 00 79 00')
('CAN Frame: Timestamp:        0.000000    ID: 0000030b    X Rx                '
 'DL:  8    00 00 00 00 00 00 1b 01')
('CAN Frame: Timestamp:        0.000000    ID: 0000030b    X Rx                '
 'DL:  8    00 00 00 00 00 00 19 01')
('CAN Frame: Timestamp:        0.000000    ID: 0000030b    X Rx                '
 'DL:  8    00 00 00 00 00 00 0a 00')
('CAN Frame: Timestamp:        0.000000    ID: 0000030b    X Rx                '
 'DL:  8    00 00 00 00 00 00 b0 00')
"Message: message('FS_Position_01', 0x6be, False, 8, None)"
('CAN Frame: Timestamp:        0.000000    ID: 000006be    X Rx                '
 'DL:  8    59 00 00 00 00 00 00 00')
('CAN Frame: Timestamp:        0.000000    ID: 000006be    X Rx                '
 'DL:  8    31 00 00 00 00 00 00 00')
('CAN Frame: Timestamp:        0.000000    ID: 000006be    X Rx                '
 'DL:  8    29 00 00 00 00 00 00 00')
('CAN Frame: Timestamp:        0.000000    ID: 000006be    X Rx                '
 'DL:  8    07 00 00 00 00 00 00 00')
('CAN Frame: Timestamp:        0.000000    ID: 000006be    X Rx                '
 'DL:  8    40 00 00 00 00 00 00 00')
('CAN Frame: Timestamp:        0.000000    ID: 000006be    X Rx                '
 'DL:  8    55 00 00 00 00 00 00 00')
('CAN Frame: Timestamp:        0.000000    ID: 000006be    X Rx                '
 'DL:  8    54 00 00 00 00 00 00 00')
('CAN Frame: Timestamp:        0.000000    ID: 000006be    X Rx                '
 'DL:  8    07 00 00 00 00 00 00 00')
('CAN Frame: Timestamp:        0.000000    ID: 000006be    X Rx                '
 'DL:  8    62 00 00 00 00 00 00 00')
('CAN Frame: Timestamp:        0.000000    ID: 000006be    X Rx                '
 'DL:  8    59 00 00 00 00 00 00 00')
dbc2val on workstation
Get the latest sources:
git clone https://github.com/eclipse/kuksa.val.feeders
Looping a CAN dump recording:
kuksa.val.feeders/dbc2val/dbcfeeder.py \
    --dumpfile candump.log \
    --canport vcan0 \
    --server-type kuksa_databroker \
    --dbcfile custom.dbc \
    --mapping custom_vss_dbc.json
Listening on CAN interface:
# CAN must be set up up front, e.g.
# modprobe vcan
# ip link add dev vcan0 type vcan
# ip link set vcan0 up

kuksa.val.feeders/dbc2val/dbcfeeder.py \
    --canport vcan0 \
    --use-socketcan \
    --server-type kuksa_databroker \
    --dbcfile /custom/custom.dbc \
    --mapping /custom/custom_vss_dbc.json
dbc2val on Leda device
To run the dbc2val feeder on Leda, you can use kanto-cm (instead of docker) to create the respective containers.
Note: Due to Issue #73, the container
ghcr.io/eclipse/kuksa.val.feeders/dbc2val:v0.1.1cannot be used with SocketCAN. Please use a later release or build the container from the sources after fixing the bug. Alternatively, use the candump file instead of SocketCAN.
-
Remove any existing
dbc2valcontainer:kanto-cm remove --force --name dbc2val -
Create the new container in Kanto Container Management:
kanto-cm create \
    --name dbc2val \
    --mp="/home/root:/data" \
    --e=VDB_ADDRESS="databroker:30555" \
    --e=USECASE="databroker" \
    --network=host \
    --privileged \
    ghcr.io/eclipse/kuksa.val.feeders/dbc2val:v0.1.1 \
    /dist/dbcfeeder-exe \
    --canport vcan0 \
    --use-socketcan \
    --usecase databroker \
    --dbcfile /data/custom.dbc \
    --mapping /data/custom_vss_dbc.json
Note: The host networking and privileged is used to allow the container access to the CAN sockets.
-
Start the container:
kanto-cm start --a --i --name dbc2val -
Check the logs to verify container is running:
kanto-cm logs --name dbc2val
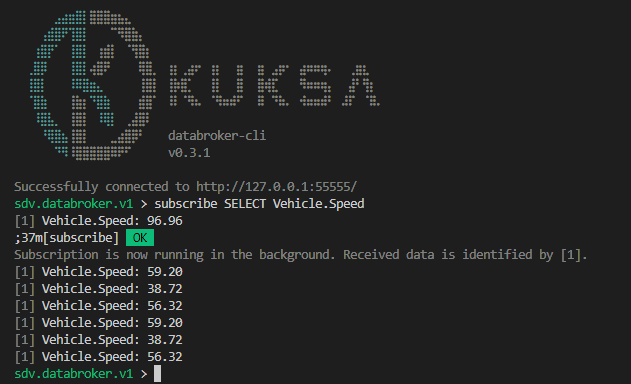
Querying via CLI
To be able to see the changes, you may want to use the Kuksa Databroker CLI:
docker run --rm -it --network host ghcr.io/eclipse/kuksa.val/databroker-cli:0.3.1
Now, depending on the way how the dbc2val feeder has been started (candump vs. socketcan), you will either already see data from the candump loop.
Feedback
Was this page helpful?
Glad to hear it! Please tell us how we can improve.
Sorry to hear that. Please tell us how we can improve.